Owner's Manual
Page 61
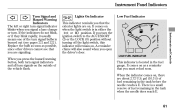
... indicators and all turn signals on . If the indicators do not blink, or if they blink rapidly, it usually means one of the turn signal bulbs is a small reserve of fuel remaining in the fuel gauge. When you open the driver's door. When the indicator comes on, there are on the... either the or position. If you must refuel soon. It comes on as possible, since other drivers cannot see pages 221 and 222 ). Replace the bulb as soon as a reminder that you signal a lane change or turn. It comes on . LOW FUEL INDICATOR Low Fuel Indicator Instruments and Controls This indicator...
... indicators and all turn signals on . If the indicators do not blink, or if they blink rapidly, it usually means one of the turn signal bulbs is a small reserve of fuel remaining in the fuel gauge. When you open the driver's door. When the indicator comes on, there are on the... either the or position. If you must refuel soon. It comes on as possible, since other drivers cannot see pages 221 and 222 ). Replace the bulb as soon as a reminder that you signal a lane change or turn. It comes on . LOW FUEL INDICATOR Low Fuel Indicator Instruments and Controls This indicator...

Owner's Manual
Page 216
If you regularly carry heavy items in total. Replacing a Headlight Bulb Your vehicle has two bulbs on the glass can cause the bulb to overheat and shatter. 218 When replacing a bulb, handle it with your vehicle was new. Oil, perspiration, or a scratch on each side, four in the trunk or pull ... case and protect the glass from contact with denatured alcohol and a clean cloth. Adjustments should be required. If you are replacing the bulb that is burned out. Make sure you touch the glass, clean it by your dealer or other qualified mechanic. Lights Headlight Aiming The...
If you regularly carry heavy items in total. Replacing a Headlight Bulb Your vehicle has two bulbs on the glass can cause the bulb to overheat and shatter. 218 When replacing a bulb, handle it with your vehicle was new. Oil, perspiration, or a scratch on each side, four in the trunk or pull ... case and protect the glass from contact with denatured alcohol and a clean cloth. Adjustments should be required. If you are replacing the bulb that is burned out. Make sure you touch the glass, clean it by your dealer or other qualified mechanic. Lights Headlight Aiming The...

Owner's Manual
Page 217
...place. Lights High Beam Headlight FASTENERS AIR INTAKE COVER AIR INTAKE COVER FASTENERS BULB 4-cylinder models V6 models 4-cylinder models TAB Maintenance 1. Install the new bulb, and turn counterclockwise. 4. To change a bulb on the passenger's side, undo the two fasteners and remove the air... intake cover. 2. Remove the electrical connector from the bulb by turning it approximately one -quarter turn ...
...place. Lights High Beam Headlight FASTENERS AIR INTAKE COVER AIR INTAKE COVER FASTENERS BULB 4-cylinder models V6 models 4-cylinder models TAB Maintenance 1. Install the new bulb, and turn counterclockwise. 4. To change a bulb on the passenger's side, undo the two fasteners and remove the air... intake cover. 2. Remove the electrical connector from the bulb by turning it approximately one -quarter turn ...

Owner's Manual
Page 218
... inner fender. 3. Reinstall the two fasteners and secure them by squeezing the connector to the right. 2. To change the driver's side bulb, turn the steering wheel all the way to remove the two holding clips from the fender and bumper. 4. To change the passenger's side...the tab, then slide the connector off the engine. Remove the bulb by turning it approximately one-quarter turn off the bulb. 220 Push the electrical connector onto the bulb. 6. Lights Low Beam Headlight BULB HOLDING CLIPS TAB V6 models BULB 5. Turn on the heads until they lock. 1. Reinstall the air...
... inner fender. 3. Reinstall the two fasteners and secure them by squeezing the connector to the right. 2. To change the driver's side bulb, turn the steering wheel all the way to remove the two holding clips from the fender and bumper. 4. To change the passenger's side...the tab, then slide the connector off the engine. Remove the bulb by turning it approximately one-quarter turn off the bulb. 220 Push the electrical connector onto the bulb. 6. Lights Low Beam Headlight BULB HOLDING CLIPS TAB V6 models BULB 5. Turn on the heads until they lock. 1. Reinstall the air...

Owner's Manual
Page 219
...and bumper. 4. Install the two holding clips from the inner fender. 3. BULB Replacing the Front Side Marker/ Turn Signal and Parking Light Bulb HOLDING CLIPS Maintenance 1. To change the driver's side bulb, turn counterclockwise. Lights 6. CONTINUED 221 Lock each one -quarter turn it one... in place by turning it in place. Install the new bulb, and turn clockwise to lock ...
...and bumper. 4. Install the two holding clips from the inner fender. 3. BULB Replacing the Front Side Marker/ Turn Signal and Parking Light Bulb HOLDING CLIPS Maintenance 1. To change the driver's side bulb, turn counterclockwise. Lights 6. CONTINUED 221 Lock each one -quarter turn it one... in place by turning it in place. Install the new bulb, and turn clockwise to lock ...

Owner's Manual
Page 220
...socket by pushing on the center. 1. SOCKET Replacing Rear Turn Signal Light Bulbs HOLDING CLIPS BULB 3. Set the lining back. 222 Install the new bulb and turn it clockwise to lock it in and turn counterclockwise, and pull the bulb straight out of its socket. 4. Install and lock each holding clips ... lining by turning it clockwise until it locks. 5. Insert the socket into the light assembly by using a flat-tipped screwdriver. Push a new bulb straight into the socket until it bottoms, and reinstall the socket into the headlight assembly. To remove the burned out...
...socket by pushing on the center. 1. SOCKET Replacing Rear Turn Signal Light Bulbs HOLDING CLIPS BULB 3. Set the lining back. 222 Install the new bulb and turn it clockwise to lock it in and turn counterclockwise, and pull the bulb straight out of its socket. 4. Install and lock each holding clips ... lining by turning it clockwise until it locks. 5. Insert the socket into the light assembly by using a flat-tipped screwdriver. Push a new bulb straight into the socket until it bottoms, and reinstall the socket into the headlight assembly. To remove the burned out...

Owner's Manual
Page 221
... the socket, and reinstall the socket into position. 8. Lights Replacing Back-up Light Bulbs TRIM CLIPS BULB SOCKET BULB SOCKET Maintenance 1. Carefully bend back the corner of its socket. 5. Remove the socket by carefully prying them using a small, flat-tip screwdriver wrapped with tape. 3. ... Remove the trim clips from the right or left corner of the trunk lid trim by turning it one-quarter turn counterclockwise, and pull the bulb straight out of the trunk lid trim to expose the...
... the socket, and reinstall the socket into position. 8. Lights Replacing Back-up Light Bulbs TRIM CLIPS BULB SOCKET BULB SOCKET Maintenance 1. Carefully bend back the corner of its socket. 5. Remove the socket by carefully prying them using a small, flat-tip screwdriver wrapped with tape. 3. ... Remove the trim clips from the right or left corner of the trunk lid trim by turning it one-quarter turn counterclockwise, and pull the bulb straight out of the trunk lid trim to expose the...
Owner's Manual
Page 281
... ...179 Braking System...179 Break-in, New Vehicle ...154 Brightness Control, Instruments ...71 Brights, Headlights ...69 Bulb Replacement Back-up Lights ...223 Front Parking Lights ...221 Headlights ...218 Specifications ...269 Turn Signal Lights ...221, 222 Bulbs, Halogen ...218 C Capacities Chart...268 Carbon Monoxide Hazard ...51 Carrying Cargo ...164 CAUTION, Explanation of ...iii...
... ...179 Braking System...179 Break-in, New Vehicle ...154 Brightness Control, Instruments ...71 Brights, Headlights ...69 Bulb Replacement Back-up Lights ...223 Front Parking Lights ...221 Headlights ...218 Specifications ...269 Turn Signal Lights ...221, 222 Bulbs, Halogen ...218 C Capacities Chart...268 Carbon Monoxide Hazard ...51 Carrying Cargo ...164 CAUTION, Explanation of ...iii...
Owner's Manual
Page 283
... the...156 Fuses, Checking the ...257 Automatic Lighting Off ...70 Daytime Running Lights...70 Low Beams, Turning on ...69 Reminder Chime ...69 Replacing Halogen Bulbs ...218 Turning on ...69 Head Restraints ...15, 87 Heating and Cooling ...102 Heated Mirror ...91 HomeLink Universal Transceiver...148 Hood, Opening and Closing the... Ignition Keys...74 Switch ...76 Timing Control System ...275 Immobilizer System...75 Important Safety Precautions ...8 Indicators, Instrument Panel ...58 CONTINUED H Halogen Headlight Bulbs...218 Hazard Warning Flashers...71 Headlights...69 Aiming ...218 INDEX III
... the...156 Fuses, Checking the ...257 Automatic Lighting Off ...70 Daytime Running Lights...70 Low Beams, Turning on ...69 Reminder Chime ...69 Replacing Halogen Bulbs ...218 Turning on ...69 Head Restraints ...15, 87 Heating and Cooling ...102 Heated Mirror ...91 HomeLink Universal Transceiver...148 Hood, Opening and Closing the... Ignition Keys...74 Switch ...76 Timing Control System ...275 Immobilizer System...75 Important Safety Precautions ...8 Indicators, Instrument Panel ...58 CONTINUED H Halogen Headlight Bulbs...218 Hazard Warning Flashers...71 Headlights...69 Aiming ...218 INDEX III
Owner's Manual
Page 284
... ...43 Tether Anchorage Points ...48 Using LATCH ...44 Instrument Panel ...57 Instrument Panel Brightness ...71 Introduction ...i Lane Change, Signaling ...69 Lap/Shoulder Belts ...21 Lights Bulb Replacement ...218 Indicator ...57 Parking ...69 Turn Signal ...61 LOCK (Ignition Key Position) ...76 Locks Anti-theft Steering Column ...76 Fuel Fill Door ...156 Glove...
... ...43 Tether Anchorage Points ...48 Using LATCH ...44 Instrument Panel ...57 Instrument Panel Brightness ...71 Introduction ...i Lane Change, Signaling ...69 Lap/Shoulder Belts ...21 Lights Bulb Replacement ...218 Indicator ...57 Parking ...69 Turn Signal ...61 LOCK (Ignition Key Position) ...76 Locks Anti-theft Steering Column ...76 Fuel Fill Door ...156 Glove...
Owner's Manual
Page 285
...Advice for Pregnant Women...18 Protecting Children ...34 Protecting Infants and Small Children ...39 Protecting Larger Children ...49 Using Booster Seat ...50 Light Bulbs ...218 Timing Belt ...217 Tires ...232 Wiper Blades ...226 Replacing Seat Belts After a Crash ...22 Reserve Tank, Coolant ...208 Restraint... Gear Position...172, 174 Rotation, Tire ...231 R Radiator Overheating ...251 Radio/CD Sound System ...114, 122, 131, 135 Rear Lights, Bulb Replacement ...222, 223 Rear Seat, Folding ...88 Rear View Mirror ...90 Rear Window Defogger ...72 Reclining the Seat Backs ...85 Recommended Shift ...
...Advice for Pregnant Women...18 Protecting Children ...34 Protecting Infants and Small Children ...39 Protecting Larger Children ...49 Using Booster Seat ...50 Light Bulbs ...218 Timing Belt ...217 Tires ...232 Wiper Blades ...226 Replacing Seat Belts After a Crash ...22 Reserve Tank, Coolant ...208 Restraint... Gear Position...172, 174 Rotation, Tire ...231 R Radiator Overheating ...251 Radio/CD Sound System ...114, 122, 131, 135 Rear Lights, Bulb Replacement ...222, 223 Rear Seat, Folding ...88 Rear View Mirror ...90 Rear Window Defogger ...72 Reclining the Seat Backs ...85 Recommended Shift ...


