
Owner's Manual
Page 4
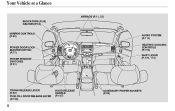
Your Vehicle at a Glance AIRBAGS (P.11, 23) INDICATORS (P.58) GAUGES (P.64) MIRROR CONTROLS (P.90) AUDIO SYSTEM (P.114) HEATING/COOLING CONTROLS (P.102) SHIFT LEVER (P.170, 173) POWER DOOR LOCK MASTER SWITCH (P.77) POWER WINDOW SWITCHES (P.91) TRUNK RELEASE LEVER (P.82) FUEL FILL DOOR RELEASE LEVER (P.156) HOOD RELEASE HANDLE (P.157) ACCESSORY POWER SOCKETS (P.99) 4
Your Vehicle at a Glance AIRBAGS (P.11, 23) INDICATORS (P.58) GAUGES (P.64) MIRROR CONTROLS (P.90) AUDIO SYSTEM (P.114) HEATING/COOLING CONTROLS (P.102) SHIFT LEVER (P.170, 173) POWER DOOR LOCK MASTER SWITCH (P.77) POWER WINDOW SWITCHES (P.91) TRUNK RELEASE LEVER (P.82) FUEL FILL DOOR RELEASE LEVER (P.156) HOOD RELEASE HANDLE (P.157) ACCESSORY POWER SOCKETS (P.99) 4
Owner's Manual
Page 52
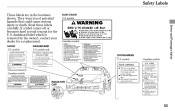
models SUN VISOR U.S. models Canadian models Canadian models RADIATOR CAP 53 dashboard label which is removed by the owner), contact your dealer for the U.S. models Driver and Passenger Safety Canadian models DASHBOARD U.S. Read these labels carefully. models only DOORJAMBS U.S. If a label comes off or becomes hard to read (except for a replacement. Safety Labels These labels are in the locations shown. HOOD U.S. They warn you of potential hazards that could cause serious injury or death.
models SUN VISOR U.S. models Canadian models Canadian models RADIATOR CAP 53 dashboard label which is removed by the owner), contact your dealer for the U.S. models Driver and Passenger Safety Canadian models DASHBOARD U.S. Read these labels carefully. models only DOORJAMBS U.S. If a label comes off or becomes hard to read (except for a replacement. Safety Labels These labels are in the locations shown. HOOD U.S. They warn you of potential hazards that could cause serious injury or death.
Owner's Manual
Page 54
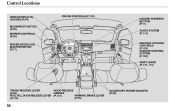
Control Locations INDICATORS (P.58) GAUGES (P.64) MOONROOF SWITCH (P.94) MIRROR CONTROLS (P.90) POWER DOOR LOCK MASTER SWITCH (P.77) CRUISE CONTROLS (P.145) HAZARD WARNING BUTTON (P.71) AUDIO SYSTEM (P.114) HEATING/COOLING CONTROLS (P.102) CLIMATE CONTROL SYSTEM (P.109) SHIFT LEVER (P.170, 173) TRUNK RELEASE LEVER HOOD RELEASE (P.82) HANDLE PARKING BRAKE LEVER FUEL FILL DOOR RELEASE LEVER (P.157) (P.95) (P.156) ACCESSORY POWER SOCKETS (P.99) 56
Control Locations INDICATORS (P.58) GAUGES (P.64) MOONROOF SWITCH (P.94) MIRROR CONTROLS (P.90) POWER DOOR LOCK MASTER SWITCH (P.77) CRUISE CONTROLS (P.145) HAZARD WARNING BUTTON (P.71) AUDIO SYSTEM (P.114) HEATING/COOLING CONTROLS (P.102) CLIMATE CONTROL SYSTEM (P.109) SHIFT LEVER (P.170, 173) TRUNK RELEASE LEVER HOOD RELEASE (P.82) HANDLE PARKING BRAKE LEVER FUEL FILL DOOR RELEASE LEVER (P.157) (P.95) (P.156) ACCESSORY POWER SOCKETS (P.99) 56
Owner's Manual
Page 142
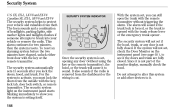
... marker lights and taillights flashes if someone attempts to it is cut. 144 The horn sounds and a combination of the monitor display, manually check the hood. The security system automatically sets 15 seconds after you can still open the trunk with the key, lock tab, door lock switch, or remote transmitter... blinking immediately to activate, you must lock the doors from theft. For the system to show you the system is set , you lock the doors, hood, and trunk. The security system will sound if the trunk lock is forced, or the trunk is not fully closed . Do not attempt to alter...
... marker lights and taillights flashes if someone attempts to it is cut. 144 The horn sounds and a combination of the monitor display, manually check the hood. The security system automatically sets 15 seconds after you can still open the trunk with the key, lock tab, door lock switch, or remote transmitter... blinking immediately to activate, you must lock the doors from theft. For the system to show you the system is set , you lock the doors, hood, and trunk. The security system will sound if the trunk lock is forced, or the trunk is not fully closed . Do not attempt to alter...
Owner's Manual
Page 150
... know how to properly store luggage or packages. Break-in Period ...154 Fuel Recommendation ...154 Service Station Procedures ...156 Refueling...156 Opening and Closing the Hood ...157 Oil Check ...159 Engine Coolant Check ...160 Fuel Economy ...161 Improving Fuel Economy ...161 Accessories and Modifications ...162 Accessories...162 Modifying Your Vehicle...163...
... know how to properly store luggage or packages. Break-in Period ...154 Fuel Recommendation ...154 Service Station Procedures ...156 Refueling...156 Opening and Closing the Hood ...157 Oil Check ...159 Engine Coolant Check ...160 Fuel Economy ...161 Improving Fuel Economy ...161 Accessories and Modifications ...162 Accessories...162 Modifying Your Vehicle...163...
Owner's Manual
Page 154
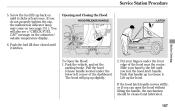
...and set the parking brake. Opening and Closing the Hood HOOD RELEASE HANDLE LATCH Before Driving To Open the Hood: 1. The hood will also see page 251 ). Lift up slightly. 2. If the hood latch handle moves stiffly, or if you feel the hood latch handle. Pull the hood release handle located under the front edge of the... on (see a ''CHECK FUEL CAP'' message on until it clicks at least once. Push the fuel fill door closed until you can open the hood without lifting the handle, the mechanism should be cleaned and lubricated. 157 Slide your fingers under the lower left until it .
...and set the parking brake. Opening and Closing the Hood HOOD RELEASE HANDLE LATCH Before Driving To Open the Hood: 1. The hood will also see page 251 ). Lift up slightly. 2. If the hood latch handle moves stiffly, or if you feel the hood latch handle. Pull the hood release handle located under the front edge of the... on (see a ''CHECK FUEL CAP'' message on until it clicks at least once. Push the fuel fill door closed until you can open the hood without lifting the handle, the mechanism should be cleaned and lubricated. 157 Slide your fingers under the lower left until it .
Owner's Manual
Page 155
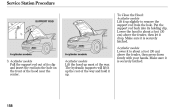
Put the support rod back into the hole on the front of the hood near the center. 6-cylinder models Lower it to about a foot (30 cm) above the fender, ...models 3. 4-cylinder models Pull the support rod out of its clip and insert the end into its holding clip. Lower the hood to about a foot (30 cm) above the fender, then press down firmly with your hands. The hydraulic supports will lift... hold it up slightly to remove the support rod from the hole. Lift the hood up . 158 Service Station Procedure To Close the Hood: 4-cylinder models SUPPORT ROD Lift it up most of the way.
Put the support rod back into the hole on the front of the hood near the center. 6-cylinder models Lower it to about a foot (30 cm) above the fender, ...models 3. 4-cylinder models Pull the support rod out of its clip and insert the end into its holding clip. Lower the hood to about a foot (30 cm) above the fender, then press down firmly with your hands. The hydraulic supports will lift... hold it up slightly to remove the support rod from the hole. Lift the hood up . 158 Service Station Procedure To Close the Hood: 4-cylinder models SUPPORT ROD Lift it up most of the way.
Owner's Manual
Page 165
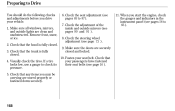
... Check the seat adjustment (see page 16 ). 6. Fasten your passengers have fastened their seat belts (see pages 85 to check its pressure. 5. Check that the hood is fully closed . 3. Visually check the tires. Remove frost, snow, or ice. 2.
... Check the seat adjustment (see page 16 ). 6. Fasten your passengers have fastened their seat belts (see pages 85 to check its pressure. 5. Check that the hood is fully closed . 3. Visually check the tires. Remove frost, snow, or ice. 2.
Owner's Manual
Page 202
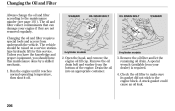
... stationtype hydraulic lift for this maintenance done by a skilled mechanic. 1. Remove the oil filter and let the remaining oil drain. Open the hood, and remove the engine oil fill cap. WASHER OIL DRAIN BOLT OIL DRAIN BOLT WASHER 4-cylinder models 6-cylinder models 2. The oil and .... 4. Remove the oil drain bolt and washer from underneath the vehicle. Changing the Oil and Filter Always change the oil and filter according to the engine block. The vehicle should have the knowledge and proper equipment, you have this service. A special wrench (available from your...
... stationtype hydraulic lift for this maintenance done by a skilled mechanic. 1. Remove the oil filter and let the remaining oil drain. Open the hood, and remove the engine oil fill cap. WASHER OIL DRAIN BOLT OIL DRAIN BOLT WASHER 4-cylinder models 6-cylinder models 2. The oil and .... 4. Remove the oil drain bolt and washer from underneath the vehicle. Changing the Oil and Filter Always change the oil and filter according to the engine block. The vehicle should have the knowledge and proper equipment, you have this service. A special wrench (available from your...
Owner's Manual
Page 215
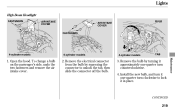
Open the hood. Install the new bulb, and turn it one -quarter turn clockwise to unlock the tab, then slide the connector off the bulb. 3. CONTINUED 219 Lights ...
Open the hood. Install the new bulb, and turn it one -quarter turn clockwise to unlock the tab, then slide the connector off the bulb. 3. CONTINUED 219 Lights ...

Owner's Manual
Page 221
Raise the wiper arm off the windshield. Maintenance Do not open the hood when the wiper arms are getting hard. Wiper Blades Check the condition of cracking in the lock tab. Replace the blades if you push the ... a wiper blade: 1. Disconnect the blade assembly from the wiper arm by pushing in the rubber, or areas that are raised, or you will damage the hood and wiper arms. 225 Look for signs of the wiper blades at least every six months.
Raise the wiper arm off the windshield. Maintenance Do not open the hood when the wiper arms are getting hard. Wiper Blades Check the condition of cracking in the lock tab. Replace the blades if you push the ... a wiper blade: 1. Disconnect the blade assembly from the wiper arm by pushing in the rubber, or areas that are raised, or you will damage the hood and wiper arms. 225 Look for signs of the wiper blades at least every six months.
Owner's Manual
Page 241
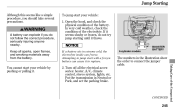
.... You cannot start your vehicle by pushing or pulling it. Turn off all sparks, open flames, and smoking materials away from the battery. Open the hood, and check the physical condition of the electrolyte. Put the transmission in Neutral or Park, and set the parking brake. 4-cylinder models The numbers in...
.... You cannot start your vehicle by pushing or pulling it. Turn off all sparks, open flames, and smoking materials away from the battery. Open the hood, and check the physical condition of the electrolyte. Put the transmission in Neutral or Park, and set the parking brake. 4-cylinder models The numbers in...
Owner's Manual
Page 244
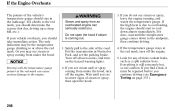
.... 248 Safely pull to the midpoint, then continue driving. 4. The only indication may see no more signs of steam or spray, then open the hood if steam is due to overloading, the engine should start to cool down to the side of the vehicle's temperature gauge should stay in Neutral... climbs to or above the red mark. Turn off all accessories, and turn off the engine. If the high heat is coming from under the hood. 3. If the temperature gauge stays at the red mark can seriously scald you should determine the reason (hot day, driving up a steep hill, etc.). ...
.... 248 Safely pull to the midpoint, then continue driving. 4. The only indication may see no more signs of steam or spray, then open the hood if steam is due to overloading, the engine should start to cool down to the side of the vehicle's temperature gauge should stay in Neutral... climbs to or above the red mark. Turn off all accessories, and turn off the engine. If the high heat is coming from under the hood. 3. If the temperature gauge stays at the red mark can seriously scald you should determine the reason (hot day, driving up a steep hill, etc.). ...
Owner's Manual
Page 246
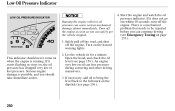
... that needs to the full mark on , the oil pressure has dropped very low or lost pressure. This indicator should take immediate action. 2. Open the hood, and check the oil level (see page 204 ). 250 If necessary, add oil to bring the level back to be repaired before you can continue...
... that needs to the full mark on , the oil pressure has dropped very low or lost pressure. This indicator should take immediate action. 2. Open the hood, and check the oil level (see page 204 ). 250 If necessary, add oil to bring the level back to be repaired before you can continue...

Owner's Manual
Page 253
... box lid, which fuse or fuses control that a blown fuse is a blown fuse. To open it out of the Unexpected CONTINUED 257 Fuses INTERIOR UNDER-HOOD TAB Checking and Replacing Fuses If something electrical in your vehicle stops working, the first thing you and take it , push the tabs as shown.... The under-hood fuse box is on the driver's side. Determine from the fuse box. Turn the ignition switch to the LOCK (0) position. To remove the fuse ...
... box lid, which fuse or fuses control that a blown fuse is a blown fuse. To open it out of the Unexpected CONTINUED 257 Fuses INTERIOR UNDER-HOOD TAB Checking and Replacing Fuses If something electrical in your vehicle stops working, the first thing you and take it , push the tabs as shown.... The under-hood fuse box is on the driver's side. Determine from the fuse box. Turn the ignition switch to the LOCK (0) position. To remove the fuse ...

Owner's Manual
Page 254
Check the smaller fuses in the under-hood fuse box and all the fuses in the under -hood fuse box by pulling out each one of the spare fuses of the large fuses in the under -hood fuse box. 5. Check each of the same rating or lower. 258 If it is burned out, replace it with one with the fuse puller provided in the interior fuse box by looking at the wire inside the fuse. Look for a burned wire inside . Removing these fuses requires a Phillips-head screwdriver. 4. Fuses BLOWN BLOWN BLOWN 3.
Check the smaller fuses in the under-hood fuse box and all the fuses in the under -hood fuse box by pulling out each one of the spare fuses of the large fuses in the under -hood fuse box. 5. Check each of the same rating or lower. 258 If it is burned out, replace it with one with the fuse puller provided in the interior fuse box by looking at the wire inside the fuse. Look for a burned wire inside . Removing these fuses requires a Phillips-head screwdriver. 4. Fuses BLOWN BLOWN BLOWN 3.
Owner's Manual
Page 256
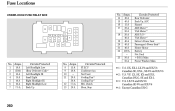
... Headlight Low (Rear Defroster Coil) Left Headlight Hi Small Light Right Headlight Hi Right Headlight Low Back Up 1 No. Clutch Horn, Stop 1 : U.S. Fuse Locations UNDER-HOOD FUSE/RELAY BOX No. Amps. 14 15 16 17 18 19 20 21 22 23 40 A 40 A 15 A 30 A 30 A 20 A 40 A 40 A 40 A 40...
... Headlight Low (Rear Defroster Coil) Left Headlight Hi Small Light Right Headlight Hi Right Headlight Low Back Up 1 No. Clutch Horn, Stop 1 : U.S. Fuse Locations UNDER-HOOD FUSE/RELAY BOX No. Amps. 14 15 16 17 18 19 20 21 22 23 40 A 40 A 15 A 30 A 30 A 20 A 40 A 40 A 40 A 40...
Owner's Manual
Page 262
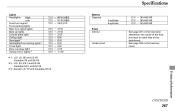
...) 51 W (HB4) 24/2.2 CP 21 W 21 W 3 CP 8W 8W 8W 5W 2 CP 1.1 W 12 V 12 V 12 V 36 AH/5 HR 38 AH/5 HR 52 AH/5 HR 2 Under-hood See page 261 or the fuse label attached to the inside of the fuse box door on each side of the dashboard. LX, SE and...
...) 51 W (HB4) 24/2.2 CP 21 W 21 W 3 CP 8W 8W 8W 5W 2 CP 1.1 W 12 V 12 V 12 V 36 AH/5 HR 38 AH/5 HR 52 AH/5 HR 2 Under-hood See page 261 or the fuse label attached to the inside of the fuse box door on each side of the dashboard. LX, SE and...
Owner's Manual
Page 280
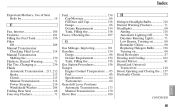
... ...69 Reminder Chime ...69 Replacing Halogen Bulbs ...218 Turning on ...69 Head Restraints ...87 Heating and Cooling ...102 Heated Mirror ...91 HomeLink Universal Transceiver...14 8 Hood, Opening and Closing the ...157 Hydraulic Clutch ...215 F Fan, Interior...104 Features ...101 Filling the Fuel Tank ...156 Filter Oil ...206 Manual Transmission Checking Fluid...
... ...69 Reminder Chime ...69 Replacing Halogen Bulbs ...218 Turning on ...69 Head Restraints ...87 Heating and Cooling ...102 Heated Mirror ...91 HomeLink Universal Transceiver...14 8 Hood, Opening and Closing the ...157 Hydraulic Clutch ...215 F Fan, Interior...104 Features ...101 Filling the Fuel Tank ...156 Filter Oil ...206 Manual Transmission Checking Fluid...

