Owner's Manual
Page 4
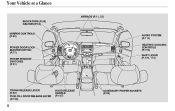
Your Vehicle at a Glance AIRBAGS (P.11, 23) INDICATORS (P.58) GAUGES (P.64) MIRROR CONTROLS (P.90) AUDIO SYSTEM (P.114) HEATING/COOLING CONTROLS (P.102) SHIFT LEVER (P.170, 173) POWER DOOR LOCK MASTER SWITCH (P.77) POWER WINDOW SWITCHES (P.91) TRUNK RELEASE LEVER (P.82) FUEL FILL DOOR RELEASE LEVER (P.156) HOOD RELEASE HANDLE (P.157) ACCESSORY POWER SOCKETS (P.99) 4
Your Vehicle at a Glance AIRBAGS (P.11, 23) INDICATORS (P.58) GAUGES (P.64) MIRROR CONTROLS (P.90) AUDIO SYSTEM (P.114) HEATING/COOLING CONTROLS (P.102) SHIFT LEVER (P.170, 173) POWER DOOR LOCK MASTER SWITCH (P.77) POWER WINDOW SWITCHES (P.91) TRUNK RELEASE LEVER (P.82) FUEL FILL DOOR RELEASE LEVER (P.156) HOOD RELEASE HANDLE (P.157) ACCESSORY POWER SOCKETS (P.99) 4
Owner's Manual
Page 18
.... Do not attach or place objects on or near the door could be propelled inside the vehicle and hurt someone . 19 Do not put any accessories on your lap, or driving with the proper operation of serious injury in a crash.
.... Do not attach or place objects on or near the door could be propelled inside the vehicle and hurt someone . 19 Do not put any accessories on your lap, or driving with the proper operation of serious injury in a crash.

Owner's Manual
Page 50
... to in a crash. Protecting Larger Children Additional Safety Precautions Do not let a child wear a seat belt across the neck. Do not let a child put any accessories on a seat belt. Driver and Passenger Safety cause very serious injuries during a crash. This could result Do not put the shoulder part of serious injury...
... to in a crash. Protecting Larger Children Additional Safety Precautions Do not let a child wear a seat belt across the neck. Do not let a child put any accessories on a seat belt. Driver and Passenger Safety cause very serious injuries during a crash. This could result Do not put the shoulder part of serious injury...
Owner's Manual
Page 53
... Brake ...95 Sun Visor...96 Vanity Mirror ...96 Interior Lights ...97 Ceiling Light ...97 Individual Interior Lights...97 Interior Convenience Items ...98 Beverage Holders ...99 Accessory Power Sockets...99 Console Compartment ...99 Sunglasses Holder ...100 Glove Box ...100 Instruments and Controls Control Locations ...56 Instrument Panel ...57 Instrument Panel Indicators ...58...
... Brake ...95 Sun Visor...96 Vanity Mirror ...96 Interior Lights ...97 Ceiling Light ...97 Individual Interior Lights...97 Interior Convenience Items ...98 Beverage Holders ...99 Accessory Power Sockets...99 Console Compartment ...99 Sunglasses Holder ...100 Glove Box ...100 Instruments and Controls Control Locations ...56 Instrument Panel ...57 Instrument Panel Indicators ...58...
Owner's Manual
Page 54
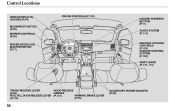
Control Locations INDICATORS (P.58) GAUGES (P.64) MOONROOF SWITCH (P.94) MIRROR CONTROLS (P.90) POWER DOOR LOCK MASTER SWITCH (P.77) CRUISE CONTROLS (P.145) HAZARD WARNING BUTTON (P.71) AUDIO SYSTEM (P.114) HEATING/COOLING CONTROLS (P.102) CLIMATE CONTROL SYSTEM (P.109) SHIFT LEVER (P.170, 173) TRUNK RELEASE LEVER HOOD RELEASE (P.82) HANDLE PARKING BRAKE LEVER FUEL FILL DOOR RELEASE LEVER (P.157) (P.95) (P.156) ACCESSORY POWER SOCKETS (P.99) 56
Control Locations INDICATORS (P.58) GAUGES (P.64) MOONROOF SWITCH (P.94) MIRROR CONTROLS (P.90) POWER DOOR LOCK MASTER SWITCH (P.77) CRUISE CONTROLS (P.145) HAZARD WARNING BUTTON (P.71) AUDIO SYSTEM (P.114) HEATING/COOLING CONTROLS (P.102) CLIMATE CONTROL SYSTEM (P.109) SHIFT LEVER (P.170, 173) TRUNK RELEASE LEVER HOOD RELEASE (P.82) HANDLE PARKING BRAKE LEVER FUEL FILL DOOR RELEASE LEVER (P.157) (P.95) (P.156) ACCESSORY POWER SOCKETS (P.99) 56
Owner's Manual
Page 59
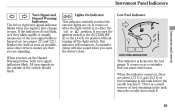
... vehicle should flash. When the indicator comes on the outside of fuel remaining in the fuel gauge. If you turn the ignition switch to the ACCESSORY (I) or the LOCK (0) position without turning off the light switch, this indicator will also sound when you open the driver's door. It comes on when...
... vehicle should flash. When the indicator comes on the outside of fuel remaining in the fuel gauge. If you turn the ignition switch to the ACCESSORY (I) or the LOCK (0) position without turning off the light switch, this indicator will also sound when you open the driver's door. It comes on when...

Owner's Manual
Page 61
... Level Indicator Canadian models only Instruments and Controls This indicator comes on when you turn the ignition switch from the ON (II) position to the ACCESSORY (I) or the LOCK (0) position. See page 193 for information on operating the cruise control. See page 145 for more information on the maintenance minder. This...
... Level Indicator Canadian models only Instruments and Controls This indicator comes on when you turn the ignition switch from the ON (II) position to the ACCESSORY (I) or the LOCK (0) position. See page 193 for information on operating the cruise control. See page 145 for more information on the maintenance minder. This...

Owner's Manual
Page 67
... the lights on as a reminder. The high beams remain on the left lever to signal a left lever to signal a right turn on the lever in ACCESSORY (I) or LOCK (0), you will come on the headlights.
... the lights on as a reminder. The high beams remain on the left lever to signal a left lever to signal a right turn on the lever in ACCESSORY (I) or LOCK (0), you will come on the headlights.
Owner's Manual
Page 74
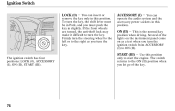
... wheel to the left or to the right as a test when you turn the ignition switch from ACCESSORY (I) to turn the key, the shift lever must push the key in Park, and you let go... of the lights on the instrument panel come on as you turn the key. ACCESSORY (I ), ON (II), START (III). 76 START (III) Use this position only to the ON (II)..., the anti-theft lock may make it difficult to ON (II). The ignition switch has four positions: LOCK (0), ACCESSORY (I ) You can insert or remove the key only in this position. The switch returns to start the engine....
... wheel to the left or to the right as a test when you turn the ignition switch from ACCESSORY (I) to turn the key, the shift lever must push the key in Park, and you let go... of the lights on the instrument panel come on as you turn the key. ACCESSORY (I ), ON (II), START (III). 76 START (III) Use this position only to the ON (II)..., the anti-theft lock may make it difficult to ON (II). The ignition switch has four positions: LOCK (0), ACCESSORY (I ) You can insert or remove the key only in this position. The switch returns to start the engine....
Owner's Manual
Page 75
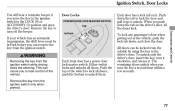
... key, turn the key a second time within a few seconds. If your vehicle has an automatic transmission, the shift lever must be in the LOCK (0) or ACCESSORY (I) position and open the driver's door. Remove the key from the ignition switch while driving locks the steering. Instruments and Controls To lock any passenger...
... key, turn the key a second time within a few seconds. If your vehicle has an automatic transmission, the shift lever must be in the LOCK (0) or ACCESSORY (I) position and open the driver's door. Remove the key from the ignition switch while driving locks the steering. Instruments and Controls To lock any passenger...

Owner's Manual
Page 96
Interior Convenience Items CONSOLE COMPARTMENT and ACCESSORY POWER SOCKET FRONT DOOR POCKET and BEVERAGE HOLDER CENTER POCKET, COIN POCKET and ACCESSORY POWER SOCKET BEVERAGE HOLDER REAR DOOR POCKET GLOVE BOX BEVERAGE HOLDERS TRUNK SEAT-BACK POCKETS 98
Interior Convenience Items CONSOLE COMPARTMENT and ACCESSORY POWER SOCKET FRONT DOOR POCKET and BEVERAGE HOLDER CENTER POCKET, COIN POCKET and ACCESSORY POWER SOCKET BEVERAGE HOLDER REAR DOOR POCKET GLOVE BOX BEVERAGE HOLDERS TRUNK SEAT-BACK POCKETS 98

Owner's Manual
Page 97
... from the door pocket beverage holders when you close , lower the armrest, and push it down until it latches. None of the accessories should be 120 watts or less (10 amps). To close the doors. Interior Convenience Items Beverage Holders Be careful when you or your.... Except U.S. Use only resealable containers in the console compartment lid. A spilled liquid that are intended to supply power for 12 volt DC accessories that is equipped with a coin holder. 99 VP and Canadian DX-G Console Compartment RIGHT LEVER LEFT LEVER Instruments and Controls CONSOLE COMPARTMENT These...
... from the door pocket beverage holders when you close , lower the armrest, and push it down until it latches. None of the accessories should be 120 watts or less (10 amps). To close the doors. Interior Convenience Items Beverage Holders Be careful when you or your.... Except U.S. Use only resealable containers in the console compartment lid. A spilled liquid that are intended to supply power for 12 volt DC accessories that is equipped with a coin holder. 99 VP and Canadian DX-G Console Compartment RIGHT LEVER LEFT LEVER Instruments and Controls CONSOLE COMPARTMENT These...
Owner's Manual
Page 114
... by pushing the PWR/VOL knob or the FM/AM button. For Vehicles with a strong signal. Pushing the AUDIO DISPLAY button will be in the ACCESSORY (I) or the ON (II) position. The band and frequency that the radio was last tuned to a desired frequency. Stereo reproduction on by turning the PWR...
... by pushing the PWR/VOL knob or the FM/AM button. For Vehicles with a strong signal. Pushing the AUDIO DISPLAY button will be in the ACCESSORY (I) or the ON (II) position. The band and frequency that the radio was last tuned to a desired frequency. Stereo reproduction on by turning the PWR...

Owner's Manual
Page 122
... back to the CD player. You operate the CD player/CD changer with adhesive labels. To play CDs, the ignition switch must be in the ACCESSORY (I) or ON(II) position. Press the CD button again to switch back to the CD player. If a tape is playing, press the CD/AUX XM...
... back to the CD player. You operate the CD player/CD changer with adhesive labels. To play CDs, the ignition switch must be in the ACCESSORY (I) or ON(II) position. Press the CD button again to switch back to the CD player. If a tape is playing, press the CD/AUX XM...
Owner's Manual
Page 130
... now playing. When you which side of the way into the slot. To change back to turn the player off until you inserted upward in ACCESSORY (I) or ON (II). To switch to show you turn off by pressing the Preset 4 (NR) side of the Dolby Laboratories Licensing Corporation. Vehicles) To Play...
... now playing. When you which side of the way into the slot. To change back to turn the player off until you inserted upward in ACCESSORY (I) or ON (II). To switch to show you turn off by pressing the Preset 4 (NR) side of the Dolby Laboratories Licensing Corporation. Vehicles) To Play...
Owner's Manual
Page 134
... find channels: TUNE, SEEK/SKIP (CATEGORY), and SCAN. 136 Press for higher numbered channels and for lower numbered channels. To Select a Channel When in the ACCESSORY (I) or ON (II) position. Turn the knob right for higher numbered channels and left for lower numbered channels.
... find channels: TUNE, SEEK/SKIP (CATEGORY), and SCAN. 136 Press for higher numbered channels and for lower numbered channels. To Select a Channel When in the ACCESSORY (I) or ON (II) position. Turn the knob right for higher numbered channels and left for lower numbered channels.
Owner's Manual
Page 137
... that could void the user's authority to turn on the lower level of a multi-tiered road. With the ignition switch in tunnels. Driving in the ACCESSORY (I) or ON (II) position, push the PWR/VOL knob to operate the equipment. CONTINUED As required by the FCC: Changes or modifications not expressly approved...
... that could void the user's authority to turn on the lower level of a multi-tiered road. With the ignition switch in tunnels. Driving in the ACCESSORY (I) or ON (II) position, push the PWR/VOL knob to operate the equipment. CONTINUED As required by the FCC: Changes or modifications not expressly approved...
Owner's Manual
Page 150
......156 Opening and Closing the Hood ...157 Oil Check ...159 Engine Coolant Check ...160 Fuel Economy ...161 Improving Fuel Economy ...161 Accessories and Modifications ...162 Accessories...162 Modifying Your Vehicle...163 Additional Safety Precautions .. 163 Carrying Cargo ...164 Load Limits...165 Carrying Cargo in the Trunk or on ... also need to know what gasoline to use and how to check the levels of important fluids. If you plan to add any accessories to your vehicle, you . Before Driving Before you begin driving your vehicle, please read the information in this section will help you...
......156 Opening and Closing the Hood ...157 Oil Check ...159 Engine Coolant Check ...160 Fuel Economy ...161 Improving Fuel Economy ...161 Accessories and Modifications ...162 Accessories...162 Modifying Your Vehicle...163 Additional Safety Precautions .. 163 Carrying Cargo ...164 Load Limits...165 Carrying Cargo in the Trunk or on ... also need to know what gasoline to use and how to check the levels of important fluids. If you plan to add any accessories to your vehicle, you . Before Driving Before you begin driving your vehicle, please read the information in this section will help you...

Owner's Manual
Page 159
... your vehicle, and are covered by warranty. Before installing any accessories, be hurt or killed. Before you to read the following information. Accessories and Modifications Modifying your vehicle, or installing some non-Honda accessories, can be sure to personalize your vehicle. Accessories Your dealer has Honda accessories that allow you make your vehicle unsafe. Follow all instructions...
... your vehicle, and are covered by warranty. Before installing any accessories, be hurt or killed. Before you to read the following information. Accessories and Modifications Modifying your vehicle, or installing some non-Honda accessories, can be sure to personalize your vehicle. Accessories Your dealer has Honda accessories that allow you make your vehicle unsafe. Follow all instructions...
Owner's Manual
Page 160
..., stability, and reliability. attached to or placed on the covers marked ''SRS AIRBAG'' in the center of the airbags. Accessories and Modifications Modifying Your Vehicle Removing parts from inflating properly. Non-Honda wheels, because they are : Lowering the vehicle with an aftermarket suspension kit can make the systems ineffective. Some examples are...
..., stability, and reliability. attached to or placed on the covers marked ''SRS AIRBAG'' in the center of the airbags. Accessories and Modifications Modifying Your Vehicle Removing parts from inflating properly. Non-Honda wheels, because they are : Lowering the vehicle with an aftermarket suspension kit can make the systems ineffective. Some examples are...