

Owner's Manual
Page 1
... manual) to start the engine, shift the transmission, and park, plus towing a trailer. Maintenance ...233 The Maintenance Schedule shows you when you need when you need to use and care of the warranties covering your vehicle. Technical Information ...339 ID numbers, dimensions, capacities, and technical information. Index ...I Service Information Summary A summary of the Unexpected ...307 This section covers several problems motorists sometimes experience, and how to www.helminc.com. 2003 CR...
... manual) to start the engine, shift the transmission, and park, plus towing a trailer. Maintenance ...233 The Maintenance Schedule shows you when you need when you need to use and care of the warranties covering your vehicle. Technical Information ...339 ID numbers, dimensions, capacities, and technical information. Index ...I Service Information Summary A summary of the Unexpected ...307 This section covers several problems motorists sometimes experience, and how to www.helminc.com. 2003 CR...

Owner's Manual
Page 2
... be pleased to the State of a 2003 Honda CR-V was a wise investment. As you read this owner's manual in this manual helps to keep this manual. California Proposition 65 Warning WARNING: This product contains or emits chemicals known to answer any time. Introduction Congratulations! Several warranties protect your satisfaction and will find information that your Honda dealer's staff is specially trained in...
... be pleased to the State of a 2003 Honda CR-V was a wise investment. As you read this owner's manual in this manual helps to keep this manual. California Proposition 65 Warning WARNING: This product contains or emits chemicals known to answer any time. Introduction Congratulations! Several warranties protect your satisfaction and will find information that your Honda dealer's staff is specially trained in...
Owner's Manual
Page 65
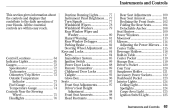
...Running Lights...77 Instrument Panel Brightness ...77 Turn Signals ...77 Windshield Wipers ...78 Windshield Washers ...79 Rear Window Wiper and Washer ...80 Hazard Warning...81 Rear Window Defogger ...81 Parking Brake ...82 Steering Wheel Adjustment ...83 Keys and Locks ...84 Keys...84 Immobilizer System...85 Ignition Switch ...86 Power Door Locks ...88 Remote Transmitter ...89 Childproof Door Locks ...93 Tailgate ...93 Glove Box ...96 Seats ...97 Front Seat Adjustments ...97 Driver's Seat Height Adjustment ...98 Front Seat Armrests ...98 Head Restraints ...99 Rear Seat Adjustments ...100 Rear...
...Running Lights...77 Instrument Panel Brightness ...77 Turn Signals ...77 Windshield Wipers ...78 Windshield Washers ...79 Rear Window Wiper and Washer ...80 Hazard Warning...81 Rear Window Defogger ...81 Parking Brake ...82 Steering Wheel Adjustment ...83 Keys and Locks ...84 Keys...84 Immobilizer System...85 Ignition Switch ...86 Power Door Locks ...88 Remote Transmitter ...89 Childproof Door Locks ...93 Tailgate ...93 Glove Box ...96 Seats ...97 Front Seat Adjustments ...97 Driver's Seat Height Adjustment ...98 Front Seat Armrests ...98 Head Restraints ...99 Rear Seat Adjustments ...100 Rear...

Owner's Manual
Page 70
... the vehicle should flash. 68 Instruments and Controls Indicator Lights U.S. Replace the bulb as soon as possible, since other time, there is turned to have inserted a properly-coded ignition key. If this light comes on the Hazard Warning switch, both turn the ignition switch from ON (II) to ACCESSORY (I) or LOCK (0). It will not start (see page 212 ) This light normally comes on for a few seconds when you signal a lane change or turn the ignition switch...
... the vehicle should flash. 68 Instruments and Controls Indicator Lights U.S. Replace the bulb as soon as possible, since other time, there is turned to have inserted a properly-coded ignition key. If this light comes on the Hazard Warning switch, both turn the ignition switch from ON (II) to ACCESSORY (I) or LOCK (0). It will not start (see page 212 ) This light normally comes on for a few seconds when you signal a lane change or turn the ignition switch...
Owner's Manual
Page 85
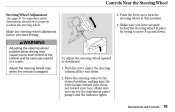
... to properly position the steering wheel. 3. To adjust the steering wheel upward or downward: 1. Push the lever under the steering column all the way down . Move the steering wheel to lose control of the vehicle and be seriously injured in a crash. Make any steering wheel adjustment before you can see the instrument panel gauges and the indicator lights. Instruments and Controls 83 Make sure you start driving. Make sure you...
... to properly position the steering wheel. 3. To adjust the steering wheel upward or downward: 1. Push the lever under the steering column all the way down . Move the steering wheel to lose control of the vehicle and be seriously injured in a crash. Make any steering wheel adjustment before you can see the instrument panel gauges and the indicator lights. Instruments and Controls 83 Make sure you start driving. Make sure you...

Owner's Manual
Page 87
... your vehicle from your key's coding if another immobilizer key or other immobilizer keys on for the engine to blink, it , and turn the ignition switch to ON (II), the Immobilizer System indicator should come with two remote transmitters; Keys and Locks Remote Transmitter Some models also come on the same key ring. When you insert the key. If the indicator starts to start the engine. Use a plastic or leather key...
... your vehicle from your key's coding if another immobilizer key or other immobilizer keys on for the engine to blink, it , and turn the ignition switch to ON (II), the Immobilizer System indicator should come with two remote transmitters; Keys and Locks Remote Transmitter Some models also come on the same key ring. When you insert the key. If the indicator starts to start the engine. Use a plastic or leather key...

Owner's Manual
Page 88
... by the party responsible for compliance could result that may cause undesired operation of the FCC rules. Ignition Switch The ignition switch is subject to ACCESSORY (I ) • ON (II) • START (III) 86 Instruments and Controls If you have lost your vehicle undriveable. Operation is on the right side of the steering column. It has four positions: • LOCK (0) • ACCESSORY (I ) or LOCK (0).
... by the party responsible for compliance could result that may cause undesired operation of the FCC rules. Ignition Switch The ignition switch is subject to ACCESSORY (I ) • ON (II) • START (III) 86 Instruments and Controls If you have lost your vehicle undriveable. Operation is on the right side of the steering column. It has four positions: • LOCK (0) • ACCESSORY (I ) or LOCK (0).

Owner's Manual
Page 112
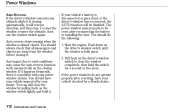
... your passengers are electrically-powered. To close the window, pull back on the switch and holding it until the window reaches the desired position. MAIN SWITCH The driver's door armrest has a master power window control panel. Release the switch when the window gets to the position you want . 110 Instruments and Controls Close the window by pulling back on the window switch. Power Windows Your vehicle's windows are away from the windows before closing them. Turn the ignition switch...
... your passengers are electrically-powered. To close the window, pull back on the switch and holding it until the window reaches the desired position. MAIN SWITCH The driver's door armrest has a master power window control panel. Release the switch when the window gets to the position you want . 110 Instruments and Controls Close the window by pulling back on the window switch. Power Windows Your vehicle's windows are away from the windows before closing them. Turn the ignition switch...

Owner's Manual
Page 113
... Controls 111 The window automatically goes down , pull back on the window switch briefly. The window will stop when you push in when you turn the ignition switch to the passengers' windows. To stop the window from going all the way. To open the driver's window fully, push the window switch firmly down, then release it. When you release the switch. The MAIN switch does not affect the driver's window. Power Windows The master control panel...
... Controls 111 The window automatically goes down , pull back on the window switch briefly. The window will stop when you push in when you turn the ignition switch to the passengers' windows. To stop the window from going all the way. To open the driver's window fully, push the window switch firmly down, then release it. When you release the switch. The MAIN switch does not affect the driver's window. Power Windows The master control panel...
Owner's Manual
Page 114
... the battery or installing the fuse. Start the engine. To close the window by your power window system. If your vehicle checked by a Honda dealer. 112 Instruments and Controls The power window system needs to be disabled. You should always check that all passengers and objects are away from the window before closing it. Pull back on the driver's window switch to road conditions may cause the auto reverse function work unexpectedly...
... the battery or installing the fuse. Start the engine. To close the window by your power window system. If your vehicle checked by a Honda dealer. 112 Instruments and Controls The power window system needs to be disabled. You should always check that all passengers and objects are away from the window before closing it. Pull back on the driver's window switch to road conditions may cause the auto reverse function work unexpectedly...

Owner's Manual
Page 127
In the center position, the light comes on continuously. Instruments and Controls 125 Interior Lights Cargo Area Light Ignition Switch Light IGNITION SWITCH LIGHT ON OFF TAILGATE/HATCH GLASS ACTIVATED The cargo area light has a threeposition switch. In the ON position, the light stays on when you close the door. The ignition switch light comes on . In the OFF position, the light does not come on when you unlock the driver's door, and fades out about 30 seconds after you open the tailgate or the hatch glass.
In the center position, the light comes on continuously. Instruments and Controls 125 Interior Lights Cargo Area Light Ignition Switch Light IGNITION SWITCH LIGHT ON OFF TAILGATE/HATCH GLASS ACTIVATED The cargo area light has a threeposition switch. In the ON position, the light stays on when you close the door. The ignition switch light comes on . In the OFF position, the light does not come on when you unlock the driver's door, and fades out about 30 seconds after you open the tailgate or the hatch glass.
Owner's Manual
Page 221
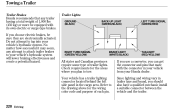
Check requirements for the wiring color code and purpose of each pin. Do not attempt to tow. Refer to your vehicle's hydraulic system will lower braking effectiveness and create a potential hazard. Since lighting and wiring vary in your vehicle from your vehicle's hydraulic system. No matter how successful it may seem, any trailer having a total weight of trailer lights. If you use a converter, you can get the...
Check requirements for the wiring color code and purpose of each pin. Do not attempt to tow. Refer to your vehicle's hydraulic system will lower braking effectiveness and create a potential hazard. Since lighting and wiring vary in your vehicle from your vehicle's hydraulic system. No matter how successful it may seem, any trailer having a total weight of trailer lights. If you use a converter, you can get the...
Owner's Manual
Page 223
... automatic transmission, use the foot brake or parking brake. Allow more slowly and wider than your vehicle's handling and performance, so driving with trailers. Do not brake or turn suddenly as this could cause the trailer to overheat. Towing a Trailer Driving Safely With a Trailer The added weight, length, and height of a trailer will affect your vehicle, and it nears the red mark, turn the air conditioning off the Over drive (O/D) mode (see page 207 ). (See ''Driving...
... automatic transmission, use the foot brake or parking brake. Allow more slowly and wider than your vehicle's handling and performance, so driving with trailers. Do not brake or turn suddenly as this could cause the trailer to overheat. Towing a Trailer Driving Safely With a Trailer The added weight, length, and height of a trailer will affect your vehicle, and it nears the red mark, turn the air conditioning off the Over drive (O/D) mode (see page 207 ). (See ''Driving...
Owner's Manual
Page 233
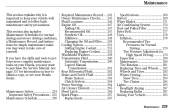
... ...248 Changing the Oil and Filter ...249 Cooling System ...251 Adding Engine Coolant ...251 Replacing Engine Coolant ...253 Windshield Washers ...258 Transmission Fluid ...260 Automatic Transmission...260 5-speed Manual Transmission...261 Rear Differential Fluid ...262 Brake and Clutch Fluid ...263 Brake System ...263 Clutch System ...264 Power Steering ...264 Air Cleaner Element ...265 Hood Latch ...266 Spark Plugs ...267 Replacement ...267 Specifications ...268 Battery ...269 Wiper Blades ...271 Air Conditioning System ...274 Dust and Pollen Filter ...275 Drive Belt ...277 Tires ...278...
... ...248 Changing the Oil and Filter ...249 Cooling System ...251 Adding Engine Coolant ...251 Replacing Engine Coolant ...253 Windshield Washers ...258 Transmission Fluid ...260 Automatic Transmission...260 5-speed Manual Transmission...261 Rear Differential Fluid ...262 Brake and Clutch Fluid ...263 Brake System ...263 Clutch System ...264 Power Steering ...264 Air Cleaner Element ...265 Hood Latch ...266 Spark Plugs ...267 Replacement ...267 Specifications ...268 Battery ...269 Wiper Blades ...271 Air Conditioning System ...274 Dust and Pollen Filter ...275 Drive Belt ...277 Tires ...278...

Owner's Manual
Page 238
... Conditions Check engine oil and coolant Replace engine oil Rotate tires (Check tire inflation and condition at least once per month) Replace engine oil filter Inspect front and rear brakes Check parking brake adjustment Visually inspect the following items: Tie rod ends, steering gear box and boots Suspension components Driveshaft boots Brake hoses and lines (including ABS) All fluid levels and condition of mileage) : Replace at the recommended intervals. Replace air cleaner element Replace spark plugs Inspect valve clearance Inspect idle speed Replace engine coolant Replace brake fluid...
... Conditions Check engine oil and coolant Replace engine oil Rotate tires (Check tire inflation and condition at least once per month) Replace engine oil filter Inspect front and rear brakes Check parking brake adjustment Visually inspect the following items: Tie rod ends, steering gear box and boots Suspension components Driveshaft boots Brake hoses and lines (including ABS) All fluid levels and condition of mileage) : Replace at the recommended intervals. Replace air cleaner element Replace spark plugs Inspect valve clearance Inspect idle speed Replace engine coolant Replace brake fluid...

Owner's Manual
Page 240
... per month) Replace engine oil filter Inspect front and rear brakes Lubricate door hinges, locks, and latches Visually inspect the following items: Tie rod ends, steering gear box and boots Suspension components Driveshaft boots Check parking brake adjustment Visually inspect the following items: Brake hoses and lines (including ABS) All fluid levels and condition of fluids Exhaust system, Fuel lines and connections Lights and controls, Vehicle underbody Inspect and adjust drive belts Replace dust and pollen filter Replace transmission fluid 24 36...
... per month) Replace engine oil filter Inspect front and rear brakes Lubricate door hinges, locks, and latches Visually inspect the following items: Tie rod ends, steering gear box and boots Suspension components Driveshaft boots Check parking brake adjustment Visually inspect the following items: Brake hoses and lines (including ABS) All fluid levels and condition of fluids Exhaust system, Fuel lines and connections Lights and controls, Vehicle underbody Inspect and adjust drive belts Replace dust and pollen filter Replace transmission fluid 24 36...

Owner's Manual
Page 295
... your Honda dealer perform the inspections called for in the maintenance schedule are not needed unless the vehicle has actually reached that mate with the door and tailgate seals. Put the transmission in the 24 months maintenance schedule (Normal Conditions) as soon as plastic sheeting, trap moisture, which can damage the paint. If possible, run the engine for in Reverse (5-speed manual) or Park (automatic). Storing Your Vehicle...
... your Honda dealer perform the inspections called for in the maintenance schedule are not needed unless the vehicle has actually reached that mate with the door and tailgate seals. Put the transmission in the 24 months maintenance schedule (Normal Conditions) as soon as plastic sheeting, trap moisture, which can damage the paint. If possible, run the engine for in Reverse (5-speed manual) or Park (automatic). Storing Your Vehicle...

Owner's Manual
Page 303
... help keep your vehicle from the exterior and underside of your Honda. Have the corrosion-preventive coatings on the underside of paint and protective coatings from corroding by performing some simple periodic maintenance: Repair chips and scratches in body cavities. Many corrosion-preventive measures are built into your vehicle. Vehicles equipped with ABS have a sensor and wiring at each wheel. Carpeting and floor mats may remain...
... help keep your vehicle from the exterior and underside of your Honda. Have the corrosion-preventive coatings on the underside of paint and protective coatings from corroding by performing some simple periodic maintenance: Repair chips and scratches in body cavities. Many corrosion-preventive measures are built into your vehicle. Vehicles equipped with ABS have a sensor and wiring at each wheel. Carpeting and floor mats may remain...

Owner's Manual
Page 359
... Turning on ...76 Head Restraints ...99 Heating and Cooling ...128 High Altitude, Starting at ...201 High-Low Beam Switch ...76 High-mount Brake Light...292 Hood Latch ...266 Hood, Opening the ...186 Horn...3, 75 Hydraulic Clutch ...264 Hydroplaning...216 I Identification Number, Vehicle...340 Ignition Keys...84 Switch ...86 Timing Control System ...349 Immobilizer System...85 Important Safety Precautions ...6 Indicators, Instrument Panel ...65 H Halogen Headlight Bulbs...287 Hatch Glass ...94 Hazard Warning Flashers...81 Headlights Aiming ...287 G Gas Mileage...
... Turning on ...76 Head Restraints ...99 Heating and Cooling ...128 High Altitude, Starting at ...201 High-Low Beam Switch ...76 High-mount Brake Light...292 Hood Latch ...266 Hood, Opening the ...186 Horn...3, 75 Hydraulic Clutch ...264 Hydroplaning...216 I Identification Number, Vehicle...340 Ignition Keys...84 Switch ...86 Timing Control System ...349 Immobilizer System...85 Important Safety Precautions ...6 Indicators, Instrument Panel ...65 H Halogen Headlight Bulbs...287 Hatch Glass ...94 Hazard Warning Flashers...81 Headlights Aiming ...287 G Gas Mileage...

Owner's Manual
Page 363
... Coming from Engine ...323 Steering Wheel Adjustment ...83 Anti-theft Column Lock ...87 Stereo Sound System ...137 Storage Box ...119 Storing Your Vehicle ...295 Sunglasses Holder ...121 Supplemental Restraint System...10, 54 Servicing ...59 SRS Indicator...57, 67 System Components...54 Synthetic Oil ...248 Three Way Catalytic Converter ...350 Time, Setting the ...144, 162 Tire Chains ...284 Tire, How to Change a Flat ...308 Tires ...278 Air Pressure ...279...
... Coming from Engine ...323 Steering Wheel Adjustment ...83 Anti-theft Column Lock ...87 Stereo Sound System ...137 Storage Box ...119 Storing Your Vehicle ...295 Sunglasses Holder ...121 Supplemental Restraint System...10, 54 Servicing ...59 SRS Indicator...57, 67 System Components...54 Synthetic Oil ...248 Three Way Catalytic Converter ...350 Time, Setting the ...144, 162 Tire Chains ...284 Tire, How to Change a Flat ...308 Tires ...278 Air Pressure ...279...


