Owner's Manual
Page 1
... features. Authorized Manuals (U.S. Appearance Care ...297 Tips on authorized manuals or go to start the engine, shift the transmission, and park, plus towing a trailer. Warranty and Customer Relations (U.S. only) ...357 How to operate the climate control system, the audio system, and other technical literature. Instruments and Controls ...63 Instrument panel indicator and gauge, and how to use , how to break-in your new vehicle, and how to use dashboard and steering...
... features. Authorized Manuals (U.S. Appearance Care ...297 Tips on authorized manuals or go to start the engine, shift the transmission, and park, plus towing a trailer. Warranty and Customer Relations (U.S. only) ...357 How to operate the climate control system, the audio system, and other technical literature. Instruments and Controls ...63 Instrument panel indicator and gauge, and how to use , how to break-in your new vehicle, and how to use dashboard and steering...

Owner's Manual
Page 3
... of driving pleasure. One of the best ways to your Honda. This information is specially trained in your investment. Several warranties protect your new Honda is preceded by a symbol. When your vehicle needs maintenance, keep this manual, you will give you avoid damage to enhance the enjoyment of a 2002 Honda CR-V was a wise investment. Maintaining your vehicle according to your Honda, other...
... of driving pleasure. One of the best ways to your Honda. This information is specially trained in your investment. Several warranties protect your new Honda is preceded by a symbol. When your vehicle needs maintenance, keep this manual, you will give you avoid damage to enhance the enjoyment of a 2002 Honda CR-V was a wise investment. Maintaining your vehicle according to your Honda, other...
Owner's Manual
Page 4
... operate its driving controls and convenience items. Afterwards, keep your driving trouble-free while it at any questions and concerns. Several warranties protect your Honda. When your vehicle needs maintenance, keep in servicing the many systems...Honda dealer's staff is intended to help you avoid damage to answer any time. One of the best ways to enhance the enjoyment of a 2002 Honda CR-V was a wise investment. Your Honda dealer is dedicated to your new Honda is to read this manual helps to keep this manual, you will be pleased to your vehicle so you read this owner's manual...
... operate its driving controls and convenience items. Afterwards, keep your driving trouble-free while it at any questions and concerns. Several warranties protect your Honda. When your vehicle needs maintenance, keep in servicing the many systems...Honda dealer's staff is intended to help you avoid damage to answer any time. One of the best ways to enhance the enjoyment of a 2002 Honda CR-V was a wise investment. Your Honda dealer is dedicated to your new Honda is to read this manual helps to keep this manual, you will be pleased to your vehicle so you read this owner's manual...
Owner's Manual
Page 67
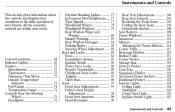
... essential controls are within easy reach. Daytime Running Lights...77 Instrument Panel Brightness ...77 Turn Signals ...77 Windshield Wipers ...78 Windshield Washers ...79 Rear Window Wiper and Washer ...80 Hazard Warning...81 Rear Window Defogger ...81 Parking Brake ...82 Steering Wheel Adjustment ...83 Keys and Locks ...84 Keys...84 Immobilizer System...85 Ignition Switch ...86 Power Door Locks ...88 Remote Transmitter ...89 Childproof Door Locks ...93 Tailgate ...93 Glove Box ...96 Seats ...97 Front Seat Adjustments ...97 Driver's Seat Height Adjustment ...98 Front Seat Armrests ...98...
... essential controls are within easy reach. Daytime Running Lights...77 Instrument Panel Brightness ...77 Turn Signals ...77 Windshield Wipers ...78 Windshield Washers ...79 Rear Window Wiper and Washer ...80 Hazard Warning...81 Rear Window Defogger ...81 Parking Brake ...82 Steering Wheel Adjustment ...83 Keys and Locks ...84 Keys...84 Immobilizer System...85 Ignition Switch ...86 Power Door Locks ...88 Remote Transmitter ...89 Childproof Door Locks ...93 Tailgate ...93 Glove Box ...96 Seats ...97 Front Seat Adjustments ...97 Driver's Seat Height Adjustment ...98 Front Seat Armrests ...98...
Owner's Manual
Page 72
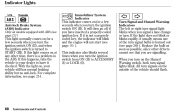
... engine will then go off if you turn signal bulbs is a problem in the ABS. It will not start (see that you turn the ignition switch from ON (II) to START (III). This indicator also blinks several times when you are signalling. When you turn on at any other drivers cannot see page 85 ). Turn Signal and Hazard Warning Indicators The left or right turn signal light blinks when you signal a lane change...
... engine will then go off if you turn signal bulbs is a problem in the ABS. It will not start (see that you turn the ignition switch from ON (II) to START (III). This indicator also blinks several times when you are signalling. When you turn on at any other drivers cannot see page 85 ). Turn Signal and Hazard Warning Indicators The left or right turn signal light blinks when you signal a lane change...
Owner's Manual
Page 87
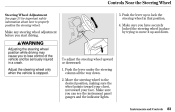
... the steering wheel to properly position the steering wheel. 3. To adjust the steering wheel upward or downward: 1. Instruments and Controls 83 Controls Near the Steering Wheel Steering Wheel Adjustment See page 20 for important safety information about how to the desired position, making sure the wheel points toward your chest, not toward your face. Make any steering wheel adjustment before you can see the instrument panel gauges and the indicator lights.
... the steering wheel to properly position the steering wheel. 3. To adjust the steering wheel upward or downward: 1. Instruments and Controls 83 Controls Near the Steering Wheel Steering Wheel Adjustment See page 20 for important safety information about how to the desired position, making sure the wheel points toward your chest, not toward your face. Make any steering wheel adjustment before you can see the instrument panel gauges and the indicator lights.
Owner's Manual
Page 89
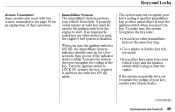
... immobilizer key or other keys away from theft. If the indicator starts to ON (II) again. Turn the ignition switch to LOCK (0), remove the key, reinsert it means the system does not recognize the coding of your key, contact your vehicle's key and the ignition switch while trying to start the engine. If the system repeatedly does not recognize the coding of the key. Keys and Locks Remote Transmitter Some models also...
... immobilizer key or other keys away from theft. If the indicator starts to ON (II) again. Turn the ignition switch to LOCK (0), remove the key, reinsert it means the system does not recognize the coding of your key, contact your vehicle's key and the ignition switch while trying to start the engine. If the system repeatedly does not recognize the coding of the key. Keys and Locks Remote Transmitter Some models also...

Owner's Manual
Page 114
... or lower any of the passengers' windows, push down and hold it . Release the switch when the window gets to the position you want . 110 Instruments and Controls Power Windows Your vehicle's windows are away from the windows before closing them. Close the window by pulling back on the appropriate switch and hold it until the window reaches the desired position. MAIN SWITCH The driver's door armrest has a master power window control panel.
... or lower any of the passengers' windows, push down and hold it . Release the switch when the window gets to the position you want . 110 Instruments and Controls Power Windows Your vehicle's windows are away from the windows before closing them. Close the window by pulling back on the appropriate switch and hold it until the window reaches the desired position. MAIN SWITCH The driver's door armrest has a master power window control panel.

Owner's Manual
Page 115
... MAIN switch controls power to ON (II). The window will stop the window from going all the way up , push down , then release it. Power Windows The master control panel also contains these extra features: AUTO To open or close the driver's window fully, pull back the window switch firmly, then release it. To cancel this feature, push on the window switch briefly. To stop when you turn the ignition switch to the passengers' windows.
... MAIN switch controls power to ON (II). The window will stop the window from going all the way up , push down , then release it. Power Windows The master control panel also contains these extra features: AUTO To open or close the driver's window fully, pull back the window switch firmly, then release it. To cancel this feature, push on the window switch briefly. To stop when you turn the ignition switch to the passengers' windows.
Owner's Manual
Page 116
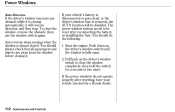
... always check that all passengers and objects are away from the window before closing automatically, it will be reset after resetting, have your vehicle's battery is disconnected or goes dead, or the driver's window fuse is fully open. 2. Start the engine. If the power windows do the following. 1. If your vehicle checked by a Honda dealer. 112 Instruments and Controls Push down on the driver's window switch to be disabled...
... always check that all passengers and objects are away from the window before closing automatically, it will be reset after resetting, have your vehicle's battery is disconnected or goes dead, or the driver's window fuse is fully open. 2. Start the engine. If the power windows do the following. 1. If your vehicle checked by a Honda dealer. 112 Instruments and Controls Push down on the driver's window switch to be disabled...
Owner's Manual
Page 129
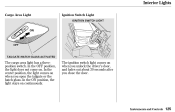
The ignition switch light comes on when you close the door. In the OFF position, the light does not come on continuously. Instruments and Controls 125 In the center position, the light comes on when you unlock the driver's door, and fades out about 30 seconds after you open the tailgate or the hatch glass. In the ON position, the light stays on . Interior Lights Cargo Area Light Ignition Switch Light IGNITION SWITCH LIGHT ON OFF TAILGATE/HATCH GLASS ACTIVATED The cargo area light has a threeposition switch.
The ignition switch light comes on when you close the door. In the OFF position, the light does not come on continuously. Instruments and Controls 125 In the center position, the light comes on when you unlock the driver's door, and fades out about 30 seconds after you open the tailgate or the hatch glass. In the ON position, the light stays on . Interior Lights Cargo Area Light Ignition Switch Light IGNITION SWITCH LIGHT ON OFF TAILGATE/HATCH GLASS ACTIVATED The cargo area light has a threeposition switch.
Owner's Manual
Page 223
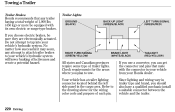
Towing a Trailer Trailer Brakes Trailer Lights GROUND (BLACK) BACK-UP LIGHT (GREEN/BLACK) LEFT TURN SIGNAL (GREEN/RED) Honda recommends that mate with its own electric or surge-type brakes. Since lighting and wiring vary in trailer type and brand, you can get the connector and pins that any attempt to attach trailer brakes to the drawing above for the areas where you choose electric brakes, be equipped with the connector...
Towing a Trailer Trailer Brakes Trailer Lights GROUND (BLACK) BACK-UP LIGHT (GREEN/BLACK) LEFT TURN SIGNAL (GREEN/RED) Honda recommends that mate with its own electric or surge-type brakes. Since lighting and wiring vary in trailer type and brand, you can get the connector and pins that any attempt to attach trailer brakes to the drawing above for the areas where you choose electric brakes, be equipped with the connector...
Owner's Manual
Page 225
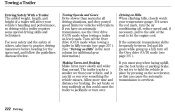
... arc than normal in place by pressing on level roads. Towing a Trailer Driving Safely With a Trailer The added weight, length, and height of a trailer will affect your safety and the safety of the road to let the engine cool. If it can cause the automatic transmission to overheat. Make turns more time and distance for braking. For your vehicle's handling and performance, so driving with trailers. Towing Speeds and Gears Driving on Hills Drive slower than your temperature gauge.
... arc than normal in place by pressing on level roads. Towing a Trailer Driving Safely With a Trailer The added weight, length, and height of a trailer will affect your safety and the safety of the road to let the engine cool. If it can cause the automatic transmission to overheat. Make turns more time and distance for braking. For your vehicle's handling and performance, so driving with trailers. Towing Speeds and Gears Driving on Hills Drive slower than your temperature gauge.

Owner's Manual
Page 235
... ...248 Changing the Oil and Filter ...249 Cooling System ...251 Adding Engine Coolant ...251 Replacing Engine Coolant ...253 Windshield Washers ...258 Transmission Fluid ...260 Automatic Transmission...260 5-speed Manual Transmission...261 Rear Differential Fluid ...262 Brake and Clutch Fluid ...263 Brake System ...263 Clutch System ...264 Power Steering ...264 Air Cleaner Element ...265 Hood Latch ...266 Spark Plugs ...267 Replacement ...267 Specifications ...268 Battery ...269 Wiper Blades ...271 Air Conditioning System ...274 Dust and Pollen Filter ...275 Drive Belt ...277 Tires ...278...
... ...248 Changing the Oil and Filter ...249 Cooling System ...251 Adding Engine Coolant ...251 Replacing Engine Coolant ...253 Windshield Washers ...258 Transmission Fluid ...260 Automatic Transmission...260 5-speed Manual Transmission...261 Rear Differential Fluid ...262 Brake and Clutch Fluid ...263 Brake System ...263 Clutch System ...264 Power Steering ...264 Air Cleaner Element ...265 Hood Latch ...266 Spark Plugs ...267 Replacement ...267 Specifications ...268 Battery ...269 Wiper Blades ...271 Air Conditioning System ...274 Dust and Pollen Filter ...275 Drive Belt ...277 Tires ...278...
Owner's Manual
Page 240
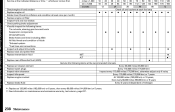
... 72 120 192 Maintenance Schedule for Normal Conditions Check engine oil and coolant Replace engine oil Rotate tires (Check tire inflation and condition at least once per month) Replace engine oil filter Inspect front and rear brakes Check parking brake adjustment Visually inspect the following items: Tie rod ends, steering gear box and boots Suspension components Driveshaft boots Brake hoses and lines (including ABS) All fluid levels and condition of mileage) : Replace at the indicated distance or time whichever comes first...
... 72 120 192 Maintenance Schedule for Normal Conditions Check engine oil and coolant Replace engine oil Rotate tires (Check tire inflation and condition at least once per month) Replace engine oil filter Inspect front and rear brakes Check parking brake adjustment Visually inspect the following items: Tie rod ends, steering gear box and boots Suspension components Driveshaft boots Brake hoses and lines (including ABS) All fluid levels and condition of mileage) : Replace at the indicated distance or time whichever comes first...

Owner's Manual
Page 242
... of fluids Exhaust system, Fuel lines and connections Lights and controls, Vehicle underbody Inspect and adjust drive belts Replace dust and pollen filter Replace transmission fluid 24 36 48 60 Check oil and coolant at each fuel stop Replace every 5,000 miles (8,000 km) or 6 months M/T A/T At 60,000 miles (96,000 km) or 3 years, then every 30,000 miles (48,000 km) or 2 years Replace rear differential fluid (4WD) Replace air cleaner element Replace spark plugs Inspect valve clearance Inspect idle speed Replace engine coolant Replace brake fluid Service...
... of fluids Exhaust system, Fuel lines and connections Lights and controls, Vehicle underbody Inspect and adjust drive belts Replace dust and pollen filter Replace transmission fluid 24 36 48 60 Check oil and coolant at each fuel stop Replace every 5,000 miles (8,000 km) or 6 months M/T A/T At 60,000 miles (96,000 km) or 3 years, then every 30,000 miles (48,000 km) or 2 years Replace rear differential fluid (4WD) Replace air cleaner element Replace spark plugs Inspect valve clearance Inspect idle speed Replace engine coolant Replace brake fluid Service...
Owner's Manual
Page 297
... paint. If possible, store your vehicle indoors. Wash and dry the exterior completely. are completely dry. If possible, run the engine for a while periodically (preferably once a month). Nonporous materials, such as cotton. Fill the fuel tank. If you store your vehicle for 12 months or longer, have your Honda dealer perform the inspections called for in Reverse (5-speed manual) or Park (automatic). Block the rear wheels. Maintenance...
... paint. If possible, store your vehicle indoors. Wash and dry the exterior completely. are completely dry. If possible, run the engine for a while periodically (preferably once a month). Nonporous materials, such as cotton. Fill the fuel tank. If you store your vehicle for 12 months or longer, have your Honda dealer perform the inspections called for in Reverse (5-speed manual) or Park (automatic). Block the rear wheels. Maintenance...
Owner's Manual
Page 305
... of paint and protective coatings from corroding by performing some simple periodic maintenance: Repair chips and scratches in the bottom of the vehicle. Use a high-pressure spray to clean the underside of the vehicle stays damp, promoting corrosion in humid climates and areas subject to salt air. Carpeting and floor mats may remain damp for dampness. Dirt and road salt that...
... of paint and protective coatings from corroding by performing some simple periodic maintenance: Repair chips and scratches in the bottom of the vehicle. Use a high-pressure spray to clean the underside of the vehicle stays damp, promoting corrosion in humid climates and areas subject to salt air. Carpeting and floor mats may remain damp for dampness. Dirt and road salt that...
Owner's Manual
Page 361
... Turning on ...76 Head Restraints ...99 Heating and Cooling ...128 High Altitude, Starting at ...201 High-Low Beam Switch ...76 High-mount Brake Light...292 Hood Latch ...266 Hood, Opening the ...186 Horn...3, 75 Hydraulic Clutch ...264 Hydroplaning...216 I Identification Number, Vehicle...340 Ignition Keys...84 Switch ...86 Timing Control System ...349 Immobilizer System...85 Important Safety Precautions ...6 Indicators, Instrument Panel ...65 H Halogen Headlight Bulbs...287 Hatch Glass ...94 Hazard Warning Flashers...81 Headlights Aiming ...287 G Gas Mileage...
... Turning on ...76 Head Restraints ...99 Heating and Cooling ...128 High Altitude, Starting at ...201 High-Low Beam Switch ...76 High-mount Brake Light...292 Hood Latch ...266 Hood, Opening the ...186 Horn...3, 75 Hydraulic Clutch ...264 Hydroplaning...216 I Identification Number, Vehicle...340 Ignition Keys...84 Switch ...86 Timing Control System ...349 Immobilizer System...85 Important Safety Precautions ...6 Indicators, Instrument Panel ...65 H Halogen Headlight Bulbs...287 Hatch Glass ...94 Hazard Warning Flashers...81 Headlights Aiming ...287 G Gas Mileage...

Owner's Manual
Page 365
... Coming from Engine ...323 Steering Wheel Adjustment ...83 Anti-theft Column Lock ...87 Stereo Sound System ...137 Storage Box ...119 Storing Your Vehicle ...295 Sunglasses Holder ...121 Supplemental Restraint System...10, 54 Servicing ...59 SRS Indicator...57, 67 System Components...54 Synthetic Oil ...248 Three Way Catalytic Converter ...350 Time, Setting the ...144, 162 Tire Chains ...284 Tire, How to Change a Flat ...308 Tires ...278 Air Pressure ...279...
... Coming from Engine ...323 Steering Wheel Adjustment ...83 Anti-theft Column Lock ...87 Stereo Sound System ...137 Storage Box ...119 Storing Your Vehicle ...295 Sunglasses Holder ...121 Supplemental Restraint System...10, 54 Servicing ...59 SRS Indicator...57, 67 System Components...54 Synthetic Oil ...248 Three Way Catalytic Converter ...350 Time, Setting the ...144, 162 Tire Chains ...284 Tire, How to Change a Flat ...308 Tires ...278 Air Pressure ...279...


