
Owner's Manual
Page 1
...proper way to navigate through this reference. Instruments and Controls ...53 Instrument panel indicator and gauge, and how to use and care of information you need when you need to take your new Honda, and how to operate the climate control system, the audio system, and other cargo.... For a printed owner's manual, click on cleaning and protecting your car ever needs body repairs. Maintenance ...235 The Maintenance Schedule shows you when you pull up to www.helminc.com. 2002 Accord...
...proper way to navigate through this reference. Instruments and Controls ...53 Instrument panel indicator and gauge, and how to use and care of information you need when you need to take your new Honda, and how to operate the climate control system, the audio system, and other cargo.... For a printed owner's manual, click on cleaning and protecting your car ever needs body repairs. Maintenance ...235 The Maintenance Schedule shows you when you pull up to www.helminc.com. 2002 Accord...
Owner's Manual
Page 52
... and Controls This section gives information about the controls and displays that contribute to the daily operation of your Honda. Automatic Lighting Off Feature ...65 Daytime Running Lights...65 Instrument Panel Brightness ...65 Turn Signals ...66 Windshield ... ...100 Accessory Power Socket ...100 Interior Lights ...101 Control Locations ...54 Indicator Lights...55 Gauges ...60 Speedometer ...60 Tachometer ...60 Odometer ...60 Trip Meter ...61 Temperature Gauge ...61 Fuel Gauge ...61 Maintenance Required Indicator ...62 Controls Near the Steering Wheel ...63 Headlights ...64 Instruments ...
... and Controls This section gives information about the controls and displays that contribute to the daily operation of your Honda. Automatic Lighting Off Feature ...65 Daytime Running Lights...65 Instrument Panel Brightness ...65 Turn Signals ...66 Windshield ... ...100 Accessory Power Socket ...100 Interior Lights ...101 Control Locations ...54 Indicator Lights...55 Gauges ...60 Speedometer ...60 Tachometer ...60 Odometer ...60 Trip Meter ...61 Temperature Gauge ...61 Fuel Gauge ...61 Maintenance Required Indicator ...62 Controls Near the Steering Wheel ...63 Headlights ...64 Instruments ...

Owner's Manual
Page 59
... in miles per hour (km/h). Models This shows your car has been driven. The smaller inner numbers are the speed in Canadian models. Gauges TACHOMETER SPEEDOMETER FUEL GAUGE TEMPERATURE GAUGE Odometer The odometer shows the total distance your speed in miles per hour (mph). 60 Instruments and Controls MAINTENANCE REQUIRED INDICATOR TRIP METER...
... in miles per hour (km/h). Models This shows your car has been driven. The smaller inner numbers are the speed in Canadian models. Gauges TACHOMETER SPEEDOMETER FUEL GAUGE TEMPERATURE GAUGE Odometer The odometer shows the total distance your speed in miles per hour (mph). 60 Instruments and Controls MAINTENANCE REQUIRED INDICATOR TRIP METER...

Owner's Manual
Page 60
...uphill driving, the pointer may show slightly more or less than the actual amount when you turn off the ignition. Instruments and Controls 61 The gauge shows the fuel level reading immediately after you last reset it reaches the red (Hot) mark, pull safely to page 325 for instructions and ... to ''0.0''. There are driving on checking the engine's cooling system. It is most accurate when the car is disconnected. When you add fuel, the gauge slowly changes to the new reading after you turn the ignition switch back ON (II). 6-cylinder models The needle returns to near the upper grey...
...uphill driving, the pointer may show slightly more or less than the actual amount when you turn off the ignition. Instruments and Controls 61 The gauge shows the fuel level reading immediately after you last reset it reaches the red (Hot) mark, pull safely to page 325 for instructions and ... to ''0.0''. There are driving on checking the engine's cooling system. It is most accurate when the car is disconnected. When you add fuel, the gauge slowly changes to the new reading after you turn the ignition switch back ON (II). 6-cylinder models The needle returns to near the upper grey...

Owner's Manual
Page 61
... as follows. 1. Turn off the engine. 2. Between 6,000 miles (9,600 km) and 7,500 miles (12,000 km) this indicator will remain on pages 240 244 . Gauges Maintenance Required Indicator SELECT/RESET BUTTON Your dealer will reset this maintenance is done by someone other than your car in the instrument panel, then... for approximately ten seconds until the indicator resets. 62 Instruments and Controls If you first turn the ignition switch ON (II). Refer to take your Honda dealer, reset the indicator as a constant reminder. 3.
... as follows. 1. Turn off the engine. 2. Between 6,000 miles (9,600 km) and 7,500 miles (12,000 km) this indicator will remain on pages 240 244 . Gauges Maintenance Required Indicator SELECT/RESET BUTTON Your dealer will reset this maintenance is done by someone other than your car in the instrument panel, then... for approximately ten seconds until the indicator resets. 62 Instruments and Controls If you first turn the ignition switch ON (II). Refer to take your Honda dealer, reset the indicator as a constant reminder. 3.
Owner's Manual
Page 68
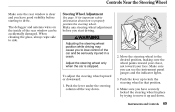
... you can be seriously injured in place by trying to move it up to lose control of the rear window can see the instrument panel gauges and the indicator lights. 3. Adjusting the steering wheel position while driving may cause you to lock the steering wheel in that position. 4. Adjust the steering...
... you can be seriously injured in place by trying to move it up to lose control of the rear window can see the instrument panel gauges and the indicator lights. 3. Adjusting the steering wheel position while driving may cause you to lock the steering wheel in that position. 4. Adjust the steering...
Owner's Manual
Page 109
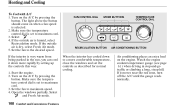
... cooled down more comfortable temperature, close the windows and set to a more rapidly by setting up the controls this way: 1. Watch the engine coolant temperature gauge (see page 61 ) when driving in the sun, you can cool it moves near the red zone, turn off the A/C until the... gauge reads normally. 108 Comfort and Convenience Features Turn on the A/C by pressing the button. If the interior is dry, select Fresh Air mode. 5. Make sure ...
... cooled down more comfortable temperature, close the windows and set to a more rapidly by setting up the controls this way: 1. Watch the engine coolant temperature gauge (see page 61 ) when driving in the sun, you can cool it moves near the red zone, turn off the A/C until the... gauge reads normally. 108 Comfort and Convenience Features Turn on the A/C by pressing the button. If the interior is dry, select Fresh Air mode. 5. Make sure ...

Owner's Manual
Page 209
... frost, snow, or ice. 2. Check that the hood and trunk are stored properly or fastened down securely. 5. Fasten your car. 1. If a tire looks low, use a gauge to Drive You should do the following checks and adjustments every day before you inside and outside lights are securely closed . 3. Check the adjustment of... closed and locked. 9. Start the engine (see page 55 ). 208 Driving Check that your passengers have fastened their seat belts (see page 69 ). 8. Check the gauges and indicator lights in the instrument panel. 11. Preparing to check its pressure. 4.
... frost, snow, or ice. 2. Check that the hood and trunk are stored properly or fastened down securely. 5. Fasten your car. 1. If a tire looks low, use a gauge to Drive You should do the following checks and adjustments every day before you inside and outside lights are securely closed . 3. Check the adjustment of... closed and locked. 9. Start the engine (see page 55 ). 208 Driving Check that your passengers have fastened their seat belts (see page 69 ). 8. Check the gauges and indicator lights in the instrument panel. 11. Preparing to check its pressure. 4.
Owner's Manual
Page 215
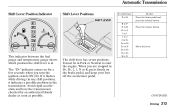
... and have the transmission checked by an authorized Honda dealer as soon as possible. CONTINUED Driving 213 If it flashes while driving (in any shift position), it indicates a possible problem in . The shift lever has seven positions. This indicator between the fuel gauge and temperature gauge shows which position the shift lever is...
... and have the transmission checked by an authorized Honda dealer as soon as possible. CONTINUED Driving 213 If it flashes while driving (in any shift position), it indicates a possible problem in . The shift lever has seven positions. This indicator between the fuel gauge and temperature gauge shows which position the shift lever is...

Owner's Manual
Page 231
... successful it will lower braking effectiveness and create a potential hazard. Towing Equipment and Accessories Towing can require a variety of your vehicle's hydraulic system. Trailer Brakes Honda recommends that any attempt to attach trailer brakes to both the trailer and hitch, and that they cross under the tongue so they are electronically... to confirm that vehicle and trailer weights are within limits is properly installed and that it becomes unhitched. Using a suitable scale or a special tongue load gauge, check the tongue load the first time you are towing.
... successful it will lower braking effectiveness and create a potential hazard. Towing Equipment and Accessories Towing can require a variety of your vehicle's hydraulic system. Trailer Brakes Honda recommends that any attempt to attach trailer brakes to both the trailer and hitch, and that they cross under the tongue so they are electronically... to confirm that vehicle and trailer weights are within limits is properly installed and that it becomes unhitched. Using a suitable scale or a special tongue load gauge, check the tongue load the first time you are towing.
Owner's Manual
Page 234
Do not ''ride'' the brakes, and remember it will affect your temperature gauge. D3 is the proper shift lever position to slow down to D3. 232 Driving Allow more slowly and wider than normal. Drive slower than your ...
Do not ''ride'' the brakes, and remember it will affect your temperature gauge. D3 is the proper shift lever position to slow down to D3. 232 Driving Allow more slowly and wider than normal. Drive slower than your ...
Owner's Manual
Page 263
Check the reservoir's fluid level by removing the cap and looking at least monthly during normal usage. Canadian Models LEVEL GAUGE 4-cylinder models 6-cylinder models The low washer level indicator will help to the cap. Antif reeze can damage your car's paint,...while a vinegar/water solution can damage the windshield washer pump. Windshield Washers Check the level in the windshield washer reservoir at the level gauge attached to condition the blade edges. 262 Maintenance This increases the cleaning capability and prevents freezing in the windshield washer reservoir. Use only ...
Check the reservoir's fluid level by removing the cap and looking at least monthly during normal usage. Canadian Models LEVEL GAUGE 4-cylinder models 6-cylinder models The low washer level indicator will help to the cap. Antif reeze can damage your car's paint,...while a vinegar/water solution can damage the windshield washer pump. Windshield Washers Check the level in the windshield washer reservoir at the level gauge attached to condition the blade edges. 262 Maintenance This increases the cleaning capability and prevents freezing in the windshield washer reservoir. Use only ...

Owner's Manual
Page 288
...the tires properly inflated provides the best combination of handling, tread life and riding comfort. Use a gauge to measure the air pressure at least three hours. If you have to a variation between gauges. 284 Maintenance This is due to a tire problem and not due to drive the car before checking... the pressure when the tires are more prone to tell if a pressure loss is normal. This will make your own tire pressure gauge and use it immediately with a tire gauge. The tire will see readings 4 to 6 psi (30 to 40 kPa, 0.3 to match the specified cold pressure. If you think ...
...the tires properly inflated provides the best combination of handling, tread life and riding comfort. Use a gauge to measure the air pressure at least three hours. If you have to a variation between gauges. 284 Maintenance This is due to a tire problem and not due to drive the car before checking... the pressure when the tires are more prone to tell if a pressure loss is normal. This will make your own tire pressure gauge and use it immediately with a tire gauge. The tire will see readings 4 to 6 psi (30 to 40 kPa, 0.3 to match the specified cold pressure. If you think ...

Owner's Manual
Page 324
...battery can f reeze. Turn off all the fuses (see page 276 ). There may not be able to ON (II) for a minute and watch the fuel gauge. If you find the problem. Open the hood and check the physical condition of the electrolyte. In very cold weather, check the condition of the... try jump starting until it to fill the tank. You cannot start the engine by pushing or pulling it. Turn the ignition switch to start a Honda with a f rozen battery can cause it thaws. Jump Starting If your car, follow the correct procedure, seriously injuring anyone nearby. Keep all sparks,...
...battery can f reeze. Turn off all the fuses (see page 276 ). There may not be able to ON (II) for a minute and watch the fuel gauge. If you find the problem. Open the hood and check the physical condition of the electrolyte. In very cold weather, check the condition of the... try jump starting until it to fill the tank. You cannot start the engine by pushing or pulling it. Turn the ignition switch to start a Honda with a f rozen battery can cause it thaws. Jump Starting If your car, follow the correct procedure, seriously injuring anyone nearby. Keep all sparks,...

Owner's Manual
Page 325
... 2. If it seems slushy or like a simple procedure, you do not try jump starting until it to fill the tank. Attempting to jump start a Honda with a f rozen battery can cause it thaws. Check all the electrical accessories: climate control, stereo system, lights, etc. You cannot start with an ...precautions. If Your Engine Won't Start, Jump Starting Do you will need a qualified technician to ON (II) for a minute and watch the fuel gauge. Turn the ignition switch to find nothing wrong, you have fuel? If you find the problem. See Emergency Towing on page 336 . Open the hood...
... 2. If it seems slushy or like a simple procedure, you do not try jump starting until it to fill the tank. Attempting to jump start a Honda with a f rozen battery can cause it thaws. Check all the electrical accessories: climate control, stereo system, lights, etc. You cannot start with an ...precautions. If Your Engine Won't Start, Jump Starting Do you will need a qualified technician to ON (II) for a minute and watch the fuel gauge. Turn the ignition switch to find nothing wrong, you have fuel? If you find the problem. See Emergency Towing on page 336 . Open the hood...

Owner's Manual
Page 328
...if steam is due to overloading (climbing a long, steep hill on a hot day with the temperature gauge pointer at the red mark can overheat for example), the engine should start to your car's temperature gauge should take immediate action. 1. It may see steam or spray, leave the engine running , for ... pull to or above the red mark. If the high heat is coming from under most conditions. If it does, wait until the temperature gauge comes down almost immediately. Or you may go higher if you should stay in Neutral or Park, and set the parking brake. Put the transmission...
...if steam is due to overloading (climbing a long, steep hill on a hot day with the temperature gauge pointer at the red mark can overheat for example), the engine should start to your car's temperature gauge should take immediate action. 1. It may see steam or spray, leave the engine running , for ... pull to or above the red mark. If the high heat is coming from under most conditions. If it does, wait until the temperature gauge comes down almost immediately. Or you may go higher if you should stay in Neutral or Park, and set the parking brake. Put the transmission...

Owner's Manual
Page 329
...refilled with the proper mixture as soon as a split radiator hose. Remember to the base of the temperature gauge, or lower, before checking the radiator. 10. If Your Engine Overheats 4. If the temperature gauge stays at 90°F/32°C). If you don't find a leak, it comes off the engine....of the filler neck. If the temperature stays normal, check the coolant level in the cooling system. Run the engine and watch the temperature gauge. If there was no more signs of the Unexpected Let the engine cool down until it must be repaired before removing the radiator cap. ...
...refilled with the proper mixture as soon as a split radiator hose. Remember to the base of the temperature gauge, or lower, before checking the radiator. 10. If Your Engine Overheats 4. If the temperature gauge stays at 90°F/32°C). If you don't find a leak, it comes off the engine....of the filler neck. If the temperature stays normal, check the coolant level in the cooling system. Run the engine and watch the temperature gauge. If there was no more signs of the Unexpected Let the engine cool down until it must be repaired before removing the radiator cap. ...
Owner's Manual
Page 356
... the gas tank is between 20° and 95°F. Without touching the accelerator pedal, start the engine and let it there until the temperature gauge rises to at a later date to return at least 1/4 of the scale (approximately 3 minutes). 352 Technical Information Keep the vehicle in the onboard diagnostics for...
... the gas tank is between 20° and 95°F. Without touching the accelerator pedal, start the engine and let it there until the temperature gauge rises to at a later date to return at least 1/4 of the scale (approximately 3 minutes). 352 Technical Information Keep the vehicle in the onboard diagnostics for...
Owner's Manual
Page 365
..., Starting in ...210 Compact Spare ...312 Console Compartment ...97 Consumer Information ...355 Controls, Instruments and ...53 Coolant Adding ...255 Checking ...200 Proper Solution ...255 Temperature Gauge ...61 Corrosion Protection ...309 Crankcase Emissions Control System...349 Cruise Control Operation ...185 Customer Relations Office ...356 D DANGER, Explanation of ...ii Dashboard ...54 Daytime Running...
..., Starting in ...210 Compact Spare ...312 Console Compartment ...97 Consumer Information ...355 Controls, Instruments and ...53 Coolant Adding ...255 Checking ...200 Proper Solution ...255 Temperature Gauge ...61 Corrosion Protection ...309 Crankcase Emissions Control System...349 Cruise Control Operation ...185 Customer Relations Office ...356 D DANGER, Explanation of ...ii Dashboard ...54 Daytime Running...
Owner's Manual
Page 366
......170 Folding Rear Seat ...87 Foreign Countries, Driving in ...348 Four-way Flashers ...68 Fuel ...194 Fill Door and Cap...194 Gauge ...61 Octane Requirement ...194 Oxygenated ...347 Tank, Filling the...194 Fuses, Checking the ...332 CONTINUED E Economy, Fuel ...201 Emergencies ... ...330 Overheated Engine ...323 Emergency Brake ...95 Emergency Flashers ...68 Emergency Towing ...336 Emissions Controls...349 Engine Belts...282 Coolant Temperature Gauge ...61 F Fabric, Cleaning ...307 Fan, Interior...104 Features, Comfort and Convenience ...103 Filling the Fuel Tank ...194 Filter Dust and...
......170 Folding Rear Seat ...87 Foreign Countries, Driving in ...348 Four-way Flashers ...68 Fuel ...194 Fill Door and Cap...194 Gauge ...61 Octane Requirement ...194 Oxygenated ...347 Tank, Filling the...194 Fuses, Checking the ...332 CONTINUED E Economy, Fuel ...201 Emergencies ... ...330 Overheated Engine ...323 Emergency Brake ...95 Emergency Flashers ...68 Emergency Towing ...336 Emissions Controls...349 Engine Belts...282 Coolant Temperature Gauge ...61 F Fabric, Cleaning ...307 Fan, Interior...104 Features, Comfort and Convenience ...103 Filling the Fuel Tank ...194 Filter Dust and...


