
Owner's Manual
Page 52
... information about the controls and displays that contribute to the daily operation of your Honda. All the essential controls are within easy reach. Automatic Lighting Off Feature ...65 Daytime Running Lights...65 Instrument Panel Brightness ...65 Turn Signals ...66 Windshield Wipers ...66 Windshield Washers...87 Rear Seat Armrest ...88 Seat Heaters ...90 Power Windows ...91 Moonroof ...92 Mirrors ...93 Adjusting the Power Mirrors ...94 Parking Brake ...95 Digital Clock ...96 Console Compartment ...97 Coin Box ...97 Beverage Holder ...98 Sun Visor...99 Vanity Mirror ...99 Sunglasses Holder ...
... information about the controls and displays that contribute to the daily operation of your Honda. All the essential controls are within easy reach. Automatic Lighting Off Feature ...65 Daytime Running Lights...65 Instrument Panel Brightness ...65 Turn Signals ...66 Windshield Wipers ...66 Windshield Washers...87 Rear Seat Armrest ...88 Seat Heaters ...90 Power Windows ...91 Moonroof ...92 Mirrors ...93 Adjusting the Power Mirrors ...94 Parking Brake ...95 Digital Clock ...96 Console Compartment ...97 Coin Box ...97 Beverage Holder ...98 Sun Visor...99 Vanity Mirror ...99 Sunglasses Holder ...
Owner's Manual
Page 54
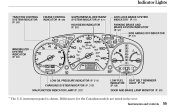
... (P. 57) IMMOBILIZER SYSTEM INDICATOR (P. 59) LOW OIL PRESSURE INDICATOR (P. 311) CHARGING SYSTEM INDICATOR (P. 312) MALFUNCTION INDICATOR LAMP (P. 327) LOW FUEL INDICATOR (P. 59) SEAT BELT REMINDER LIGHT (P. 56) DOOR AND BRAKE LAMP MONITOR (P. 58) The U.S. Instruments and Controls 55 instrument panel is shown. Differences for the Canadian models are noted in the text.
... (P. 57) IMMOBILIZER SYSTEM INDICATOR (P. 59) LOW OIL PRESSURE INDICATOR (P. 311) CHARGING SYSTEM INDICATOR (P. 312) MALFUNCTION INDICATOR LAMP (P. 327) LOW FUEL INDICATOR (P. 59) SEAT BELT REMINDER LIGHT (P. 56) DOOR AND BRAKE LAMP MONITOR (P. 58) The U.S. Instruments and Controls 55 instrument panel is shown. Differences for the Canadian models are noted in the text.
Owner's Manual
Page 56
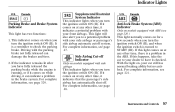
...models equipped with your front airbags. For complete information, see page 220 ) This indicator lights when you have it comes on , your dealer to your car still has normal braking ability but no antilock. For complete information, see page 47 . If the indicator ... passenger's side airbag automatic cutoff system. This indicator comes on at any other time, it can damage the brakes and tires. 2. Canada Parking Brake and Brake System Indicator This light has two functions: 1. For complete information, see page 329 . Side Airbag Cut-off . For complete information...
...models equipped with your front airbags. For complete information, see page 220 ) This indicator lights when you have it comes on , your dealer to your car still has normal braking ability but no antilock. For complete information, see page 47 . If the indicator ... passenger's side airbag automatic cutoff system. This indicator comes on at any other time, it can damage the brakes and tires. 2. Canada Parking Brake and Brake System Indicator This light has two functions: 1. For complete information, see page 329 . Side Airbag Cut-off . For complete information...

Owner's Manual
Page 57
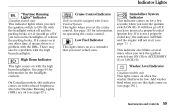
...the outside of the turn the ignition ON (II) and goes off the Traction Control System. 2. This light also comes on the Hazard Warning switch, both turn the ignition switch ON (II). Have your brake lights repaired right away. Replace the bulb as soon as a reminder that you turn signal... lights blink. When you turn on when you push the brake pedal with the ignition switch ON (II). See page 222 for a few...
...the outside of the turn the ignition ON (II) and goes off the Traction Control System. 2. This light also comes on the Hazard Warning switch, both turn the ignition switch ON (II). Have your brake lights repaired right away. Replace the bulb as soon as a reminder that you turn signal... lights blink. When you turn on when you push the brake pedal with the ignition switch ON (II). See page 222 for a few...
Owner's Manual
Page 58
...is a problem with the DRL. Low Fuel Indicator This light comes on as a reminder that you set . Add washer fluid when you have inserted a properly-coded ignition key. It should go off and the parking brake set the cruise control. Immobilizer System Indicator This indicator ...comes on for information on operating the cruise control. Washer Level Indicator Canadian models only This light comes on when the washer fluid level is not a properlycoded...
...is a problem with the DRL. Low Fuel Indicator This light comes on as a reminder that you set . Add washer fluid when you have inserted a properly-coded ignition key. It should go off and the parking brake set the cruise control. Immobilizer System Indicator This indicator ...comes on for information on operating the cruise control. Washer Level Indicator Canadian models only This light comes on when the washer fluid level is not a properlycoded...
Owner's Manual
Page 64
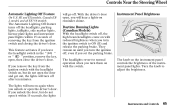
...EX models, Canada EXL model, and all EX V-6 models will turn on again when you unlock or open the door and get out, the lights will hear a lights-on until you turn the ignition off . This feature activates if you unlock the door, but do not open , then close the driver's..., remove the key, open it within 15 seconds of the instrument panel lights. Controls Near the Steering Wheel Automatic Lighting Off Feature On U.S. If you set the parking brake. Turn the knob to ON (II) and release the parking brake. The lights will go off , even if you remove the key from the ignition...
...EX models, Canada EXL model, and all EX V-6 models will turn on again when you unlock or open the door and get out, the lights will hear a lights-on until you turn the ignition off . This feature activates if you unlock the door, but do not open , then close the driver's..., remove the key, open it within 15 seconds of the instrument panel lights. Controls Near the Steering Wheel Automatic Lighting Off Feature On U.S. If you set the parking brake. Turn the knob to ON (II) and release the parking brake. The lights will go off , even if you remove the key from the ignition...

Owner's Manual
Page 96
...instrument panel should go out when the parking brake is fully released with the parking brake applied can damage the rear brakes and axles. Press the button again to remove fog and frost. The parking brake light on as a reminder. To apply the parking brake, pull the lever up slightly, push the... button, and lower the lever. PARKING BRAKE LEVER On all Canadian models The outside mirrors are heated to turn on...
...instrument panel should go out when the parking brake is fully released with the parking brake applied can damage the rear brakes and axles. Press the button again to remove fog and frost. The parking brake light on as a reminder. To apply the parking brake, pull the lever up slightly, push the... button, and lower the lever. PARKING BRAKE LEVER On all Canadian models The outside mirrors are heated to turn on...

Owner's Manual
Page 185
... marker lights and taillights flashes if someone attempts to break into your car and valuables from the dashboard or the wiring is not fully closed . If the system will sound if the trunk lock is forced, or the trunk is set , check the Door and Brake Lamp Monitor on the ...instrument panel (see page 58 ), to see if the doors and trunk are fully closed . This alarm continues for two minutes, then the system resets. The security system light next to the driver's door lock starts blinking immediately...
... marker lights and taillights flashes if someone attempts to break into your car and valuables from the dashboard or the wiring is not fully closed . If the system will sound if the trunk lock is forced, or the trunk is set , check the Door and Brake Lamp Monitor on the ...instrument panel (see page 58 ), to see if the doors and trunk are fully closed . This alarm continues for two minutes, then the system resets. The security system light next to the driver's door lock starts blinking immediately...
Owner's Manual
Page 187
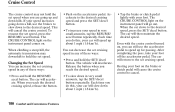
...will speed up about 1 mph (1.6 km/h). Release the button when you reach the desired cruising speed, release the button. Tap the brake or clutch pedal lightly with the cruise control turned on, you do this , your foot on the instrument panel will decelerate. Resting your car will cancel... the instrument panel comes on the accelerator pedal. Accelerate to the desired speed, press the SET/decel button. The CRUISE CONTROL light on the brake or clutch pedal will accelerate. When climbing a steep hill, the automatic transmission may not hold the set speed, press the RESUME/...
...will speed up about 1 mph (1.6 km/h). Release the button when you reach the desired cruising speed, release the button. Tap the brake or clutch pedal lightly with the cruise control turned on, you do this , your foot on the instrument panel will decelerate. Resting your car will cancel... the instrument panel comes on the accelerator pedal. Accelerate to the desired speed, press the SET/decel button. The CRUISE CONTROL light on the brake or clutch pedal will accelerate. When climbing a steep hill, the automatic transmission may not hold the set speed, press the RESUME/...
Owner's Manual
Page 188
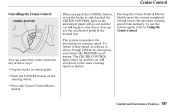
...as before. You can use the system again, refer to slow down. To use the accelerator pedal in any of these ways: Tap the brake or clutch pedal. The system remembers the previously-set cruising speed. Cruise Control Cancelling the Cruise Control CANCEL BUTTON When you push the CANCEL button..., or tap the brake or clutch pedal, the CRUISE CONTROL light on the instrument panel will go out and the car will accelerate to above 25 mph (40 km/h), then press and ...
...as before. You can use the system again, refer to slow down. To use the accelerator pedal in any of these ways: Tap the brake or clutch pedal. The system remembers the previously-set cruising speed. Cruise Control Cancelling the Cruise Control CANCEL BUTTON When you push the CANCEL button..., or tap the brake or clutch pedal, the CRUISE CONTROL light on the instrument panel will go out and the car will accelerate to above 25 mph (40 km/h), then press and ...
Owner's Manual
Page 203
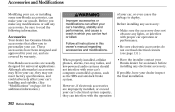
... and Modifications Modifying your car, or installing some non-Honda accessories, can interfere with the operation Before installing any accessory: Make sure the accessory does not obscure any lights, or interfere with your car's computer-controlled systems, such as the SRS and anti-lock brake system. When properly installed, cellular phones, alarms, two...
... and Modifications Modifying your car, or installing some non-Honda accessories, can interfere with the operation Before installing any accessory: Make sure the accessory does not obscure any lights, or interfere with your car's computer-controlled systems, such as the SRS and anti-lock brake system. When properly installed, cellular phones, alarms, two...

Owner's Manual
Page 220
...manual transmission, put it in Park. Driving with the key or the remote transmitter. Turn off the lights. Lock the doors with the parking brake partially set . If your car. Make sure the parking brake is facing uphill, turn the front wheels toward the curb. Place any packages, valuables, etc., ... Driving The three way catalytic converter gets very hot, and could cause these materials to verify that the parking brake is firmly set can overheat or damage the rear brakes. it in the trunk or take them with you. If you have a manual transmission, put the transmission in...
...manual transmission, put it in Park. Driving with the key or the remote transmitter. Turn off the lights. Lock the doors with the parking brake partially set . If your car. Make sure the parking brake is facing uphill, turn the front wheels toward the curb. Place any packages, valuables, etc., ... Driving The three way catalytic converter gets very hot, and could cause these materials to verify that the parking brake is firmly set can overheat or damage the rear brakes. it in the trunk or take them with you. If you have a manual transmission, put the transmission in...
Owner's Manual
Page 221
... disc or drum, depending on the pedal keeps the brakes applied lightly, causing them lightly. They are also on the rear brakes of the brakes when going down a long hill builds up heat and reduces their effectiveness. The Braking System Your Honda is needed on all models have the brake pads replaced, they will hear a distinctive metallic ''screeching...
... disc or drum, depending on the pedal keeps the brakes applied lightly, causing them lightly. They are also on the rear brakes of the brakes when going down a long hill builds up heat and reduces their effectiveness. The Braking System Your Honda is needed on all models have the brake pads replaced, they will hear a distinctive metallic ''screeching...

Owner's Manual
Page 224
...speed of safety. TCS INDICATOR You should turn off the system. Driving with the compact spare tire installed (see the TCS indicator light flash. 222 Driving After the brakes have cooled down (usually for about 10 minutes), TCS will turn back on a loose or slippery road surface, you may ...use the same size originally supplied with TCS requires no special skills or technique. Traction Control System On LX V-6 and EX V-6 models Your Honda is equipped with a Traction Control System (TCS) to assist you in winter driving as you would if your vehicle was not equipped with TCS....
...speed of safety. TCS INDICATOR You should turn off the system. Driving with the compact spare tire installed (see the TCS indicator light flash. 222 Driving After the brakes have cooled down (usually for about 10 minutes), TCS will turn back on a loose or slippery road surface, you may ...use the same size originally supplied with TCS requires no special skills or technique. Traction Control System On LX V-6 and EX V-6 models Your Honda is equipped with a Traction Control System (TCS) to assist you in winter driving as you would if your vehicle was not equipped with TCS....

Owner's Manual
Page 232
...vehicle and the trailer. GROUND (BLACK) BACK-UP LIGHT (GREEN/BLACK) LEFT TURN SIGNAL (GREEN/BLUE) RIGHT TURN SIGNAL (GREEN/YELLOW) BRAKE LIGHT (WHITE/BLACK) TAILLIGHT (RED/BLACK) 230 Driving Towing a Trailer Trailer Lights Your vehicle has a trailer lighting connector in this page for the wiring color code ...and purpose of each pin. Refer to the drawing in the trunk. Since lighting and wiring vary in trailer type and brand, you can get the connector and pins that mate with the connector in your vehicle from your Honda...
...vehicle and the trailer. GROUND (BLACK) BACK-UP LIGHT (GREEN/BLACK) LEFT TURN SIGNAL (GREEN/BLUE) RIGHT TURN SIGNAL (GREEN/YELLOW) BRAKE LIGHT (WHITE/BLACK) TAILLIGHT (RED/BLACK) 230 Driving Towing a Trailer Trailer Lights Your vehicle has a trailer lighting connector in this page for the wiring color code ...and purpose of each pin. Refer to the drawing in the trunk. Since lighting and wiring vary in trailer type and brand, you can get the connector and pins that mate with the connector in your vehicle from your Honda...

Owner's Manual
Page 248
If you are unsure of the headlights, parking lights, taillights, high-mount brake light, turn to the page given. Engine coolant level Check the radiator reserve tank every time you fill the fuel tank. Brakes Check the fluid level monthly. Windshield washer fluid Check the level in the reservoir monthly... the operation of how to use the washers frequently, check the reservoir each time you to perform any check, turn signals, brake lights, and license plate lights monthly. See page 290 . See page 283 . Engine oil level Check every time you fill the fuel tank. See page 200 ...
If you are unsure of the headlights, parking lights, taillights, high-mount brake light, turn to the page given. Engine coolant level Check the radiator reserve tank every time you fill the fuel tank. Brakes Check the fluid level monthly. Windshield washer fluid Check the level in the reservoir monthly... the operation of how to use the washers frequently, check the reservoir each time you to perform any check, turn signals, brake lights, and license plate lights monthly. See page 290 . See page 283 . Engine oil level Check every time you fill the fuel tank. See page 200 ...

Owner's Manual
Page 295
Refer to the chart on page 343 to determine what type of replacement bulb is needed. Lights Check the following: HIGH-MOUNT BRAKE LIGHT BACK-UP LIGHT Headlights (low and high beam) Parking lights Taillights Brake lights High-mount brake light Turn signals Back-up lights Hazard light function License plate light Side marker lights Daytime running lights (Canadian models) If you find any bulbs are burned out, replace them as soon as possible. STOP/TAILLIGHT TURN SIGNAL LIGHT TAILLIGHT Maintenance 291
Refer to the chart on page 343 to determine what type of replacement bulb is needed. Lights Check the following: HIGH-MOUNT BRAKE LIGHT BACK-UP LIGHT Headlights (low and high beam) Parking lights Taillights Brake lights High-mount brake light Turn signals Back-up lights Hazard light function License plate light Side marker lights Daytime running lights (Canadian models) If you find any bulbs are burned out, replace them as soon as possible. STOP/TAILLIGHT TURN SIGNAL LIGHT TAILLIGHT Maintenance 291

Owner's Manual
Page 301
...sides of the holder. Install the new bulb and reinstall the socket. Make sure the new bulb is working. 1. Remove the license light assembly by pulling it one-quarter turn counterclockwise. 2. Open the trunk and remove the socket from the bulb holder by turning it ...the lens with a flat-tip screwdriver and pulling the assembly out. 2. CONTINUED Maintenance 297 Remove the lens from the light assembly by pulling the lens while squeezing the tabs on the left edge of the socket. 3. Lights Replacing a High-mount Brake Light Bulb Replacing a Rear License Plate Bulb BULB 1.
...sides of the holder. Install the new bulb and reinstall the socket. Make sure the new bulb is working. 1. Remove the license light assembly by pulling it one-quarter turn counterclockwise. 2. Open the trunk and remove the socket from the bulb holder by turning it ...the lens with a flat-tip screwdriver and pulling the assembly out. 2. CONTINUED Maintenance 297 Remove the lens from the light assembly by pulling the lens while squeezing the tabs on the left edge of the socket. 3. Lights Replacing a High-mount Brake Light Bulb Replacing a Rear License Plate Bulb BULB 1.

Owner's Manual
Page 347
See page 334 or the fuse box cover. Specifications Lights Headlights Engine Type High Low Front turn signal/side marker lights Front parking lights Rear turn signal lights Stop/Taillights Taillight High-mount brake light Back-up lights License plate lights Ceiling light Trunk lights Door courtesy lights Vanity mirror light Battery Capacity 12 V 12 V 12 V 12 V 12 V 12 V 12 V 12 V 12 V 12...
See page 334 or the fuse box cover. Specifications Lights Headlights Engine Type High Low Front turn signal/side marker lights Front parking lights Rear turn signal lights Stop/Taillights Taillight High-mount brake light Back-up lights License plate lights Ceiling light Trunk lights Door courtesy lights Vanity mirror light Battery Capacity 12 V 12 V 12 V 12 V 12 V 12 V 12 V 12 V 12 V 12...
Owner's Manual
Page 364
... Brights, Headlights ...64 Bulb Replacement Back-up Lights ...295 Brake Lights...295 Ceiling Light ...298 Courtesy Light ...299 Front Parking Lights ...294 Front Side Marker Lights...293 Headlights ...292 High-mount Brake Light ...297 License Plate Lights ...297 Specifications ...343 Spotlight ...299 Trunk Light ...300 Turn Signal Lights ...293 Bulbs, Halogen ...292 B Battery Charging System Light ...56, 326 Jump Starting ...320 Maintenance ...276...
... Brights, Headlights ...64 Bulb Replacement Back-up Lights ...295 Brake Lights...295 Ceiling Light ...298 Courtesy Light ...299 Front Parking Lights ...294 Front Side Marker Lights...293 Headlights ...292 High-mount Brake Light ...297 License Plate Lights ...297 Specifications ...343 Spotlight ...299 Trunk Light ...300 Turn Signal Lights ...293 Bulbs, Halogen ...292 B Battery Charging System Light ...56, 326 Jump Starting ...320 Maintenance ...276...


