

Owner's Manual
Page 4
...'s Airbag Works...15 How the SRS Indicator Light Works...16 System Service...16 System Service Precautions...17 Additional Safety Information...18 Seat-back Position...18 Head Restraint Position...18 Door Locks...19 Storing Cargo Safely...19 Driving with Pets...19 Child Safety...20 Where Should Children Sit?...20 Important Safety Reminders...
...'s Airbag Works...15 How the SRS Indicator Light Works...16 System Service...16 System Service Precautions...17 Additional Safety Information...18 Seat-back Position...18 Head Restraint Position...18 Door Locks...19 Storing Cargo Safely...19 Driving with Pets...19 Child Safety...20 Where Should Children Sit?...20 Important Safety Reminders...
Owner's Manual
Page 5
.... Infants and small children are properly adjusted (see pages 18 and 55 ). The seats, head restraints, and door locks also play a role in severe crashes. Remember, however, that no...loose items that could be thrown around and hurt someone during a crash. Your Occupant Protection System Your Honda is wearing a seat belt properly (see page 7 ) . The other features that can reduce injuries... the following these guidelines, you and your passenger during a severe frontal collision, your Odyssey has a Supplemental Restraint System (SRS) with your passengers in the car is equipped ...
.... Infants and small children are properly adjusted (see pages 18 and 55 ). The seats, head restraints, and door locks also play a role in severe crashes. Remember, however, that no...loose items that could be thrown around and hurt someone during a crash. Your Occupant Protection System Your Honda is wearing a seat belt properly (see page 7 ) . The other features that can reduce injuries... the following these guidelines, you and your passenger during a severe frontal collision, your Odyssey has a Supplemental Restraint System (SRS) with your passengers in the car is equipped ...
Owner's Manual
Page 13
...the driver and another in a crash. The airbags will detect rapid deceleration and signal the control unit to absorb crash energy and help protect the head and chest of serious injury or death in a crash, even if you and your car's electrical system is ON (II). Not wearing seat belts... deflate. An indicator light on the instrument panel to alert you to a possible problem with a Supplemental Restraint System (SRS) to help keep the head and chest of the driver and front passenger from detection to , the protection offered by the airbag inflators, or realize what has happened.
...the driver and another in a crash. The airbags will detect rapid deceleration and signal the control unit to absorb crash energy and help protect the head and chest of serious injury or death in a crash, even if you and your car's electrical system is ON (II). Not wearing seat belts... deflate. An indicator light on the instrument panel to alert you to a possible problem with a Supplemental Restraint System (SRS) to help keep the head and chest of the driver and front passenger from detection to , the protection offered by the airbag inflators, or realize what has happened.

Owner's Manual
Page 15
... the airbag has been fully inflated. After the bag completely inflates, it immediately starts deflating so it can reduce serious injuries and even save your head and chest. Driver and Passenger Safety So, while it won't interfere with considerable force. Supplemental Restraint System How the Driver's Airbag Works To do its...
... the airbag has been fully inflated. After the bag completely inflates, it immediately starts deflating so it can reduce serious injuries and even save your head and chest. Driver and Passenger Safety So, while it won't interfere with considerable force. Supplemental Restraint System How the Driver's Airbag Works To do its...

Owner's Manual
Page 19
... The seat belts and airbags are obviously important parts of your seat belt. If you recline a seat-back, you and your life. Head restraints can also increase your safety and possibly even save your passengers to adjust the seat-back, see page 56. For information on adjusting... the head restraints, see page 55. Head Restraint Position Driver and Passenger Safety Seat-back Position The seat-backs should know that you from the seat belts. In addition...
... The seat belts and airbags are obviously important parts of your seat belt. If you recline a seat-back, you and your life. Head restraints can also increase your safety and possibly even save your passengers to adjust the seat-back, see page 56. For information on adjusting... the head restraints, see page 55. Head Restraint Position Driver and Passenger Safety Seat-back Position The seat-backs should know that you from the seat belts. In addition...

Owner's Manual
Page 32
Instruments and Controls This section gives information about the controls and displays that contribute to the daily operation of your Honda. Daytime Running Lights...40 Instrument Panel Brightness...41 Turn Signals...41 Windshield Wipers...42 Windshield Washers...42 Rear Window Wiper and ...Childproof Door Locks...52 Tailgate...52 Glove Box...53 Seats...54 Passenger Seating...54 Seat Adjustments...54 Driver's Seat Power Height Adjustment...55 Head Restraints...56 Third Seat Access...56 Removing the Second Seats in the Six-Passenger Model...57 Folding the Second Seats in the Seven-Passenger...
Instruments and Controls This section gives information about the controls and displays that contribute to the daily operation of your Honda. Daytime Running Lights...40 Instrument Panel Brightness...41 Turn Signals...41 Windshield Wipers...42 Windshield Washers...42 Rear Window Wiper and ...Childproof Door Locks...52 Tailgate...52 Glove Box...53 Seats...54 Passenger Seating...54 Seat Adjustments...54 Driver's Seat Power Height Adjustment...55 Head Restraints...56 Third Seat Access...56 Removing the Second Seats in the Six-Passenger Model...57 Folding the Second Seats in the Seven-Passenger...

Owner's Manual
Page 57
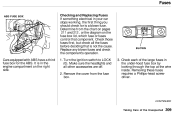
...Your Honda has adjustable head restraints in place and adjusted properly before driving. Third Seat Access Six-passenger model KNOB The head restraints are in all the outside seating positions. Adjust the head restraint so the top is even with the tops of neck injuries. Driving your vehicle without head restraints... to adjust it while driving. You need both hands to help reduce the risk of your passengers in a crash. Make sure the head restraints are designed to adjust the restraint. To lower the restraint, press the release button and push the restraint down. To raise it...
...Your Honda has adjustable head restraints in place and adjusted properly before driving. Third Seat Access Six-passenger model KNOB The head restraints are in all the outside seating positions. Adjust the head restraint so the top is even with the tops of neck injuries. Driving your vehicle without head restraints... to adjust it while driving. You need both hands to help reduce the risk of your passengers in a crash. Make sure the head restraints are designed to adjust the restraint. To lower the restraint, press the release button and push the restraint down. To raise it...

Owner's Manual
Page 60
... lever and pivot the seat forward. Reverse this : 1. Hook the ring on the fastening strap to the upright position. CONTINUED Instruments and Controls Remove the head restraints. Make sure you store the fastening strap properly, and that the seat is secure. Seats SEAT-BACK ANGLE ADJUSTMENT LEVER RIVET Reclining the Second...
... lever and pivot the seat forward. Reverse this : 1. Hook the ring on the fastening strap to the upright position. CONTINUED Instruments and Controls Remove the head restraints. Make sure you store the fastening strap properly, and that the seat is secure. Seats SEAT-BACK ANGLE ADJUSTMENT LEVER RIVET Reclining the Second...

Owner's Manual
Page 61
...back angle adjustment lever and pivot the seat-back backward. Reverse this procedure to return the second seat to the upright position. Remove the head restraints. Store them in the pocket in All Models ANGLE ADJUSTMENT LEVER SLIDE LEVER 2. Release the lever when the seatback is even with ...third seat. To fold the third seat: 1. Push the seat-back forward. Instruments and Controls KNOB To create more cargo space, you install the head restraints before driving (see page 56). Seats Folding the Third Seat in the left side panel. 2. Make sure you can fold the third seat...
...back angle adjustment lever and pivot the seat-back backward. Reverse this procedure to return the second seat to the upright position. Remove the head restraints. Store them in the pocket in All Models ANGLE ADJUSTMENT LEVER SLIDE LEVER 2. Release the lever when the seatback is even with ...third seat. To fold the third seat: 1. Push the seat-back forward. Instruments and Controls KNOB To create more cargo space, you install the head restraints before driving (see page 56). Seats Folding the Third Seat in the left side panel. 2. Make sure you can fold the third seat...

Owner's Manual
Page 62
Turn the knob on the back of the recess by pulling on the handle. Reinstall the head restraints. To return the seat to the upright position: 1. Instruments and Controls Turn the knob on the seat-back and pull the seat-back upright. Pivot the seat into the floor recess. Pull the seat out of the seat cushion while you pull the entire seat towards you. Pivot the seat forward all the way. 2. Seats KNOB KNOB 3. Make sure the seat is securely locked in place. 3.
Turn the knob on the back of the recess by pulling on the handle. Reinstall the head restraints. To return the seat to the upright position: 1. Instruments and Controls Turn the knob on the seat-back and pull the seat-back upright. Pivot the seat into the floor recess. Pull the seat out of the seat cushion while you pull the entire seat towards you. Pivot the seat forward all the way. 2. Seats KNOB KNOB 3. Make sure the seat is securely locked in place. 3.

Owner's Manual
Page 157
... box on each pin. Remove the air duct from the air cleaner housing cover. Cleaning (Severe Conditions) Clean the air cleaner element by pulling the head on the passenger's side of the engine compartment. If you do not have access to compressed air (such as a service station), ask your... Honda dealer to normal air flow. Remove the two pins holding the air intake cover by blowing compressed air through it : 1. Maintenance Air Cleaner The air ...
... box on each pin. Remove the air duct from the air cleaner housing cover. Cleaning (Severe Conditions) Clean the air cleaner element by pulling the head on the passenger's side of the engine compartment. If you do not have access to compressed air (such as a service station), ask your... Honda dealer to normal air flow. Remove the two pins holding the air intake cover by blowing compressed air through it : 1. Maintenance Air Cleaner The air ...

Owner's Manual
Page 158
... air cleaner housing. 6. Remove the maintenance hole cap so you can reach the right front bolt through the hole. 4. Reinstall the air duct on the heads until they lock. MAINTENANCE HOLE CAP BOLTS AIR CLEANER ELEMENT 3.
... air cleaner housing. 6. Remove the maintenance hole cap so you can reach the right front bolt through the hole. 4. Reinstall the air duct on the heads until they lock. MAINTENANCE HOLE CAP BOLTS AIR CLEANER ELEMENT 3.

Owner's Manual
Page 160
Install the spark plug cap. 7. Spark Plugs NOTICE Tighten the spark plugs carefully. Specifications: NGK: Nippondenso: ZFR5F-11 KJ16CR-L11 Spark Plug Gap: 1.1 mm (0.04 in the cylinder head. Torque the spark plug. (If you do not have a torque wrench, tighten the spark plug 2/3 turn after it contacts the cylinder head.) Tightening torque: 18 N.m (1.8 kgf.m , 13 Ibf.ft) Maintenance Overtightening can overheat and damage the engine. Repeat this procedure for the other three spark plugs. 5. A spark plug that is too loose can cause damage to the threads in ) 6.
Install the spark plug cap. 7. Spark Plugs NOTICE Tighten the spark plugs carefully. Specifications: NGK: Nippondenso: ZFR5F-11 KJ16CR-L11 Spark Plug Gap: 1.1 mm (0.04 in the cylinder head. Torque the spark plug. (If you do not have a torque wrench, tighten the spark plug 2/3 turn after it contacts the cylinder head.) Tightening torque: 18 N.m (1.8 kgf.m , 13 Ibf.ft) Maintenance Overtightening can overheat and damage the engine. Repeat this procedure for the other three spark plugs. 5. A spark plug that is too loose can cause damage to the threads in ) 6.

Owner's Manual
Page 175
Check the vertical angle gauge. The bubble should be made using a Phillips-head screwdriver to realign it with its "0" mark as described, an adjustment can be centered underneath the longest scribe mark on the gauge. 6. Please refer to align, have your Honda dealer inspect the car for body damage suspension problems. Maintenance If you cannot get an indicator to the illustrations. 7. Lights VERTICAL ADJUSTMENT VERTICAL ANGLE GAUGE HORIZONTAL ADJUSTMENT 5. If either indicator is not aligned with the "0" mark.
Check the vertical angle gauge. The bubble should be made using a Phillips-head screwdriver to realign it with its "0" mark as described, an adjustment can be centered underneath the longest scribe mark on the gauge. 6. Please refer to align, have your Honda dealer inspect the car for body damage suspension problems. Maintenance If you cannot get an indicator to the illustrations. 7. Lights VERTICAL ADJUSTMENT VERTICAL ANGLE GAUGE HORIZONTAL ADJUSTMENT 5. If either indicator is not aligned with the "0" mark.

Owner's Manual
Page 177
... clockwise to lock it slides out of the fender. 2. Align the four tabs and push on the front edge until it in place. 7. Use a Phillips-head screwdriver to remove it snaps into place. Move the side marker light assembly forward until it from the top of the body. 3. Lights Replacing the...
... clockwise to lock it slides out of the fender. 2. Align the four tabs and push on the front edge until it in place. 7. Use a Phillips-head screwdriver to remove it snaps into place. Move the side marker light assembly forward until it from the top of the body. 3. Lights Replacing the...
Owner's Manual
Page 207
... to LOCK (0). Remove the cover from the chart on pages 211 and 212 , or the diagram on the right side. 3. Removing these fuses requires a Phillips-head screwdriver. It is in the engine compartment on the fuse box lid, which fuse or fuses control that is a blown fuse. Check each of the...
... to LOCK (0). Remove the cover from the chart on pages 211 and 212 , or the diagram on the right side. 3. Removing these fuses requires a Phillips-head screwdriver. It is in the engine compartment on the fuse box lid, which fuse or fuses control that is a blown fuse. Check each of the...

Owner's Manual
Page 232
......157 Windshield Washer Fluid...154 Additional Safety Information...18 Door Locks...19 Driving with Pets...19 Head Restraint Position...18 Seat-back Position...18 Storing Cargo Safely...19 Additives, Engine Oil...148 Adjustments Mirrors...64 Head Restraints...56 Seats...54 Steering Wheel...44 Battery Charging System Light...34 Jump Starting...200 Maintenance...
......157 Windshield Washer Fluid...154 Additional Safety Information...18 Door Locks...19 Driving with Pets...19 Head Restraint Position...18 Seat-back Position...18 Storing Cargo Safely...19 Additives, Engine Oil...148 Adjustments Mirrors...64 Head Restraints...56 Seats...54 Steering Wheel...44 Battery Charging System Light...34 Jump Starting...200 Maintenance...
Owner's Manual
Page 235
......40 High Beam Indicator...36 High Beams, Turning on...40 Low Beams, Turning on...40 Reminder Chime...40 Replacing Halogen Bulbs ...177 Turning on...40 Head Restraints...56 Heating and Cooling...74 Identification Number, Vehicle.. 216 If Your Car Has to be Towed...213 Ignition Keys...49 Switch...49 Timing Control...
......40 High Beam Indicator...36 High Beams, Turning on...40 Low Beams, Turning on...40 Reminder Chime...40 Replacing Halogen Bulbs ...177 Turning on...40 Head Restraints...56 Heating and Cooling...74 Identification Number, Vehicle.. 216 If Your Car Has to be Towed...213 Ignition Keys...49 Switch...49 Timing Control...

Owner's Manual
Page 237
... Belt...7 Wearing the Lap Belt...9 Seats...54 Adjustments ...54 Driver's Seat Power Height Adjustment...55 Folding the Second Seats...58 Folding the Third Seats...60 Head Restraints ...56 Passenger Seating...54
... Belt...7 Wearing the Lap Belt...9 Seats...54 Adjustments ...54 Driver's Seat Power Height Adjustment...55 Folding the Second Seats...58 Folding the Third Seats...60 Head Restraints ...56 Passenger Seating...54
