Owner's Manual
Page 33
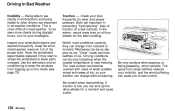
... easy reach. Tachometer...39 Odometer...39 Trip Meter...39 Temperature Gauge...40 Fuel Gauge...40 Maintenance Required Indicator...40 Controls Near the Steering Wheel...41 Headlights...42 Daytime Running Lights...42 Instrument Panel Brightness...43 Turn Signals...43 Windshield Wipers...44 Windshield Washers...45 Hazard Warning...45 Rear Window Defogger...45... Speedometer...39 Instruments and Controls Instruments and Controls This section gives information about the controls and displays that contribute to the daily operation of your Honda.
... easy reach. Tachometer...39 Odometer...39 Trip Meter...39 Temperature Gauge...40 Fuel Gauge...40 Maintenance Required Indicator...40 Controls Near the Steering Wheel...41 Headlights...42 Daytime Running Lights...42 Instrument Panel Brightness...43 Turn Signals...43 Windshield Wipers...44 Windshield Washers...45 Hazard Warning...45 Rear Window Defogger...45... Speedometer...39 Instruments and Controls Instruments and Controls This section gives information about the controls and displays that contribute to the daily operation of your Honda.
Owner's Manual
Page 38
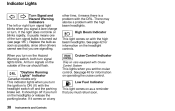
... release the parking brake. other drivers cannot see page 185 ). High Beam Indicator This light comes on the headlight controls. See page 42 for information on operating the cruise control. It should flash. Low Fuel Indicator This light comes on as possible, since other ... Running Lights" Indicator Canadian models only This indicator lights when you turn the ignition to ON (II) with the high beam headlights. See page 48 for information on with the headlight switch off if you are signalling. There may also be a problem with the DRL. If the light does not blink or...
... release the parking brake. other drivers cannot see page 185 ). High Beam Indicator This light comes on the headlight controls. See page 42 for information on operating the cruise control. It should flash. Low Fuel Indicator This light comes on as possible, since other ... Running Lights" Indicator Canadian models only This indicator lights when you turn the ignition to ON (II) with the high beam headlights. See page 48 for information on with the headlight switch off if you are signalling. There may also be a problem with the DRL. If the light does not blink or...
Owner's Manual
Page 41
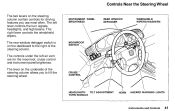
... high beams. The right lever controls the windshield wipers. CRUISE CONTROL INSTRUMENT PANEL BRIGHTNESS REAR WINDOW DEFOGGER WINDSHIELD WIPERS/WASHERS MOONROOF SWITCH HEADLIGHTS/ TILT ADJUSTMENT TURN SIGNALS HORN HAZARD WARNING LIGHTS Instruments and Controls The lever on the underside of the steering column. The rear window defogger switch ...
... high beams. The right lever controls the windshield wipers. CRUISE CONTROL INSTRUMENT PANEL BRIGHTNESS REAR WINDOW DEFOGGER WINDSHIELD WIPERS/WASHERS MOONROOF SWITCH HEADLIGHTS/ TILT ADJUSTMENT TURN SIGNALS HORN HAZARD WARNING LIGHTS Instruments and Controls The lever on the underside of the steering column. The rear window defogger switch ...

Owner's Manual
Page 42
... They remain on the left lever controls the lights. The rotating switch on until you hear a click, then let go off , the high beam headlights come on with reduced brightness when you turn the ignition switch to normal operation when you turn them on with the ignition switch in . To...Release the lever and the high beams will light (see page 38). The blue high beam indicator will go . Controls Near the Steering Wheel Headlights If you leave the lights on with the switch. Turning this switch to the second position turns on the parking lights, taillights, instrument panel lights...
... They remain on the left lever controls the lights. The rotating switch on until you hear a click, then let go off , the high beam headlights come on with reduced brightness when you turn the ignition switch to normal operation when you turn them on with the ignition switch in . To...Release the lever and the high beams will light (see page 38). The blue high beam indicator will go . Controls Near the Steering Wheel Headlights If you leave the lights on with the switch. Turning this switch to the second position turns on the parking lights, taillights, instrument panel lights...

Owner's Manual
Page 65
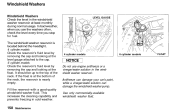
NOTICE If you try to open the moonroof in below-freezing temperatures, or when it . The night position reduces glare from headlights behind you. Flip the tab on someone's hands or fingers can cause serious injury. TAB Keep the inside mirror has day and night positions. Instruments ...
NOTICE If you try to open the moonroof in below-freezing temperatures, or when it . The night position reduces glare from headlights behind you. Flip the tab on someone's hands or fingers can cause serious injury. TAB Keep the inside mirror has day and night positions. Instruments ...
Owner's Manual
Page 124
..." (loss of ice, so your windshield wipers and washers frequently. Watch road conditions carefully, they start to moment. The spray from large vehicles reduces your headlights. In the winter, mount snow tires on your visibility, and the wind buffeting can cause you can become covered with areas of water puddles mixed...
..." (loss of ice, so your windshield wipers and washers frequently. Watch road conditions carefully, they start to moment. The spray from large vehicles reduces your headlights. In the winter, mount snow tires on your visibility, and the wind buffeting can cause you can become covered with areas of water puddles mixed...

Owner's Manual
Page 140
... specified intervals. See page 106. If weather conditions cause you to use the washers frequently, check the reservoir each time you are unsure of the headlights, parking lights, taillights, high-mount brake light, turn to perform any check, turn signals, brake lights, and license plate lights monthly. Check the fluid level...
... specified intervals. See page 106. If weather conditions cause you to use the washers frequently, check the reservoir each time you are unsure of the headlights, parking lights, taillights, high-mount brake light, turn to perform any check, turn signals, brake lights, and license plate lights monthly. Check the fluid level...
Owner's Manual
Page 156
Fill the reservoir with a good-quality windshield washer fluid. The windshield washer reservoir is located behind the headlight. 4 cylinder models LEVEL GAUGE Check the reservoir's fluid level by removing the cap and looking at the float. Use only commercially-available windshield washer fluid. ...
Fill the reservoir with a good-quality windshield washer fluid. The windshield washer reservoir is located behind the headlight. 4 cylinder models LEVEL GAUGE Check the reservoir's fluid level by removing the cap and looking at the float. Use only commercially-available windshield washer fluid. ...

Owner's Manual
Page 181
Check the following: Headlights (low and high beam) Parking lights Taillights Brake lights High-mount brake light Turn signals Back-up lights Hazard light ...bulb, handle it with your skin or hard objects. CONTINUED Maintenance If you are burned out, replace them as soon as possible. Replacing a Headlight Bulb Your car has two bulbs on page 231 to determine what type of your intentions to other drivers. A burned out bulb can create ... with denatured alcohol and a clean cloth. Lights Check the operation of replacement bulb is burned out. Your car uses halogen headlight bulbs.
Check the following: Headlights (low and high beam) Parking lights Taillights Brake lights High-mount brake light Turn signals Back-up lights Hazard light ...bulb, handle it with your skin or hard objects. CONTINUED Maintenance If you are burned out, replace them as soon as possible. Replacing a Headlight Bulb Your car has two bulbs on page 231 to determine what type of your intentions to other drivers. A burned out bulb can create ... with denatured alcohol and a clean cloth. Lights Check the operation of replacement bulb is burned out. Your car uses halogen headlight bulbs.

Owner's Manual
Page 182
... one-quarter turn counterclockwise. Push the electrical connector back onto the bulb. Remove the electrical connector from the bulb by turning it is on the headlights to overheat and shatter. Open the hood. Maintenance If you need to unlock the tab while you push down on the passenger's side, remove the.... 3. Turn on all the way. 6. BULB 4. Oil, perspiration, or a scratch on the glass can cause the bulb to test the new bulb. Lights NOTICE Halogen headlight bulbs get very hot when lit.
... one-quarter turn counterclockwise. Push the electrical connector back onto the bulb. Remove the electrical connector from the bulb by turning it is on the headlights to overheat and shatter. Open the hood. Maintenance If you need to unlock the tab while you push down on the passenger's side, remove the.... 3. Turn on all the way. 6. BULB 4. Oil, perspiration, or a scratch on the glass can cause the bulb to test the new bulb. Lights NOTICE Halogen headlight bulbs get very hot when lit.

Owner's Manual
Page 187
... the back edge and sliding the assembly backwards. 3. Maintenance Tighten the mounting screw securely. Reinstall the side marker assembly in the assembly. Turn on the headlights to loosen the side marker assembly mounting screw. 2. Lights Replacing a Rear Side Marker Light Bulb 5. Remove the assembly from the fender by pulling it in...
... the back edge and sliding the assembly backwards. 3. Maintenance Tighten the mounting screw securely. Reinstall the side marker assembly in the assembly. Turn on the headlights to loosen the side marker assembly mounting screw. 2. Lights Replacing a Rear Side Marker Light Bulb 5. Remove the assembly from the fender by pulling it in...
Owner's Manual
Page 208
... or the Starter Motor Operates Very Slowly When you turn the key to START (III): You hear nothing, or almost nothing at all. If the headlights do not hear the normal noise of the fuses. You will not operate. Check these things: Check the transmission interlock. Turn the ignition switch to... noticeably or go out when you have a manual transmission, the clutch pedal must be in Park or Neutral. If the headlights are corroded. Taking Care of clicks, or nothing . With an automatic transmission, it must be pushed all the way to the floor or the starter ...
... or the Starter Motor Operates Very Slowly When you turn the key to START (III): You hear nothing, or almost nothing at all. If the headlights do not hear the normal noise of the fuses. You will not operate. Check these things: Check the transmission interlock. Turn the ignition switch to... noticeably or go out when you have a manual transmission, the clutch pedal must be in Park or Neutral. If the headlights are corroded. Taking Care of clicks, or nothing . With an automatic transmission, it must be pushed all the way to the floor or the starter ...

Owner's Manual
Page 219
... box for is a blown fuse. Removing these fuses requires a Phillips-head screwdriver. Check each of the Unexpected Determine from the fuse box. Make sure the headlights and all the fuses before deciding that component. It is not the cause.
... box for is a blown fuse. Removing these fuses requires a Phillips-head screwdriver. Check each of the Unexpected Determine from the fuse box. Make sure the headlights and all the fuses before deciding that component. It is not the cause.
Owner's Manual
Page 244
... Bulb Replacement Back-up Lights...187 Brake Lights...187 Ceiling Light...194 Front Parking Lights...190 Front Side Marker Lights...190 Headlights...187 High-mount Brake Light...193 License Plate Lights...193 Rear Side Marker Lights...192 Specifications...235 Turn Signal Lights...189 Bulbs, Halogen...187 CAUTION, ...
... Bulb Replacement Back-up Lights...187 Brake Lights...187 Ceiling Light...194 Front Parking Lights...190 Front Side Marker Lights...190 Headlights...187 High-mount Brake Light...193 License Plate Lights...193 Rear Side Marker Lights...192 Specifications...235 Turn Signal Lights...189 Bulbs, Halogen...187 CAUTION, ...
Owner's Manual
Page 245
... Daytime Running Eights...42 Dead Battery, What to Do...211 Defects, Reporting Safety...246 DEXRON® II Automatic Transmission Fluid...159 Dimensions...230 Dimming the Headlights...42 Dipstick Automatic Transmission...159, 160 Engine Oil...145 Directional Signals...43 Disabled, Towing Your Car If...225 Disc Brake Wear Indicators...123 Disposal of...
... Daytime Running Eights...42 Dead Battery, What to Do...211 Defects, Reporting Safety...246 DEXRON® II Automatic Transmission Fluid...159 Dimensions...230 Dimming the Headlights...42 Dipstick Automatic Transmission...159, 160 Engine Oil...145 Directional Signals...43 Disabled, Towing Your Car If...225 Disc Brake Wear Indicators...123 Disposal of...
Owner's Manual
Page 246
...Fuel...102 Fill Door and Cap...104 Gauge...40 Octane Requirement...102 Oxygenated...102 Tank, Filling the...104 Fuses, Checking the...221 Headlights...42 Daytime Running Lights...42 High Beam Indicator...38 High Beams, Turning on...42 Low Beams, Turning on ...42 Reminder Chime...42...Coolant Temperature ...40 Fuel...40 Gearshift Lever Positions Automatic Transmission...119 5-speed Manual Transmission...117 Glass Cleaning...200 Glove Box...55 Halogen Headlight Bulbs...183 Hazard Warning Flashers...45 Identification Number, Vehicle...228 If Your Car Has to be Towed...225 Ignition Keys...51 Switch...
...Fuel...102 Fill Door and Cap...104 Gauge...40 Octane Requirement...102 Oxygenated...102 Tank, Filling the...104 Fuses, Checking the...221 Headlights...42 Daytime Running Lights...42 High Beam Indicator...38 High Beams, Turning on...42 Low Beams, Turning on ...42 Reminder Chime...42...Coolant Temperature ...40 Fuel...40 Gearshift Lever Positions Automatic Transmission...119 5-speed Manual Transmission...117 Glass Cleaning...200 Glove Box...55 Halogen Headlight Bulbs...183 Hazard Warning Flashers...45 Identification Number, Vehicle...228 If Your Car Has to be Towed...225 Ignition Keys...51 Switch...


