Owner's Manual
Page 156
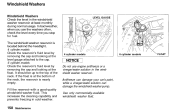
... reservoir is nearly empty. If the float is at the bottom of the neck, the reservoir is located behind the headlight. 4 cylinder models LEVEL GAUGE Check the reservoir's fluid level by removing the cap and looking at the level gauge attached to the top of the neck. Maintenance Fill the reservoir with... Washers Check the level in the windshield washer reservoir at the float. Use only commercially-available windshield washer fluid. Check the reservoir's fluid level by removing the cap and looking at least monthly during normal usage.
... reservoir is nearly empty. If the float is at the bottom of the neck, the reservoir is located behind the headlight. 4 cylinder models LEVEL GAUGE Check the reservoir's fluid level by removing the cap and looking at the level gauge attached to the top of the neck. Maintenance Fill the reservoir with... Washers Check the level in the windshield washer reservoir at the float. Use only commercially-available windshield washer fluid. Check the reservoir's fluid level by removing the cap and looking at least monthly during normal usage.

Owner's Manual
Page 182
... bulb to change a bulb on all the way. 6. Remove the bulb by squeezing the connector to unlock the tab while you need to overheat and shatter. If you push down on the connector. 3. Lights NOTICE Halogen headlight bulbs get very hot when lit. BULB 4. Open the ...hood. Insert the new bulb into the hole and turn it onequarter turn clockwise. 5. TAB 7. (Passenger's side) Reinstall the radiator reserve tank. 1. Remove the electrical connector from the bulb by ...
... bulb to change a bulb on all the way. 6. Remove the bulb by squeezing the connector to unlock the tab while you need to overheat and shatter. If you push down on the connector. 3. Lights NOTICE Halogen headlight bulbs get very hot when lit. BULB 4. Open the ...hood. Insert the new bulb into the hole and turn it onequarter turn clockwise. 5. TAB 7. (Passenger's side) Reinstall the radiator reserve tank. 1. Remove the electrical connector from the bulb by ...

Owner's Manual
Page 187
... from the socket by pulling it straight out. Turn on the headlights to loosen the side marker assembly mounting screw. 2. Insert the socket in the fender. SCREW 1. Install the new bulb. Tighten the mounting screw securely. Remove the bulb from the fender by turning it in place. 6. ...Reinstall the side marker assembly in the assembly. Remove the socket from the light assembly by pulling out the back edge and sliding the assembly...
... from the socket by pulling it straight out. Turn on the headlights to loosen the side marker assembly mounting screw. 2. Insert the socket in the fender. SCREW 1. Install the new bulb. Tighten the mounting screw securely. Remove the bulb from the fender by turning it in place. 6. ...Reinstall the side marker assembly in the assembly. Remove the socket from the light assembly by pulling out the back edge and sliding the assembly...

Owner's Manual
Page 219
... 1. Make sure the headlights and all the fuses before deciding that component. Check each of the Unexpected BLOWN Cars equipped with ABS have a third fuse box for is in the engine compartment on the fuse box lid, which fuse or fuses control that is not the cause. Removing these fuses requires a ... switch to LOCK (0). CONTINUED Taking Care of the large fuses in the under-hood fuse box by looking through the top at the wire inside. Remove the cover from the chart on pages 223 and 224, or the diagram on the right side. 3. It is a blown fuse. Fuses ABS FUSE...
... 1. Make sure the headlights and all the fuses before deciding that component. Check each of the Unexpected BLOWN Cars equipped with ABS have a third fuse box for is in the engine compartment on the fuse box lid, which fuse or fuses control that is not the cause. Removing these fuses requires a ... switch to LOCK (0). CONTINUED Taking Care of the large fuses in the under-hood fuse box by looking through the top at the wire inside. Remove the cover from the chart on pages 223 and 224, or the diagram on the right side. 3. It is a blown fuse. Fuses ABS FUSE...

