Owner's Manual
Page 19
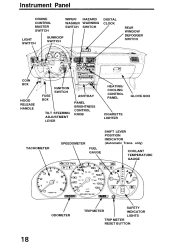
only) COOLANT TEMPERATURE GAUGE TRIP METER ODOMETER SAFETY INDICATOR LIGHTS TRIP METER RESET BUTTON Instrument Panel CRUISE CONTROL MASTER SWITCH LIGHT SWITCH SUNROOF SWITCH WIPER/ HAZARD WASHER WARNING SWITCH SWITCH DIGITAL CLOCK REAR WINDOW DEFOGGER SWITCH COIN BOX IGNITION SWITCH HOOD RELEASE HANDLE FUSE BOX ASHTRAY PANEL BRIGHTNESS CONTROL KNOB HEATING/ COOLING CONTROL PANEL GLOVE BOX TILT STEERING ADJUSTMENT LEVER CIGARETTE LIGHTER SPEEDOMETER TACHOMETER FUEL GAUGE SHIFT LEVER POSITION INDICATOR (Automatic Trans.
only) COOLANT TEMPERATURE GAUGE TRIP METER ODOMETER SAFETY INDICATOR LIGHTS TRIP METER RESET BUTTON Instrument Panel CRUISE CONTROL MASTER SWITCH LIGHT SWITCH SUNROOF SWITCH WIPER/ HAZARD WASHER WARNING SWITCH SWITCH DIGITAL CLOCK REAR WINDOW DEFOGGER SWITCH COIN BOX IGNITION SWITCH HOOD RELEASE HANDLE FUSE BOX ASHTRAY PANEL BRIGHTNESS CONTROL KNOB HEATING/ COOLING CONTROL PANEL GLOVE BOX TILT STEERING ADJUSTMENT LEVER CIGARETTE LIGHTER SPEEDOMETER TACHOMETER FUEL GAUGE SHIFT LEVER POSITION INDICATOR (Automatic Trans.
Owner's Manual
Page 29
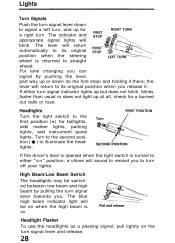
... either turn . If either " o n " position, a chime will return to straight ahead. Turn to the second position ( ) to the first position ( ) for a burned out bulb or fuse. High Beam/Low Beam Switch The headlights may be on when the high beam is returned to its original position when you to turn signal...
... either turn . If either " o n " position, a chime will return to straight ahead. Turn to the second position ( ) to the first position ( ) for a burned out bulb or fuse. High Beam/Low Beam Switch The headlights may be on when the high beam is returned to its original position when you to turn signal...
Owner's Manual
Page 99
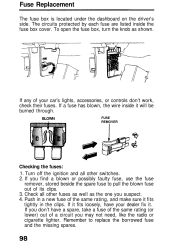
... as shown. Remember to pull the blown fuse out of the same rating, and make sure it will be burned through. Fuse Replacement The fuse box is located under the dashboard on the driver's side. BLOWN FUSE REMOVER Checking the fuses: 1. To open the fuse box, turn the knob as the one ...you find a blown or possibly faulty fuse, use the fuse remover, stored beside the spare fuse to replace the borrowed fuse and the missing spares. If you don't have...
... as shown. Remember to pull the blown fuse out of the same rating, and make sure it will be burned through. Fuse Replacement The fuse box is located under the dashboard on the driver's side. BLOWN FUSE REMOVER Checking the fuses: 1. To open the fuse box, turn the knob as the one ...you find a blown or possibly faulty fuse, use the fuse remover, stored beside the spare fuse to replace the borrowed fuse and the missing spares. If you don't have...
Owner's Manual
Page 100
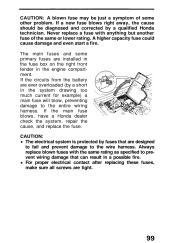
... check the system, repair the cause, and replace the fuse. For proper electrical contact after replacing these fuses, make sure all screws are ever overloaded (by a qualified Honda technician. Always replace blown fuses with anything but another fuse of some primary fuses are installed in the fuse box on the right front fender in the engine compartment...
... check the system, repair the cause, and replace the fuse. For proper electrical contact after replacing these fuses, make sure all screws are ever overloaded (by a qualified Honda technician. Always replace blown fuses with anything but another fuse of some primary fuses are installed in the fuse box on the right front fender in the engine compartment...
Owner's Manual
Page 117
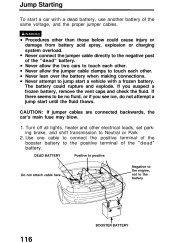
..., do not attempt a jump start a vehicle with a dead battery, use another battery of the " d e a d " battery. CAUTION: If jumper cables are connected backwards, the car's main fuse may blow. 1. Never attempt to Neutral or Park. 2. Procedures other . Never lean over the battery when making connections.
..., do not attempt a jump start a vehicle with a dead battery, use another battery of the " d e a d " battery. CAUTION: If jumper cables are connected backwards, the car's main fuse may blow. 1. Never attempt to Neutral or Park. 2. Procedures other . Never lean over the battery when making connections.
Owner's Manual
Page 121
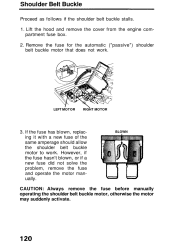
... if the shoulder belt buckle stalls. 1. Remove the fuse for the automatic ("passive") shoulder belt buckle motor that does not work . However, if the fuse hasn't blown, or if a new fuse did not solve the problem, remove the fuse and operate the motor manually. LEFT MOTOR RIGHT MOTOR ... hood and remove the cover from the engine compartment fuse box. 2. If the fuse has blown, replacing it with a new fuse of the same amperage should allow the shoulder belt buckle motor to work . BLOWN CAUTION: Always remove the fuse before manually operating the shoulder belt buckle motor, otherwise...
... if the shoulder belt buckle stalls. 1. Remove the fuse for the automatic ("passive") shoulder belt buckle motor that does not work . However, if the fuse hasn't blown, or if a new fuse did not solve the problem, remove the fuse and operate the motor manually. LEFT MOTOR RIGHT MOTOR ... hood and remove the cover from the engine compartment fuse box. 2. If the fuse has blown, replacing it with a new fuse of the same amperage should allow the shoulder belt buckle motor to work . BLOWN CAUTION: Always remove the fuse before manually operating the shoulder belt buckle motor, otherwise...
Owner's Manual
Page 122
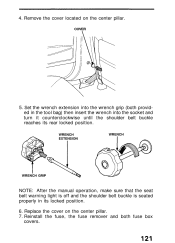
Set the wrench extension into the socket and turn it counterclockwise until the shoulder belt buckle reaches its locked position. 6. COVER 5. Replace the cover on the center pillar. Remove the cover located on the center pillar. 7. WRENCH EXTENSION WRENCH WRENCH GRIP NOTE: After the manual operation, make sure that the seat belt warning light is off and the shoulder belt buckle is seated properly in the tool bag) then insert the wrench into the wrench grip (both fuse box covers. Reinstall the fuse, the fuse remover and both provided in its rear locked position. 4.
Set the wrench extension into the socket and turn it counterclockwise until the shoulder belt buckle reaches its locked position. 6. COVER 5. Replace the cover on the center pillar. Remove the cover located on the center pillar. 7. WRENCH EXTENSION WRENCH WRENCH GRIP NOTE: After the manual operation, make sure that the seat belt warning light is off and the shoulder belt buckle is seated properly in the tool bag) then insert the wrench into the wrench grip (both fuse box covers. Reinstall the fuse, the fuse remover and both provided in its rear locked position. 4.
Owner's Manual
Page 135
... in ...57 Front Seat Adjustment ...6 Fuel Filler Door and Cap ...58 Filter ...94 Gasohol ...56 Gasoline ...56 Gauge ...19 Requirement ...56 Reserve Warning Light ...20 Fuse Checking and Replacing ...98 Specification ...123 Identification Numbers ...Ignition Keys ...Switch ...Ignition Switch Light ...Indicator Lights ...Inflation Pressures, Tire ...Instrument Panel ...Instrument Panel Brightness Control...
... in ...57 Front Seat Adjustment ...6 Fuel Filler Door and Cap ...58 Filter ...94 Gasohol ...56 Gasoline ...56 Gauge ...19 Requirement ...56 Reserve Warning Light ...20 Fuse Checking and Replacing ...98 Specification ...123 Identification Numbers ...Ignition Keys ...Switch ...Ignition Switch Light ...Indicator Lights ...Inflation Pressures, Tire ...Instrument Panel ...Instrument Panel Brightness Control...
Owner's Manual
Page 136
... ...Glove Box ...Ignition ...Key Reminder Beeper ...Keys ...Trunk Lock ... Numbers, Identification ...124 3 35 60 60 3 5 Lap/Shoulder Belts ...See "Seat Belts" Lights Bulb Replacement ...100 Fuse Replacement ...98 Light Reminder Chime ...28 Operation ...28 Warning and Indicator Lights ...20 Locks Anti-theft Steering Column Lock ...60 Child Proof Door Locks ...5 Doors...
... ...Glove Box ...Ignition ...Key Reminder Beeper ...Keys ...Trunk Lock ... Numbers, Identification ...124 3 35 60 60 3 5 Lap/Shoulder Belts ...See "Seat Belts" Lights Bulb Replacement ...100 Fuse Replacement ...98 Light Reminder Chime ...28 Operation ...28 Warning and Indicator Lights ...20 Locks Anti-theft Steering Column Lock ...60 Child Proof Door Locks ...5 Doors...
Owner's Manual
Page 137
Index (cont'd) Replacement Air Filter ...94 Bulbs ...100 Engine Oil ...84 Fuel Filter ...94 Fuses ...98 Oil Filter ...84 Radiator Coolant ...89 Spark Plugs ...95 Tires ...104 Wiper Blades ...96 Rust Prevention ...108 Spare Tire Changing a Flat Tire ...COMPACT Spare ...
Index (cont'd) Replacement Air Filter ...94 Bulbs ...100 Engine Oil ...84 Fuel Filter ...94 Fuses ...98 Oil Filter ...84 Radiator Coolant ...89 Spark Plugs ...95 Tires ...104 Wiper Blades ...96 Rust Prevention ...108 Spare Tire Changing a Flat Tire ...COMPACT Spare ...


