Owner's Manual
Page 22
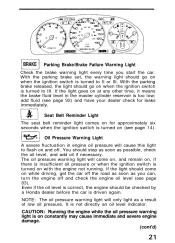
...by a Honda dealer before the car is correct, the engine should stop as soon as possible, check the oil level, and add oil if necessary. Even if the oil level is driven again. The oil pressure warning light will come on at any other time, it means the brake fluid level... fluctuation in the master cylinder reservoir is turned on constantly may cause immediate and severe engine damage. (cont'd) BRAKE Parking Brake/Brake Failure Warning Light Check the brake warning light every time you can, turn the engine off and check the engine oil level (see page 83). It is turned on and ...
...by a Honda dealer before the car is correct, the engine should stop as soon as possible, check the oil level, and add oil if necessary. Even if the oil level is driven again. The oil pressure warning light will come on at any other time, it means the brake fluid level... fluctuation in the master cylinder reservoir is turned on constantly may cause immediate and severe engine damage. (cont'd) BRAKE Parking Brake/Brake Failure Warning Light Check the brake warning light every time you can, turn the engine off and check the engine oil level (see page 83). It is turned on and ...

Owner's Manual
Page 24
.... have the system checked by a Honda dealer. If they don't, have your car with the ignition on; BRAKE LAMP Brake Lamp Warning Light If a brake light does not work, the BRAKE LAMP indicator will go on when you push the brake pedal with a problem in either the brake electrical or hydraulic systems; Safety Indicator Lights: Door and Trunk Lid Warning...
.... have the system checked by a Honda dealer. If they don't, have your car with the ignition on; BRAKE LAMP Brake Lamp Warning Light If a brake light does not work, the BRAKE LAMP indicator will go on when you push the brake pedal with a problem in either the brake electrical or hydraulic systems; Safety Indicator Lights: Door and Trunk Lid Warning...
Owner's Manual
Page 32
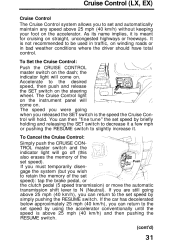
...To Cancel the Cruise Control: Simply push the CRUISE CONTROL master switch and the indicator light will come on. the indicator light will go off (this also erases the memory of the set speed): tap the brake pedal, or the clutch pedal (5 speed transmission) or move the automatic transmission shift ... on. If the car has decelerated below approximately 25 mph (40 km/h), you can then "fine tune" the set speed). The Cruise Control light on the instrument panel will hold. Accelerate to set speed by simply pushing the RESUME switch. As its name implies, it . Cruise Control (LX...
...To Cancel the Cruise Control: Simply push the CRUISE CONTROL master switch and the indicator light will come on. the indicator light will go off (this also erases the memory of the set speed): tap the brake pedal, or the clutch pedal (5 speed transmission) or move the automatic transmission shift ... on. If the car has decelerated below approximately 25 mph (40 km/h), you can then "fine tune" the set speed). The Cruise Control light on the instrument panel will hold. Accelerate to set speed by simply pushing the RESUME switch. As its name implies, it . Cruise Control (LX...
Owner's Manual
Page 34
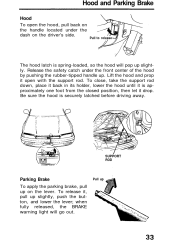
when fully released, the BRAKE warning light will pop up Pull up slightly. Release the safety catch under the dash on the lever. Be sure the hood is spring-loaded,... closed position, then let it , pull up slightly, push the button, and lower the lever; To release it drop. Hood and Parking Brake Hood To open with the support rod. Lift the hood and prop it open the hood, pull back on the handle located under the front...-tipped handle up on the driver's side. Pull to release The hood latch is securely latched before driving away. SUPPORT ROD Parking Brake To apply the parking...
when fully released, the BRAKE warning light will pop up Pull up slightly. Release the safety catch under the dash on the lever. Be sure the hood is spring-loaded,... closed position, then let it , pull up slightly, push the button, and lower the lever; To release it drop. Hood and Parking Brake Hood To open with the support rod. Lift the hood and prop it open the hood, pull back on the handle located under the front...-tipped handle up on the driver's side. Pull to release The hood latch is securely latched before driving away. SUPPORT ROD Parking Brake To apply the parking...

Owner's Manual
Page 49
POP-UP WIND DEFLECTOR Close Open Do not allow any part of the brakes, severe personal injury could result. CAUTION: Operating the sunroof in severe cold or when it is covered with the roof closed , the sunroof, push and ... to extend through the sunroof while the vehicle is a sliding sunshade which you may cause damage to block out light entirely. The sunshade automatically opens as the sunroof, there is in light with snow or ice may damage the sunroof motor. Sunshade As well as you open or close Release the switch...
POP-UP WIND DEFLECTOR Close Open Do not allow any part of the brakes, severe personal injury could result. CAUTION: Operating the sunroof in severe cold or when it is covered with the roof closed , the sunroof, push and ... to extend through the sunroof while the vehicle is a sliding sunshade which you may cause damage to block out light entirely. The sunshade automatically opens as the sunroof, there is in light with snow or ice may damage the sunroof motor. Sunshade As well as you open or close Release the switch...
Owner's Manual
Page 62
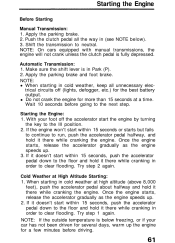
... unnecessary electrical circuits off the accelerator start within 15 seconds, push the accelerator pedal down to clear flooding. Apply the parking brake and foot brake. Once the engine starts, release the accelerator gradually as the engine speeds up. 3. Wait 10 seconds before driving. Once the...). 3. Try step 2 again. When starting in cold weather, keep all the way in (see NOTE below freezing, or if your foot off (lights, defogger, etc.) for a few minutes before going to neutral. Try step 1 again. Starting the Engine Before Starting Manual Transmission: 1. If it...
... unnecessary electrical circuits off the accelerator start within 15 seconds, push the accelerator pedal down to clear flooding. Apply the parking brake and foot brake. Once the engine starts, release the accelerator gradually as the engine speeds up. 3. Wait 10 seconds before driving. Once the...). 3. Try step 2 again. When starting in cold weather, keep all the way in (see NOTE below freezing, or if your foot off (lights, defogger, etc.) for a few minutes before going to neutral. Try step 1 again. Starting the Engine Before Starting Manual Transmission: 1. If it...
Owner's Manual
Page 63
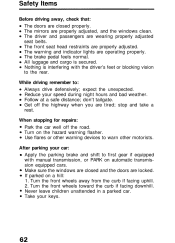
The mirrors are tired; The brake pedal feels normal. Get off the road. After parking your speed during night hours and bad weather. Turn the front wheels toward the curb if .... Turn the front wheels away from the curb if facing uphill. 2. The warning and indicator lights are closed and the doors are wearing properly adjusted seat belts. Nothing is secured. Reduce your car: Apply the parking brake and shift to the rear. Follow at a safe distance; The driver and passengers are locked...
The mirrors are tired; The brake pedal feels normal. Get off the road. After parking your speed during night hours and bad weather. Turn the front wheels toward the curb if .... Turn the front wheels away from the curb if facing uphill. 2. The warning and indicator lights are closed and the doors are wearing properly adjusted seat belts. Nothing is secured. Reduce your car: Apply the parking brake and shift to the rear. Follow at a safe distance; The driver and passengers are locked...
Owner's Manual
Page 69
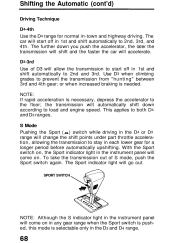
Use D3 when climbing grades to both D4 and D3 ranges. or when increased braking is necessary, depress the accelerator to 2nd and 3rd. The car will start... automatically to the floor; To take the transmission out of D3 will come on . The Sport indicator light will accelerate. This applies to prevent the transmission from "hunting" between 3rd and 4th gear; With the Sport switch ... will shift and the faster the car will go out. The further down according to 2nd, 3rd, and 4th. NOTE: If rapid acceleration is needed. SPORT SWITCH NOTE: Although the S indicator...
Use D3 when climbing grades to both D4 and D3 ranges. or when increased braking is necessary, depress the accelerator to 2nd and 3rd. The car will start... automatically to the floor; To take the transmission out of D3 will come on . The Sport indicator light will accelerate. This applies to prevent the transmission from "hunting" between 3rd and 4th gear; With the Sport switch ... will shift and the faster the car will go out. The further down according to 2nd, 3rd, and 4th. NOTE: If rapid acceleration is needed. SPORT SWITCH NOTE: Although the S indicator...
Owner's Manual
Page 72
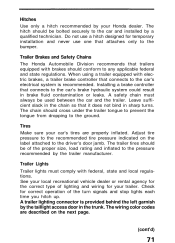
.... The hitch should be of the turn signals and stop lights each time you hitch up. Adjust tire pressure to the recommended tire pressure indicated on the next page. (cont'd) Check for your Honda dealer. Installing a brake controller that it does not bind in sharp turns. The ...wiring color codes are properly inflated. See your local recreational vehicle dealer or rental agency for the correct type of lighting and wiring for correct operation of the...
.... The hitch should be of the turn signals and stop lights each time you hitch up. Adjust tire pressure to the recommended tire pressure indicated on the next page. (cont'd) Check for your Honda dealer. Installing a brake controller that it does not bind in sharp turns. The ...wiring color codes are properly inflated. See your local recreational vehicle dealer or rental agency for the correct type of lighting and wiring for correct operation of the...
Owner's Manual
Page 73
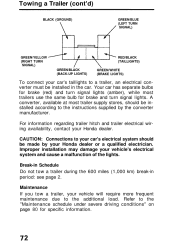
...should be made by the converter manufacturer. Refer to the "Maintenance schedule under severe driving conditions" on page 80 for brake and turn signal lights. A converter, available at most trailers use the same bulb for specific information. Towing a Trailer (cont'd) BLACK (...GROUND) GREEN/BLUE (LEFT TURN SIGNAL) GREEN/YELLOW (RIGHT TURN SIGNAL) GREEN/BLACK (BACK-UP LIGHTS) RED/BLACK (TAILLIGHTS) GREEN/WHITE (BRAKE LIGHTS) To connect your car's taillights to a trailer, an electrical converter must be installed according to the instructions supplied by your Honda dealer.
...should be made by the converter manufacturer. Refer to the "Maintenance schedule under severe driving conditions" on page 80 for brake and turn signal lights. A converter, available at most trailers use the same bulb for specific information. Towing a Trailer (cont'd) BLACK (...GROUND) GREEN/BLUE (LEFT TURN SIGNAL) GREEN/YELLOW (RIGHT TURN SIGNAL) GREEN/BLACK (BACK-UP LIGHTS) RED/BLACK (TAILLIGHTS) GREEN/WHITE (BRAKE LIGHTS) To connect your car's taillights to a trailer, an electrical converter must be installed according to the instructions supplied by your Honda dealer.
Owner's Manual
Page 75
After driving a short distance, stop and recheck the lights and connections. On cars equipped with automatic transmission. - this , grip... wheel a little at a time, and keep the speed very low. Because of the added load of the brakes, shift into a lower gear to overheat. NOTE: Be sure to the coolant temperature gauge when going up hills... sudden downshifts. Towing a Trailer (cont'd) CAUTION: Before starting out, check the operation of engine braking before leaving home, because restrictions may vary. To help prevent overheating of the trailer, your hand to the ...
After driving a short distance, stop and recheck the lights and connections. On cars equipped with automatic transmission. - this , grip... wheel a little at a time, and keep the speed very low. Because of the added load of the brakes, shift into a lower gear to overheat. NOTE: Be sure to the coolant temperature gauge when going up hills... sudden downshifts. Towing a Trailer (cont'd) CAUTION: Before starting out, check the operation of engine braking before leaving home, because restrictions may vary. To help prevent overheating of the trailer, your hand to the ...
Owner's Manual
Page 78
... operation of windshield wipers and washer, and condition of headlights, taillights, side marker lights, stoplights, turn signals and back-up lights. 3. Seat belts: for braking efficiency, brake pedal travel and hydraulic fluid level. 2. Brakes: for condition of fabric and buckles, and operation of restraint mechanism. 8. Steering: for correct pressures (including spare); Tires: for excessive play...
... operation of windshield wipers and washer, and condition of headlights, taillights, side marker lights, stoplights, turn signals and back-up lights. 3. Seat belts: for braking efficiency, brake pedal travel and hydraulic fluid level. 2. Brakes: for condition of fabric and buckles, and operation of restraint mechanism. 8. Steering: for correct pressures (including spare); Tires: for excessive play...
Owner's Manual
Page 92
... will require more pedal pressure and pedal travel than normal. Your brake lights may affect the brakes. Brake Wear Both front and rear brakes should be longer using only half the brake system. When the brakes require maintenance use only genuine Honda replacement parts or their effectiveness by pressing the brake pedal gently. Stopping the car after losing the...
... will require more pedal pressure and pedal travel than normal. Your brake lights may affect the brakes. Brake Wear Both front and rear brakes should be longer using only half the brake system. When the brakes require maintenance use only genuine Honda replacement parts or their effectiveness by pressing the brake pedal gently. Stopping the car after losing the...

Owner's Manual
Page 101
Front turn signal lights Front side marker and turn signal lights/position lights Rear turn signal/brake and taillights Brake and taillights/ back-up lights License plate lights Bulb Replacement See page 123 for bulb specifications.
Front turn signal lights Front side marker and turn signal lights/position lights Rear turn signal/brake and taillights Brake and taillights/ back-up lights License plate lights Bulb Replacement See page 123 for bulb specifications.
Owner's Manual
Page 102
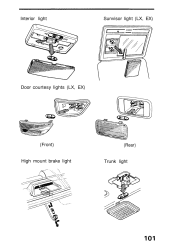
Interior light Sunvisor light (LX, EX) Door courtesy lights (LX, EX) (Front) (Rear) High mount brake light Trunk light
Interior light Sunvisor light (LX, EX) Door courtesy lights (LX, EX) (Front) (Rear) High mount brake light Trunk light
Owner's Manual
Page 117
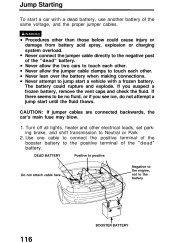
... terminal of the booster battery to the positive terminal of the "dead" battery. Turn off all lights, heater and other . Never allow the jumper cable clamps to touch each other electrical loads, set parking brake, and shift transmission to touch each other than those below could rupture and explode. Procedures other . CAUTION...
... terminal of the booster battery to the positive terminal of the "dead" battery. Turn off all lights, heater and other . Never allow the jumper cable clamps to touch each other electrical loads, set parking brake, and shift transmission to touch each other than those below could rupture and explode. Procedures other . CAUTION...
Owner's Manual
Page 134
... System Fasten Seat Belt Beeper ...14 Key Reminder ...60 Light Reminder Chime ...28 Belts, Seat ...See "Seat Belts" Beverage Holder ...36 Body Repair ...110 Brake Warning Light ...21 Brakes Brake Failure Warning Light ...21 Brake Fluid ...92 Brake System Design ...91 Brake Wear ...91 Brake Wear Indicators ...91 Parking Brake ...33 Parking Brake Warning Light ...21 Break-in Period ...2 Capacities ...Care and Cleaning...
... System Fasten Seat Belt Beeper ...14 Key Reminder ...60 Light Reminder Chime ...28 Belts, Seat ...See "Seat Belts" Beverage Holder ...36 Body Repair ...110 Brake Warning Light ...21 Brakes Brake Failure Warning Light ...21 Brake Fluid ...92 Brake System Design ...91 Brake Wear ...91 Brake Wear Indicators ...91 Parking Brake ...33 Parking Brake Warning Light ...21 Break-in Period ...2 Capacities ...Care and Cleaning...
Owner's Manual
Page 136
... Gasoline ...See " F u e l " Odometer ...19 Oil Clutch Fluid ...92 Engine Oil ...83 Fluid Locations ...82 Oil Pressure Warning Light ...21 Power Steering Fluid ...93 Transmission Oil/Fluid ...86 Operation In Foreign Countries ...57 Maintenance Record ...79 Schedule ...76 Manual Transmission Maximum Allowable..., Gauges ...See "Gauges" Mirrors Power Mirrors ...27 Rearview Mirrors ...27 Panel Brightness Control ...29 Parking Brake ...33 Passive Belt ...9 PGM-FI Check Engine Warning Light ...22 System ...128 Power Door Locks ...4 Mirrors ...27 Steering ...93 Windows ...34 Pregnant Women ...16...
... Gasoline ...See " F u e l " Odometer ...19 Oil Clutch Fluid ...92 Engine Oil ...83 Fluid Locations ...82 Oil Pressure Warning Light ...21 Power Steering Fluid ...93 Transmission Oil/Fluid ...86 Operation In Foreign Countries ...57 Maintenance Record ...79 Schedule ...76 Manual Transmission Maximum Allowable..., Gauges ...See "Gauges" Mirrors Power Mirrors ...27 Rearview Mirrors ...27 Panel Brightness Control ...29 Parking Brake ...33 Passive Belt ...9 PGM-FI Check Engine Warning Light ...22 System ...128 Power Door Locks ...4 Mirrors ...27 Steering ...93 Windows ...34 Pregnant Women ...16...


