
Owner's Manual
Page 12
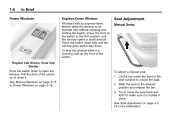
... Windows on page 2‑15 or Power Windows on page 3‑3 for more information. See Seat Adjustment on page 2‑15. To adjust a manual seat: 1. Lift the bar under the front of the switch to the desired position and release the bar. 3. Press the switch down fully and the window goes...
... Windows on page 2‑15 or Power Windows on page 3‑3 for more information. See Seat Adjustment on page 2‑15. To adjust a manual seat: 1. Lift the bar under the front of the switch to the desired position and release the bar. 3. Press the switch down fully and the window goes...
Owner's Manual
Page 34
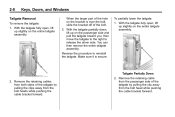
... away from the bolt head while pushing the cable bracket forward. Reverse the procedure to release the driver side. With the tailgate fully open , lift up on the bracket is secure. Make sure it is over the bolt, slide the bracket off of the bolt. 3. Remove the retaining cables... the clip away from the bolt heads while pushing the cable bracket forward. 2. To partially lower the tailgate: 1. With the tailgate fully open , lift up slightly on the entire tailgate assembly. 2-8 Keys, Doors, and Windows When the larger part of the hole on the passenger side and pull the...
... away from the bolt head while pushing the cable bracket forward. Reverse the procedure to release the driver side. With the tailgate fully open , lift up on the bracket is secure. Make sure it is over the bolt, slide the bracket off of the bolt. 3. Remove the retaining cables... the clip away from the bolt heads while pushing the cable bracket forward. 2. To partially lower the tailgate: 1. With the tailgate fully open , lift up slightly on the entire tailgate assembly. 2-8 Keys, Doors, and Windows When the larger part of the hole on the passenger side and pull the...
Owner's Manual
Page 47
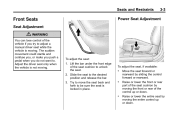
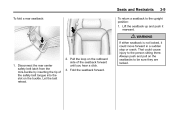
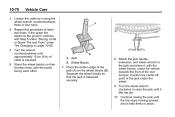
... the control up or down . To adjust the seat: 1. Try to move the seat back and forth to be sure the seat is not moving . Lift the bar under the front edge of the seat cushion to the desired position and release the bar. 3. To adjust the seat, if available: . Raise...
... the control up or down . To adjust the seat: 1. Try to move the seat back and forth to be sure the seat is not moving . Lift the bar under the front edge of the seat cushion to the desired position and release the bar. 3. To adjust the seat, if available: . Raise...
Owner's Manual
Page 49
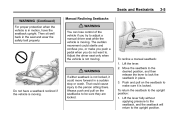
... seatback to the desired position, and then release the lever to the upright position. { WARNING If either seatback is not locked, it is not moving. Lift the lever fully without applying pressure to the seatback, and the seatback will return to lock the seatback in a sudden stop or crash...
... seatback to the desired position, and then release the lever to the upright position. { WARNING If either seatback is not locked, it is not moving. Lift the lever fully without applying pressure to the seatback, and the seatback will return to lock the seatback in a sudden stop or crash...
Owner's Manual
Page 53
... latch from the mini-buckle by inserting the tip of the seatback forward until you hear a click. 3. Let the belt retract. 2. Fold the seatback forward. Lift the seatback up and push it rearward. { WARNING If either seatback is not locked, it could cause injury to the person sitting there. Always push...
... latch from the mini-buckle by inserting the tip of the seatback forward until you hear a click. 3. Let the belt retract. 2. Fold the seatback forward. Lift the seatback up and push it rearward. { WARNING If either seatback is not locked, it could cause injury to the person sitting there. Always push...
Owner's Manual
Page 105
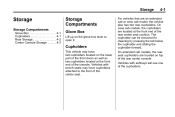
... are located at the front end of the console. Storage 4-1 Storage Storage Compartments Glove Box ...Cupholders ...Rear Storage ...Center Console Storage ...4-1 4-1 4-2 4-3 Storage Compartments Glove Box Lift up on the glove box lever to the front of the cupholders. Vehicles with ashtrays will use one of the center seat. On extended cab...
... are located at the front end of the console. Storage 4-1 Storage Storage Compartments Glove Box ...Cupholders ...Rear Storage ...Center Console Storage ...4-1 4-1 4-2 4-3 Storage Compartments Glove Box Lift up on the glove box lever to the front of the cupholders. Vehicles with ashtrays will use one of the center seat. On extended cab...
Owner's Manual
Page 106
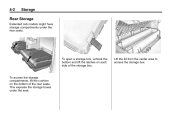
Lift the lid from the center area to access the storage box. To open a storage box, unhook the bottom and lift the latches on the bottom of the storage box. This exposes the storage boxes under the rear seats. To access the storage compartments, lift the cushion on each side of the rear seats. 4-2 Storage Rear Storage Extended cab models might have storage compartments under the seat.
Lift the lid from the center area to access the storage box. To open a storage box, unhook the bottom and lift the latches on the bottom of the storage box. This exposes the storage boxes under the rear seats. To access the storage compartments, lift the cushion on each side of the rear seats. 4-2 Storage Rear Storage Extended cab models might have storage compartments under the seat.
Owner's Manual
Page 107
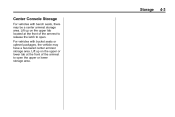
Lift up on the upper or lower tab at the front of the armrest to open the upper or lower storage area. For vehicles with bench seats, there may have a two-tiered center armrest storage area. Lift up on the upper tab located at the front of the armrest to release the latch to open . Storage 4-3 Center Console Storage For vehicles with bucket seats or uplevel packages, the vehicle may be a center armrest storage area.
Lift up on the upper or lower tab at the front of the armrest to open the upper or lower storage area. For vehicles with bench seats, there may have a two-tiered center armrest storage area. Lift up on the upper tab located at the front of the armrest to release the latch to open . Storage 4-3 Center Console Storage For vehicles with bucket seats or uplevel packages, the vehicle may be a center armrest storage area.
Owner's Manual
Page 171
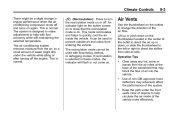
... of air into the vehicle. An indicator light on the button comes on to show that may adversely affect the performance of the air flow. Lift up or down on .
... of air into the vehicle. An indicator light on the button comes on to show that may adversely affect the performance of the air flow. Lift up or down on .

Owner's Manual
Page 241
... hood prop. Lower the hood 25 to 30 cm (10 to 12 in) above the vehicle and release it . Lift the hood. 4. Pull the handle with this symbol on properly. Then lift the hood to latch fully. It is located inside the vehicle on the hood. Vehicle Care 10-5 Hood To open...
... hood prop. Lower the hood 25 to 30 cm (10 to 12 in) above the vehicle and release it . Lift the hood. 4. Pull the handle with this symbol on properly. Then lift the hood to latch fully. It is located inside the vehicle on the hood. Vehicle Care 10-5 Hood To open...
Owner's Manual
Page 254
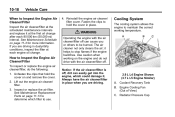
... only cleans the air; Unfasten the clips that hold the cover in place when you or others to use. 2.9 L L4 Engine Shown (3.7 L L5 Engine Similar) A. Lift out the engine air cleaner/ filter. 3. Coolant Recovery Tank B.
... only cleans the air; Unfasten the clips that hold the cover in place when you or others to use. 2.9 L L4 Engine Shown (3.7 L L5 Engine Similar) A. Lift out the engine air cleaner/ filter. 3. Coolant Recovery Tank B.

Owner's Manual
Page 259
...can be badly damaged. Replace the pressure cap. If the engine is overheating, the fan should increase when idle speed is made not to lift the hood when the warning appears, but instead get service help right away. Start the engine and let it run the engine and have the... of the proper DEX‐COOL coolant mixture through the filler neck until the upper radiator hose can be felt getting hot. Then check to lift the hood, make sure the vehicle is overheating. Engine Overheating 6. See Roadside Assistance Program (U.S. If it does not, the vehicle needs service. The ...
...can be badly damaged. Replace the pressure cap. If the engine is overheating, the fan should increase when idle speed is made not to lift the hood when the warning appears, but instead get service help right away. Start the engine and let it run the engine and have the... of the proper DEX‐COOL coolant mixture through the filler neck until the upper radiator hose can be felt getting hot. Then check to lift the hood, make sure the vehicle is overheating. Engine Overheating 6. See Roadside Assistance Program (U.S. If it does not, the vehicle needs service. The ...
Owner's Manual
Page 269
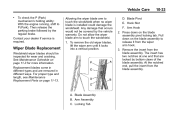
... Hook 2. Blade Assembly B. For proper type and length, see Maintenance Replacement Parts on the blade assembly pivot locking tab. To remove the old wiper blades, lift the wiper arm until it from the wiper arm hook. 3. Locking Tab Pull down on page 11‑13. Then release the parking brake followed...
... Hook 2. Blade Assembly B. For proper type and length, see Maintenance Replacement Parts on the blade assembly pivot locking tab. To remove the old wiper blades, lift the wiper arm until it from the wiper arm hook. 3. Locking Tab Pull down on page 11‑13. Then release the parking brake followed...
Owner's Manual
Page 272
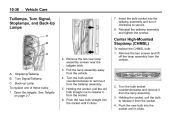
... assembly screws near the tailgate latch. Push the new bulb into the socket until it from the socket. 4. Stoplamp/Taillamp B. Remove the two screws and lift off the lamp assembly from the lamp assembly. 3. Open the tailgate. Turn the bulb socket counterclockwise and remove it clicks. Reinstall the taillamp assembly and...
... assembly screws near the tailgate latch. Push the new bulb into the socket until it from the socket. 4. Stoplamp/Taillamp B. Remove the two screws and lift off the lamp assembly from the lamp assembly. 3. Open the tailgate. Turn the bulb socket counterclockwise and remove it clicks. Reinstall the taillamp assembly and...
Owner's Manual
Page 275
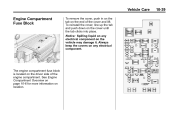
Notice: Spilling liquid on any electrical component. The engine compartment fuse block is located on the vehicle may damage it. To reinstall the cover, line up the tab and push down on any electrical component on the driver side of the cover and lift. Always keep the covers on the cover until the tab clicks into place. See Engine Compartment Overview on page 10‑6 for more information on the end of the engine compartment. Vehicle Care 10-39 Engine Compartment Fuse Block To remove the cover, push in on the tab on location.
Notice: Spilling liquid on any electrical component. The engine compartment fuse block is located on the vehicle may damage it. To reinstall the cover, line up the tab and push down on any electrical component on the driver side of the cover and lift. Always keep the covers on the cover until the tab clicks into place. See Engine Compartment Overview on page 10‑6 for more information on the end of the engine compartment. Vehicle Care 10-39 Engine Compartment Fuse Block To remove the cover, push in on the tab on location.

Owner's Manual
Page 301
Re-inflating a tire after it is much like a skid and may require the same correction as possible. { WARNING Lifting a vehicle and getting under it is designed only for changing a flat tire. See Hazard Warning Flashers on while severely underinflated or flat. Stop pressing the ...
Re-inflating a tire after it is much like a skid and may require the same correction as possible. { WARNING Lifting a vehicle and getting under it is designed only for changing a flat tire. See Hazard Warning Flashers on while severely underinflated or flat. Stop pressing the ...
Owner's Manual
Page 306
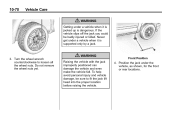
... nuts. Never get under the vehicle, as shown, for the front or rear locations. Front Position 4. Turn the wheel wrench counterclockwise to fit the jack lift head into the proper location before raising the vehicle. Do not remove the wheel nuts yet. { WARNING Raising the vehicle with the jack improperly positioned...
... nuts. Never get under the vehicle, as shown, for the front or rear locations. Front Position 4. Turn the wheel wrench counterclockwise to fit the jack lift head into the proper location before raising the vehicle. Do not remove the wheel nuts yet. { WARNING Raising the vehicle with the jack improperly positioned...
Owner's Manual
Page 314
... front of the jack under Tire Changing on the wheel blocks (B). Attach the jack handle, extension, and wheel wrench to the jack and place it lifts the tire. 10. 10-78 Vehicle Care 3. If the spare tire lowers to raise the jack until the tire stops moving upward and is held... a Flat or Spare Tire and Tools" under the wheel. 9. Loosen the cable by turning the wheel wrench counterclockwise three or four turns. 4. Position the center lift point of the rear bumper.
... front of the jack under Tire Changing on the wheel blocks (B). Attach the jack handle, extension, and wheel wrench to the jack and place it lifts the tire. 10. 10-78 Vehicle Care 3. If the spare tire lowers to raise the jack until the tire stops moving upward and is held... a Flat or Spare Tire and Tools" under the wheel. 9. Loosen the cable by turning the wheel wrench counterclockwise three or four turns. 4. Position the center lift point of the rear bumper.
Owner's Manual
Page 361
... . For more information on the limited offer, visit www.gmmobility.com or call 1-800-833-9935. GMC and General Motors of eligible aftermarket adaptive equipment required for the vehicle, such as hand controls or a wheelchair/ scooter lift for the vehicle. Location of the vehicle Model, year, color, and license plate number of...
... . For more information on the limited offer, visit www.gmmobility.com or call 1-800-833-9935. GMC and General Motors of eligible aftermarket adaptive equipment required for the vehicle, such as hand controls or a wheelchair/ scooter lift for the vehicle. Location of the vehicle Model, year, color, and license plate number of...