
Owner's Manual
Page 121
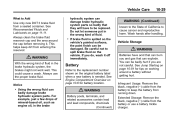
... serious damage to evaporate into the atmosphere. Avoid steep uphill grades. See Filling the Tank on page 10‑3. A loose or missing fuel cap allows fuel to the vehicle: ... 5-13 Light On Steady: An emission control system malfunction has been detected on the vehicle. See Accessories and Modifications... trips with other than those of the same Tire Performance Criteria (TPC) can affect the vehicle's emission controls and can determine if the fuel cap has been left off , wait at least 10 seconds, and restart the engine. Notice: Modifications made to come on. Avoid hard accelerations. ...
... serious damage to evaporate into the atmosphere. Avoid steep uphill grades. See Filling the Tank on page 10‑3. A loose or missing fuel cap allows fuel to the vehicle: ... 5-13 Light On Steady: An emission control system malfunction has been detected on the vehicle. See Accessories and Modifications... trips with other than those of the same Tire Performance Criteria (TPC) can affect the vehicle's emission controls and can determine if the fuel cap has been left off , wait at least 10 seconds, and restart the engine. Notice: Modifications made to come on. Avoid hard accelerations. ...
Owner's Manual
Page 132
... your vehicle serviced by your dealer for more information if the light still remains on , but acceleration and speed may also see if the fuel cap is on . LOW FUEL This message displays if the level of travel. See Engine Oil Pressure Light on page 5‑17 and Engine Oil on... as soon as Lamp Messages TURN SIGNAL This message displays when the turn signal is either off . See StabiliTrak® System on when the fuel cap was loose, it from the display. If the check engine light does come on page 9‑44 for about 1.2 km (0.75 miles) of fuel in...
... your vehicle serviced by your dealer for more information if the light still remains on , but acceleration and speed may also see if the fuel cap is on . LOW FUEL This message displays if the level of travel. See Engine Oil Pressure Light on page 5‑17 and Engine Oil on... as soon as Lamp Messages TURN SIGNAL This message displays when the turn signal is either off . See StabiliTrak® System on when the fuel cap was loose, it from the display. If the check engine light does come on page 9‑44 for about 1.2 km (0.75 miles) of fuel in...
Owner's Manual
Page 223
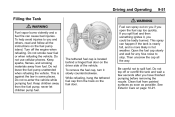
... Do not smoke near fuel or when refueling the vehicle. Do not leave the fuel pump unattended when refueling the vehicle. Then unscrew the cap all the instructions on the fuel pump island. Clean fuel from the fuel pump; See Exterior Care on you if you have finished pumping ...pump fuel. Keep sparks, flames, and smoking materials away from the hook on the driver side of the vehicle. While refueling, hang the tethered fuel cap from fuel. Driving and Operating 9-51 Filling the Tank { WARNING Fuel can spray out on page 10‑91. { WARNING Fuel vapor burns violently...
... Do not smoke near fuel or when refueling the vehicle. Do not leave the fuel pump unattended when refueling the vehicle. Then unscrew the cap all the instructions on the fuel pump island. Clean fuel from the fuel pump; See Exterior Care on you if you have finished pumping ...pump fuel. Keep sparks, flames, and smoking materials away from the hook on the driver side of the vehicle. While refueling, hang the tethered fuel cap from fuel. Driving and Operating 9-51 Filling the Tank { WARNING Fuel can spray out on page 10‑91. { WARNING Fuel vapor burns violently...
Owner's Manual
Page 224
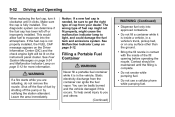
...the atmosphere. Shut off the pump or by notifying the station attendant. The wrong type of fuel by shutting off the flow of fuel cap might not fit properly, might cause the malfunction indicator lamp to light, and could damage the fuel tank and emissions system. WARNING (Continued)... fuel to you and others: (Continued) . . { WARNING If a fire starts while you are refueling, do not remove the nozzle. Make sure the cap is complete. Filling a Portable Fuel Container . { WARNING Never fill a portable fuel container while it clicks. See Fuel System Messages on page 5‑24 and...
...the atmosphere. Shut off the pump or by notifying the station attendant. The wrong type of fuel by shutting off the flow of fuel cap might not fit properly, might cause the malfunction indicator lamp to light, and could damage the fuel tank and emissions system. WARNING (Continued)... fuel to you and others: (Continued) . . { WARNING If a fire starts while you are refueling, do not remove the nozzle. Make sure the cap is complete. Filling a Portable Fuel Container . { WARNING Never fill a portable fuel container while it clicks. See Fuel System Messages on page 5‑24 and...

Owner's Manual
Page 241
... this symbol on it to latch fully. Then lift the hood to 12 in the hood. 1. Before closing the hood, be sure all the filler caps are on the hood prop. Release the secondary latch on the lower left side of the hood. 3. It is located inside the vehicle on the...
... this symbol on it to latch fully. Then lift the hood to 12 in the hood. 1. Before closing the hood, be sure all the filler caps are on the hood prop. Release the secondary latch on the lower left side of the hood. 3. It is located inside the vehicle on the...
Owner's Manual
Page 243
...‑10. See "When to Add Engine Oil" under Engine Oil on page 10‑81. J. Battery on page 10‑18. E. Engine Oil Fill Cap. L. M. Vehicle Care A. Brake Fluid Reservoir. Power Steering Fluid Reservoir (low in engine compartment). F. See Cooling System on page 10‑29. See Hydraulic Clutch on...
...‑10. See "When to Add Engine Oil" under Engine Oil on page 10‑81. J. Battery on page 10‑18. E. Engine Oil Fill Cap. L. M. Vehicle Care A. Brake Fluid Reservoir. Power Steering Fluid Reservoir (low in engine compartment). F. See Cooling System on page 10‑29. See Hydraulic Clutch on...
Owner's Manual
Page 245
... Engine Oil on page 10‑10. 10-9 H. See Brake Fluid on page 10‑19. Power Steering Fluid Reservoir. Engine Oil Fill Cap. K. Engine Oil Dipstick. Radiator Pressure Cap. See Cooling System on page 10‑25. B. E. See Power Steering Fluid on page 10‑18. See "When to Add Engine...
... Engine Oil on page 10‑10. 10-9 H. See Brake Fluid on page 10‑19. Power Steering Fluid Reservoir. Engine Oil Fill Cap. K. Engine Oil Dipstick. Radiator Pressure Cap. See Cooling System on page 10‑25. B. E. See Power Steering Fluid on page 10‑18. See "When to Add Engine...
Owner's Manual
Page 247
... oils meeting the requirements for more information. Viscosity Grade SAE 5W‐30 is approved to remove the excess amount of the engine oil fill cap. An oil of the appropriate viscosity grade, always select an oil that the oil level gets above or below −20°F (−29°...
... oils meeting the requirements for more information. Viscosity Grade SAE 5W‐30 is approved to remove the excess amount of the engine oil fill cap. An oil of the appropriate viscosity grade, always select an oil that the oil level gets above or below −20°F (−29°...
Owner's Manual
Page 253
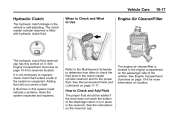
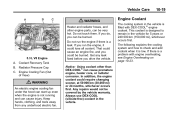
Vehicle Care 10-17 Hydraulic Clutch The hydraulic clutch linkage in this symbol on the reservoir cap. See Engine Compartment Overview on the passenger side of the diaphragm when it . Have the system inspected and repaired. See Recommended Fluids and Lubricants on... 10‑6 for the proper fluid. The clutch master cylinder reservoir is not necessary to Use Engine Air Cleaner/Filter The hydraulic clutch fluid reservoir cap has this system could indicate a problem. Adding fluid will not correct a leak. The engine air cleaner/filter is located in the system is self-...
Vehicle Care 10-17 Hydraulic Clutch The hydraulic clutch linkage in this symbol on the reservoir cap. See Engine Compartment Overview on the passenger side of the diaphragm when it . Have the system inspected and repaired. See Recommended Fluids and Lubricants on... 10‑6 for the proper fluid. The clutch master cylinder reservoir is not necessary to Use Engine Air Cleaner/Filter The hydraulic clutch fluid reservoir cap has this system could indicate a problem. Adding fluid will not correct a leak. The engine air cleaner/filter is located in the system is self-...
Owner's Manual
Page 254
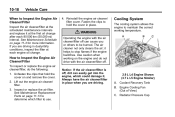
... the clips to use. 2.9 L L4 Engine Shown (3.7 L L5 Engine Similar) A. it at the scheduled maintenance intervals and replace it helps to be burned. Radiator Pressure Cap When to Inspect the Engine Air Cleaner/Filter Inspect the air cleaner/filter at the first oil change after each engine oil change. How to...
... the clips to use. 2.9 L L4 Engine Shown (3.7 L L5 Engine Similar) A. it at the scheduled maintenance intervals and replace it helps to be burned. Radiator Pressure Cap When to Inspect the Engine Air Cleaner/Filter Inspect the air cleaner/filter at the first oil change after each engine oil change. How to...
Owner's Manual
Page 255
..., heater core, or radiator corrosion. Vehicle Care 10-19 { WARNING Heater and radiator hoses, and other than DEX-COOL® can be burned. Radiator Pressure Cap C. If there is filled with engine overheating, see Engine Overheating on page 10‑23. 5.3 L V8 Engine A. Do not touch them. Do not run the...
..., heater core, or radiator corrosion. Vehicle Care 10-19 { WARNING Heater and radiator hoses, and other than DEX-COOL® can be burned. Radiator Pressure Cap C. If there is filled with engine overheating, see Engine Overheating on page 10‑23. 5.3 L V8 Engine A. Do not touch them. Do not run the...

Owner's Manual
Page 257
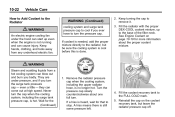
...-COOL coolant mixture at the FULL COLD mark, start the vehicle. If it . If coolant is at the coolant recovery tank. The coolant recovery tank cap has this procedure could be on a level surface when checking the coolant level. When the engine is not at or above the FULL COLD level...
...-COOL coolant mixture at the FULL COLD mark, start the vehicle. If it . If coolant is at the coolant recovery tank. The coolant recovery tank cap has this procedure could be on a level surface when checking the coolant level. When the engine is not at or above the FULL COLD level...
Owner's Manual
Page 258
... hot. They are under the hood can start up to the base of the filler neck. even a little - Never turn . Keep turning the cap to the FULL COLD mark. 5. Wait for that to stop. A hiss means there is heard, wait for the (Continued) 1. Fill the coolant recovery tank to ... away from any underhood electric fan. { WARNING Steam and scalding liquids from a hot cooling system can come out at high speed. Remove the radiator pressure cap when the cooling system, including the upper radiator hose, is needed, add the proper mixture directly to the radiator, but leave the radiator pressure...
... hot. They are under the hood can start up to the base of the filler neck. even a little - Never turn . Keep turning the cap to the FULL COLD mark. 5. Wait for that to stop. A hiss means there is heard, wait for the (Continued) 1. Fill the coolant recovery tank to ... away from any underhood electric fan. { WARNING Steam and scalding liquids from a hot cooling system can come out at high speed. Remove the radiator pressure cap when the cooling system, including the upper radiator hose, is needed, add the proper mixture directly to the radiator, but leave the radiator pressure...

Owner's Manual
Page 259
... installed, coolant loss and possible engine damage may occur. Notice: If the engine catches fire because of the filler neck, reinstall the pressure cap. By this procedure if coolant begins to lift the hood, make sure the vehicle is not covered by pushing the accelerator pedal down. Notice...: If the pressure cap is normal and helps cool the engine. Notice: Engine damage from running . Turn off the engine. See Roadside Assistance Program (U.S. See Engine ...
... installed, coolant loss and possible engine damage may occur. Notice: If the engine catches fire because of the filler neck, reinstall the pressure cap. By this procedure if coolant begins to lift the hood, make sure the vehicle is not covered by pushing the accelerator pedal down. Notice...: If the pressure cap is normal and helps cool the engine. Notice: Engine damage from running . Turn off the engine. See Roadside Assistance Program (U.S. See Engine ...
Owner's Manual
Page 261
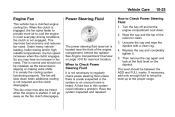
...will go away as the transmission slipping or making extra shifts. It will slow down . 2. Wipe the cap and the top of the engine compartment, behind the radiator. Then remove the cap again and look at the fluid level on page 10‑6 for reservoir location. 3. When to Check ...check power steering fluid unless there is a leak suspected in this system could indicate a problem. See Engine Compartment Overview on the dipstick. Replace the cap and completely tighten it. 5. It is not engaged. Power Steering Fluid How to the proper range. If necessary, add only enough fluid to ...
...will go away as the transmission slipping or making extra shifts. It will slow down . 2. Wipe the cap and the top of the engine compartment, behind the radiator. Then remove the cap again and look at the fluid level on page 10‑6 for reservoir location. 3. When to Check ...check power steering fluid unless there is a leak suspected in this system could indicate a problem. See Engine Compartment Overview on the dipstick. Replace the cap and completely tighten it. 5. It is not engaged. Power Steering Fluid How to the proper range. If necessary, add only enough fluid to ...

Owner's Manual
Page 262
... manufacturer's instructions before use engine coolant (antifreeze) in the windshield washer. When using concentrated washer fluid, follow the manufacturer's instructions for reservoir location. Open the cap with ready-to Use When windshield washer fluid is completely full. Also, water does not clean as well as washer fluid. . Add washer fluid until...
... manufacturer's instructions before use engine coolant (antifreeze) in the windshield washer. When using concentrated washer fluid, follow the manufacturer's instructions for reservoir location. Open the cap with ready-to Use When windshield washer fluid is completely full. Also, water does not clean as well as washer fluid. . Add washer fluid until...
Owner's Manual
Page 265
... Storage { WARNING Batteries have to keep dirt from running down. Battery Refer to spill brake fluid on working around the cap before removing it off immediately. Always clean the brake fluid reservoir cap and the area around a battery without getting hurt. If brake fluid is needed. If you and gas that they...
... Storage { WARNING Batteries have to keep dirt from running down. Battery Refer to spill brake fluid on working around the cap before removing it off immediately. Always clean the brake fluid reservoir cap and the area around a battery without getting hurt. If brake fluid is needed. If you and gas that they...
Owner's Manual
Page 270
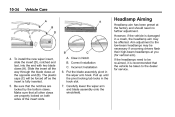
... end last, into the end with two blade claws (A). Make sure that all the way through the blade claws at the opposite end (B). The plastic caps (C) will be taken to the dealer for vertical aim). 4. Carefully lower the wiper arm and blade assembly onto the windshield. If the headlamps need no...
... end last, into the end with two blade claws (A). Make sure that all the way through the blade claws at the opposite end (B). The plastic caps (C) will be taken to the dealer for vertical aim). 4. Carefully lower the wiper arm and blade assembly onto the windshield. If the headlamps need no...

Owner's Manual
Page 288
10-52 Vehicle Care Remove the valve cap from the tire valve stem. If the inflation pressure is low, add air until the recommended pressure is high, press on the metal stem in ... Check Use a good quality pocket-type gauge to prevent leaks and keep out dirt and moisture. If the inflation pressure is reached. Return the valve caps on tires. Do not forget to get a pressure measurement. Tire Pressure for at least three hours or no further adjustment is necessary. Some high-speed...
10-52 Vehicle Care Remove the valve cap from the tire valve stem. If the inflation pressure is low, add air until the recommended pressure is high, press on the metal stem in ... Check Use a good quality pocket-type gauge to prevent leaks and keep out dirt and moisture. If the inflation pressure is reached. Return the valve caps on tires. Do not forget to get a pressure measurement. Tire Pressure for at least three hours or no further adjustment is necessary. Some high-speed...
Owner's Manual
Page 305
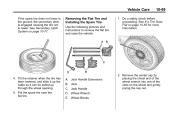
... Handle Extensions B. Wheel Blocks 2. Do a safety check before proceeding. See If a Tire Goes Flat on the wheel and gently prying the cap out. Jack Handle D. Wheel Wrench E. Remove the center cap by placing the chisel end of the wheel wrench into one of the slots on page 10‑65 for more...
... Handle Extensions B. Wheel Blocks 2. Do a safety check before proceeding. See If a Tire Goes Flat on the wheel and gently prying the cap out. Jack Handle D. Wheel Wrench E. Remove the center cap by placing the chisel end of the wheel wrench into one of the slots on page 10‑65 for more...
