
Owner's Manual
Page 41
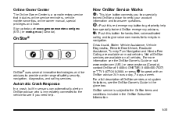
... see the OnStar Owner's Guide or visit www.onstar.com (U.S.) or www.onstar.ca (Canada), contact OnStar at : www.gmownercenter.com/gmc (U.S.) or www.gm.ca (Canada). For more . OnStar service is immediately connected to the vehicle to the OnStar terms and conditions included... in the glove box. X: Push this red emergency button to provide a wide range of OnStar services and system limitations, see the OnStar Owner's Guide in the OnStar Subscriber Information. ...
... see the OnStar Owner's Guide or visit www.onstar.com (U.S.) or www.onstar.ca (Canada), contact OnStar at : www.gmownercenter.com/gmc (U.S.) or www.gm.ca (Canada). For more . OnStar service is immediately connected to the vehicle to the OnStar terms and conditions included... in the glove box. X: Push this red emergency button to provide a wide range of OnStar services and system limitations, see the OnStar Owner's Guide in the OnStar Subscriber Information. ...

Owner's Manual
Page 42
.... Press Q and request a vehicle diagnostic. the direction from providing OnStar service at all services are other problems OnStar cannot control that the OnStar equipment is red, the system may prevent OnStar from which the vehicle was involved in the event of the radio if the OnStar advisor cannot be functioning properly...
.... Press Q and request a vehicle diagnostic. the direction from providing OnStar service at all services are other problems OnStar cannot control that the OnStar equipment is red, the system may prevent OnStar from which the vehicle was involved in the event of the radio if the OnStar advisor cannot be functioning properly...
Owner's Manual
Page 362
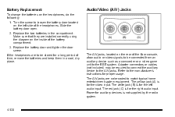
... for the left side of the headphones. The white jack (B) is for the right audio input. Replace the two batteries in a cool, dry place. The red jack (C) is not supplied by the radio system. 4-138 Power for auxiliary devices is for the video input. Slide the battery door open. 2. Make sure...
... for the left side of the headphones. The white jack (B) is for the right audio input. Replace the two batteries in a cool, dry place. The red jack (C) is not supplied by the radio system. 4-138 Power for auxiliary devices is for the video input. Slide the battery door open. 2. Make sure...

Owner's Manual
Page 406
... your vehicle. Stay with the vehicle unless there is blocking the exhaust pipe. WARNING: (Continued) . Turn on the Hazard Warning Flashers on page 8‑7. Tie a red cloth to get help nearby. Fully open the air outlets on page 3‑58. It can trap exhaust gases under your vehicle, especially any that...
... your vehicle. Stay with the vehicle unless there is blocking the exhaust pipe. WARNING: (Continued) . Turn on the Hazard Warning Flashers on page 8‑7. Tie a red cloth to get help nearby. Fully open the air outlets on page 3‑58. It can trap exhaust gases under your vehicle, especially any that...
Owner's Manual
Page 457
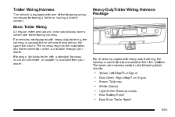
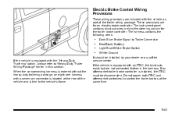
... Dark Green: Right Stop/Turn Signal Brown: Taillamps White: Ground Light Green: Back-up Lamps Red: Battery Feed* Dark Blue: Trailer Brake* 5-81 Heavy-DutyTrailer Wiring Harness Package Basic Trailer Wiring All regular, extended cab and crew cab pickups have a seven‐wire trailer towing harness. Trailer Wiring Harness The vehicle is equipped with...
... Dark Green: Right Stop/Turn Signal Brown: Taillamps White: Ground Light Green: Back-up Lamps Red: Battery Feed* Dark Blue: Trailer Brake* 5-81 Heavy-DutyTrailer Wiring Harness Package Basic Trailer Wiring All regular, extended cab and crew cab pickups have a seven‐wire trailer towing harness. Trailer Wiring Harness The vehicle is equipped with...
Owner's Manual
Page 458
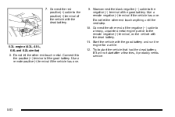
... vehicle, attached to the camper. Yellow: Left Stop/Turn Signal Dark Green: Right Stop/Turn Signal Brown: Taillamps White: Ground Light Green: Back-up Lamps Red: Battery Feed Dark Blue: Trailer Brake 5-82
... vehicle, attached to the camper. Yellow: Left Stop/Turn Signal Dark Green: Right Stop/Turn Signal Brown: Taillamps White: Ground Light Green: Back-up Lamps Red: Battery Feed Dark Blue: Trailer Brake 5-82
Owner's Manual
Page 459
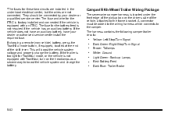
... with the "Heavy-Duty Trailering" option, please refer to "Heavy-Duty Trailer Wiring Package" earlier in the harness. Dark Blue: Brake Signal to Trailer Connector Red/Black: Battery Light Blue/White: Brake Switch White: Ground If the vehicle is equipped with the vehicle as part of the vehicle and is installed...
... with the "Heavy-Duty Trailering" option, please refer to "Heavy-Duty Trailer Wiring Package" earlier in the harness. Dark Blue: Brake Signal to Trailer Connector Red/Black: Battery Light Blue/White: Brake Switch White: Ground If the vehicle is equipped with the vehicle as part of the vehicle and is installed...

Owner's Manual
Page 510
.... To avoid the possibility of the engine, where the negative battery cable attaches. To uncover the positive (+) terminal, open the red plastic cover. The remote negative (−) terminal is located under a red plastic cover at the positive battery post. If you leave the radio or other accessories when jump starting procedure, they...
.... To avoid the possibility of the engine, where the negative battery cable attaches. To uncover the positive (+) terminal, open the red plastic cover. The remote negative (−) terminal is located under a red plastic cover at the positive battery post. If you leave the radio or other accessories when jump starting procedure, they...
Owner's Manual
Page 512
... the other end of the negative (−) cable to a heavy, unpainted metal engine part or to the positive (+) terminal of the good battery. Connect the red positive (+) cable to the remote negative (−) terminal, on the vehicle with the dead battery. 9. 7. Do not let the other end touch metal. Use a remote...
... the other end of the negative (−) cable to a heavy, unpainted metal engine part or to the positive (+) terminal of the good battery. Connect the red positive (+) cable to the remote negative (−) terminal, on the vehicle with the dead battery. 9. 7. Do not let the other end touch metal. Use a remote...
Owner's Manual
Page 513
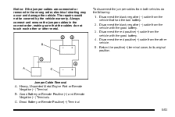
... (−) Terminal B. To disconnect the jumper cables from both vehicles do not touch each other or other vehicle. 5. Disconnect the red positive (+) cable from the other metal. Jumper Cable Removal A. Disconnect the red positive (+) cable from the vehicle with the good battery. 3. Dead Battery or Remote Positive (+) Terminal 6-53 Disconnect the black...
... (−) Terminal B. To disconnect the jumper cables from both vehicles do not touch each other or other vehicle. 5. Disconnect the red positive (+) cable from the other metal. Jumper Cable Removal A. Disconnect the red positive (+) cable from the vehicle with the good battery. 3. Dead Battery or Remote Positive (+) Terminal 6-53 Disconnect the black...
