
Owner's Manual
Page 35
...The accessory power outlets are powered, even when the ignition is an accessory power outlet inside rear view mirror or the navigation screen, if equipped. See Accessory Power Outlet(s) on the vehicle's rear bumper clean to run down. Keep the sensors on page 4‑17. The system can be... and system information. Power Outlets Accessory power outlets can be another accessory power outlet in the bezel for more information, see Rear Vision Camera (RVC) on the rear bumper to use power outlets while the ignition is shifted into R (Reverse) and operates at speeds less than 8 km/h (5 mph...
...The accessory power outlets are powered, even when the ignition is an accessory power outlet inside rear view mirror or the navigation screen, if equipped. See Accessory Power Outlet(s) on the vehicle's rear bumper clean to run down. Keep the sensors on page 4‑17. The system can be... and system information. Power Outlets Accessory power outlets can be another accessory power outlet in the bezel for more information, see Rear Vision Camera (RVC) on the rear bumper to use power outlets while the ignition is shifted into R (Reverse) and operates at speeds less than 8 km/h (5 mph...
Owner's Manual
Page 202
The sensors on the rear bumper are too close or far from the vehicle Children, pedestrians, bicyclists, or pets. . It cannot detect: . Objects that are below the bumper, underneath the vehicle, or if they are used to detect the distance to an object up . If you do not...system, it operates at least 25.4 cm (10 in R (Reverse). Object Detection Systems Ultrasonic Rear Parking Assist (URPA) For vehicles with parking and avoiding objects while in ) off the ground. { WARNING: The Ultrasonic Rear Parking Assist (URPA) system does not replace driver vision. vehicle damage, injury, or death ...
The sensors on the rear bumper are too close or far from the vehicle Children, pedestrians, bicyclists, or pets. . It cannot detect: . Objects that are below the bumper, underneath the vehicle, or if they are used to detect the distance to an object up . If you do not...system, it operates at least 25.4 cm (10 in R (Reverse). Object Detection Systems Ultrasonic Rear Parking Assist (URPA) For vehicles with parking and avoiding objects while in ) off the ground. { WARNING: The Ultrasonic Rear Parking Assist (URPA) system does not replace driver vision. vehicle damage, injury, or death ...
Owner's Manual
Page 203
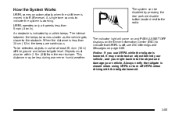
... beeps becomes shorter as the vehicle gets closer to indicate the system is lowered, it may be within 2.5 m (8 ft) from the rear bumper. An obstacle is indicated by pressing the rear park aid disable button located next to indicate that URPA is off, see DIC Warnings and Messages on automatically when the shift...
... beeps becomes shorter as the vehicle gets closer to indicate the system is lowered, it may be within 2.5 m (8 ft) from the rear bumper. An obstacle is indicated by pressing the rear park aid disable button located next to indicate that URPA is off, see DIC Warnings and Messages on automatically when the shift...

Owner's Manual
Page 204
...the tailgate during the last drive cycle. A trailer was attached to repair the system. Take the vehicle to your dealer. 3-66 The vehicle's bumper is raised, URPA will be seen; A tow bar is still disabled, after washing the vehicle in cold weather. The message may affect system... performance, such as vibrations from a jackhammer or the compression of mud, dirt, snow, ice and slush. Keep the vehicle's rear bumper free of air brakes on a very large truck. . . . When the System Does Not Seem to Work Properly If the URPA system will not...
...the tailgate during the last drive cycle. A trailer was attached to repair the system. Take the vehicle to your dealer. 3-66 The vehicle's bumper is raised, URPA will be seen; A tow bar is still disabled, after washing the vehicle in cold weather. The message may affect system... performance, such as vibrations from a jackhammer or the compression of mud, dirt, snow, ice and slush. Keep the vehicle's rear bumper free of air brakes on a very large truck. . . . When the System Does Not Seem to Work Properly If the URPA system will not...
Owner's Manual
Page 205
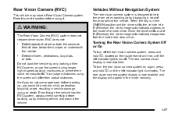
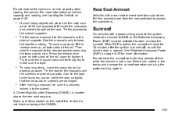
... backing up by displaying a view of the area behind and around the vehicle. 3-67 Once the driver shifts out of view, below the bumper, or underneath the vehicle. Read this entire section before backing up by checking behind the vehicle. Detect children, pedestrians, bicyclists, or pets. ... in the ON/RUN position and the driver shifts the vehicle into R (Reverse), the video image automatically appears on the inside rear view mirror. { WARNING: The Rear Vision Camera (RVC) system does not replace driver vision. Your judged distances using it. RVC does not: . When the key...
... backing up by displaying a view of the area behind and around the vehicle. 3-67 Once the driver shifts out of view, below the bumper, or underneath the vehicle. Read this entire section before backing up by checking behind the vehicle. Detect children, pedestrians, bicyclists, or pets. ... in the ON/RUN position and the driver shifts the vehicle into R (Reverse), the video image automatically appears on the inside rear view mirror. { WARNING: The Rear Vision Camera (RVC) system does not replace driver vision. Your judged distances using it. RVC does not: . When the key...
Owner's Manual
Page 208
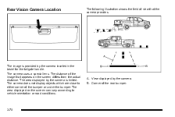
... orientation or road conditions. The camera uses a special lens. A. Corner of the bumper or under the bumper. The image is limited. The distance of view that appears on the screen can vary according to either corner of the rear bumper. 3-70 Rear Vision Camera Location The following illustration shows the field of the image that...
... orientation or road conditions. The camera uses a special lens. A. Corner of the bumper or under the bumper. The image is limited. The distance of view that appears on the screen can vary according to either corner of the rear bumper. 3-70 Rear Vision Camera Location The following illustration shows the field of the image that...
Owner's Manual
Page 221
..., move a crossrail, lift the release lever up, on the roof, cut a piece of the rail. Use the crossrails only to keep the load from the rear seatback to RUN, or the Retained Accessory Power (RAP) must be sure it to the siderail supports. Tie the load and secure it is opened... on vehicle capacity and loading, see Loading the Vehicle on the roof of the rail, down from sliding. After moving a crossrail, be activated to the bumpers, but do not tie the load so tightly that the crossrails or siderails are placed on both sides of the vehicle do not block or...
..., move a crossrail, lift the release lever up, on the roof, cut a piece of the rail. Use the crossrails only to keep the load from the rear seatback to RUN, or the Retained Accessory Power (RAP) must be sure it to the siderail supports. Tie the load and secure it is opened... on vehicle capacity and loading, see Loading the Vehicle on the roof of the rail, down from sliding. After moving a crossrail, be activated to the bumpers, but do not tie the load so tightly that the crossrails or siderails are placed on both sides of the vehicle do not block or...
Owner's Manual
Page 444
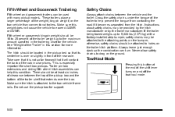
...maximum amount specified in this condition. This is attached to help this section for support. There should be 15 to 25 percent of the cab in front of the weight (kingpin weight) on the ground. Instructions about safety chains may be attached to drag on the tow vehicle...shelf that it is over the box. These trailers place a larger percentage of the rear axle. Fifth Wheel and Gooseneck Trailering Fifth wheel and gooseneck trailers can be used with a factory-installed step bumper, safety chains may be provided by the hitch manufacturer or by the trailer manufacturer. If...
...maximum amount specified in this condition. This is attached to help this section for support. There should be 15 to 25 percent of the cab in front of the weight (kingpin weight) on the ground. Instructions about safety chains may be attached to drag on the tow vehicle...shelf that it is over the box. These trailers place a larger percentage of the rear axle. Fifth Wheel and Gooseneck Trailering Fifth wheel and gooseneck trailers can be used with a factory-installed step bumper, safety chains may be provided by the hitch manufacturer or by the trailer manufacturer. If...
Owner's Manual
Page 528
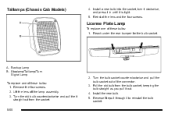
... bulb socket, keeping the bulb straight as you pull it is tight. 5. Taillamps (Chassis Cab Models) 4. License Plate Lamp To replace one of the connector. 3. Backup Lamp B. Pull the old bulb from the socket. 6-68 2. Reach under the rear bumper for the bulb socket. Remove the four screws. 2. Install the new bulb. 5. Install...
... bulb socket, keeping the bulb straight as you pull it is tight. 5. Taillamps (Chassis Cab Models) 4. License Plate Lamp To replace one of the connector. 3. Backup Lamp B. Pull the old bulb from the socket. 6-68 2. Reach under the rear bumper for the bulb socket. Remove the four screws. 2. Install the new bulb. 5. Install...
Owner's Manual
Page 564
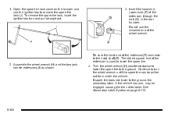
...vehicle. Insert the hoist end (open end) (F) of the extension is used to remove the spare tire lock (J). See Secondary Latch System on the bumper and use the chiseled end of the extension (F) connects to turn and pull straight out. 3. Open the spare tire lock cover on page 6‑113.... 6-104 The ribbed square end of the extension through the hole (G) in the rear bumper. Continue to the hoist shaft (E). 1. To remove the spare tire lock, insert the ignition key turn the wheel wrench until the spare tire can be...
...vehicle. Insert the hoist end (open end) (F) of the extension is used to remove the spare tire lock (J). See Secondary Latch System on the bumper and use the chiseled end of the extension (F) connects to turn and pull straight out. 3. Open the spare tire lock cover on page 6‑113.... 6-104 The ribbed square end of the extension through the hole (G) in the rear bumper. Continue to the hoist shaft (E). 1. To remove the spare tire lock, insert the ignition key turn the wheel wrench until the spare tire can be...
Owner's Manual
Page 574
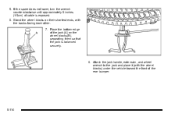
Place the bottom edge of the jack (A) on their shortest ends, with the wheel blocks) under the vehicle toward the front of cable is balanced securely. 8. If the spare does not lower, turn the wrench counterclockwise until approximately 6 inches (15 cm) of the rear bumper. 6-114 Attach the jack handle, extension, and wheel wrench to the jack and place it (with the backs facing each other. 7. Stand the wheel blocks on the wheel blocks (B), separating them so that the jack is exposed. 6. 5.
Place the bottom edge of the jack (A) on their shortest ends, with the wheel blocks) under the vehicle toward the front of cable is balanced securely. 8. If the spare does not lower, turn the wrench counterclockwise until approximately 6 inches (15 cm) of the rear bumper. 6-114 Attach the jack handle, extension, and wheel wrench to the jack and place it (with the backs facing each other. 7. Stand the wheel blocks on the wheel blocks (B), separating them so that the jack is exposed. 6. 5.
Owner's Manual
Page 578
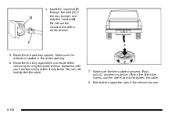
... sure the retainer is stored securely. Reinstall the spare tire lock, if the vehicle has one. 6-118 Make sure the tire is seated in the rear bumper and onto the hoist shaft. 4. Insert the hoist end (F) through the hole (G) in the wheel opening. 6. Do not use the wheel wrench to turn (B) the...
... sure the retainer is stored securely. Reinstall the spare tire lock, if the vehicle has one. 6-118 Make sure the tire is seated in the rear bumper and onto the hoist shaft. 4. Insert the hoist end (F) through the hole (G) in the wheel opening. 6. Do not use the wheel wrench to turn (B) the...


