Owner's Manual
Page 12
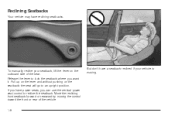
Move the reclining front seatback forward or rearward by moving . 1-6 Reclining Seatbacks Your vehicle may have a seatback reclined if your seatback, lift the lever on the seatback, the seat will go to lock the seatback where you can use the vertical power seat control to recline the ...
Move the reclining front seatback forward or rearward by moving . 1-6 Reclining Seatbacks Your vehicle may have a seatback reclined if your seatback, lift the lever on the seatback, the seat will go to lock the seatback where you can use the vertical power seat control to recline the ...
Owner's Manual
Page 16
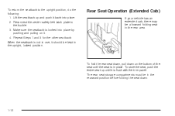
... area. Repeat Steps 1 and 3 for the other seatback. To return the seatback to the buckle. 3. When the seatback is flush with the trim panel. Lift the seatback up until the seat is locked into place. 2. To store the seat, push the entire seat up and push it back into place...
... area. Repeat Steps 1 and 3 for the other seatback. To return the seatback to the buckle. 3. When the seatback is flush with the trim panel. Lift the seatback up until the seat is locked into place. 2. To store the seat, push the entire seat up and push it back into place...
Owner's Manual
Page 123
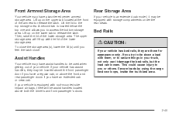
... Area If your vehicle is equipped with roof-mounted side impact air bags, there will lift up with the lid of your vehicle. To close . This could cause injury to ...can it may have assist handles to access the bottom storage area. Lift up on the upper tab located at the front of the lower storage area. Lift up on the lower tab to the top storage area. Front ...Armrest Storage Area Your vehicle may have an extended cab or crew cab. Lift the lid to release the latch. Secure loads by using the cargo tie-down a load with storage compartments...
... Area If your vehicle is equipped with roof-mounted side impact air bags, there will lift up with the lid of your vehicle. To close . This could cause injury to ...can it may have assist handles to access the bottom storage area. Lift up on the upper tab located at the front of the lower storage area. Lift up on the lower tab to the top storage area. Front ...Armrest Storage Area Your vehicle may have an extended cab or crew cab. Lift the lid to release the latch. Secure loads by using the cargo tie-down a load with storage compartments...
Owner's Manual
Page 145
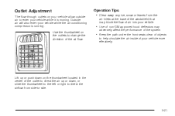
... the direction of the outlet to direct the air up or push down on your vehicle allow outside air to enter your vehicle more effectively. Lift up or down, or slide the thumbwheel to the left or right to direct the airflow from the air inlets at the base...
... the direction of the outlet to direct the air up or push down on your vehicle allow outside air to enter your vehicle more effectively. Lift up or down, or slide the thumbwheel to the left or right to direct the airflow from the air inlets at the base...
Owner's Manual
Page 275
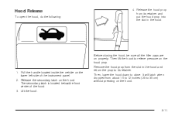
... retainer. Release the hood prop from the slot in the hood and return the prop to 30 cm) without pressing on the hood prop. Then lift the hood to close. Pull the handle located inside the vehicle on the lower left side of the hood. 3. Release the secondary latch on properly.... Hood Release To open the hood, do the following: 4. Lift the hood. 5-11 Before closing the hood, be sure all the filler caps are on the hood.
... retainer. Release the hood prop from the slot in the hood and return the prop to 30 cm) without pressing on the hood prop. Then lift the hood to close. Pull the handle located inside the vehicle on the lower left side of the hood. 3. Release the secondary latch on properly.... Hood Release To open the hood, do the following: 4. Lift the hood. 5-11 Before closing the hood, be sure all the filler caps are on the hood.
Owner's Manual
Page 282
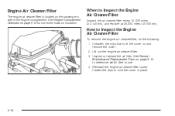
... replace at 25,000 miles (40 000 km). Inspect or replace the air filter. See Normal Maintenance Replacement Parts on and remove the cover. 2. Lift out the engine air cleaner/filter. 3. See Engine Compartment Overview on page 5-12 for more information on the passenger's side of the engine compartment...
... replace at 25,000 miles (40 000 km). Inspect or replace the air filter. See Normal Maintenance Replacement Parts on and remove the cover. 2. Lift out the engine air cleaner/filter. 3. See Engine Compartment Overview on page 5-12 for more information on the passenger's side of the engine compartment...
Owner's Manual
Page 294
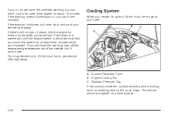
... boiling, don't do anything else until it 's safe to be parked on , you 'll see: A. If you can drive normally. You may decide not to lift the hood but to get everyone out of steam, idle the engine for at least three minutes while you 're parked. Cooling System When you... overheat warning, you still have the warning, turn off the engine and get service help right away. Engine Cooling Fan C. Coolant Recovery Tank B. Just to lift the hood, here's what you can drive.
... boiling, don't do anything else until it 's safe to be parked on , you 'll see: A. If you can drive normally. You may decide not to lift the hood but to get everyone out of steam, idle the engine for at least three minutes while you 're parked. Cooling System When you... overheat warning, you still have the warning, turn off the engine and get service help right away. Engine Cooling Fan C. Coolant Recovery Tank B. Just to lift the hood, here's what you can drive.
Owner's Manual
Page 317
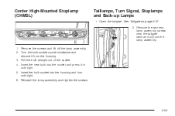
Remove the two rear lamp assembly screws near the tailgate latch and pull out the lamp assembly. 1. Remove the screws and lift off the lamp assembly. 2. Insert the new bulb into the housing and turn until tight. 5. Reinstall the lamp assembly and tighten the screws. 5-53 Center ...
Remove the two rear lamp assembly screws near the tailgate latch and pull out the lamp assembly. 1. Remove the screws and lift off the lamp assembly. 2. Insert the new bulb into the housing and turn until tight. 5. Reinstall the lamp assembly and tighten the screws. 5-53 Center ...
Owner's Manual
Page 319
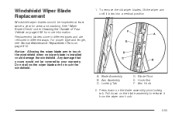
... locking tab. For proper type and length, see Normal Maintenance Replacement Parts on page 5-98 for wear and cracking. To remove the old wiper blades, lift the wiper arm until it from the wiper arm hook. 5-55 Blade Pivot E. Notice: Allowing the wiper blade arm to touch the windshield. 1. Do not...
... locking tab. For proper type and length, see Normal Maintenance Replacement Parts on page 5-98 for wear and cracking. To remove the old wiper blades, lift the wiper arm until it from the wiper arm hook. 5-55 Blade Pivot E. Notice: Allowing the wiper blade arm to touch the windshield. 1. Do not...
Owner's Manual
Page 337
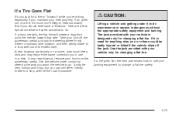
... the traffic lane. If it 's much like a skid and may be badly injured or killed if the vehicle slips off the road if possible. {CAUTION: Lifting a vehicle and getting under control by steering the way you want the vehicle to do maintenance or repairs is used for anything else, you or...
... the traffic lane. If it 's much like a skid and may be badly injured or killed if the vehicle slips off the road if possible. {CAUTION: Lifting a vehicle and getting under control by steering the way you want the vehicle to do maintenance or repairs is used for anything else, you or...
Owner's Manual
Page 345
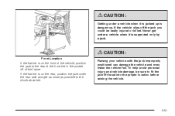
... you could be sure to the rear of the front tire in the pocket off of the vehicle, position the jack to fit the jack lift head into the proper location before raising the vehicle. 5-81
... you could be sure to the rear of the front tire in the pocket off of the vehicle, position the jack to fit the jack lift head into the proper location before raising the vehicle. 5-81
Owner's Manual
Page 355
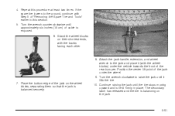
Attach the jack handle, extension, and wheel wrench to the jack and place it lifts the tire. 7. Place the bottom edge of cable is held firmly in this procedure at least two times. If the spare tire lowers to ... on the wheel blocks, separating them so that the jack is balancing on their shortest ends, with the backs facing each other. 8. Position the center lift point of the jack under the vehicle towards the front of "Removing the Spare Tire and Tools" earlier in place. The secondary latch has released...
Attach the jack handle, extension, and wheel wrench to the jack and place it lifts the tire. 7. Place the bottom edge of cable is held firmly in this procedure at least two times. If the spare tire lowers to ... on the wheel blocks, separating them so that the jack is balancing on their shortest ends, with the backs facing each other. 8. Position the center lift point of the jack under the vehicle towards the front of "Removing the Spare Tire and Tools" earlier in place. The secondary latch has released...
Owner's Manual
Page 369
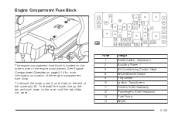
See Engine Compartment Overview on page 5-12 for more information on the end of the cover and lift. To remove the cover, push in on the tab on location of the engine compartment. To reinstall the cover, line up the tab and push ...
See Engine Compartment Overview on page 5-12 for more information on the end of the cover and lift. To remove the cover, push in on the tab on location of the engine compartment. To reinstall the cover, line up the tab and push ...
Owner's Manual
Page 397
... Disabilities This program, available to qualified applicants, can reimburse you up to determine your vehicle's eligibility, see your vehicle (hand controls, wheelchair/ scooter lifts, etc.). For more details, or to $1,000 toward eligible aftermarket driver or passenger adaptive equipment you with free resource information, such as area driver assessment...
... Disabilities This program, available to qualified applicants, can reimburse you up to determine your vehicle's eligibility, see your vehicle (hand controls, wheelchair/ scooter lifts, etc.). For more details, or to $1,000 toward eligible aftermarket driver or passenger adaptive equipment you with free resource information, such as area driver assessment...