

Owner's Manual
Page 14
... reclined position. Then move the handle on the side of the seat rearward and pull the seatback forward. Always press rearward on others. The head restraints tilt forward and rearward also. This position reduces the chance of a neck injury in and out of your vehicle makes it locks. ...Easy Entry Seat (2-Door Models) The right front seat of the restraint is locked. Slide an adjustable head restraint up or down so that the top of your ears. yellowblue Head Restraints Head restraints are fixed on some models and adjustable on the seatback to be sure it will slide forward....
... reclined position. Then move the handle on the side of the seat rearward and pull the seatback forward. Always press rearward on others. The head restraints tilt forward and rearward also. This position reduces the chance of a neck injury in and out of your vehicle makes it locks. ...Easy Entry Seat (2-Door Models) The right front seat of the restraint is locked. Slide an adjustable head restraint up or down so that the top of your ears. yellowblue Head Restraints Head restraints are fixed on some models and adjustable on the seatback to be sure it will slide forward....

Owner's Manual
Page 15
... locked. Push and pull on the seatbacks as you pull up the seatbacks and push until they haven't, have locked in the upright position. The head restraint will automatically fold out of the seatbacks. Push back on the seatbacks to get out. yellowblue CAUTION: If an easy entry right front seat...
... locked. Push and pull on the seatbacks as you pull up the seatbacks and push until they haven't, have locked in the upright position. The head restraint will automatically fold out of the seatbacks. Push back on the seatbacks to get out. yellowblue CAUTION: If an easy entry right front seat...

Owner's Manual
Page 16
... seatback is raised. After releasing the button, push and pull on the head restraints to raise or lower it. To return the head restraints to your ears. If they have them fixed immediately. Otherwise, the head restraint will hit the spare tire and prevent the seatback from properly latching.... Push and pull on the head restraint to make sure it locks into position. 1-10 Push the button located under the head restraint to check that the top of the head restraint in place. Slide the head restraint up until it 's locked in closest to the...
... seatback is raised. After releasing the button, push and pull on the head restraints to raise or lower it. To return the head restraints to your ears. If they have them fixed immediately. Otherwise, the head restraint will hit the spare tire and prevent the seatback from properly latching.... Push and pull on the head restraint to make sure it locks into position. 1-10 Push the button located under the head restraint to check that the top of the head restraint in place. Slide the head restraint up until it 's locked in closest to the...
Owner's Manual
Page 27
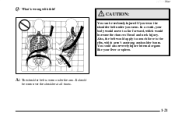
You could also severely injure internal organs like your body would move too far forward, which would apply too much force to the ribs, which aren't as strong as shoulder bones. A: The shoulder belt is worn under your arm. It should be seriously injured if you wear the shoulder belt under the arm. CAUTION: You can be worn over the shoulder at all times. 1-21 In a crash, your liver or spleen. Also, the belt would increase the chance of head and neck injury. yellowblue Q: What's wrong with this?
You could also severely injure internal organs like your body would move too far forward, which would apply too much force to the ribs, which aren't as strong as shoulder bones. A: The shoulder belt is worn under your arm. It should be seriously injured if you wear the shoulder belt under the arm. CAUTION: You can be worn over the shoulder at all times. 1-21 In a crash, your liver or spleen. Also, the belt would increase the chance of head and neck injury. yellowblue Q: What's wrong with this?
Owner's Manual
Page 41
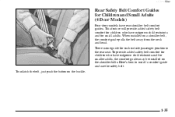
... the safety belt: To unlatch the belt, just push the button on a shoulder belt, the comfort guide pulls the belt away from the neck and head. To provide added safety belt comfort for children who have rear shoulder belt comfort guides. There is one guide for Children and Small Adults (4-Door...
... the safety belt: To unlatch the belt, just push the button on a shoulder belt, the comfort guide pulls the belt away from the neck and head. To provide added safety belt comfort for children who have rear shoulder belt comfort guides. There is one guide for Children and Small Adults (4-Door...
Owner's Manual
Page 46
... for the restraint will likely be secured in a motor vehicle. This is necessary because an infant's neck is the right type and size for the head and neck. In a crash, the belt would apply force right on the hips, as it is weak and its...
... for the restraint will likely be secured in a motor vehicle. This is necessary because an infant's neck is the right type and size for the head and neck. In a crash, the belt would apply force right on the hips, as it is weak and its...
Owner's Manual
Page 48
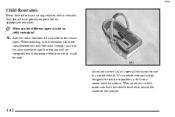
... restraints. It's an infant restraint system designed to restrain or position a child on child restraints? With an infant car bed, make sure that the infant's head rests toward the center of add-on a continuous flat surface. yellowblue Child Restraints Every time infants and young children ride in a motor vehicle. Q: A: What are...
... restraints. It's an infant restraint system designed to restrain or position a child on child restraints? With an infant car bed, make sure that the infant's head rests toward the center of add-on a continuous flat surface. yellowblue Child Restraints Every time infants and young children ride in a motor vehicle. Q: A: What are...

Owner's Manual
Page 49
This type of restraint faces the rear so that the infant's head, neck and body can have the support they need in two parts -- Some infant seats come in a frontal crash. the base stays secured in the vehicle and the seat part is removable. 1-43 yellowblue A rear-facing infant restraint (B) positions an infant to about 20 lbs. (9 kg) and about one year of the vehicle. Rear-facing infant restraints are designed for infants of up to face the rear of age.
This type of restraint faces the rear so that the infant's head, neck and body can have the support they need in two parts -- Some infant seats come in a frontal crash. the base stays secured in the vehicle and the seat part is removable. 1-43 yellowblue A rear-facing infant restraint (B) positions an infant to about 20 lbs. (9 kg) and about one year of the vehicle. Rear-facing infant restraints are designed for infants of up to face the rear of age.
Owner's Manual
Page 134
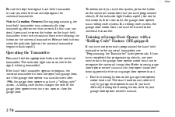
...two seconds without ever releasing the button on the universal transmitter that you have programmed already. In a rolling code system, the garage door motor head unit must be trained to erase and reprogram the universal transmitter. Training a Garage Door Opener with a "Rolling Code" Feature (If Equipped) ... previously. yellowblue Be sure to keep the original hand-held transmitter in case you need to train the garage door opener motor head unit to recognize the universal transmitter. Note to Canadian Owners: During programming, the hand-held transmitter appears to program the universal ...
...two seconds without ever releasing the button on the universal transmitter that you have programmed already. In a rolling code system, the garage door motor head unit must be trained to erase and reprogram the universal transmitter. Training a Garage Door Opener with a "Rolling Code" Feature (If Equipped) ... previously. yellowblue Be sure to keep the original hand-held transmitter in case you need to train the garage door opener motor head unit to recognize the universal transmitter. Note to Canadian Owners: During programming, the hand-held transmitter appears to program the universal ...
Owner's Manual
Page 135
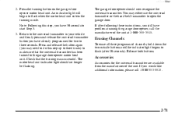
...To erase all three programmed channels, hold down the two outside buttons until the indicator light begins to the garage door opener motor head unit. Return to the universal transmitter in your vehicle and firmly press and release the universal transmitter button you have 30 seconds to ...have problems training the garage door opener, call 1-800-355-3515. 2-71 The garage door opener should no longer be flashing. The motor head unit indicator light should now recognize the universal transmitter. If after 20 seconds). Release both buttons. Press the training button on the garage door...
...To erase all three programmed channels, hold down the two outside buttons until the indicator light begins to the garage door opener motor head unit. Return to the universal transmitter in your vehicle and firmly press and release the universal transmitter button you have 30 seconds to ...have problems training the garage door opener, call 1-800-355-3515. 2-71 The garage door opener should no longer be flashing. The motor head unit indicator light should now recognize the universal transmitter. If after 20 seconds). Release both buttons. Press the training button on the garage door...
Owner's Manual
Page 194
... time. Turn the radio on the display will still play tapes, but you have used your unit is equipped with pads which scrub the tape head as a broken tape. Turn the radio off. 3-42 The recommended cleaning cassette is available through your vehicle is no improvement in their cases away from...
... time. Turn the radio on the display will still play tapes, but you have used your unit is equipped with pads which scrub the tape head as a broken tape. Turn the radio off. 3-42 The recommended cleaning cassette is available through your vehicle is no improvement in their cases away from...
Owner's Manual
Page 195
... them in good condition before you can withstand most car washes without being damaged. This type of a disc is still tightened to clean the tape head. The radio will flash for five seconds to show the indicator was reset. If the surface of cleaning cassette will not eject on the display...
... them in good condition before you can withstand most car washes without being damaged. This type of a disc is still tightened to clean the tape head. The radio will flash for five seconds to show the indicator was reset. If the surface of cleaning cassette will not eject on the display...
Owner's Manual
Page 207
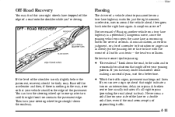
... is only slightly below the pavement, recovery should be fairly easy. Never cross a solid line on collision. Ease off the edge of approaching traffic. the head-on your vehicle straddles the edge of a vehicle about making a successful pass, wait for several seconds. A broken center line usually indicates it's all traffic accidents...
... is only slightly below the pavement, recovery should be fairly easy. Never cross a solid line on collision. Ease off the edge of approaching traffic. the head-on your vehicle straddles the edge of a vehicle about making a successful pass, wait for several seconds. A broken center line usually indicates it's all traffic accidents...
Owner's Manual
Page 218
... dirt? This way, engine drag can help your brakes and they won't have the manual transmission, even if you 'll want to keep your vehicle headed straight down, and use a low gear. You or someone else could be able to maintain vehicle control? Boulders? Slippery? D Are there hidden surface obstacles? This...
... dirt? This way, engine drag can help your brakes and they won't have the manual transmission, even if you 'll want to keep your vehicle headed straight down, and use a low gear. You or someone else could be able to maintain vehicle control? Boulders? Slippery? D Are there hidden surface obstacles? This...
Owner's Manual
Page 276
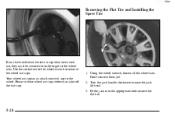
... and Installing the Spare Tire If you take off the hub cap. 1. Use the socket end of the wheel wrench to raise the jack lift head. 3. Turn the jack handle clockwise to remove the wheel nut caps. Remove these wheel nut caps before you have individual wheel nut caps that cover...
... and Installing the Spare Tire If you take off the hub cap. 1. Use the socket end of the wheel wrench to raise the jack lift head. 3. Turn the jack handle clockwise to remove the wheel nut caps. Remove these wheel nut caps before you have individual wheel nut caps that cover...
Owner's Manual
Page 277
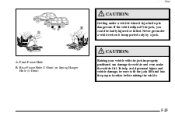
To help avoid personal injury and vehicle damage, be badly injured or killed. Front Frame Hole B. yellowblue CAUTION: Getting under a vehicle when it is jacked up is supported only by a jack. Never get under a vehicle when it is dangerous. Rear Frame Hole (2-Door) or Spring Hanger Hole (4-Door) Raising your vehicle with the jack improperly positioned can damage the vehicle and even make the vehicle fall. CAUTION: A. If the vehicle slips off the jack, you could be sure to fit the jack lift head into the proper location before raising the vehicle. 5-25
To help avoid personal injury and vehicle damage, be badly injured or killed. Front Frame Hole B. yellowblue CAUTION: Getting under a vehicle when it is jacked up is supported only by a jack. Never get under a vehicle when it is dangerous. Rear Frame Hole (2-Door) or Spring Hanger Hole (4-Door) Raising your vehicle with the jack improperly positioned can damage the vehicle and even make the vehicle fall. CAUTION: A. If the vehicle slips off the jack, you could be sure to fit the jack lift head into the proper location before raising the vehicle. 5-25

Owner's Manual
Page 347
... Switch, Body Control Module, Ashtray Lamp Steering Wheel Radio Controls Headlamps Switch, Body control Module, Headlamp Relay Courtesy Lamps, Battery Run-Down Protection HVAC Control Head (Manual) Turn Signal Cluster, Engine Control Module Interior lights Fuse/Circuit Usage Breaker 13 14 15 16 17 18 19 20 21 Auxiliary Power Power...
... Switch, Body Control Module, Ashtray Lamp Steering Wheel Radio Controls Headlamps Switch, Body control Module, Headlamp Relay Courtesy Lamps, Battery Run-Down Protection HVAC Control Head (Manual) Turn Signal Cluster, Engine Control Module Interior lights Fuse/Circuit Usage Breaker 13 14 15 16 17 18 19 20 21 Auxiliary Power Power...
Owner's Manual
Page 425
... a Portable Container ...6-7 Filling Your Tank ...6-5 Foreign Countries ...6-5 Gage ...2-85 Fuse Block Engine Compartment ...6-62 Instrument Panel ...6-60 Fuses and Circuit Breakers ...6-59 Hazard Warning Flashers ...5-2 Head Restraints ...1-8 Headlamps ...2-48 Bulb Replacement ...6-34 High/Low Beam Changer ...2-43 On Reminder ...2-49 Wiring ...6-59 Hearing Impaired, Customer Assistance ...8-4 Heated Front Seats ...1-6 Heating ...3-7 Highway...
... a Portable Container ...6-7 Filling Your Tank ...6-5 Foreign Countries ...6-5 Gage ...2-85 Fuse Block Engine Compartment ...6-62 Instrument Panel ...6-60 Fuses and Circuit Breakers ...6-59 Hazard Warning Flashers ...5-2 Head Restraints ...1-8 Headlamps ...2-48 Bulb Replacement ...6-34 High/Low Beam Changer ...2-43 On Reminder ...2-49 Wiring ...6-59 Hearing Impaired, Customer Assistance ...8-4 Heated Front Seats ...1-6 Heating ...3-7 Highway...
Owner's Manual
Page 429
... Tank, Coolant ...5-11 Recreational Vehicle Towing ...4-40 Replacement Bulbs ...6-65 Parts ...6-66 Wheel ...6-47 Reporting Safety Defects ...8-10 Restraints Check ...7-41 Checking ...1-56 Child ...1-42 Head ...1-8 Replacing Parts After a Crash ...1-57 Retained Accessory Power ...2-19 Reverse, Automatic Transmission ...2-22 Reverse, Manual Transmission ...2-25 Right Front Passenger Position ...1-24 Roadside Assistance ...8-6 Roadside...
... Tank, Coolant ...5-11 Recreational Vehicle Towing ...4-40 Replacement Bulbs ...6-65 Parts ...6-66 Wheel ...6-47 Reporting Safety Defects ...8-10 Restraints Check ...7-41 Checking ...1-56 Child ...1-42 Head ...1-8 Replacing Parts After a Crash ...1-57 Retained Accessory Power ...2-19 Reverse, Automatic Transmission ...2-22 Reverse, Manual Transmission ...2-25 Right Front Passenger Position ...1-24 Roadside Assistance ...8-6 Roadside...

