

Owner Guide 2nd Printing (Spanish)
Page 536
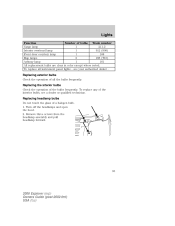
...the ground (2) and mark an 8 foot (2.4 meter) long horizontal line on the plain surface (1) at this vehicle and is non-adjustable. 92 2008 Explorer (exp) Owners Guide (post-2002-fmt) USA (fus) Measure the height from the center of the light should be adjusted. 4. Turn on ...horizontal line (4). Adjust the aim by turning the adjuster control either clockwise (to adjust down) or counterclockwise (to turn the vertical adjuster control. 6. Open the hood. 5. If it is not required for each headlamp. Note: Use a 4 mm socket or box wrench to adjust up). Lights • (1) Eight ...
...the ground (2) and mark an 8 foot (2.4 meter) long horizontal line on the plain surface (1) at this vehicle and is non-adjustable. 92 2008 Explorer (exp) Owners Guide (post-2002-fmt) USA (fus) Measure the height from the center of the light should be adjusted. 4. Turn on ...horizontal line (4). Adjust the aim by turning the adjuster control either clockwise (to adjust down) or counterclockwise (to turn the vertical adjuster control. 6. Open the hood. 5. If it is not required for each headlamp. Note: Use a 4 mm socket or box wrench to adjust up). Lights • (1) Eight ...
Owner Guide 2nd Printing (Spanish)
Page 539
... operation of the interior bulbs, see your authorized dealer . To replace any of the bulbs frequently. Turn off the headlamps and open the hood. 2. see a dealer or qualified technician. To replace all the bulbs frequently. Replacing exterior bulbs Check the operation of a halogen bulb.... 1. Remove three screws from the headlamp assembly and pull headlamp forward. 95 2008 Explorer (exp) Owners Guide (post-2002-fmt) USA (fus) Replacing headlamp bulbs Do not touch the glass of all instrument panel lights -...
... operation of the interior bulbs, see your authorized dealer . To replace any of the bulbs frequently. Turn off the headlamps and open the hood. 2. see a dealer or qualified technician. To replace all the bulbs frequently. Replacing exterior bulbs Check the operation of a halogen bulb.... 1. Remove three screws from the headlamp assembly and pull headlamp forward. 95 2008 Explorer (exp) Owners Guide (post-2002-fmt) USA (fus) Replacing headlamp bulbs Do not touch the glass of all instrument panel lights -...
Owner Guide 2nd Printing (Spanish)
Page 540
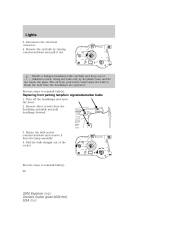
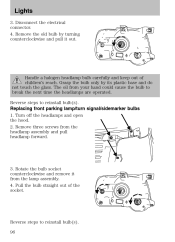
...to break the next time the headlamps are operated. Lights 3. Replacing front parking lamp/turn signal/sidemarker bulbs 1. Turn off the headlamps and open the hood. 2. Pull the bulb straight out of children's reach. Remove the old bulb by its plastic base and do not touch the glass. Grasp the ... and pull it from the headlamp assembly and pull headlamp forward. 3. The oil from your hand could cause the bulb to reinstall bulb(s). 96 2008 Explorer (exp) Owners Guide (post-2002-fmt) USA (fus) Reverse steps to reinstall bulb(s). Disconnect the electrical connector. 4.
...to break the next time the headlamps are operated. Lights 3. Replacing front parking lamp/turn signal/sidemarker bulbs 1. Turn off the headlamps and open the hood. 2. Pull the bulb straight out of children's reach. Remove the old bulb by its plastic base and do not touch the glass. Grasp the ... and pull it from the headlamp assembly and pull headlamp forward. 3. The oil from your hand could cause the bulb to reinstall bulb(s). 96 2008 Explorer (exp) Owners Guide (post-2002-fmt) USA (fus) Reverse steps to reinstall bulb(s). Disconnect the electrical connector. 4.
Owner Guide 2nd Printing (Spanish)
Page 765
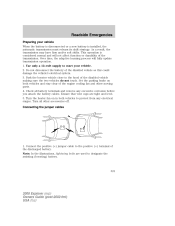
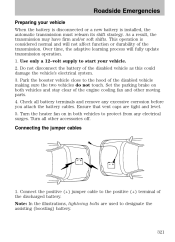
... transmission. Roadside Emergencies Preparing your vehicle. 2. Ensure that vent caps are used to the hood of the disabled vehicle making sure the two vehicles do not touch. Park the booster vehicle close to designate the assisting (boosting) battery. 2008 Explorer (exp) Owners Guide (post-2002-fmt) USA (fus) - - + + 321 As a result, the transmission...
... transmission. Roadside Emergencies Preparing your vehicle. 2. Ensure that vent caps are used to the hood of the disabled vehicle making sure the two vehicles do not touch. Park the booster vehicle close to designate the assisting (boosting) battery. 2008 Explorer (exp) Owners Guide (post-2002-fmt) USA (fus) - - + + 321 As a result, the transmission...
Owner Guide 2nd Printing (Spanish)
Page 789
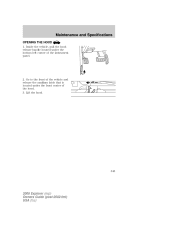
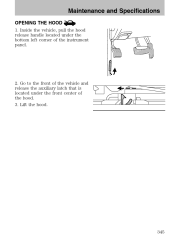
Maintenance and Specifications OPENING THE HOOD 1. Lift the hood. 345 2008 Explorer (exp) Owners Guide (post-2002-fmt) USA (fus) Go to the front of the vehicle and release the auxiliary latch that is located under the bottom left corner of the hood. 3. Inside the vehicle, pull the hood release handle located under the front center of the instrument panel. 2.
Maintenance and Specifications OPENING THE HOOD 1. Lift the hood. 345 2008 Explorer (exp) Owners Guide (post-2002-fmt) USA (fus) Go to the front of the vehicle and release the auxiliary latch that is located under the bottom left corner of the hood. 3. Inside the vehicle, pull the hood release handle located under the front center of the instrument panel. 2.
Owner Guide 2nd Printing (Spanish)
Page 794
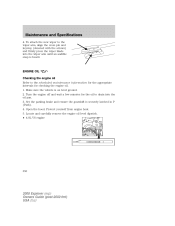
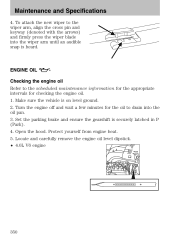
... vehicle is securely latched in P (Park). 4. Locate and carefully remove the engine oil level dipstick. • 4.0L V6 engine 350 2008 Explorer (exp) Owners Guide (post-2002-fmt) USA (fus) Open the hood. To attach the new wiper to drain into the wiper arm until an audible snap is heard. ENGINE OIL Checking...
... vehicle is securely latched in P (Park). 4. Locate and carefully remove the engine oil level dipstick. • 4.0L V6 engine 350 2008 Explorer (exp) Owners Guide (post-2002-fmt) USA (fus) Open the hood. To attach the new wiper to drain into the wiper arm until an audible snap is heard. ENGINE OIL Checking...
Owner Guide 2nd Printing (Spanish)
Page 825
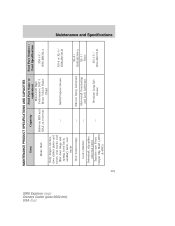
MAINTENANCE PRODUCT SPECIFICATIONS AND CAPACITIES Item Capacity Ford Part Number / Ford Specification PM-1-C / WSS-M6C62-A Brake fluid Between MIN and MAX on reservoir Ford Part Name or equivalent Motorcraft High Performance DOT 3 Motor Vehicle Brake Fluid 2008 Explorer (exp) Owners Guide (post-2002-fmt) USA (...fus) Body hinges, latches, door striker plates and rotors, seat tracks, fuel filler door hinge and spring, hood latch, ...
MAINTENANCE PRODUCT SPECIFICATIONS AND CAPACITIES Item Capacity Ford Part Number / Ford Specification PM-1-C / WSS-M6C62-A Brake fluid Between MIN and MAX on reservoir Ford Part Name or equivalent Motorcraft High Performance DOT 3 Motor Vehicle Brake Fluid 2008 Explorer (exp) Owners Guide (post-2002-fmt) USA (...fus) Body hinges, latches, door striker plates and rotors, seat tracks, fuel filler door hinge and spring, hood latch, ...
Owner Guide 2nd Printing (Spanish)
Page 833
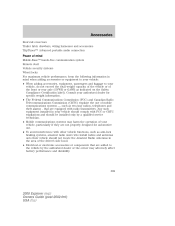
...and luggage to the vehicle by a qualified service technician. • Mobile communications systems may adversely affect battery performance and durability. 389 2008 Explorer (exp) Owners Guide (post-2002-fmt) USA (fus) Accessories Roof rail cross bars Trailer hitch drawbars, wiring harnesses and accessories TripTunes... systems Wheel locks For maximum vehicle performance, keep the following information in the area of the driver's side hood. • Electrical or electronic accessories or components that are equipped with other vehicle functions, such as two-way radios, ...
...and luggage to the vehicle by a qualified service technician. • Mobile communications systems may adversely affect battery performance and durability. 389 2008 Explorer (exp) Owners Guide (post-2002-fmt) USA (fus) Accessories Roof rail cross bars Trailer hitch drawbars, wiring harnesses and accessories TripTunes... systems Wheel locks For maximum vehicle performance, keep the following information in the area of the driver's side hood. • Electrical or electronic accessories or components that are equipped with other vehicle functions, such as two-way radios, ...
Owner Guide 2nd Printing (Spanish)
Page 837
Index Heating heating and air conditioning system ...82, 84 Homelink wireless control system ...115 Hood ...345 How to get going ...24 I Ignition ...263, 385 Illuminated visor mirror ...100 Infant seats (see Safety seats) ...216 Inspection/maintenance (I/M) testing ...375 Instrument panel ...-107 automatic dimming rearview mirror ...107 fold away ...108 heated ...108 side view mirrors (power) ...107 Moon roof ...114 Motorcraft parts ...342, 363, 380 393 2008 Explorer (exp) Owners Guide (post-2002-fmt) USA (fus)
Index Heating heating and air conditioning system ...82, 84 Homelink wireless control system ...115 Hood ...345 How to get going ...24 I Ignition ...263, 385 Illuminated visor mirror ...100 Infant seats (see Safety seats) ...216 Inspection/maintenance (I/M) testing ...375 Instrument panel ...-107 automatic dimming rearview mirror ...107 fold away ...108 heated ...108 side view mirrors (power) ...107 Moon roof ...114 Motorcraft parts ...342, 363, 380 393 2008 Explorer (exp) Owners Guide (post-2002-fmt) USA (fus)

Owner Guide 3rd Printing
Page 92
... to adjust up). Horizontal aiming is above the line the headlamp will need to ground • (3) Twenty-five feet • (4) Horizontal reference line 2. Open the hood. 5. Locate the vertical adjuster for this height (masking tape works well). 3. Adjust the aim by turning the adjuster control either clockwise (to adjust down) or...
... to adjust up). Horizontal aiming is above the line the headlamp will need to ground • (3) Twenty-five feet • (4) Horizontal reference line 2. Open the hood. 5. Locate the vertical adjuster for this height (masking tape works well). 3. Adjust the aim by turning the adjuster control either clockwise (to adjust down) or...

Owner Guide 3rd Printing
Page 95
... the bulbs frequently. Replacing the interior bulbs Check the operation of the interior bulbs, see your authorized dealer . Turn off the headlamps and open the hood. 2. Lights Function Number of a halogen bulb. 1. Replacing headlamp bulbs Do not touch the glass of bulbs Trade number Cargo lamp 1 211-2 Interior overhead lamp 1 912...
... the bulbs frequently. Replacing the interior bulbs Check the operation of the interior bulbs, see your authorized dealer . Turn off the headlamps and open the hood. 2. Lights Function Number of a halogen bulb. 1. Replacing headlamp bulbs Do not touch the glass of bulbs Trade number Cargo lamp 1 211-2 Interior overhead lamp 1 912...
Owner Guide 3rd Printing
Page 96
... keep out of the socket. Remove three screws from the lamp assembly. 4. Reverse steps to reinstall bulb(s). 96 Turn off the headlamps and open the hood. 2. Pull the bulb straight out of children's reach. Disconnect the electrical connector. 4. Reverse steps to reinstall bulb(s). The oil from your hand could cause the...
... keep out of the socket. Remove three screws from the lamp assembly. 4. Reverse steps to reinstall bulb(s). 96 Turn off the headlamps and open the hood. 2. Pull the bulb straight out of children's reach. Disconnect the electrical connector. 4. Reverse steps to reinstall bulb(s). The oil from your hand could cause the...
Owner Guide 3rd Printing
Page 321
... the battery is disconnected or a new battery is considered normal and will fully update transmission operation. 1. Turn the heater fan on both vehicles to the hood of the discharged battery. Connect the positive (+) jumper cable to designate the assisting (boosting) battery. - - + + 321 Over time, the adaptive learning process will not affect...
... the battery is disconnected or a new battery is considered normal and will fully update transmission operation. 1. Turn the heater fan on both vehicles to the hood of the discharged battery. Connect the positive (+) jumper cable to designate the assisting (boosting) battery. - - + + 321 Over time, the adaptive learning process will not affect...
Owner Guide 3rd Printing
Page 345
Inside the vehicle, pull the hood release handle located under the front center of the instrument panel. 2. Go to the front of the vehicle and release the auxiliary latch that is located under the bottom left corner of the hood. 3. Lift the hood. 345 Maintenance and Specifications OPENING THE HOOD 1.
Inside the vehicle, pull the hood release handle located under the front center of the instrument panel. 2. Go to the front of the vehicle and release the auxiliary latch that is located under the bottom left corner of the hood. 3. Lift the hood. 345 Maintenance and Specifications OPENING THE HOOD 1.
Owner Guide 3rd Printing
Page 350
Turn the engine off and wait a few minutes for checking the engine oil. 1. Open the hood. ENGINE OIL Checking the engine oil Refer to the scheduled maintenance information for the appropriate intervals for the oil to the wiper arm, align the ...
Turn the engine off and wait a few minutes for checking the engine oil. 1. Open the hood. ENGINE OIL Checking the engine oil Refer to the scheduled maintenance information for the appropriate intervals for the oil to the wiper arm, align the ...
Owner Guide 3rd Printing
Page 381
... Output Slip Shaft (AWD & 4WD) - MAINTENANCE PRODUCT SPECIFICATIONS AND CAPACITIES Capacity Ford Part Number / Ford Specification PM-1-C / WSS-M6C62-A Item Brake fluid Between MIN and MAX on reservoir Ford Part Name or equivalent Motorcraft High Performance DOT 3 Motor Vehicle Brake Fluid Body hinges..., latches, door striker plates and rotors, seat tracks, fuel filler door hinge and spring, hood latch, auxiliary latch, seat tracks - Premium ...
... Output Slip Shaft (AWD & 4WD) - MAINTENANCE PRODUCT SPECIFICATIONS AND CAPACITIES Capacity Ford Part Number / Ford Specification PM-1-C / WSS-M6C62-A Item Brake fluid Between MIN and MAX on reservoir Ford Part Name or equivalent Motorcraft High Performance DOT 3 Motor Vehicle Brake Fluid Body hinges..., latches, door striker plates and rotors, seat tracks, fuel filler door hinge and spring, hood latch, auxiliary latch, seat tracks - Premium ...
Owner Guide 3rd Printing
Page 389
..., amateur radio users who install radios and antennas onto their vehicle should not locate the Amateur Radio Antennas in the area of the driver's side hood. • Electrical or electronic accessories or components that are added to your vehicle, do not exceed the total weight capacity of the vehicle or of...
..., amateur radio users who install radios and antennas onto their vehicle should not locate the Amateur Radio Antennas in the area of the driver's side hood. • Electrical or electronic accessories or components that are added to your vehicle, do not exceed the total weight capacity of the vehicle or of...
Owner Guide 3rd Printing
Page 393
Index Heating heating and air conditioning system ...82, 84 Homelink wireless control system ...115 Hood ...345 How to get going ...24 I Ignition ...263, 385 Illuminated visor mirror ...100 Infant seats (see Safety seats) ...216 Inspection/maintenance (I/M) testing ...375 Instrument panel ...
Index Heating heating and air conditioning system ...82, 84 Homelink wireless control system ...115 Hood ...345 How to get going ...24 I Ignition ...263, 385 Illuminated visor mirror ...100 Infant seats (see Safety seats) ...216 Inspection/maintenance (I/M) testing ...375 Instrument panel ...

