Warranty Guide 5th Printing
Page 11
...module, electronic driver unit, injectors, injection pressure sensor, high pressure oil regulator, exhaust back pressure regulator and sensor, camshaft position sensor, accelerator switch. NOTE: Some components may also be covered by airborne material (environmental fallout) - For more information, see pages 11-24. after the...(three years or 36,000 miles, whichever occurs first), you must pay a $100 deductible for five years after the vehicle leaves Ford's control 7 If corrosion does not cause perforation (holes), and is not the result of usage and/or environmental conditions, paint damage...
...module, electronic driver unit, injectors, injection pressure sensor, high pressure oil regulator, exhaust back pressure regulator and sensor, camshaft position sensor, accelerator switch. NOTE: Some components may also be covered by airborne material (environmental fallout) - For more information, see pages 11-24. after the...(three years or 36,000 miles, whichever occurs first), you must pay a $100 deductible for five years after the vehicle leaves Ford's control 7 If corrosion does not cause perforation (holes), and is not the result of usage and/or environmental conditions, paint damage...
Warranty Guide 5th Printing
Page 17
... first), to the applicable national EPA standards. • You are covered by the EPA. Under Emissions Performance Warranty Coverage, Ford Motor Company will pass the applicable state or local government test using test procedures and standards set by both the Emissions Defect ...• Exhaust Pipe (Manifold to meet standards only at high altitude, but is certified to Catalyst) • Electronic Engine Control Sensors and Switches • Evaporative Emission Control System • Exhaust Gas Recirculation (EGR) System • Exhaust Heat Control Valve • Exhaust Manifold 13 ...
... first), to the applicable national EPA standards. • You are covered by the EPA. Under Emissions Performance Warranty Coverage, Ford Motor Company will pass the applicable state or local government test using test procedures and standards set by both the Emissions Defect ...• Exhaust Pipe (Manifold to meet standards only at high altitude, but is certified to Catalyst) • Electronic Engine Control Sensors and Switches • Evaporative Emission Control System • Exhaust Gas Recirculation (EGR) System • Exhaust Heat Control Valve • Exhaust Manifold 13 ...
Warranty Guide 5th Printing
Page 22
... diesel engines is for Deceleration • Electronic Ignition System • Exhaust Pipe (Manifold to Catalyst) • Electronic Engine Control Sensors and Switches • Evaporative Emission Control System • Exhaust Gas Recirculation (EGR) System • Exhaust Heat Control Valve • Exhaust Manifold •... (1) • Intercooler Assembly - The parts on the following list are covered by the Defects Warranties that apply to every California 2003-model vehicle, regardless of the GVWR* of the vehicle. * Gross Vehicle Weight Rating List of Parts Covered by Defects Warranties ...
... diesel engines is for Deceleration • Electronic Ignition System • Exhaust Pipe (Manifold to Catalyst) • Electronic Engine Control Sensors and Switches • Evaporative Emission Control System • Exhaust Gas Recirculation (EGR) System • Exhaust Heat Control Valve • Exhaust Manifold •... (1) • Intercooler Assembly - The parts on the following list are covered by the Defects Warranties that apply to every California 2003-model vehicle, regardless of the GVWR* of the vehicle. * Gross Vehicle Weight Rating List of Parts Covered by Defects Warranties ...

Owner Guide 3rd Printing
Page 2
... 98 Driving Starting Brakes Traction control Transmission operation Trailer towing 110 110 114 115 117 123 Roadside Emergencies Getting roadside assistance Hazard flasher switch Fuel pump shut-off switch Fuses and relays Changing tires Jump starting Wrecker towing 127 127 128 128 130 135 139 145 Customer Assistance Reporting safety defects (U.S. only...
... 98 Driving Starting Brakes Traction control Transmission operation Trailer towing 110 110 114 115 117 123 Roadside Emergencies Getting roadside assistance Hazard flasher switch Fuel pump shut-off switch Fuses and relays Changing tires Jump starting Wrecker towing 127 127 128 128 130 135 139 145 Customer Assistance Reporting safety defects (U.S. only...

Owner Guide 3rd Printing
Page 4
...parking). Furthermore, due to your vehicle the greater the safety and pleasure you will automatically cut off switch in separate publications. Fuel pump shut-off switch In the event of the items covered may describe options before they are generally available. Please take ...Ford Motor Company and its constituents, and certain vehicle components contain or emit chemicals known to the State of California to pass on acquiring your vehicle by reading this handbook. Introduction CALIFORNIA Proposition 65 Warning WARNING: Engine exhaust, some of an accident the safety switch...
...parking). Furthermore, due to your vehicle the greater the safety and pleasure you will automatically cut off switch in separate publications. Fuel pump shut-off switch In the event of the items covered may describe options before they are generally available. Please take ...Ford Motor Company and its constituents, and certain vehicle components contain or emit chemicals known to the State of California to pass on acquiring your vehicle by reading this handbook. Introduction CALIFORNIA Proposition 65 Warning WARNING: Engine exhaust, some of an accident the safety switch...

Owner Guide 3rd Printing
Page 8
Introduction These are some of the symbols you may see on your vehicle. Vehicle Symbol Glossary Safety Alert See Owner's Guide Fasten Safety Belt Air Bag-Front Air Bag-Side Child Seat Installation Warning Child Seat Tether Anchor Anti-Lock Brake System Child Seat Child Seat Lower Anchor Brake System Brake Fluid Non-Petroleum Based AdvanceTrac Traction Control Master Lighting Switch Hazard Warning Flasher Fog Lamps-Front Fuse Compartment Fuel Pump Reset Windshield Defrost/Demist Windshield Wash/Wipe Rear Window Defrost/Demist 8
Introduction These are some of the symbols you may see on your vehicle. Vehicle Symbol Glossary Safety Alert See Owner's Guide Fasten Safety Belt Air Bag-Front Air Bag-Side Child Seat Installation Warning Child Seat Tether Anchor Anti-Lock Brake System Child Seat Child Seat Lower Anchor Brake System Brake Fluid Non-Petroleum Based AdvanceTrac Traction Control Master Lighting Switch Hazard Warning Flasher Fog Lamps-Front Fuse Compartment Fuel Pump Reset Windshield Defrost/Demist Windshield Wash/Wipe Rear Window Defrost/Demist 8

Owner Guide 3rd Printing
Page 14
...) of individual journeys. At normal operating temperature, the needle will be in the normal range (between "H" and "C"). Stop the vehicle as soon as safely possible, switch off the engine and let the engine cool. To reset, depress the control. 20 40 60 60 0 0 0 0 80 140 0 00000 20 100 180 MPH km...
...) of individual journeys. At normal operating temperature, the needle will be in the normal range (between "H" and "C"). Stop the vehicle as soon as safely possible, switch off the engine and let the engine cool. To reset, depress the control. 20 40 60 60 0 0 0 0 80 140 0 00000 20 100 180 MPH km...

Owner Guide 3rd Printing
Page 30
... equipped) The autolamp system provides light sensitive automatic on , rotate the control counterclockwise. • To turn autolamps on -off control of time after the ignition switch is in a collision. 30 Failure to activate your tail lamps and generally may result in the OFF, parking lamp or autolamp position. A A • To turn...
... equipped) The autolamp system provides light sensitive automatic on , rotate the control counterclockwise. • To turn autolamps on -off control of time after the ignition switch is in a collision. 30 Failure to activate your tail lamps and generally may result in the OFF, parking lamp or autolamp position. A A • To turn...

Owner Guide 3rd Printing
Page 31
... to the full down position, past detent, to adjust the brightness of the instrument panel and all applicable switches in the OFF position. The dome lamp will not illuminate if the control switch is in the vehicle during headlamp and parklamp operation. PANEL DIMMER CONTROL Use to turn on the interior lamps...
... to the full down position, past detent, to adjust the brightness of the instrument panel and all applicable switches in the OFF position. The dome lamp will not illuminate if the control switch is in the vehicle during headlamp and parklamp operation. PANEL DIMMER CONTROL Use to turn on the interior lamps...

Owner Guide 3rd Printing
Page 35
... in the ACC or ON position, the rear dome lamp can be marked with the control in the middle position. • the instrument panel dimmer switch is moved to assure lamp performance, light brightness and pattern and safe visibility. The correct bulbs will not damage the lamp assembly or void the...
... in the ACC or ON position, the rear dome lamp can be marked with the control in the middle position. • the instrument panel dimmer switch is moved to assure lamp performance, light brightness and pattern and safe visibility. The correct bulbs will not damage the lamp assembly or void the...

Owner Guide 3rd Printing
Page 37
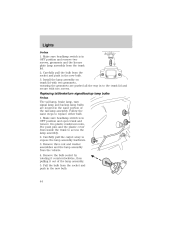
Make sure headlamp switch is in OFF position. 2. At the back of the headlamp, pry up and remove the two retainer pins to release the headlamp assembly from the rear). 37 Remove the protective dust shield from the housing by turning the dust shield counterclockwise (when viewed from the vehicle and pull headlamp forward. 4. Remove the bolt from the headlamp housing. 3. Lights Replacing headlamp bulbs To remove the headlamp bulb: 1.
Make sure headlamp switch is in OFF position. 2. At the back of the headlamp, pry up and remove the two retainer pins to release the headlamp assembly from the rear). 37 Remove the protective dust shield from the housing by turning the dust shield counterclockwise (when viewed from the vehicle and pull headlamp forward. 4. Remove the bolt from the headlamp housing. 3. Lights Replacing headlamp bulbs To remove the headlamp bulb: 1.

Owner Guide 3rd Printing
Page 43
... assembly from liftgate. 2. Lights 3. Replacing license plate lamp bulbs Wagon 1. Replace the LED module. 7. Install the lamp assembly on the LED module). 4. Make sure headlamp switch is in the new bulb. 4. Remove the two screws that are holding the LED module in reverse order. On the underside of the spoiler, remove...
... assembly from liftgate. 2. Lights 3. Replacing license plate lamp bulbs Wagon 1. Replace the LED module. 7. Install the lamp assembly on the LED module). 4. Make sure headlamp switch is in the new bulb. 4. Remove the two screws that are holding the LED module in reverse order. On the underside of the spoiler, remove...
Owner Guide 3rd Printing
Page 44
...2. Follow the same steps to expose the lamp assembly hardware. 3. Carefully pull the carpet away to replace either bulb. 1. Lights Sedan 1. Make sure headlamp switch is in OFF position and remove two screws, grommets and the license plate lamp assembly from the socket and push in the new bulb. 3. Pull... the bulb from the trunk lid. 2. Make sure headlamp switch is in OFF position and open trunk and remove two plastic mushroom nuts, five push pins and the plastic cover from the vehicle. 4. Remove ...
...2. Follow the same steps to expose the lamp assembly hardware. 3. Carefully pull the carpet away to replace either bulb. 1. Lights Sedan 1. Make sure headlamp switch is in OFF position and remove two screws, grommets and the license plate lamp assembly from the socket and push in the new bulb. 3. Pull... the bulb from the trunk lid. 2. Make sure headlamp switch is in OFF position and open trunk and remove two plastic mushroom nuts, five push pins and the plastic cover from the vehicle. 4. Remove ...

Owner Guide 3rd Printing
Page 45
... open the liftgate to place and install the plastic cover inside the trunk with five push pins and two plastic mushroom nuts. Make sure headlamp switch is in to expose the lamp assemblies. 2. Carefully pull the lamp assembly from lamp assembly. 5. Pull the bulb straight out of the tail lamp assembly...
... open the liftgate to place and install the plastic cover inside the trunk with five push pins and two plastic mushroom nuts. Make sure headlamp switch is in to expose the lamp assemblies. 2. Carefully pull the lamp assembly from lamp assembly. 5. Pull the bulb straight out of the tail lamp assembly...

Owner Guide 3rd Printing
Page 48
... cause damage not covered by sliding the control. POWER WINDOWS When closing the power windows, you should verify they are free of the rocker switch to open the window. Press and hold the top part of obstructions and ensure that children and/or pets are designed for accessory plugs only.... AUXILIARY POWER POINT Power outlets are not in the proximity of the rocker switch to close the window. 48 Use the power point. Driver Controls ILLUMINATED VISOR MIRROR (IF EQUIPPED) To turn on the instrument panel below the ...
... cause damage not covered by sliding the control. POWER WINDOWS When closing the power windows, you should verify they are free of the rocker switch to open the window. Press and hold the top part of obstructions and ensure that children and/or pets are designed for accessory plugs only.... AUXILIARY POWER POINT Power outlets are not in the proximity of the rocker switch to close the window. 48 Use the power point. Driver Controls ILLUMINATED VISOR MIRROR (IF EQUIPPED) To turn on the instrument panel below the ...

Owner Guide 3rd Printing
Page 49
...the driver's window to restore the window controls. To lock out all the window controls except for up to ten minutes after the ignition switch is turned to stop. COMP MIRROR 49 MIRRORS Automatic dimming inside rear view mirror with electric compass (if equipped) Your vehicle is opened.... Accessory delay (if equipped) With accessory delay, the window switches may be used for the driver's press the left side of the mirror since this may impair proper mirror performance. Press completely down on...
...the driver's window to restore the window controls. To lock out all the window controls except for up to ten minutes after the ignition switch is turned to stop. COMP MIRROR 49 MIRRORS Automatic dimming inside rear view mirror with electric compass (if equipped) Your vehicle is opened.... Accessory delay (if equipped) With accessory delay, the window switches may be used for the driver's press the left side of the mirror since this may impair proper mirror performance. Press completely down on...

Owner Guide 3rd Printing
Page 66
... items will illuminate: • Puddle lamps • Park lamps • Tail lamps The system will automatically turn off the interior lights if: • the ignition switch is turned to the ON position, or • the remote transmitter lock control is pressed, or • after the ignition has been turned to the... off the interior lamps 10 minutes after 25 seconds of illumination. Locks and Security The illuminated entry system will turn off if: • the ignition switch is turned to the ON position, or • after 25 seconds of illumination.
... items will illuminate: • Puddle lamps • Park lamps • Tail lamps The system will automatically turn off the interior lights if: • the ignition switch is turned to the ON position, or • the remote transmitter lock control is pressed, or • after the ignition has been turned to the... off the interior lamps 10 minutes after 25 seconds of illumination. Locks and Security The illuminated entry system will turn off if: • the ignition switch is turned to the ON position, or • after 25 seconds of illumination.
Owner Guide 3rd Printing
Page 70
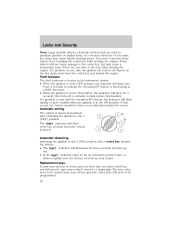
... flash rapidly or glow steadily when the ignition is in the ON position. Automatic arming The vehicle is armed. 4 1 5 Automatic disarming Switching the ignition to be taken to an authorized dealer for 3 seconds, then turn the ignition off , to a dealership. The THEFT indicator will... flash every two seconds when the vehicle is armed immediately 3 after switching the ignition to prevent these objects from your vehicle towed to indicate normal system functionality. The key codes need to the 3 2 (OFF) ...
... flash rapidly or glow steadily when the ignition is in the ON position. Automatic arming The vehicle is armed. 4 1 5 Automatic disarming Switching the ignition to be taken to an authorized dealer for 3 seconds, then turn the ignition off , to a dealership. The THEFT indicator will... flash every two seconds when the vehicle is armed immediately 3 after switching the ignition to prevent these objects from your vehicle towed to indicate normal system functionality. The key codes need to the 3 2 (OFF) ...

Owner Guide 3rd Printing
Page 88
...safety belt is not buckled before the vehicle has reached at least 5 km/h (3 mph) and 1-2 minutes have elapsed since the ignition switch has been turned to ON...Then...The BeltMinder feature is turned to the safety belt warning function. the safety belt warning light illuminates and the...chime is sounding...The driver's safety belt is buckled The safety belt warning light and before the ignition switch is buckled The BeltMinder feature will not before the ignition switch is buckled. This feature provides additional reminders to the driver that the driver's safety belt is a supplemental...
...safety belt is not buckled before the vehicle has reached at least 5 km/h (3 mph) and 1-2 minutes have elapsed since the ignition switch has been turned to ON...Then...The BeltMinder feature is turned to the safety belt warning function. the safety belt warning light illuminates and the...chime is sounding...The driver's safety belt is buckled The safety belt warning light and before the ignition switch is buckled The BeltMinder feature will not before the ignition switch is buckled. This feature provides additional reminders to the driver that the driver's safety belt is a supplemental...

Owner Guide 3rd Printing
Page 90
... latched for that : • The parking brake is set • The gearshift is in P (Park) (automatic transmission) • The ignition switch is in the OFF position • All vehicle doors are closed • The driver's safety belt is unbuckled • The parklamps/headlamps are in... an accident. To disable (one-time) or deactivate the Belt Minder feature please follow the directions stated below. Turn the ignition switch to avoid the Belt Minder chime. Buckle then unbuckle the safety belt three times, ending with the deactivation/activation programming procedure. Sitting on...
... latched for that : • The parking brake is set • The gearshift is in P (Park) (automatic transmission) • The ignition switch is in the OFF position • All vehicle doors are closed • The driver's safety belt is unbuckled • The parklamps/headlamps are in... an accident. To disable (one-time) or deactivate the Belt Minder feature please follow the directions stated below. Turn the ignition switch to avoid the Belt Minder chime. Buckle then unbuckle the safety belt three times, ending with the deactivation/activation programming procedure. Sitting on...


