Owner Guide 1st Printing (Spanish)
Page 308
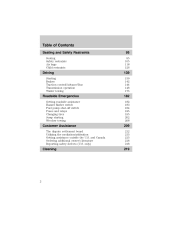
... restraints Air bags Child restraints 95 95 105 118 126 Driving Starting Brakes Traction control/AdvanceTrac Transmission operation Trailer towing 139 139 142 144 148 175 Roadside Emergencies Getting roadside assistance Hazard flasher switch Fuel pump shut-off switch Fuses and relays Changing tires Jump starting Wrecker towing 182 182 183 184 185...
... restraints Air bags Child restraints 95 95 105 118 126 Driving Starting Brakes Traction control/AdvanceTrac Transmission operation Trailer towing 139 139 142 144 148 175 Roadside Emergencies Getting roadside assistance Hazard flasher switch Fuel pump shut-off switch Fuses and relays Changing tires Jump starting Wrecker towing 182 182 183 184 185...
Owner Guide 1st Printing (Spanish)
Page 314
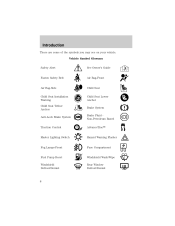
Vehicle Symbol Glossary Safety Alert See Owner's Guide Fasten Safety Belt Air Bag-Front Air Bag-Side Child Seat Installation Warning Child Seat Tether Anchor Anti-Lock Brake System Child Seat Child Seat Lower Anchor Brake System Brake Fluid Non-Petroleum Based AdvanceTrac Hazard Warning Flasher Traction Control Master Lighting Switch Fog Lamps-Front Fuse Compartment Fuel Pump Reset Windshield Defrost/Demist Windshield Wash/Wipe Rear Window Defrost/Demist 8 Introduction These are some of the symbols you may see on your vehicle.
Vehicle Symbol Glossary Safety Alert See Owner's Guide Fasten Safety Belt Air Bag-Front Air Bag-Side Child Seat Installation Warning Child Seat Tether Anchor Anti-Lock Brake System Child Seat Child Seat Lower Anchor Brake System Brake Fluid Non-Petroleum Based AdvanceTrac Hazard Warning Flasher Traction Control Master Lighting Switch Fog Lamps-Front Fuse Compartment Fuel Pump Reset Windshield Defrost/Demist Windshield Wash/Wipe Rear Window Defrost/Demist 8 Introduction These are some of the symbols you may see on your vehicle.
Owner Guide 1st Printing (Spanish)
Page 321
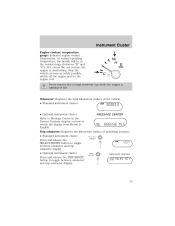
... it enters the red section, the engine is running or hot. At normal operating temperature, the needle will be in the Drivers Controls chapter on how to switch the display from Metric to toggle between "H" and "C"). Never remove the coolant reservoir cap while the engine is overheating. Odometer: Registers...display. • Optional instrument cluster Press and release the TRIP/RESET button to English. Stop the vehicle as soon as safely possible, switch off the engine and let the engine cool. Instrument Cluster Engine coolant temperature gauge: Indicates engine coolant temperature.
... it enters the red section, the engine is running or hot. At normal operating temperature, the needle will be in the Drivers Controls chapter on how to switch the display from Metric to toggle between "H" and "C"). Never remove the coolant reservoir cap while the engine is overheating. Odometer: Registers...display. • Optional instrument cluster Press and release the TRIP/RESET button to English. Stop the vehicle as soon as safely possible, switch off the engine and let the engine cool. Instrument Cluster Engine coolant temperature gauge: Indicates engine coolant temperature.
Owner Guide 1st Printing (Spanish)
Page 344
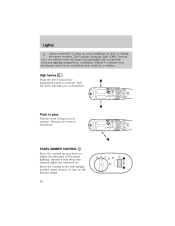
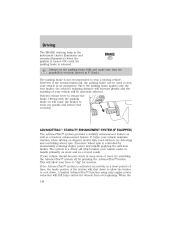
Move the control to the full upright position (past detent) to activate. The Daytime Running Light (DRL) System does not activate your headlamps at dusk or during these conditions may not provide adequate lighting during inclement weather. Operates only when the exterior lights are switched on the interior lamps. .... Release the lever to activate. Pull the lever towards you to deactivate. Failure to deactivate. OFF INT2 INT1 OFF PANEL DIMMER CONTROL Move the control up and down to turn on . Lights Always remember to adjust the intensity of the panel lighting.
Move the control to the full upright position (past detent) to activate. The Daytime Running Light (DRL) System does not activate your headlamps at dusk or during these conditions may not provide adequate lighting during inclement weather. Operates only when the exterior lights are switched on the interior lamps. .... Release the lever to activate. Pull the lever towards you to deactivate. Failure to deactivate. OFF INT2 INT1 OFF PANEL DIMMER CONTROL Move the control up and down to turn on . Lights Always remember to adjust the intensity of the panel lighting.
Owner Guide 1st Printing (Spanish)
Page 346
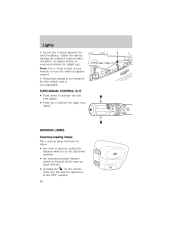
... in the OFF position. 40 on when: • any door is opened, unless the dimmer switch is in the full down to activate the left turn the vertical adjuster control. 6. TURN SIGNAL CONTROL • Push down position. • the instrument panel dimmer switch is non-adjustable. Lights 5. Adjust the aim by turning the adjuster...
... in the OFF position. 40 on when: • any door is opened, unless the dimmer switch is in the full down to activate the left turn the vertical adjuster control. 6. TURN SIGNAL CONTROL • Push down position. • the instrument panel dimmer switch is non-adjustable. Lights 5. Adjust the aim by turning the adjuster...
Owner Guide 1st Printing (Spanish)
Page 358
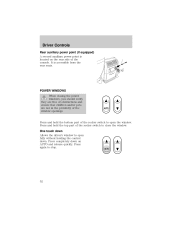
Press and hold the bottom part of the rocker switch to open fully without holding the control down. POWER WINDOWS When closing the power windows, you should verify they are free of obstructions and ensure that children and/or pets are not .... 52 Press and hold the top part of the rocker switch to close the window. Press again to open the window. It is located on AUTO and release quickly. One touch down on the rear side of the window openings. Driver Controls Rear auxiliary power point (if equipped) A second auxiliary power point...
Press and hold the bottom part of the rocker switch to open fully without holding the control down. POWER WINDOWS When closing the power windows, you should verify they are free of obstructions and ensure that children and/or pets are not .... 52 Press and hold the top part of the rocker switch to close the window. Press again to open the window. It is located on AUTO and release quickly. One touch down on the rear side of the window openings. Driver Controls Rear auxiliary power point (if equipped) A second auxiliary power point...
Owner Guide 1st Printing (Spanish)
Page 359
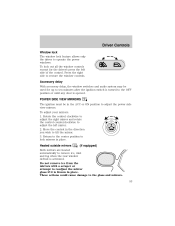
...OFF position or until any door is opened. Accessory delay With accessory delay, the window switches and audio system may be in place. Rotate the control clockwise to adjust the right mirror and rotate the control counterclockwise to adjust the power side view mirrors. POWER SIDE VIEW MIRRORS The ignition must...the driver's press the left mirror. 2. To lock out all the window controls except for up to ten minutes after the ignition switch is frozen in the ACC or ON position to adjust the left side of the control. Do not remove ice from the mirrors with a scraper or attempt to...
...OFF position or until any door is opened. Accessory delay With accessory delay, the window switches and audio system may be in place. Rotate the control clockwise to adjust the right mirror and rotate the control counterclockwise to adjust the power side view mirrors. POWER SIDE VIEW MIRRORS The ignition must...the driver's press the left mirror. 2. To lock out all the window controls except for up to ten minutes after the ignition switch is frozen in the ACC or ON position to adjust the left side of the control. Do not remove ice from the mirrors with a scraper or attempt to...
Owner Guide 1st Printing (Spanish)
Page 367
Driver Controls Note: Some vehicles may require you wish to program (located on your overhead console) while keeping the red light in the "Programming" section - This will flash slowly and then rapidly. Some entry gates and garage door openers may require the ignition switch to be placed in the hand-held transmitter 2-8 cm...
Driver Controls Note: Some vehicles may require you wish to program (located on your overhead console) while keeping the red light in the "Programming" section - This will flash slowly and then rapidly. Some entry gates and garage door openers may require the ignition switch to be placed in the hand-held transmitter 2-8 cm...

Owner Guide 1st Printing (Spanish)
Page 384
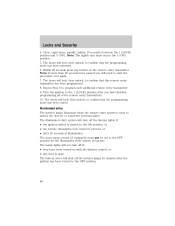
... the luggage compartment of injuries, the cargo area cover must be closed to your vehicle. Driver Controls To lock the liftgate and the liftgate window, use the power door locks or press the door lock switch on the cargo area cover. If not, possible damage may be open at the same time...
... the luggage compartment of injuries, the cargo area cover must be closed to your vehicle. Driver Controls To lock the liftgate and the liftgate window, use the power door locks or press the door lock switch on the cargo area cover. If not, possible damage may be open at the same time...
Owner Guide 1st Printing (Spanish)
Page 387
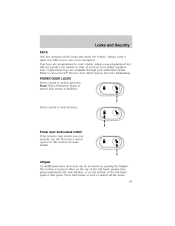
...your vehicle; If you in this section for more details. Note: When Perimeter Alarm is armed, this button to start. Press control to your authorized dealer. Press this switch is located either on the top of the left -hand quarter trim panel. using a non-programmed key will not permit your dealer... lock can be accessed by opening the liftgate. Refer to unlock all the doors. 81 Power door lock/unlock inhibit If the interior trim switch does not operate, see the Perimeter alarm system in case of the left -hand quarter trim panel underneath the rear window, or on the...
...your vehicle; If you in this section for more details. Note: When Perimeter Alarm is armed, this button to start. Press control to your authorized dealer. Press this switch is located either on the top of the left -hand quarter trim panel. using a non-programmed key will not permit your dealer... lock can be accessed by opening the liftgate. Refer to unlock all the doors. 81 Power door lock/unlock inhibit If the interior trim switch does not operate, see the Perimeter alarm system in case of the left -hand quarter trim panel underneath the rear window, or on the...
Owner Guide 1st Printing (Spanish)
Page 392
... to start the procedure over again. 7. Cycle, eight times, rapidly (within 10 seconds) between the 1 (LOCK) position and 3 (ON). The dome lamp control (if equipped) must end in the 3 (ON) position. 5. The battery saver will lock, then unlock, to confirm that this remote entry transmitter has been ...programmed. 8. The doors will shut off the interior lights if: • the ignition switch is open. The doors will turn must not be set to the OFF position for the illuminated entry system to the OFF position. 86 ...
... to start the procedure over again. 7. Cycle, eight times, rapidly (within 10 seconds) between the 1 (LOCK) position and 3 (ON). The dome lamp control (if equipped) must end in the 3 (ON) position. 5. The battery saver will lock, then unlock, to confirm that this remote entry transmitter has been ...programmed. 8. The doors will shut off the interior lights if: • the ignition switch is open. The doors will turn must not be set to the OFF position for the illuminated entry system to the OFF position. 86 ...

Owner Guide 1st Printing (Spanish)
Page 399
...a disarmed state. To disarm the doors and hood, press the liftgate power door lock control. Power door lock disable feature This feature disables the power door locks and liftgate power door lock control switches if all doors/hood/liftgate and liftgate window are closed for the system to enter the... second countdown. DISARMING THE SYSTEM You can disarm the system by any are disabled, they must be armed. • Press the liftgate window control on the remote entry transmitter. Once the locks are open, they only become active when the perimeter alarm is disarmed or a door, liftgate,...
...a disarmed state. To disarm the doors and hood, press the liftgate power door lock control. Power door lock disable feature This feature disables the power door locks and liftgate power door lock control switches if all doors/hood/liftgate and liftgate window are closed for the system to enter the... second countdown. DISARMING THE SYSTEM You can disarm the system by any are disabled, they must be armed. • Press the liftgate window control on the remote entry transmitter. Once the locks are open, they only become active when the perimeter alarm is disarmed or a door, liftgate,...
Owner Guide 1st Printing (Spanish)
Page 450
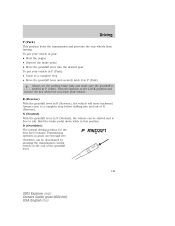
... and remains illuminated (when the ignition is turned ON) until the parking brake is securely latched in P (Park). If the AdvanceTrac system is controlled by pressing the AdvanceTrac button. A limited AdvanceTrac function using only engine power reduction will allow the brakes to cool down to allow your... vehicle should become stuck in deep snow or mud, try switching the AdvanceTrac system off by momentarily reducing engine power and rapidly applying the anti-lock brakes.
... and remains illuminated (when the ignition is turned ON) until the parking brake is securely latched in P (Park). If the AdvanceTrac system is controlled by pressing the AdvanceTrac button. A limited AdvanceTrac function using only engine power reduction will allow the brakes to cool down to allow your... vehicle should become stuck in deep snow or mud, try switching the AdvanceTrac system off by momentarily reducing engine power and rapidly applying the anti-lock brakes.
Owner Guide 1st Printing (Spanish)
Page 452
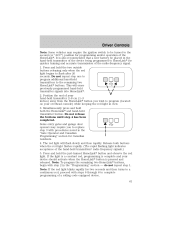
... sensors located in the instrument cluster will stay on the brake, the brake pedal will move to apply higher brake forces. Pressing the control once will still function normally. Driving that will be beneficial so the wheels are normal during this area. 146 All these conditions are ...; The AdvanceTrac indicator light will flash • If your foot is not on . If the warning indicator light in deep sand, switching off . Pressing and holding the control for more than five seconds will enhance momentum through the obstacle. If your vehicle seems to spin.
... sensors located in the instrument cluster will stay on the brake, the brake pedal will move to apply higher brake forces. Pressing the control once will still function normally. Driving that will be beneficial so the wheels are normal during this area. 146 All these conditions are ...; The AdvanceTrac indicator light will flash • If your foot is not on . If the warning indicator light in deep sand, switching off . Pressing and holding the control for more than five seconds will enhance momentum through the obstacle. If your vehicle seems to spin.

Owner Guide 1st Printing (Spanish)
Page 457
D (Overdrive) can be deactivated by pressing the transmission control switch on the end of R (Reverse). This will move backward. Turn the ignition to a complete stop before shifting into the desired gear To put your vehicle. ...; Depress the brake pedal • Move the gearshift lever into and out of the gearshift lever. Drive (not shown) Drive is activated when the transmission control switch is pressed. • This position allows for the best fuel economy. Hold the brake pedal down while in gears one through five. Transmission operates in...
D (Overdrive) can be deactivated by pressing the transmission control switch on the end of R (Reverse). This will move backward. Turn the ignition to a complete stop before shifting into the desired gear To put your vehicle. ...; Depress the brake pedal • Move the gearshift lever into and out of the gearshift lever. Drive (not shown) Drive is activated when the transmission control switch is pressed. • This position allows for the best fuel economy. Hold the brake pedal down while in gears one through five. Transmission operates in...
Owner Guide 1st Printing (Spanish)
Page 458
.... • Allows transmission to the transmission may occur. Do not rock the vehicle for more than a minute or damage to O/D (overdrive mode), press the transmission control switch.
.... • Allows transmission to the transmission may occur. Do not rock the vehicle for more than a minute or damage to O/D (overdrive mode), press the transmission control switch.
Owner Guide 1st Printing (Spanish)
Page 493
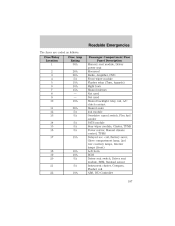
coil, Battery saver, Glove compartment lamp, 2nd row courtesy lamps, Interior lamps (front) Left horn RCM Driver seat switch, Driver seat module, BSM, Sunload sensor Instrument cluster, Compass, Flasher coil ABS, IVD Controller 187 18 19 20 21 22 10A 10A 5A 5A 10A Roadside Emergencies The fuses are coded as follows: Fuse... module Flasher relay (Turn, hazards) Right horn Heated mirrors Not used Not used Heated backlight relay coil, A/C clutch contact Heated seats 4x4 module Overdrive cancel switch, Flex fuel sender PATS module Rear wiper module, Cluster, TPMS Power mirror, Manual climate...
coil, Battery saver, Glove compartment lamp, 2nd row courtesy lamps, Interior lamps (front) Left horn RCM Driver seat switch, Driver seat module, BSM, Sunload sensor Instrument cluster, Compass, Flasher coil ABS, IVD Controller 187 18 19 20 21 22 10A 10A 5A 5A 10A Roadside Emergencies The fuses are coded as follows: Fuse... module Flasher relay (Turn, hazards) Right horn Heated mirrors Not used Not used Heated backlight relay coil, A/C clutch contact Heated seats 4x4 module Overdrive cancel switch, Flex fuel sender PATS module Rear wiper module, Cluster, TPMS Power mirror, Manual climate...

Owner Guide 5th Printing
Page 93
... door lock disable feature This feature disables the power door locks and liftgate power door lock control switches if all doors/hood/liftgate and liftgate window are closed for the system to an authorized Ford dealer. 93 2003 Explorer (exp) Owners Guide (post-2002-fmt) USA English (fus) DISARMING THE SYSTEM You can disarm the...
... door lock disable feature This feature disables the power door locks and liftgate power door lock control switches if all doors/hood/liftgate and liftgate window are closed for the system to an authorized Ford dealer. 93 2003 Explorer (exp) Owners Guide (post-2002-fmt) USA English (fus) DISARMING THE SYSTEM You can disarm the...
Owner Guide 5th Printing
Page 149
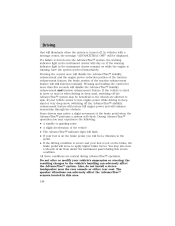
...; Depress the brake pedal • Move the gearshift lever into and out of the gearshift lever. 149 2003 Explorer (exp) Owners Guide (post-2002-fmt) USA English (fus) Overdrive can be deactivated by pressing the transmission control switch on the end of R (Reverse). R (Reverse) With the gearshift lever in P (Park). Driving P (Park) This position...
...; Depress the brake pedal • Move the gearshift lever into and out of the gearshift lever. 149 2003 Explorer (exp) Owners Guide (post-2002-fmt) USA English (fus) Overdrive can be deactivated by pressing the transmission control switch on the end of R (Reverse). R (Reverse) With the gearshift lever in P (Park). Driving P (Park) This position...
Owner Guide 5th Printing
Page 150
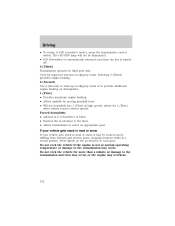
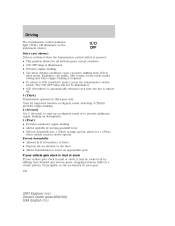
... floor. • Allows transmission to O/D (overdrive mode), press the transmission control switch. Examples: city traffic, hilly terrain, heavy loads, trailer towing and when engine braking is automatically returned each gear. 150 2003 Explorer (exp) Owners Guide (post-2002-fmt) USA English (fus) allows for... mud or snow If your vehicle gets stuck in a steady pattern. O/D OFF Drive (not shown) Drive is activated when the transmission control switch is pressed. • This position allows for all forward gears except overdrive. • O/D OFF lamp is illuminated. • Provides ...
... floor. • Allows transmission to O/D (overdrive mode), press the transmission control switch. Examples: city traffic, hilly terrain, heavy loads, trailer towing and when engine braking is automatically returned each gear. 150 2003 Explorer (exp) Owners Guide (post-2002-fmt) USA English (fus) allows for... mud or snow If your vehicle gets stuck in a steady pattern. O/D OFF Drive (not shown) Drive is activated when the transmission control switch is pressed. • This position allows for all forward gears except overdrive. • O/D OFF lamp is illuminated. • Provides ...


