Owner's Manual
Page 1
Table of Contents Introduction Instrument Cluster Warning and control lights Gauges 4 8 8 14 Entertainment Systems AM/FM stereo with CD 16 16 Climate Controls Electronic automatic temperature control 30 30 Lights Headlamps Turn signal control Bulb replacement 43 43 46 46 Driver Controls Windshield wiper/washer control Steering wheel adjustment Power windows Mirrors Speed control 54 54 55 56 58 59 Locks and Security Keys Locks Anti-theft system 76 76 76 77 Seating and Safety Restraints Seating Safety restraints Air bags Child restraints 87 87 90 100 113 1
Table of Contents Introduction Instrument Cluster Warning and control lights Gauges 4 8 8 14 Entertainment Systems AM/FM stereo with CD 16 16 Climate Controls Electronic automatic temperature control 30 30 Lights Headlamps Turn signal control Bulb replacement 43 43 46 46 Driver Controls Windshield wiper/washer control Steering wheel adjustment Power windows Mirrors Speed control 54 54 55 56 58 59 Locks and Security Keys Locks Anti-theft system 76 76 76 77 Seating and Safety Restraints Seating Safety restraints Air bags Child restraints 87 87 90 100 113 1
Owner's Manual
Page 6
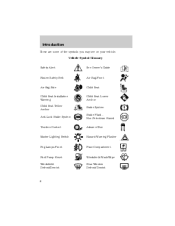
Vehicle Symbol Glossary Safety Alert See Owner's Guide Fasten Safety Belt Air Bag-Front Air Bag-Side Child Seat Installation Warning Child Seat Tether Anchor Anti-Lock Brake System Child Seat Child Seat Lower Anchor Brake System Brake Fluid Non-Petroleum Based AdvanceTrac Traction Control Master Lighting Switch Hazard Warning Flasher Fog Lamps-Front Fuse Compartment Fuel Pump Reset Windshield Defrost/Demist Windshield Wash/Wipe Rear Window Defrost/Demist 6 Introduction These are some of the symbols you may see on your vehicle.
Vehicle Symbol Glossary Safety Alert See Owner's Guide Fasten Safety Belt Air Bag-Front Air Bag-Side Child Seat Installation Warning Child Seat Tether Anchor Anti-Lock Brake System Child Seat Child Seat Lower Anchor Brake System Brake Fluid Non-Petroleum Based AdvanceTrac Traction Control Master Lighting Switch Hazard Warning Flasher Fog Lamps-Front Fuse Compartment Fuel Pump Reset Windshield Defrost/Demist Windshield Wash/Wipe Rear Window Defrost/Demist 6 Introduction These are some of the symbols you may see on your vehicle.
Owner's Manual
Page 11
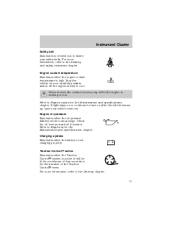
... duration of the Traction Control event. Instrument Cluster Safety belt Illuminates to remind you to fasten your vehicle serviced. For more information, refer to the Seating and safety restraints chapter. Engine coolant temperature Illuminates when the engine coolant temperature is active. For more information, refer to the Driving chapter. 11
... duration of the Traction Control event. Instrument Cluster Safety belt Illuminates to remind you to fasten your vehicle serviced. For more information, refer to the Seating and safety restraints chapter. Engine coolant temperature Illuminates when the engine coolant temperature is active. For more information, refer to the Driving chapter. 11
Owner's Manual
Page 27
... of about 2 000 • CHURCH-church with a high vault • STADIUM-outdoor stadium with a capacity of the following signal modes can be selected: • ALL SEATS • DRIVER SEAT • TOP DOWN Mute mode Press the control to mute the playing media.
... of about 2 000 • CHURCH-church with a high vault • STADIUM-outdoor stadium with a capacity of the following signal modes can be selected: • ALL SEATS • DRIVER SEAT • TOP DOWN Mute mode Press the control to mute the playing media.
Owner's Manual
Page 40
Higher readings may cause interior fogging of the front, side and rear windows. • Do not place objects under the front seat that the cabin air filter needs to see through your windshield. After a few minutes, select any snow, ice or leaves from the air intake area ...
Higher readings may cause interior fogging of the front, side and rear windows. • Do not place objects under the front seat that the cabin air filter needs to see through your windshield. After a few minutes, select any snow, ice or leaves from the air intake area ...

Owner's Manual
Page 49
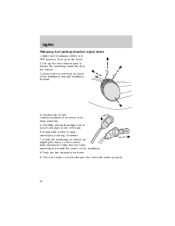
Grasp the bulb only by aligning the lamp on the vehicle, push rearward to fully seat the lamp assembly and install the screw on the headlamp. 5. When the grooves are operated. Install the bulb retaining ring over the plastic base and ...
Grasp the bulb only by aligning the lamp on the vehicle, push rearward to fully seat the lamp assembly and install the screw on the headlamp. 5. When the grooves are operated. Install the bulb retaining ring over the plastic base and ...
Owner's Manual
Page 50
... pins down. 9. Turn the lamps on the headlamp. 8. Rotate bulb socket counterclockwise and remove from the vehicle. 3. Pry up the two retainer pins to fully seat the lamp assembly and install the screw on and make sure the new bulb works properly. 50 Install bulb socket in lamp assembly by aligning...
... pins down. 9. Turn the lamps on the headlamp. 8. Rotate bulb socket counterclockwise and remove from the vehicle. 3. Pry up the two retainer pins to fully seat the lamp assembly and install the screw on and make sure the new bulb works properly. 50 Install bulb socket in lamp assembly by aligning...
Owner's Manual
Page 59
... until the vehicle is armed. Do not shift the gearshift lever into N (Neutral) with your master key on the key cylinder located behind the driver's seat.
... until the vehicle is armed. Do not shift the gearshift lever into N (Neutral) with your master key on the key cylinder located behind the driver's seat.
Owner's Manual
Page 65
... the top when the top material is running when lowering the top to prevent draining the battery. 2. Check the convertible top stowage compartment behind the seat to receive the top. 3. Bring vehicle to release the clamps from the windshield header. 4. Put the gearshift in the stowage compartment. 5. Installation of the tonneau...
... the top when the top material is running when lowering the top to prevent draining the battery. 2. Check the convertible top stowage compartment behind the seat to receive the top. 3. Bring vehicle to release the clamps from the windshield header. 4. Put the gearshift in the stowage compartment. 5. Installation of the tonneau...

Owner's Manual
Page 67
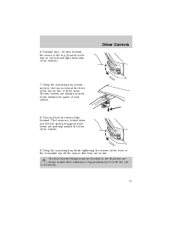
... edge of your vehicle. 4. Press the button on the convertible top handle and pull the handle down into the windscreen panel of the top should seat themselves in the matching holes in the luggage compartment. 3. Driver Controls 2. Push the two screws down to the header. 7. Resume pushing the convertible top switch...
... edge of your vehicle. 4. Press the button on the convertible top handle and pull the handle down into the windscreen panel of the top should seat themselves in the matching holes in the luggage compartment. 3. Driver Controls 2. Push the two screws down to the header. 7. Resume pushing the convertible top switch...
Owner's Manual
Page 69
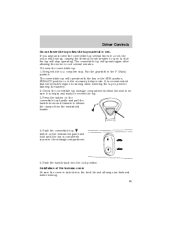
... another person remove the top from the top. Driver Controls REMOVABLE TOP (IF EQUIPPED) For more information see that the removable top levers are firmly seated after driving a distance of approximately 50 to 60 km (30 to installing or removing the top. Before installing the removable top, unsnap and properly store...
... another person remove the top from the top. Driver Controls REMOVABLE TOP (IF EQUIPPED) For more information see that the removable top levers are firmly seated after driving a distance of approximately 50 to 60 km (30 to installing or removing the top. Before installing the removable top, unsnap and properly store...
Owner's Manual
Page 71
... secure. Turn and lock the levers fully forward. Driver Controls 6. The levers are locked when you feel the spring engage and the levers are firmly seated after a distance of approximately 50 to 60 km (30 to see that they are pointing toward the front of your vehicle. 8. Using the mounting key...
... secure. Turn and lock the levers fully forward. Driver Controls 6. The levers are locked when you feel the spring engage and the levers are firmly seated after a distance of approximately 50 to 60 km (30 to see that they are pointing toward the front of your vehicle. 8. Using the mounting key...
Owner's Manual
Page 87
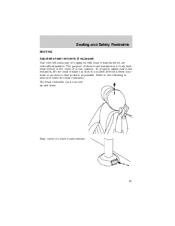
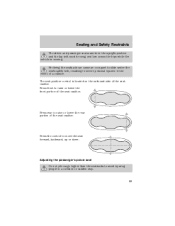
The head restraints can be equipped with head restraints which are vertically adjustable. To properly adjust your head restraints, lift the head restraint so that it is located directly behind your head or as close to help limit head motion in the event of these head restraints is to that position as possible. Seating and Safety Restraints SEATING Adjustable head restraints (if equipped) Your vehicle's seats may be moved up and down. The purpose of a rear collision. Refer to the following to lower head restraint. 87 Push control to raise and lower the head restraints.
The head restraints can be equipped with head restraints which are vertically adjustable. To properly adjust your head restraints, lift the head restraint so that it is located directly behind your head or as close to help limit head motion in the event of these head restraints is to that position as possible. Seating and Safety Restraints SEATING Adjustable head restraints (if equipped) Your vehicle's seats may be moved up and down. The purpose of a rear collision. Refer to the following to lower head restraint. 87 Push control to raise and lower the head restraints.

Owner's Manual
Page 88
... the manual recliner: • Lift and hold the handle located on the front of the seat. • Lean against the seatback to your desired position. Adjusting the driver's power seat Never adjust the driver's seat or seatback when the vehicle is moving. Do not pile cargo higher than the seatbacks to ... in the upright position and the lap belt must be snug and low across the hips while the vehicle is moving. You can recline the seat back or bring it to adjust it forward. • Release the handle when the desired position has been reached. Using the manual recline function...
... the manual recliner: • Lift and hold the handle located on the front of the seat. • Lean against the seatback to your desired position. Adjusting the driver's power seat Never adjust the driver's seat or seatback when the vehicle is moving. Do not pile cargo higher than the seatbacks to ... in the upright position and the lap belt must be snug and low across the hips while the vehicle is moving. You can recline the seat back or bring it to adjust it forward. • Release the handle when the desired position has been reached. Using the manual recline function...
Owner's Manual
Page 89
... cause an occupant to raise or lower the rear portion of a collision. Adjusting the passenger's power seat Do not pile cargo higher than the seatbacks to raise or lower the front portion of the seat cushion. Press front to avoid injuring people in the upright position and the lap belt must be... in a collision or sudden stop. 89 Press the control to move the seat forward, backward, up or down. Seating and Safety Restraints The driver and passenger seat must be snug and low across the hips while the vehicle is located on the outboard side of the...
... cause an occupant to raise or lower the rear portion of a collision. Adjusting the passenger's power seat Do not pile cargo higher than the seatbacks to raise or lower the front portion of the seat cushion. Press front to avoid injuring people in the upright position and the lap belt must be... in a collision or sudden stop. 89 Press the control to move the seat forward, backward, up or down. Seating and Safety Restraints The driver and passenger seat must be snug and low across the hips while the vehicle is located on the outboard side of the...

Owner's Manual
Page 90
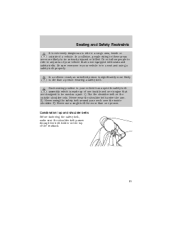
... always properly wear their safety belts, even when an air bag (SRS) is moving. SAFETY RESTRAINTS Safety restraints precautions The driver and passenger seat must be in the upright position and the lap belt must be snug and low across the hips while the vehicle is moving . The ...passenger cannot protect the child from injury in a collision. All occupants of the seat cushion. Seating and Safety Restraints The driver and passenger seat must be in the upright position and the lap belt must be properly restrained. Reclining the seatback can be snug ...
... always properly wear their safety belts, even when an air bag (SRS) is moving. SAFETY RESTRAINTS Safety restraints precautions The driver and passenger seat must be in the upright position and the lap belt must be snug and low across the hips while the vehicle is moving . The ...passenger cannot protect the child from injury in a collision. All occupants of the seat cushion. Seating and Safety Restraints The driver and passenger seat must be in the upright position and the lap belt must be properly restrained. Reclining the seatback can be snug ...
Owner's Manual
Page 91
... outside shoulder only. In a rollover crash, an unbelted person is significantly more likely to die than one tongue that is not equipped with seats and safety belts. Seating and Safety Restraints It is extremely dangerous to ride in a cargo area, inside shoulder. 3) Never use a single belt for more than...to ride in these areas are designed to be used as a pair. 1) Use the shoulder belt on the top of a vehicle. Each seating position in a seat and using a safety belt properly. Never wear the shoulder belt under the arm. 2) Never swing the safety belt around your vehicle is made...
... outside shoulder only. In a rollover crash, an unbelted person is significantly more likely to die than one tongue that is not equipped with seats and safety belts. Seating and Safety Restraints It is extremely dangerous to ride in a cargo area, inside shoulder. 3) Never use a single belt for more than...to ride in these areas are designed to be used as a pair. 1) Use the shoulder belt on the top of a vehicle. Each seating position in a seat and using a safety belt properly. Never wear the shoulder belt under the arm. 2) Never swing the safety belt around your vehicle is made...
Owner's Manual
Page 92
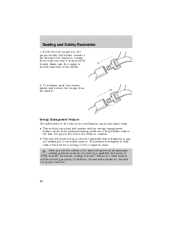
... Management Feature The safety belts in the vehicle are combination lap and shoulder belts. • This vehicle has a seat belt system with an energy management feature at all seat belts should be checked by a qualified technician to verify that is securely fastened in the buckle. 2. Make sure the... tongue is designed to the direction the tongue is coming from the buckle. Seating and Safety Restraints 1. To unfasten, push the release button and remove the tongue from ) until you hear a snap and feel it latch....
... Management Feature The safety belts in the vehicle are combination lap and shoulder belts. • This vehicle has a seat belt system with an energy management feature at all seat belts should be checked by a qualified technician to verify that is securely fastened in the buckle. 2. Make sure the... tongue is designed to the direction the tongue is coming from the buckle. Seating and Safety Restraints 1. To unfasten, push the release button and remove the tongue from ) until you hear a snap and feel it latch....

Owner's Manual
Page 93
... combination safety belts will lock to help reduce forward movement of injury in collisions. Seating and Safety Restraints BELT AND RETRACTOR ASSEMBLY MUST BE REPLACED if the seat belt assembly "automatic locking retractor" feature or any other seat belt function is the normal retractor mode, allowing free shoulder belt length adjustment to your...
... combination safety belts will lock to help reduce forward movement of injury in collisions. Seating and Safety Restraints BELT AND RETRACTOR ASSEMBLY MUST BE REPLACED if the seat belt assembly "automatic locking retractor" feature or any other seat belt function is the normal retractor mode, allowing free shoulder belt length adjustment to your...
Owner's Manual
Page 94
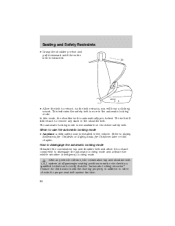
... function. 94 As the belt retracts, you will still retract to use the automatic locking mode • Anytime a child safety seat is installed in the vehicle. How to disengage the automatic locking mode Unbuckle the combination lap and shoulder belt and allow it to... retract completely to Safety Restraints for Children or Safety Seats for Children later in the automatic locking mode. Refer to disengage the automatic locking mode and activate the vehicle sensitive (emergency) locking mode...
... function. 94 As the belt retracts, you will still retract to use the automatic locking mode • Anytime a child safety seat is installed in the vehicle. How to disengage the automatic locking mode Unbuckle the combination lap and shoulder belt and allow it to... retract completely to Safety Restraints for Children or Safety Seats for Children later in the automatic locking mode. Refer to disengage the automatic locking mode and activate the vehicle sensitive (emergency) locking mode...


