

Owner's Manual
Page 45
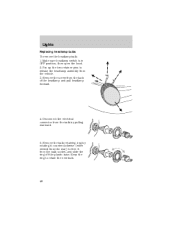
Locate the vertical adjuster on the low beam headlamps to illuminate the wall or screen and open the hood. 4. HORIZONTAL AIM IS NOT REQUIRED FOR THIS VEHICLE AND IS NON-ADJUSTABLE. 7. Turn on each headlamp, then use a 6 mm allen wrench or screwdriver to the ..., the beam will observe a light pattern with flat edges at this height (a piece of lamp to be adjusted. 5. Lights HEADLAMP VERTICAL AIM ADJUSTMENT 1. Close the hood and turn off the lamps. 45
Locate the vertical adjuster on the low beam headlamps to illuminate the wall or screen and open the hood. 4. HORIZONTAL AIM IS NOT REQUIRED FOR THIS VEHICLE AND IS NON-ADJUSTABLE. 7. Turn on each headlamp, then use a 6 mm allen wrench or screwdriver to the ..., the beam will observe a light pattern with flat edges at this height (a piece of lamp to be adjusted. 5. Lights HEADLAMP VERTICAL AIM ADJUSTMENT 1. Close the hood and turn off the lamps. 45
Owner's Manual
Page 48
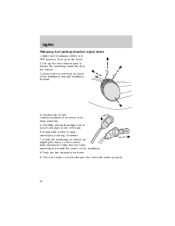
Pry up the two retainer pins to release the headlamp assembly from the back of the headlamp and pull headlamp forward. 4. Remove the screw from the vehicle. 3. Disconnect the electrical connector from the bulb by rotating it counterclockwise (when viewed from the rear) to retain the new bulb. 48 Keep the ring to free it from the bulb socket, and slide the ring off the plastic base. Remove the bulb retaining ring by pulling rearward. 5. Make sure headlamp switch is in OFF position, then open the hood. 2. Lights Replacing headlamp bulbs To remove the headlamp bulb: 1.
Pry up the two retainer pins to release the headlamp assembly from the back of the headlamp and pull headlamp forward. 4. Remove the screw from the vehicle. 3. Disconnect the electrical connector from the bulb by rotating it counterclockwise (when viewed from the rear) to retain the new bulb. 48 Keep the ring to free it from the bulb socket, and slide the ring off the plastic base. Remove the bulb retaining ring by pulling rearward. 5. Make sure headlamp switch is in OFF position, then open the hood. 2. Lights Replacing headlamp bulbs To remove the headlamp bulb: 1.
Owner's Manual
Page 50
Rotate bulb socket counterclockwise and remove from the back of socket and push in OFF position, then open the hood. 2. Remove the screw from lamp assembly. 5. Make sure headlamp switch is in the new bulb. 6. Install the headlamp on vehicle by turning clockwise. 7. Lights Replacing ...
Rotate bulb socket counterclockwise and remove from the back of socket and push in OFF position, then open the hood. 2. Remove the screw from lamp assembly. 5. Make sure headlamp switch is in the new bulb. 6. Install the headlamp on vehicle by turning clockwise. 7. Lights Replacing ...
Owner's Manual
Page 78
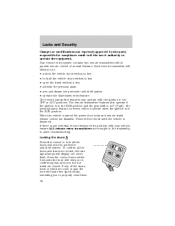
...ACC positions. When the vehicle is in the RUN position. Your remote entry system contains two remote transmitters which provide remote control of the doors, hood or trunk are open the trunk without a key • lock all the doors and trunk are disabled. Locking the doors Press this control ...to lock all doors, hood or trunk are brought to the dealership, to operate the equipment. The remote transmitter features also operate if the ignition is in the RUN position...
...ACC positions. When the vehicle is in the RUN position. Your remote entry system contains two remote transmitters which provide remote control of the doors, hood or trunk are open the trunk without a key • lock all the doors and trunk are disabled. Locking the doors Press this control ...to lock all doors, hood or trunk are brought to the dealership, to operate the equipment. The remote transmitter features also operate if the ignition is in the RUN position...
Owner's Manual
Page 85
... theft indicator will flash briefly every two seconds to indicate the perimeter alarm system is any potential perimeter anti-theft problem with your vehicle doors, hood and trunk from 1 (LOCK) to 1 (LOCK) and remove the second coded key from step 1. When the vehicle is disarmed. Turn the ignition to 4 (RUN) (maintain...
... theft indicator will flash briefly every two seconds to indicate the perimeter alarm system is any potential perimeter anti-theft problem with your vehicle doors, hood and trunk from 1 (LOCK) to 1 (LOCK) and remove the second coded key from step 1. When the vehicle is disarmed. Turn the ignition to 4 (RUN) (maintain...

Owner's Manual
Page 185
...open. 185 Block the wheels to the front of the vehicle and release the auxiliary latch that is located under the front center of the hood by pushing the handle toward the passenger side of the instrument panel. 2. Note: Do not start your engine with the engine on 1. OPENING... THE HOOD 1. Inside the vehicle, pull the hood release handle located at the bottom left of the vehicle. 3. Go to prevent the vehicle from moving unexpectedly. Lift the hood until the lift cylinders hold it while the engine is securely latched in...
...open. 185 Block the wheels to the front of the vehicle and release the auxiliary latch that is located under the front center of the hood by pushing the handle toward the passenger side of the instrument panel. 2. Note: Do not start your engine with the engine on 1. OPENING... THE HOOD 1. Inside the vehicle, pull the hood release handle located at the bottom left of the vehicle. 3. Go to prevent the vehicle from moving unexpectedly. Lift the hood until the lift cylinders hold it while the engine is securely latched in...
Owner's Manual
Page 187
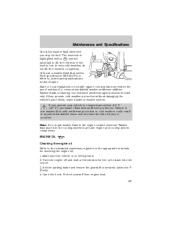
... the parking brake and ensure the gearshift is symbol. The reservoir is securely latched in P (Park). 4. Only use a washer fluid that meets Ford specification ESR-M17P5-A . Open the hood. If you stop for checking the engine oil. 1. Note: Do not put washer fluid in the engine coolant reservoir. Maintenance and Specifications Check...
... the parking brake and ensure the gearshift is symbol. The reservoir is securely latched in P (Park). 4. Only use a washer fluid that meets Ford specification ESR-M17P5-A . Open the hood. If you stop for checking the engine oil. 1. Note: Do not put washer fluid in the engine coolant reservoir. Maintenance and Specifications Check...
Owner's Manual
Page 218
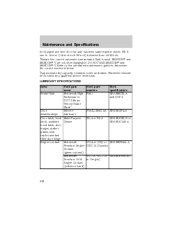
... automatic transmission fluid is used. MERCON and MERCON V are not interchangeable. LUBRICANT SPECIFICATIONS Ford part name Brake fluid Motorcraft High Performance DOT 3 Motor Vehicle Brake Fluid 1 Door Silicone weatherstrips Lubricant Door latch, hood Multi-Purpose Grease latch, auxiliary hood latch, door hinges, striker plates, seat tracks and fuel filler door hinge Engine coolant...
... automatic transmission fluid is used. MERCON and MERCON V are not interchangeable. LUBRICANT SPECIFICATIONS Ford part name Brake fluid Motorcraft High Performance DOT 3 Motor Vehicle Brake Fluid 1 Door Silicone weatherstrips Lubricant Door latch, hood Multi-Purpose Grease latch, auxiliary hood latch, door hinges, striker plates, seat tracks and fuel filler door hinge Engine coolant...
Owner's Manual
Page 228
Index replacing bulbs ...48 turning on and off ...43 warning chime ...13 Heating heating and air conditioning system ...30 Hood ...185 I Ignition ...125, 220 Infant seats (see Safety seats) ...116 Inspection/maintenance (I/M) testing ...207 Instrument panel cleaning ...181 cluster ...8 lighting up panel and interior ...44 J ...
Index replacing bulbs ...48 turning on and off ...43 warning chime ...13 Heating heating and air conditioning system ...30 Hood ...185 I Ignition ...125, 220 Infant seats (see Safety seats) ...116 Inspection/maintenance (I/M) testing ...207 Instrument panel cleaning ...181 cluster ...8 lighting up panel and interior ...44 J ...
