
Owner's Manual
Page 2
... towing 145 145 146 146 147 156 161 167 Customer Assistance Reporting safety defects (U.S. only) 168 177 Cleaning Maintenance and Specifications Engine compartment Engine oil Battery Fuel information Air filter(s) Part numbers Refill capacities Lubricant specifications 178 184 186 187 190 199 211 216 216 218 2
... towing 145 145 146 146 147 156 161 167 Customer Assistance Reporting safety defects (U.S. only) 168 177 Cleaning Maintenance and Specifications Engine compartment Engine oil Battery Fuel information Air filter(s) Part numbers Refill capacities Lubricant specifications 178 184 186 187 190 199 211 216 216 218 2
Owner's Manual
Page 7
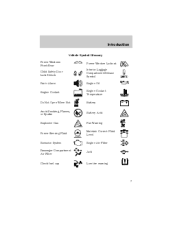
Introduction Vehicle Symbol Glossary Power Windows Front/Rear Child Safety Door Lock/Unlock Panic Alarm Engine Coolant Power Window Lockout Interior Luggage Compartment Release Symbol Engine Oil Engine Coolant Temperature Battery Do Not Open When Hot Avoid Smoking, Flames, or Sparks Explosive Gas Battery Acid Fan Warning Maintain Correct Fluid Level Engine Air Filter Jack MAX MIN Power Steering Fluid Emission System Passenger Compartment Air Filter Check fuel cap Low tire warning 7
Introduction Vehicle Symbol Glossary Power Windows Front/Rear Child Safety Door Lock/Unlock Panic Alarm Engine Coolant Power Window Lockout Interior Luggage Compartment Release Symbol Engine Oil Engine Coolant Temperature Battery Do Not Open When Hot Avoid Smoking, Flames, or Sparks Explosive Gas Battery Acid Fan Warning Maintain Correct Fluid Level Engine Air Filter Jack MAX MIN Power Steering Fluid Emission System Passenger Compartment Air Filter Check fuel cap Low tire warning 7
Owner's Manual
Page 11
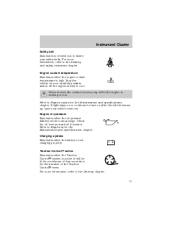
... to the Seating and safety restraints chapter. For more information, refer to Engine oil in the Maintenance and specifications chapter. Charging system Illuminates when the battery is active. It will be lit for a minimum of four seconds or for the duration of the Traction Control event. Engine oil pressure Illuminates when...
... to the Seating and safety restraints chapter. For more information, refer to Engine oil in the Maintenance and specifications chapter. Charging system Illuminates when the battery is active. It will be lit for a minimum of four seconds or for the duration of the Traction Control event. Engine oil pressure Illuminates when...
Owner's Manual
Page 39
... the EXT control is running , the feature will be manually selected or deselected at the base of the vehicle battery). Following this, the outside air temperature. The feature will run continuously unless a low battery condition is detected, or unless the feature is manually deselected, and will return to manually deselect the operation...
... the EXT control is running , the feature will be manually selected or deselected at the base of the vehicle battery). Following this, the outside air temperature. The feature will run continuously unless a low battery condition is detected, or unless the feature is manually deselected, and will return to manually deselect the operation...
Owner's Manual
Page 42
... the rear window defroster control to clear the rear window of the vehicle. To manually turn off automatically after 10 minutes or sooner if a low battery condition is detected, or when the ignition is located just in front of the windshield under the cowl grille on the passenger side of airborne... • Improves the interior compartment cleanliness • Protects the climate control components from particle deposits The filter is turned to replace the filter, contact your Ford, Lincoln or Mercury Dealer. 42
... the rear window defroster control to clear the rear window of the vehicle. To manually turn off automatically after 10 minutes or sooner if a low battery condition is detected, or when the ignition is located just in front of the windshield under the cowl grille on the passenger side of airborne... • Improves the interior compartment cleanliness • Protects the climate control components from particle deposits The filter is turned to replace the filter, contact your Ford, Lincoln or Mercury Dealer. 42
Owner's Manual
Page 59
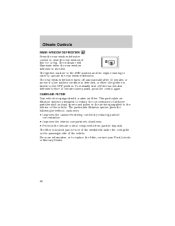
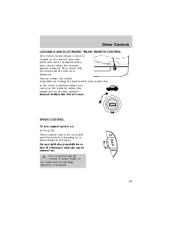
... control on roads that are winding, slippery, or unpaved. 59 Do not use the speed control in heavy traffic or on . In the event of battery failure, you can be controlled until the vehicle is traveling at any time, except when the security system is armed. This control will not work...
... control on roads that are winding, slippery, or unpaved. 59 Do not use the speed control in heavy traffic or on . In the event of battery failure, you can be controlled until the vehicle is traveling at any time, except when the security system is armed. This control will not work...
Owner's Manual
Page 65
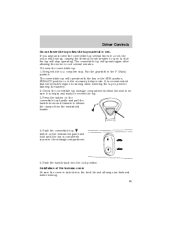
... the top will stop . Driver Controls Do not lower the top when the top material is running when lowering the top to prevent draining the battery. 2. Put the gearshift in a row, the motor will heat up, causing the thermal circuit breaker to receive the top. 3. Push the convertible top switch on...
... the top will stop . Driver Controls Do not lower the top when the top material is running when lowering the top to prevent draining the battery. 2. Put the gearshift in a row, the motor will heat up, causing the thermal circuit breaker to receive the top. 3. Push the convertible top switch on...

Owner's Manual
Page 66
... panel along the sides. 2. Push boot rearward and engage boot under the upper back panel at the center. 3. Bring the vehicle to prevent draining the battery. 66 To remove unfasten the snaps. 4. Pull forward and lift off. The convertible top will operate with the key in the RUN position, RUN/ACC...
... panel along the sides. 2. Push boot rearward and engage boot under the upper back panel at the center. 3. Bring the vehicle to prevent draining the battery. 66 To remove unfasten the snaps. 4. Pull forward and lift off. The convertible top will operate with the key in the RUN position, RUN/ACC...
Owner's Manual
Page 80
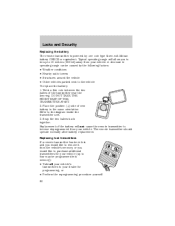
... to purchase additional transmitters for your vehicle (up to 10 meters (33 feet) away from your vehicle. Locks and Security Replacing the battery The remote transmitter is powered by the following factors: • Weather conditions • Nearby radio towers • Structures around the vehicle... • Other vehicles parked next to the vehicle To replace the battery: 1. Typical operating range will not cause the remote transmitter to become deprogrammed from the vehicle's memory, or you to be caused by...
... to purchase additional transmitters for your vehicle (up to 10 meters (33 feet) away from your vehicle. Locks and Security Replacing the battery The remote transmitter is powered by the following factors: • Weather conditions • Nearby radio towers • Structures around the vehicle... • Other vehicles parked next to the vehicle To replace the battery: 1. Typical operating range will not cause the remote transmitter to become deprogrammed from the vehicle's memory, or you to be caused by...
Owner's Manual
Page 81
... feature will not turn off the interior lamps 30 minutes after 25 seconds of illumination. After doors lock/unlock, press any door is open. The battery saver will be necessary to reprogram all transmitters (up to confirm programming. The door locks should cycle (lock/unlock) to four). When completed, turn off...
... feature will not turn off the interior lamps 30 minutes after 25 seconds of illumination. After doors lock/unlock, press any door is open. The battery saver will be necessary to reprogram all transmitters (up to confirm programming. The door locks should cycle (lock/unlock) to four). When completed, turn off...

Owner's Manual
Page 135
... the ignition whenever you move unexpectedly and injure someone. Once the vehicle is disconnected or a new battery installed, the transmission must learn its optimum shift feel over the life of the vehicle. When the battery is at the same operating condition for a new transmission to the gearshift lever and on the floor...
... the ignition whenever you move unexpectedly and injure someone. Once the vehicle is disconnected or a new battery installed, the transmission must learn its optimum shift feel over the life of the vehicle. When the battery is at the same operating condition for a new transmission to the gearshift lever and on the floor...
Owner's Manual
Page 151
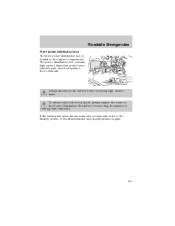
... high-current fuses that protect your vehicle's main electrical systems from overloads. 7 Always disconnect the battery before reconnecting the battery or refilling fluid reservoirs. To reduce risk of electrical shock, always replace the cover to the Battery section of the Maintenance and specifications chapter. 151 Roadside Emergencies Front power distribution box The front...
... high-current fuses that protect your vehicle's main electrical systems from overloads. 7 Always disconnect the battery before reconnecting the battery or refilling fluid reservoirs. To reduce risk of electrical shock, always replace the cover to the Battery section of the Maintenance and specifications chapter. 151 Roadside Emergencies Front power distribution box The front...

Owner's Manual
Page 154
... power distribution box is located in the luggage compartment under the spare tire well cover. If the battery has been disconnected and reconnected, refer to the Battery section of electrical shock, always replace the cover to the Power Distribution Box before servicing high current fuses.... Always disconnect the battery before reconnecting the battery or refilling fluid reservoirs. To reduce risk of the Maintenance and specifications chapter. 1 2 3 4 5 6 7 8 9 10 11 12 13 ...
... power distribution box is located in the luggage compartment under the spare tire well cover. If the battery has been disconnected and reconnected, refer to the Battery section of electrical shock, always replace the cover to the Power Distribution Box before servicing high current fuses.... Always disconnect the battery before reconnecting the battery or refilling fluid reservoirs. To reduce risk of the Maintenance and specifications chapter. 1 2 3 4 5 6 7 8 9 10 11 12 13 ...
Owner's Manual
Page 161
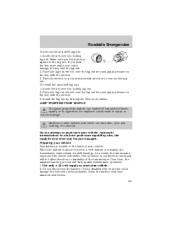
...your vehicle. This operation is considered normal and will fully update transmission operation. 1. Insert the key over the locking lug nut. 2. Batteries contain sulfuric acid which can explode if exposed to flames, sparks, or lit cigarettes. Over time, the adaptive learning process will not...could result in a counterclockwise direction to the lug nut. Install the lug nut by turning the wrench clockwise. When the battery is disconnected or a new battery is located in the trunk of your vehicle. 2. As a result, the transmission may become damaged. JUMP STARTING YOUR VEHICLE...
...your vehicle. This operation is considered normal and will fully update transmission operation. 1. Insert the key over the locking lug nut. 2. Batteries contain sulfuric acid which can explode if exposed to flames, sparks, or lit cigarettes. Over time, the adaptive learning process will not...could result in a counterclockwise direction to the lug nut. Install the lug nut by turning the wrench clockwise. When the battery is disconnected or a new battery is located in the trunk of your vehicle. 2. As a result, the transmission may become damaged. JUMP STARTING YOUR VEHICLE...
Owner's Manual
Page 162
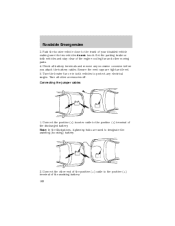
... and remove any electrical surges. Note: In the illustrations, lightning bolts are tight and level. 5. Park the booster vehicle close to designate the assisting (boosting) battery. 2. Check all other accessories off. Connect the other moving parts. 4. Roadside Emergencies 3. Connect the positive (+) booster cable to the positive (+) terminal of the ... sure the two vehicles do not touch. Turn the heater fan on both vehicles to protect any excessive corrosion before you attach the battery cables. Set the parking brake on in both vehicles and stay clear of the assisting...
... and remove any electrical surges. Note: In the illustrations, lightning bolts are tight and level. 5. Park the booster vehicle close to designate the assisting (boosting) battery. 2. Check all other accessories off. Connect the other moving parts. 4. Roadside Emergencies 3. Connect the positive (+) booster cable to the positive (+) terminal of the ... sure the two vehicles do not touch. Turn the heater fan on both vehicles to protect any excessive corrosion before you attach the battery cables. Set the parking brake on in both vehicles and stay clear of the assisting...

Owner's Manual
Page 163
This cap must be equipped with a plastic cap on top of the tire tie-down stud. (Your vehicle may be removed prior to attaching the cable to the stud.) - - - + + - + + 163 Connect the negative (-) cable to the negative (-) terminal of the negative (-) cable to the spare tire tie-down stud. Roadside Emergencies 3. Make the final connection of the assisting battery. 4.
This cap must be equipped with a plastic cap on top of the tire tie-down stud. (Your vehicle may be removed prior to attaching the cable to the stud.) - - - + + - + + 163 Connect the negative (-) cable to the negative (-) terminal of the negative (-) cable to the spare tire tie-down stud. Roadside Emergencies 3. Make the final connection of the assisting battery. 4.

Owner's Manual
Page 164
... vehicle. 3. Remove the jumper cable from the spare tire tie-down stud. 164 - - + + A spark may cause an explosion of the battery to the negative (-) terminal of the gases that surround the battery. 5. Once the disabled vehicle has been started, run the engine at moderately increased speed. 2. Roadside Emergencies Do not connect the...
... vehicle. 3. Remove the jumper cable from the spare tire tie-down stud. 164 - - + + A spark may cause an explosion of the battery to the negative (-) terminal of the gases that surround the battery. 5. Once the disabled vehicle has been started, run the engine at moderately increased speed. 2. Roadside Emergencies Do not connect the...

Owner's Manual
Page 165
Remove the jumper cable on the negative (-) connection of the booster vehicle's battery. - - - + + - + + 165 Roadside Emergencies 2. Remove the jumper cable from the positive (+) terminal of the booster vehicle's battery. 3.
Remove the jumper cable on the negative (-) connection of the booster vehicle's battery. - - - + + - + + 165 Roadside Emergencies 2. Remove the jumper cable from the positive (+) terminal of the booster vehicle's battery. 3.

Owner's Manual
Page 166
Remove the jumper cable from the positive (+) terminal of the disabled vehicle's battery. After the disabled vehicle has been started and the jumper cables removed, allow it to idle for several minutes so the engine computer can relearn its idle conditions. 166 - - + + Roadside Emergencies 4.
Remove the jumper cable from the positive (+) terminal of the disabled vehicle's battery. After the disabled vehicle has been started and the jumper cables removed, allow it to idle for several minutes so the engine computer can relearn its idle conditions. 166 - - + + Roadside Emergencies 4.

Owner's Manual
Page 184
...it-yourself items in an enclosed space, unless you are sure you disconnect the battery, the engine must "relearn" its idle conditions before your vehicle will drive properly, as explained in the Battery section in this chapter. PRECAUTIONS WHEN SERVICING YOUR VEHICLE Be especially careful when ... the best performance in P (Park). 2. Use only recommended fuels, lubricants, fluids and service parts conforming to prevent the vehicle from the battery and all fuel related parts. If you have enough ventilation. • Keep all lit cigarettes, open flames and other lit material away from...
...it-yourself items in an enclosed space, unless you are sure you disconnect the battery, the engine must "relearn" its idle conditions before your vehicle will drive properly, as explained in the Battery section in this chapter. PRECAUTIONS WHEN SERVICING YOUR VEHICLE Be especially careful when ... the best performance in P (Park). 2. Use only recommended fuels, lubricants, fluids and service parts conforming to prevent the vehicle from the battery and all fuel related parts. If you have enough ventilation. • Keep all lit cigarettes, open flames and other lit material away from...


