Scheduled Maintenance Guide 3rd Printing
Page 8
... holes safety warning lamps (brake, ABS, air bag, safety belt) for operation cooling system fluid level and coolant strength battery connections and clean if necessary clutch fluid level, if equipped 5,000 Miles Adjust clutch by lifting pedal (manual transmission Mustang only) (see Owner Guide) 8
... holes safety warning lamps (brake, ABS, air bag, safety belt) for operation cooling system fluid level and coolant strength battery connections and clean if necessary clutch fluid level, if equipped 5,000 Miles Adjust clutch by lifting pedal (manual transmission Mustang only) (see Owner Guide) 8
Warranty Guide 5th Printing
Page 13
...occurs first, wheel alignment and tire balancing are not equipped with a 6.8L engine and 4:30 axle (XC3)) that have been determined to Ford components caused by an insurance company; In addition, damage from the Scheduled Maintenance Guide are: • oil changes • cleaning/polishing •..., parts (including glass) installed by body builders or manufacturers other than Ford, or damage to be a "total loss" by installation of non-Ford parts other fluids • wiper blades • oil/air filters • clutch linings • brake linings/pads • engine tune-up •...
...occurs first, wheel alignment and tire balancing are not equipped with a 6.8L engine and 4:30 axle (XC3)) that have been determined to Ford components caused by an insurance company; In addition, damage from the Scheduled Maintenance Guide are: • oil changes • cleaning/polishing •..., parts (including glass) installed by body builders or manufacturers other than Ford, or damage to be a "total loss" by installation of non-Ford parts other fluids • wiper blades • oil/air filters • clutch linings • brake linings/pads • engine tune-up •...

Owner Guide 4th Printing
Page 96
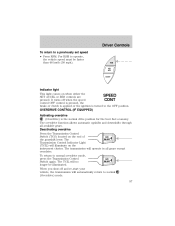
Driver Controls To disengage speed control • Depress the brake pedal or • Depress the clutch pedal (if equipped). ON OFF 96 This is returned to idle. Fully depressing the clutch pedal may cause a flare in engine RPM as the throttle is normal. Pressing OFF will not erase the previously programmed set speed. Disengaging the speed control will erase the previously programmed set speed.
Driver Controls To disengage speed control • Depress the brake pedal or • Depress the clutch pedal (if equipped). ON OFF 96 This is returned to idle. Fully depressing the clutch pedal may cause a flare in engine RPM as the throttle is normal. Pressing OFF will not erase the previously programmed set speed. Disengaging the speed control will erase the previously programmed set speed.
Owner Guide 4th Printing
Page 97
... pressed. The TCIL will illuminate on the instrument cluster. When you shut off when the speed CONT control OFF control is pressed, the brake or clutch is applied or the ignition is the normal drive position for the best fuel economy. For RSM to normal (Overdrive) mode. 97 It turns off...
... pressed. The TCIL will illuminate on the instrument cluster. When you shut off when the speed CONT control OFF control is pressed, the brake or clutch is applied or the ignition is the normal drive position for the best fuel economy. For RSM to normal (Overdrive) mode. 97 It turns off...
Owner Guide 4th Printing
Page 153
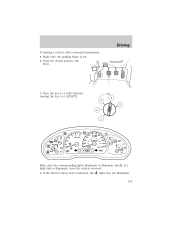
If a light fails to illuminate, have the vehicle serviced. • If the driver's safety belt is set. • Push the clutch pedal to 5 (START). 4 3 5 2 1 Make sure the corresponding lights illuminate or illuminate briefly. Driving If starting a vehicle with a manual transmission: • Make sure the parking brake is fastened, the light may not illuminate. 153 Turn the key to 4 (ON) without turning the key to the floor. 3.
If a light fails to illuminate, have the vehicle serviced. • If the driver's safety belt is set. • Push the clutch pedal to 5 (START). 4 3 5 2 1 Make sure the corresponding lights illuminate or illuminate briefly. Driving If starting a vehicle with a manual transmission: • Make sure the parking brake is fastened, the light may not illuminate. 153 Turn the key to 4 (ON) without turning the key to the floor. 3.
Owner Guide 4th Printing
Page 163
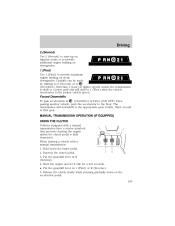
...to 1 (First) after the vehicle decelerates to the appropriate gear: fourth, third, second or first gear. MANUAL TRANSMISSION OPERATION (IF EQUIPPED) USING THE CLUTCH Vehicles equipped with a manual transmission: 1. Put the gearshift lever in 1 (First) or R (Reverse). 5. Driving 2 (Second) Use 2 (Second...163 When starting a vehicle with a manual transmission have a starter interlock that prevents starting the engine unless the clutch pedal is fully depressed. Release the clutch slowly while pressing gradually down the brake pedal. 2. Start the engine and let it idle for a few seconds...
...to 1 (First) after the vehicle decelerates to the appropriate gear: fourth, third, second or first gear. MANUAL TRANSMISSION OPERATION (IF EQUIPPED) USING THE CLUTCH Vehicles equipped with a manual transmission: 1. Put the gearshift lever in 1 (First) or R (Reverse). 5. Driving 2 (Second) Use 2 (Second...163 When starting a vehicle with a manual transmission have a starter interlock that prevents starting the engine unless the clutch pedal is fully depressed. Release the clutch slowly while pressing gradually down the brake pedal. 2. Start the engine and let it idle for a few seconds...
Owner Guide 4th Printing
Page 164
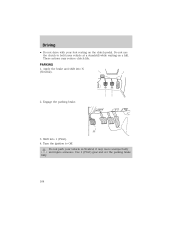
Engage the parking brake. 3. Do not park your vehicle in Neutral, it may reduce clutch life. Apply the brake and shift into 1 (First). 4. Do not use the clutch to Off. Turn the ignition to hold your vehicle at a standstill while waiting on the clutch pedal. PARKING 1. Use 1 (First) gear and set the parking brake fully. 164 Driving • Do not drive with your foot resting on a hill. Shift into N (Neutral). 2. These actions may move unexpectedly and injure someone.
Engage the parking brake. 3. Do not park your vehicle in Neutral, it may reduce clutch life. Apply the brake and shift into 1 (First). 4. Do not use the clutch to Off. Turn the ignition to hold your vehicle at a standstill while waiting on the clutch pedal. PARKING 1. Use 1 (First) gear and set the parking brake fully. 164 Driving • Do not drive with your foot resting on a hill. Shift into N (Neutral). 2. These actions may move unexpectedly and injure someone.
Owner Guide 4th Printing
Page 166
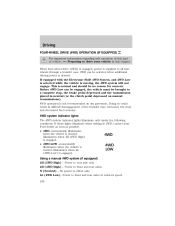
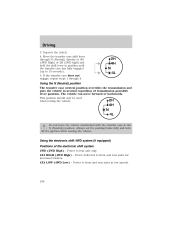
... safe operation of this chapter. This is started . Doing so could result in difficult disengagement of vehicle, see Preparing to drive your Ford dealer as soon as possible. • 4WD -momentarily illuminates when the vehicle is normal and should be selected when additional driving power is... moving, the 4WD system will not engage. If these lights illuminate when driving in 2WD, contact your vehicle in neutral (or the clutch pedal depressed on manual transmissions). 4WD operation is not recommended on dry pavement. Illuminates when 4L (4WD Low) is LOW started . When...
... safe operation of this chapter. This is started . Doing so could result in difficult disengagement of vehicle, see Preparing to drive your Ford dealer as soon as possible. • 4WD -momentarily illuminates when the vehicle is normal and should be selected when additional driving power is... moving, the 4WD system will not engage. If these lights illuminate when driving in 2WD, contact your vehicle in neutral (or the clutch pedal depressed on manual transmissions). 4WD operation is not recommended on dry pavement. Illuminates when 4L (4WD Low) is LOW started . When...

Owner Guide 4th Printing
Page 167
... fully engaged (up to 88 km/h (55 mph). 2H 4H N 4L Shifting from 4H (4WD high) to 4L (4WD low) 1. Depress the brake. 3. Depress the clutch. 4. Depress the brake. 167 Move the transfer case shift lever through 4. 2H 4H N 4L Shifting from 4L (4WD low) to 4H (4WD high) or 2H...
... fully engaged (up to 88 km/h (55 mph). 2H 4H N 4L Shifting from 4H (4WD high) to 4L (4WD low) 1. Depress the brake. 3. Depress the clutch. 4. Depress the brake. 167 Move the transfer case shift lever through 4. 2H 4H N 4L Shifting from 4L (4WD low) to 4H (4WD high) or 2H...
Owner Guide 4th Printing
Page 168
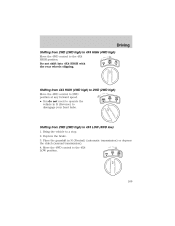
... Power to front and rear axles for increased traction. 4X4 LOW (4WD Low) - Power delivered to rear axle only. 4X4 HIGH (4WD High) - Depress the clutch. 4. The vehicle can move forward or backwards. Always set the parking brake fully and turn off the ignition when leaving the vehicle. Using the electronic...
... Power to front and rear axles for increased traction. 4X4 LOW (4WD Low) - Power delivered to rear axle only. 4X4 HIGH (4WD High) - Depress the clutch. 4. The vehicle can move forward or backwards. Always set the parking brake fully and turn off the ignition when leaving the vehicle. Using the electronic...
Owner Guide 4th Printing
Page 169
... 4X4 LOW position. 4X4 4X4 2WD HIGH LOW 169 Place the gearshift in R (Reverse) to operate the vehicle in N (Neutral) (automatic transmission) or depress the clutch (manual transmission). 4. Move the 4WD control to 4X4 LOW (4WD low) 1. Depress the brake. 3. Shifting from 4X4 HIGH (4WD high) to 2WD (2WD high) Move...
... 4X4 LOW position. 4X4 4X4 2WD HIGH LOW 169 Place the gearshift in R (Reverse) to operate the vehicle in N (Neutral) (automatic transmission) or depress the clutch (manual transmission). 4. Move the 4WD control to 4X4 LOW (4WD low) 1. Depress the brake. 3. Shifting from 4X4 HIGH (4WD high) to 2WD (2WD high) Move...
Owner Guide 4th Printing
Page 170
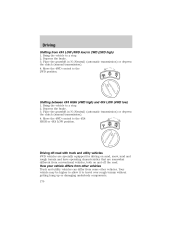
Bring the vehicle to 2WD (2WD high) 1. Place the gearshift in N (Neutral) (automatic transmission) or depress the clutch (manual transmission). 4. Depress the brake. 3. How your vehicle differs from other vehicles Truck and utility vehicles can differ from 4X4 LOW (4WD low) to a stop . 2. ... operating characteristics that are somewhat different from conventional vehicles, both on and off the road. Place the gearshift in N (Neutral) (automatic transmission) or depress the clutch (manual transmission). 4. Move the 4WD control to a stop . 2.
Bring the vehicle to 2WD (2WD high) 1. Place the gearshift in N (Neutral) (automatic transmission) or depress the clutch (manual transmission). 4. Depress the brake. 3. How your vehicle differs from other vehicles Truck and utility vehicles can differ from 4X4 LOW (4WD low) to a stop . 2. ... operating characteristics that are somewhat different from conventional vehicles, both on and off the road. Place the gearshift in N (Neutral) (automatic transmission) or depress the clutch (manual transmission). 4. Move the 4WD control to a stop . 2.
Owner Guide 4th Printing
Page 200
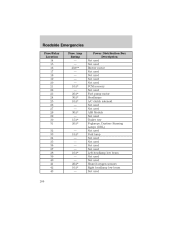
... 20A - 7.5A - 10A Passenger Compartment Fuse Panel Description Powertrain Control Module (PCM) power diode, Ignition, PATS GEM, Radio Hazard flasher Auxiliary power socket Not used Clutch Pedal Position (CPP) switch, Starter interrupt relay Not used Battery saver relay, Auxiliary relay box, Restraint Central Module (RCM), Generic Electronic Module (GEM), Instrument cluster...
... 20A - 7.5A - 10A Passenger Compartment Fuse Panel Description Powertrain Control Module (PCM) power diode, Ignition, PATS GEM, Radio Hazard flasher Auxiliary power socket Not used Clutch Pedal Position (CPP) switch, Starter interrupt relay Not used Battery saver relay, Auxiliary relay box, Restraint Central Module (RCM), Generic Electronic Module (GEM), Instrument cluster...
Owner Guide 4th Printing
Page 203
... Box Description Not used Not used Blower motor Auxiliary cooling fan Not used Not used Not used PCM memory Not used Fuel pump motor Headlamps A/C clutch solenoid Not used Not used ABS module Not used Trailer tow Foglamps, Daytime Running Lamps (DRL) Not used Park Lamp Not used Not used Not...
... Box Description Not used Not used Blower motor Auxiliary cooling fan Not used Not used Not used PCM memory Not used Fuel pump motor Headlamps A/C clutch solenoid Not used Not used ABS module Not used Trailer tow Foglamps, Daytime Running Lamps (DRL) Not used Park Lamp Not used Not used Not...

Owner Guide 4th Printing
Page 204
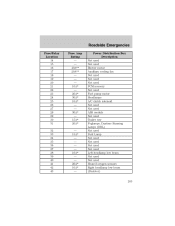
Roadside Emergencies Fuse/Relay Fuse Amp Location Rating 44 - 45A - 45B - 46A - 46B - 47 - 48 - 49 - 50 - 51 - 52 - 53 - 54 - 55 - 56A - 56B - * Mini Fuses ** Maxi Fuses Power Distribution Box Description Not used Wiper HI/LO Wiper park/run Fuel pump Trailer tow Starter Auxiliary cooling fan Not used Not used Not used Not used PCM Diode PCM Blower A/C clutch solenoid Front washer pump 204
Roadside Emergencies Fuse/Relay Fuse Amp Location Rating 44 - 45A - 45B - 46A - 46B - 47 - 48 - 49 - 50 - 51 - 52 - 53 - 54 - 55 - 56A - 56B - * Mini Fuses ** Maxi Fuses Power Distribution Box Description Not used Wiper HI/LO Wiper park/run Fuel pump Trailer tow Starter Auxiliary cooling fan Not used Not used Not used Not used PCM Diode PCM Blower A/C clutch solenoid Front washer pump 204
Owner Guide 4th Printing
Page 206
... Distribution Box Description Not used Not used Blower motor Not used Not used Not used Not used PCM memory Not used Fuel pump motor Headlamps A/C clutch solenoid Not used Not used ABS Module Not used Trailer tow Foglamps, Daytime Running Lamps (DRL) Not used Park lamp Not used Not used Not...
... Distribution Box Description Not used Not used Blower motor Not used Not used Not used Not used PCM memory Not used Fuel pump motor Headlamps A/C clutch solenoid Not used Not used ABS Module Not used Trailer tow Foglamps, Daytime Running Lamps (DRL) Not used Park lamp Not used Not used Not...
Owner Guide 4th Printing
Page 207
Wiper HI/LO 45B - Fuel pump 46B - A/C clutch solenoid 47B - Hold the steering wheel firmly and slowly move to a safe place on your tires. Replace this is the case, your speed. Roadside Emergencies ...
Wiper HI/LO 45B - Fuel pump 46B - A/C clutch solenoid 47B - Hold the steering wheel firmly and slowly move to a safe place on your tires. Replace this is the case, your speed. Roadside Emergencies ...
Owner Guide 4th Printing
Page 237
... transmission: 1. OPENING THE HOOD 1. Block the wheels to the front of the instrument panel near the fan. Depress the clutch and place the gearshift in neutral. 2. Set the parking brake, depress the clutch and place the gearshift in 1 (First). 3. Inside the vehicle, pull the hood release handle located under the front center...
... transmission: 1. OPENING THE HOOD 1. Block the wheels to the front of the instrument panel near the fan. Depress the clutch and place the gearshift in neutral. 2. Set the parking brake, depress the clutch and place the gearshift in 1 (First). 3. Inside the vehicle, pull the hood release handle located under the front center...
Owner Guide 4th Printing
Page 238
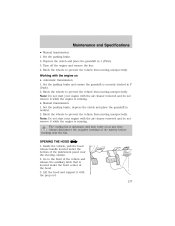
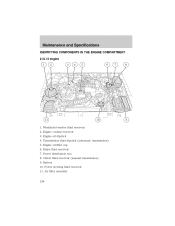
Transmission fluid dipstick (automatic transmission) 5. Clutch fluid reservoir (manual transmission) 9. Brake fluid reservoir 7. Engine oil dipstick 4. Battery 10. Engine coolant reservoir 3. Maintenance and Specifications IDENTIFYING COMPONENTS IN THE ENGINE COMPARTMENT 2.3L I4 engine 1. Windshield washer fluid reservoir 2. Air filter assembly 238 Engine oil filler cap 6. Power distribution box 8. Power steering fluid reservoir 11.
Transmission fluid dipstick (automatic transmission) 5. Clutch fluid reservoir (manual transmission) 9. Brake fluid reservoir 7. Engine oil dipstick 4. Battery 10. Engine coolant reservoir 3. Maintenance and Specifications IDENTIFYING COMPONENTS IN THE ENGINE COMPARTMENT 2.3L I4 engine 1. Windshield washer fluid reservoir 2. Air filter assembly 238 Engine oil filler cap 6. Power distribution box 8. Power steering fluid reservoir 11.
Owner Guide 4th Printing
Page 269
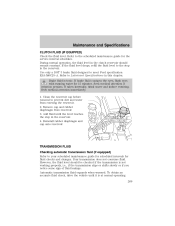
If the fluid level drops, refill the fluid level to meet Ford specification ESA-M6C25-A. Clean the reservoir cap before removal to your scheduled maintenance guide for scheduled intervals for 15 minutes. Add fluid until it is ... and rubber diaphragm from entering the reservoir. 2. Reinstall rubber diaphragm and cap onto reservoir. Use only a DOT 3 brake fluid designed to the step in the clutch reservoir should be checked if the transmission is toxic. Brake fluid is not working properly, i.e., if the transmission slips or shifts slowly or if you...
If the fluid level drops, refill the fluid level to meet Ford specification ESA-M6C25-A. Clean the reservoir cap before removal to your scheduled maintenance guide for scheduled intervals for 15 minutes. Add fluid until it is ... and rubber diaphragm from entering the reservoir. 2. Reinstall rubber diaphragm and cap onto reservoir. Use only a DOT 3 brake fluid designed to the step in the clutch reservoir should be checked if the transmission is toxic. Brake fluid is not working properly, i.e., if the transmission slips or shifts slowly or if you...


