Owner's Manual
Page 27
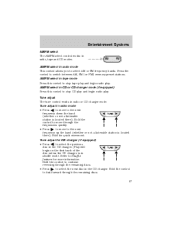
... next disc in tape mode Press this control to Shuffle feature for quick movement. Tune adjust for CD changer (if equipped) • Press to continue reversing through the frequencies quickly. Hold the control to select the previous disc in the CD changer. (Play will begin radio play and begin on the...
... next disc in tape mode Press this control to Shuffle feature for quick movement. Tune adjust for CD changer (if equipped) • Press to continue reversing through the frequencies quickly. Hold the control to select the previous disc in the CD changer. (Play will begin radio play and begin on the...
Owner's Manual
Page 28
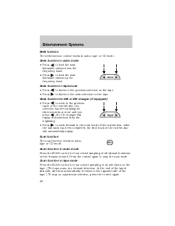
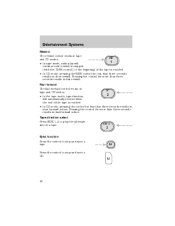
... stations on the frequency band. Scan function in tape mode Press the SCAN control to the previous track of the tape's first side, direction automatically reverses to the previous selection on a particular selection, press the control again. 28 Seek function in radio mode • Press to find the next listenable station...
... stations on the frequency band. Scan function in tape mode Press the SCAN control to the previous track of the tape's first side, direction automatically reverses to the previous selection on a particular selection, press the control again. 28 Seek function in radio mode • Press to find the next listenable station...

Owner's Manual
Page 32
... into the audio system) TAPE CD while in tape REW and CD modes. 1 • In tape mode, radio play will begin tape play will automatically reverse when the end of the tape is reached. • In CD mode, pressing the control fast forwards the CD within the current track. TAPE CD...
... into the audio system) TAPE CD while in tape REW and CD modes. 1 • In tape mode, radio play will begin tape play will automatically reverse when the end of the tape is reached. • In CD mode, pressing the control fast forwards the CD within the current track. TAPE CD...
Owner's Manual
Page 37
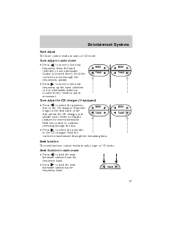
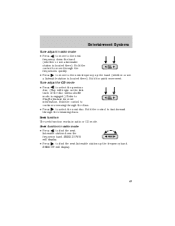
.... (Play will begin on the first track of the TUNE disc unless the CD changer is in radio mode • Press to move to continue reversing through the remaining discs. to move through the frequencies quickly. Tune adjust in shuffle mode. Hold the control to the next • Press frequency up...
.... (Play will begin on the first track of the TUNE disc unless the CD changer is in radio mode • Press to move to continue reversing through the remaining discs. to move through the frequencies quickly. Tune adjust in shuffle mode. Hold the control to the next • Press frequency up...
Owner's Manual
Page 38
... the opposite side of the tape.) To stop on a particular selection, press the control again. At the end of the tape's first side, direction automatically reverses to stop on a particular selection, press the control again. 38 After the last track has been completed, the first track of the current disc will...
... the opposite side of the tape.) To stop on a particular selection, press the control again. At the end of the tape's first side, direction automatically reverses to stop on a particular selection, press the control again. 38 After the last track has been completed, the first track of the current disc will...
Owner's Manual
Page 42
Pressing the control for less than three seconds results in fast forward action. Tape direction select Press SIDE 1-2 to play will automatically reverse when the end of the tape is reached. • In CD mode, pressing the REW control for more than three seconds results in slow forward ...
Pressing the control for less than three seconds results in fast forward action. Tape direction select Press SIDE 1-2 to play will automatically reverse when the end of the tape is reached. • In CD mode, pressing the REW control for more than three seconds results in slow forward ...
Owner's Manual
Page 49
... next listenable station down the band (whether or not a listenable station is located there). Seek function in radio mode • Press to move to continue reversing through the remaining discs. to Shuffle feature for quick movement. Tune adjust for CD mode • Press to select the previous disc. (Play will begin...
... next listenable station down the band (whether or not a listenable station is located there). Seek function in radio mode • Press to move to continue reversing through the remaining discs. to Shuffle feature for quick movement. Tune adjust for CD mode • Press to select the previous disc. (Play will begin...
Owner's Manual
Page 78
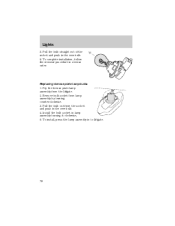
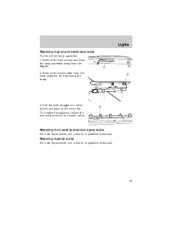
Pry the license plate lamp assembly from the socket and push in the new bulb. 4. Pull the bulb out from the liftgate. 2. To complete installation, follow the removal procedure in the new bulb. 6. Lights 5. Pull the bulb straight out of the socket and push in reverse order. Install the bulb socket in to liftgate. 78 Replacing license plate lamp bulbs 1. To install, press the lamp assembly in lamp assembly turning it clockwise, 5. Remove bulb socket from lamp assembly by turning counterclockwise. 3.
Pry the license plate lamp assembly from the socket and push in the new bulb. 4. Pull the bulb out from the liftgate. 2. To complete installation, follow the removal procedure in the new bulb. 6. Lights 5. Pull the bulb straight out of the socket and push in reverse order. Install the bulb socket in to liftgate. 78 Replacing license plate lamp bulbs 1. To install, press the lamp assembly in lamp assembly turning it clockwise, 5. Remove bulb socket from lamp assembly by turning counterclockwise. 3.
Owner's Manual
Page 79
Pull the bulb straight out of the socket and push in reverse order. Lights Replacing high-mount brake lamp bulbs To remove the lamp assembly: 1. To complete installation, follow the removal procedure in the new bulb. Remove the bulb holder from the liftgate. 2. Replacing front parking lamp/turn signal bulbs For bulb replacement, see a dealer or qualified technician. 79 Replacing foglamp bulbs For bulb replacement, see a dealer or qualified technician. Remove the two screws and move the lamp assembly away from the lamp assembly by depressing the snaps. 3.
Pull the bulb straight out of the socket and push in reverse order. Lights Replacing high-mount brake lamp bulbs To remove the lamp assembly: 1. To complete installation, follow the removal procedure in the new bulb. Remove the bulb holder from the liftgate. 2. Replacing front parking lamp/turn signal bulbs For bulb replacement, see a dealer or qualified technician. 79 Replacing foglamp bulbs For bulb replacement, see a dealer or qualified technician. Remove the two screws and move the lamp assembly away from the lamp assembly by depressing the snaps. 3.
Owner's Manual
Page 167
.... Apply the brake and shift into the access hole to move the gearshift lever, it may not be rocked out by shifting between forward and reverse gears, stopping between shifts, in each gear. Turn the ignition to Fuses and relays in P (Park). If the parking brake is latched in the Roadside...
.... Apply the brake and shift into the access hole to move the gearshift lever, it may not be rocked out by shifting between forward and reverse gears, stopping between shifts, in each gear. Turn the ignition to Fuses and relays in P (Park). If the parking brake is latched in the Roadside...
Owner's Manual
Page 169
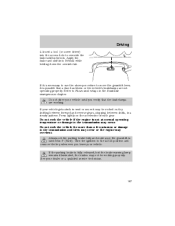
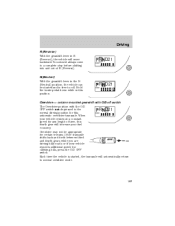
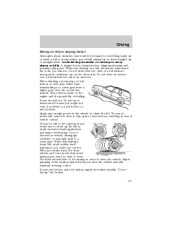
... time, this fourth gear will move backward. Each time the vehicle is free to roll. N (Neutral) With the gearshift lever in R (Reverse), the vehicle will increase your vehicle requires additional power for climbing hills, press the O/D OFF switch. If the transaxle shifts back and forth between... third and fourth gears while you are driving hilly roads or if your fuel economy. Driving R (Reverse) With the gearshift lever in the N (Neutral) position, the vehicle can be appropriate for this position. You should always come to normal ...
... time, this fourth gear will move backward. Each time the vehicle is free to roll. N (Neutral) With the gearshift lever in R (Reverse), the vehicle will increase your vehicle requires additional power for climbing hills, press the O/D OFF switch. If the transaxle shifts back and forth between... third and fourth gears while you are driving hilly roads or if your fuel economy. Driving R (Reverse) With the gearshift lever in the N (Neutral) position, the vehicle can be appropriate for this position. You should always come to normal ...
Owner's Manual
Page 174
... severe brake application, ease the vehicle back onto the pavement only after reducing your speed. Driving Drive cautiously to avoid vehicle damage from forward and reverse gears, stopping between shifts, in the area.
... severe brake application, ease the vehicle back onto the pavement only after reducing your speed. Driving Drive cautiously to avoid vehicle damage from forward and reverse gears, stopping between shifts, in the area.
Owner's Manual
Page 177
... necessary to travel diagonally up or down a hill or steep incline, you should always try to turnaround because you would use . Do not drive in reverse over . This reduces strain on a hill, determine beforehand the route you will help you slow the vehicle and still maintain steering control. Too much power...
... necessary to travel diagonally up or down a hill or steep incline, you should always try to turnaround because you would use . Do not drive in reverse over . This reduces strain on a hill, determine beforehand the route you will help you slow the vehicle and still maintain steering control. Too much power...
Owner's Manual
Page 193
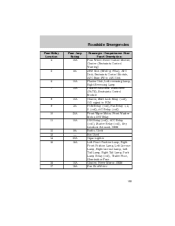
... Control Module, Cluster (Restraints Control Warning) ABS Unit (EVAC & FILL), ASC Unit, Restraints Control Module, ASC Main SW to ASC Unit Flasher Unit, Left reversing Lamp, Right Reversing Lamp Passive Anti-theft Transceiver (PATS), Restraints Control Module Cluster, Shift Lock Relay (coil), O/D signal to PCM PCM Relay (coil), Fan Relay 1, 2, 3 (coil), A/C Relay...
... Control Module, Cluster (Restraints Control Warning) ABS Unit (EVAC & FILL), ASC Unit, Restraints Control Module, ASC Main SW to ASC Unit Flasher Unit, Left reversing Lamp, Right Reversing Lamp Passive Anti-theft Transceiver (PATS), Restraints Control Module Cluster, Shift Lock Relay (coil), O/D signal to PCM PCM Relay (coil), Fan Relay 1, 2, 3 (coil), A/C Relay...

Owner's Manual
Page 199
... on the side of the vehicle, possibly injuring yourself or others. Instead, gradually decrease your vehicle is set, then block (in P (Park) (automatic transaxle) or R (Reverse) (manual transaxle). Hold the steering wheel firmly and slowly move to lose control of the road. When driving with the temporary spare tire do not...
... on the side of the vehicle, possibly injuring yourself or others. Instead, gradually decrease your vehicle is set, then block (in P (Park) (automatic transaxle) or R (Reverse) (manual transaxle). Hold the steering wheel firmly and slowly move to lose control of the road. When driving with the temporary spare tire do not...

Owner's Manual
Page 200
Block the diagonally opposite wheel. 4. Park on a level surface, activate hazard flashers and place gearshift lever in P (Park) (automatic transmission) or R (Reverse) (manual transmission). 2. Lift the cargo cover and remove the tool bag with jack handle, lug nut wrench and long spare tire rod and spare tire from the wheel well. 5. Loosen each wheel lug nut one-half turn engine OFF. 3. Set the parking brake and turn counterclockwise but do not remove them until the wheel is raised off the ground. 200 Roadside Emergencies 1.
Block the diagonally opposite wheel. 4. Park on a level surface, activate hazard flashers and place gearshift lever in P (Park) (automatic transmission) or R (Reverse) (manual transmission). 2. Lift the cargo cover and remove the tool bag with jack handle, lug nut wrench and long spare tire rod and spare tire from the wheel well. 5. Loosen each wheel lug nut one-half turn engine OFF. 3. Set the parking brake and turn counterclockwise but do not remove them until the wheel is raised off the ground. 200 Roadside Emergencies 1.
Owner's Manual
Page 207
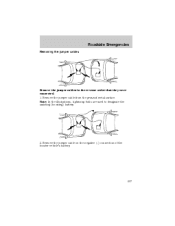
Remove the jumper cable from the ground metal surface. Note: In the illustrations, lightning bolts are used to designate the assisting (boosting) battery. 2. Remove the jumper cable on the negative (-) connection of the booster vehicle's battery. - - - - + + + + 207 Roadside Emergencies Removing the jumper cables Remove the jumper cables in the reverse order that they were connected. 1.
Remove the jumper cable from the ground metal surface. Note: In the illustrations, lightning bolts are used to designate the assisting (boosting) battery. 2. Remove the jumper cable on the negative (-) connection of the booster vehicle's battery. - - - - + + + + 207 Roadside Emergencies Removing the jumper cables Remove the jumper cables in the reverse order that they were connected. 1.

Driving Your SUV or Truck 1st Printing
Page 8
... Parking Before leaving the driver's seat, you should make sure that the gearshift is engaged in P (Park) with an automatic transmission or either 1 (First) or R (Reverse) with the transfer case in N (Neutral) position. Some 4WD vehicles include a Neutral mode. Do not leave the vehicle unattended with a manual transmission.
... Parking Before leaving the driver's seat, you should make sure that the gearshift is engaged in P (Park) with an automatic transmission or either 1 (First) or R (Reverse) with the transfer case in N (Neutral) position. Some 4WD vehicles include a Neutral mode. Do not leave the vehicle unattended with a manual transmission.
Driving Your SUV or Truck 1st Printing
Page 10
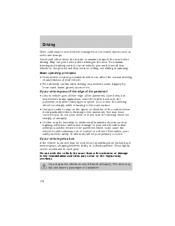
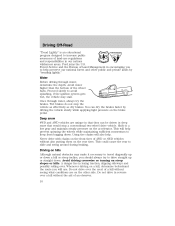
... maintaining sufficient momentum to keep from bogging down. Avoid driving crosswise or turning on the accelerator. Whenever driving on the rear tires. Ford joins the U.S. Do not drive in losing traction, slipping sideways and possibly rolling over. Proceed slowly to avoid splashing, if the...over a hill without also putting them on a hill, determine beforehand the route you should always try the brakes. A danger lies in reverse over the crest of a hill without seeing what conditions are unique in deep snow that they can dry the brakes faster by "treading ...
... maintaining sufficient momentum to keep from bogging down. Avoid driving crosswise or turning on the accelerator. Whenever driving on the rear tires. Ford joins the U.S. Do not drive in losing traction, slipping sideways and possibly rolling over. Proceed slowly to avoid splashing, if the...over a hill without also putting them on a hill, determine beforehand the route you should always try the brakes. A danger lies in reverse over the crest of a hill without seeing what conditions are unique in deep snow that they can dry the brakes faster by "treading ...


