Owner's Manual
Page 3
... or translation in whole or part is not permitted without incurring obligation. Copyright © 2002 Ford Motor Company 3 Table of Contents Cleaning Cleaning your vehicle Underbody preservation 184 184 189 Maintenance and Specifications Hood Engine compartment Engine oil Battery Fuel information Air filter(s) Part numbers Refill capacities Lubricant specifications Engine data Vehicle dimensions...
... or translation in whole or part is not permitted without incurring obligation. Copyright © 2002 Ford Motor Company 3 Table of Contents Cleaning Cleaning your vehicle Underbody preservation 184 184 189 Maintenance and Specifications Hood Engine compartment Engine oil Battery Fuel information Air filter(s) Part numbers Refill capacities Lubricant specifications Engine data Vehicle dimensions...
Owner's Manual
Page 9
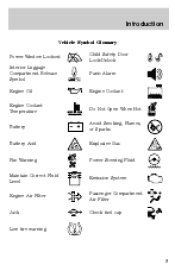
Introduction Vehicle Symbol Glossary Power Window Lockout Interior Luggage Compartment Release Symbol Engine Oil Engine Coolant Temperature Battery Child Safety Door Lock/Unlock Panic Alarm Engine Coolant Do Not Open When Hot Avoid Smoking, Flames, or Sparks Explosive Gas Battery Acid Fan Warning Maintain Correct Fluid Level Engine Air Filter MAX MIN Power Steering Fluid Emission System Passenger Compartment Air Filter Check fuel cap Jack Low tire warning 9
Introduction Vehicle Symbol Glossary Power Window Lockout Interior Luggage Compartment Release Symbol Engine Oil Engine Coolant Temperature Battery Child Safety Door Lock/Unlock Panic Alarm Engine Coolant Do Not Open When Hot Avoid Smoking, Flames, or Sparks Explosive Gas Battery Acid Fan Warning Maintain Correct Fluid Level Engine Air Filter MAX MIN Power Steering Fluid Emission System Passenger Compartment Air Filter Check fuel cap Jack Low tire warning 9
Owner's Manual
Page 13
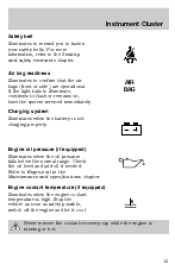
... the engine is high. Engine coolant temperature (if equipped) Illuminates when the engine coolant temperature is running or hot. 13 Charging system Illuminates when the battery is not charging properly. AIR BAG Engine oil pressure (if equipped) Illuminates when the oil pressure falls below the normal range. Refer to confirm that...
... the engine is high. Engine coolant temperature (if equipped) Illuminates when the engine coolant temperature is running or hot. 13 Charging system Illuminates when the battery is not charging properly. AIR BAG Engine oil pressure (if equipped) Illuminates when the oil pressure falls below the normal range. Refer to confirm that...
Owner's Manual
Page 19
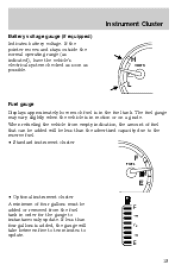
... from empty indication, the amount of fuel that can be added will take between five to ten minutes to instantaneously update. Instrument Cluster Battery voltage gauge (if equipped) Indicates battery voltage. H VOLTS L Fuel gauge Displays approximately how much fuel is added, the gauge will be less than four gallons is in the...
... from empty indication, the amount of fuel that can be added will take between five to ten minutes to instantaneously update. Instrument Cluster Battery voltage gauge (if equipped) Indicates battery voltage. H VOLTS L Fuel gauge Displays approximately how much fuel is added, the gauge will be less than four gallons is in the...
Owner's Manual
Page 95
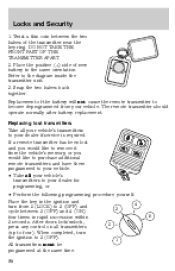
... operating range will allow you to be caused by one coin type three-volt lithium battery CR2032 or equivalent. Failure to latch the trunk may cause objects to the vehicle To replace the battery: 95 Replacing the battery The remote transmitter is closed and latched before driving your vehicle. Panic alarm will not...
... operating range will allow you to be caused by one coin type three-volt lithium battery CR2032 or equivalent. Failure to latch the trunk may cause objects to the vehicle To replace the battery: 95 Replacing the battery The remote transmitter is closed and latched before driving your vehicle. Panic alarm will not...
Owner's Manual
Page 96
...) and 4 (ON) four times in the ignition and 4 turn the ignition to 3 (OFF) and 3 cycle between the two halves of new battery in the same orientation. Place the key in rapid succession within 3 seconds. After doors lock/unlock, 2 press any control on all your vehicle's transmitters...it from your dealer for programming, or • Perform the following programming procedure yourself. The remote transmitter should operate normally after battery replacement. Snap the two halves back together. If a remote transmitter has been lost transmitters Take all transmitters (up to your vehicle....
...) and 4 (ON) four times in the ignition and 4 turn the ignition to 3 (OFF) and 3 cycle between the two halves of new battery in the same orientation. Place the key in rapid succession within 3 seconds. After doors lock/unlock, 2 press any control on all your vehicle's transmitters...it from your dealer for programming, or • Perform the following programming procedure yourself. The remote transmitter should operate normally after battery replacement. Snap the two halves back together. If a remote transmitter has been lost transmitters Take all transmitters (up to your vehicle....
Owner's Manual
Page 97
... dome lamp control (if equipped) must not be set to the OFF position for the illuminated entry system to the START or ACC position. The battery saver will shut off the interior lamps 30 minutes after the last door is closed or after the UNLOCK button on the remote transmitter is...
... dome lamp control (if equipped) must not be set to the OFF position for the illuminated entry system to the START or ACC position. The battery saver will shut off the interior lamps 30 minutes after the last door is closed or after the UNLOCK button on the remote transmitter is...
Owner's Manual
Page 162
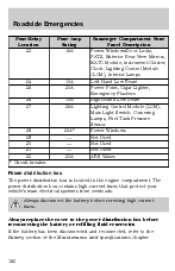
Always replace the cover to the power distribution box before servicing high current fuses. Always disconnect the battery before reconnecting the battery or refilling fluid reservoirs If the battery has been disconnected and reconnected, refer to the Battery section of the Maintenance and specifications chapter. 162 The power distribution box contains high-current fuses that...
Always replace the cover to the power distribution box before servicing high current fuses. Always disconnect the battery before reconnecting the battery or refilling fluid reservoirs If the battery has been disconnected and reconnected, refer to the Battery section of the Maintenance and specifications chapter. 162 The power distribution box contains high-current fuses that...
Owner's Manual
Page 169
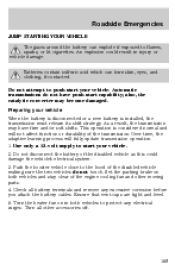
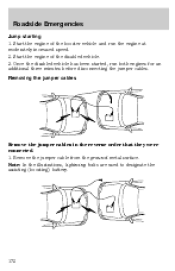
... do not touch. This operation is installed, the transmission must relearn its shift strategy. Check all other moving parts. 4. Turn all battery terminals and remove any electrical surges. Ensure that vent caps are tight and level. 5. Do not attempt to protect any excessive corrosion before...clear of the disabled vehicle as this could result in injury or vehicle damage. Roadside Emergencies JUMP STARTING YOUR VEHICLE The gases around the battery can burn skin, eyes, and clothing, if contacted. As a result, the transmission may become damaged. Turn the heater fan on...
... do not touch. This operation is installed, the transmission must relearn its shift strategy. Check all other moving parts. 4. Turn all battery terminals and remove any electrical surges. Ensure that vent caps are tight and level. 5. Do not attempt to protect any excessive corrosion before...clear of the disabled vehicle as this could result in injury or vehicle damage. Roadside Emergencies JUMP STARTING YOUR VEHICLE The gases around the battery can burn skin, eyes, and clothing, if contacted. As a result, the transmission may become damaged. Turn the heater fan on...
Owner's Manual
Page 170
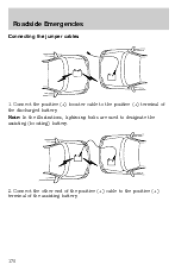
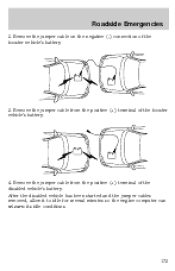
Note: In the illustrations, lightning bolts are used to the positive (+) terminal of the assisting battery. 170 - - - + - + + + Connect the other end of the discharged battery. Connect the positive (+) booster cable to the positive (+) terminal of the positive (+) cable to designate the assisting (boosting) battery. 2. Roadside Emergencies Connecting the jumper cables 1.
Note: In the illustrations, lightning bolts are used to the positive (+) terminal of the assisting battery. 170 - - - + - + + + Connect the other end of the discharged battery. Connect the positive (+) booster cable to the positive (+) terminal of the positive (+) cable to designate the assisting (boosting) battery. 2. Roadside Emergencies Connecting the jumper cables 1.
Owner's Manual
Page 171
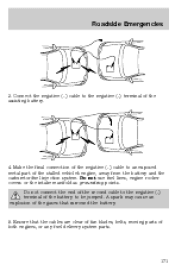
Connect the negative (-) cable to be jumped. Ensure that surround the battery. 5. A spark may cause an explosion of the gases that the cables are clear of fan blades, belts, moving parts of both engines, or any fuel ... parts. - - - + + + + - 171 Roadside Emergencies 3. Do not connect the end of the second cable to the negative (-) terminal of the battery to the negative (-) terminal of the stalled vehicle's engine, away from the battery and the carburetor/fuel injection system. Make the final connection of the negative (-) cable to an exposed metal part...
Connect the negative (-) cable to be jumped. Ensure that surround the battery. 5. A spark may cause an explosion of the gases that the cables are clear of fan blades, belts, moving parts of both engines, or any fuel ... parts. - - - + + + + - 171 Roadside Emergencies 3. Do not connect the end of the second cable to the negative (-) terminal of the battery to the negative (-) terminal of the stalled vehicle's engine, away from the battery and the carburetor/fuel injection system. Make the final connection of the negative (-) cable to an exposed metal part...
Owner's Manual
Page 172
... they were connected. 1. Remove the jumper cable from the ground metal surface. Note: In the illustrations, lightning bolts are used to designate the assisting (boosting) battery. 172 - - - - + + + + Start the engine of the booster vehicle and run both engines for an additional three minutes before disconnecting the jumper cables. Start the engine...
... they were connected. 1. Remove the jumper cable from the ground metal surface. Note: In the illustrations, lightning bolts are used to designate the assisting (boosting) battery. 172 - - - - + + + + Start the engine of the booster vehicle and run both engines for an additional three minutes before disconnecting the jumper cables. Start the engine...
Owner's Manual
Page 173
Remove the jumper cable from the positive (+) terminal of the booster vehicle's battery. 4. Remove the jumper cable from the positive (+) terminal of the booster vehicle's battery. 3. Remove the jumper cable on the negative (-) connection of the disabled vehicle's battery. After the disabled vehicle has been started and the jumper cables removed, allow it to idle for several minutes so the engine computer can relearn its idle conditions. - - - + + - + + 173 Roadside Emergencies 2.
Remove the jumper cable from the positive (+) terminal of the booster vehicle's battery. 4. Remove the jumper cable from the positive (+) terminal of the booster vehicle's battery. 3. Remove the jumper cable on the negative (-) connection of the disabled vehicle's battery. After the disabled vehicle has been started and the jumper cables removed, allow it to idle for several minutes so the engine computer can relearn its idle conditions. - - - + + - + + 173 Roadside Emergencies 2.
Owner's Manual
Page 191
... in P (Park). 2. Set the parking brake and ensure the gearshift is running, keep loose clothing, jewelry or long hair away from the battery and all fuel related parts. Working with the engine on a vehicle with the engine running . 191 Set the parking brake and ensure the gearshift... is running in an enclosed space, unless you are sure you disconnect the battery, the engine must "relearn" its idle conditions before your vehicle will drive properly, as explained in the Battery section in your vehicle. Block the wheels to prevent the vehicle from moving unexpectedly. ...
... in P (Park). 2. Set the parking brake and ensure the gearshift is running, keep loose clothing, jewelry or long hair away from the battery and all fuel related parts. Working with the engine on a vehicle with the engine running . 191 Set the parking brake and ensure the gearshift... is running in an enclosed space, unless you are sure you disconnect the battery, the engine must "relearn" its idle conditions before your vehicle will drive properly, as explained in the Battery section in your vehicle. Block the wheels to prevent the vehicle from moving unexpectedly. ...
Owner's Manual
Page 193
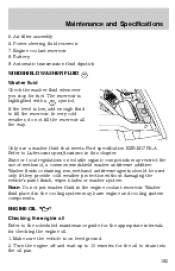
... Checking the engine oil Refer to drain into the oil pan. 193 Air filter assembly Power steering fluid reservoir Engine coolant reservoir Battery Automatic transmission fluid dipstick WINDSHIELD WASHER FLUID Washer fluid Check the washer fluid whenever you stop for checking the engine oil. 1. ...Refer to fill the reservoir. Washer fluid placed in the cooling system may restrict the use a washer fluid that meets Ford specification ESR-M17P5-A. Washer fluids containing non-methanol antifreeze agents should be used only if they provide cold weather protection without damaging the...
... Checking the engine oil Refer to drain into the oil pan. 193 Air filter assembly Power steering fluid reservoir Engine coolant reservoir Battery Automatic transmission fluid dipstick WINDSHIELD WASHER FLUID Washer fluid Check the washer fluid whenever you stop for checking the engine oil. 1. ...Refer to fill the reservoir. Washer fluid placed in the cooling system may restrict the use a washer fluid that meets Ford specification ESR-M17P5-A. Washer fluids containing non-methanol antifreeze agents should be used only if they provide cold weather protection without damaging the...
Owner's Manual
Page 197
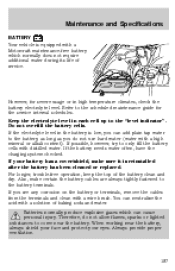
... water (water with distilled water. Therefore, do not allow flames, sparks or lighted substances to the battery, as long as you see any corrosion on the battery or terminals, remove the cables from the terminals and clean with a solution of baking soda and water.... When working near the battery. Maintenance and Specifications BATTERY Your vehicle is equipped with a Motorcraft maintenance-free battery which can cause personal injury. If the electrolyte level in high temperature climates, check the battery electrolyte level. For longer, trouble-free operation, keep...
... water (water with distilled water. Therefore, do not allow flames, sparks or lighted substances to the battery, as long as you see any corrosion on the battery or terminals, remove the cables from the terminals and clean with a solution of baking soda and water.... When working near the battery. Maintenance and Specifications BATTERY Your vehicle is equipped with a Motorcraft maintenance-free battery which can cause personal injury. If the electrolyte level in high temperature climates, check the battery electrolyte level. For longer, trouble-free operation, keep...
Owner's Manual
Page 198
...affected until it reaches normal operating temperature. 4. Avoid contact with water for a minimum of 15 minutes and get prompt medical attention. Lift the battery with a battery carrier or with the A/C on the end walls could cause acid to flow through the vent caps, resulting in personal injury and/or damage to... the vehicle or battery. In case of your hands on and allow the engine to idle for at least one minute. 6. Wash hands after handling. Allow the ...
...affected until it reaches normal operating temperature. 4. Avoid contact with water for a minimum of 15 minutes and get prompt medical attention. Lift the battery with a battery carrier or with the A/C on the end walls could cause acid to flow through the vent caps, resulting in personal injury and/or damage to... the vehicle or battery. In case of your hands on and allow the engine to idle for at least one minute. 6. Wash hands after handling. Allow the ...

Owner's Manual
Page 199
...• Boiling protection up to 129° C (265° F). • Protection against rust and other forms of automotive batteries in a responsible manner. Coolant concentration testing is reconnected. • Always dispose of corrosion. • Enables calibrated gauges to find out ...more about recycling automotive batteries. The coolant concentration should be maintained at the mileage intervals listed in the Adding engine coolant section. If the concentration ...
...• Boiling protection up to 129° C (265° F). • Protection against rust and other forms of automotive batteries in a responsible manner. Coolant concentration testing is reconnected. • Always dispose of corrosion. • Enables calibrated gauges to find out ...more about recycling automotive batteries. The coolant concentration should be maintained at the mileage intervals listed in the Adding engine coolant section. If the concentration ...
Owner's Manual
Page 214
... start the engine and complete the above driving cycle is reset to sit for complete emission warranty information. The emission system heats up to its battery has just been serviced, the on -board diagnostics system for I /M test with at least 20 minutes driving in dry grass or other dry ground cover...
... start the engine and complete the above driving cycle is reset to sit for complete emission warranty information. The emission system heats up to its battery has just been serviced, the on -board diagnostics system for I /M test with at least 20 minutes driving in dry grass or other dry ground cover...
Owner's Manual
Page 224
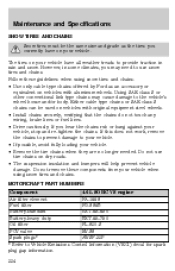
...• If possible, avoid fully loading your vehicle, stop and re-tighten the chains. MOTORCRAFT PART NUMBERS Component Air filter element Fuel filter Battery-standard Battery-heavy duty Oil filter PCV valve Spark plugs* 4.6L SOHC V8 engine FA-1668 FG-986B BXT-65-650 BXT-65-750 FL-820-S ... on your vehicle. Follow these components from your vehicle when using snow tires and chains: • Use only cable type chains offered by Ford as the tires you currently have all weather treads to Vehicle Emissions Control Information (VECI) decal for spark plug gap information. 224 The tires...
...• If possible, avoid fully loading your vehicle, stop and re-tighten the chains. MOTORCRAFT PART NUMBERS Component Air filter element Fuel filter Battery-standard Battery-heavy duty Oil filter PCV valve Spark plugs* 4.6L SOHC V8 engine FA-1668 FG-986B BXT-65-650 BXT-65-750 FL-820-S ... on your vehicle. Follow these components from your vehicle when using snow tires and chains: • Use only cable type chains offered by Ford as the tires you currently have all weather treads to Vehicle Emissions Control Information (VECI) decal for spark plug gap information. 224 The tires...


