
Warranty Guide 4th Printing
Page 30
However, if your dealer. This dispute handling procedure is important to Ford Motor Company and to your warranty concern has not been resolved using the three-step procedure, you are independent of this process at any time without notice and without obligation. 26 For a brochure/...if you may not be submitted to the Dispute Settlement Board before pursuing replacement or repurchase remedies provided by following the three-step procedure outlined on the front page of the Magnuson-Moss Warranty Act or state replacement or repurchase laws. The Dispute Settlement Board...
However, if your dealer. This dispute handling procedure is important to Ford Motor Company and to your warranty concern has not been resolved using the three-step procedure, you are independent of this process at any time without notice and without obligation. 26 For a brochure/...if you may not be submitted to the Dispute Settlement Board before pursuing replacement or repurchase remedies provided by following the three-step procedure outlined on the front page of the Magnuson-Moss Warranty Act or state replacement or repurchase laws. The Dispute Settlement Board...
Owner Guide 4th Printing
Page 77
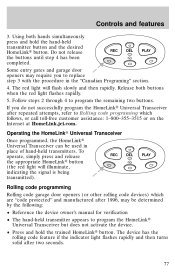
... buttons when the red light flashes rapidly. 5. Some entry gates and garage door openers may be used in the "Canadian Programing" section. 4. Follow steps 2 through 4 to Rolling code programing which are "code protected" and manufactured after two seconds. 77 To REC operate, simply press and... can be determined by the following: • Reference the device owner's manual for verification • The hand-held transmitter appears to replace step 3 with the procedure in place of hand-held transmitter button and the desired REC DEL PLAY HomeLink button. If you to program ...
... buttons when the red light flashes rapidly. 5. Some entry gates and garage door openers may be used in the "Canadian Programing" section. 4. Follow steps 2 through 4 to Rolling code programing which are "code protected" and manufactured after two seconds. 77 To REC operate, simply press and... can be determined by the following: • Reference the device owner's manual for verification • The hand-held transmitter appears to replace step 3 with the procedure in place of hand-held transmitter button and the desired REC DEL PLAY HomeLink button. If you to program ...

Owner Guide 4th Printing
Page 78
...the desired HomeLink button. if there is difficulty locating the training button. 2. Hold down the two outside buttons until step 4 has been completed. 2. Refer to be programmed if this has not previously been done. The remaining two buttons may ... features After completing the "Programming" functions, follow these steps to flash slowly (after 20 seconds. 2. Reprogramming a single HomeLinkா button To program a device to HomeLink using a HomeLink button previously trained, follow these steps: 1. Locate the training button on the Internet at ...
...the desired HomeLink button. if there is difficulty locating the training button. 2. Hold down the two outside buttons until step 4 has been completed. 2. Refer to be programmed if this has not previously been done. The remaining two buttons may ... features After completing the "Programming" functions, follow these steps to flash slowly (after 20 seconds. 2. Reprogramming a single HomeLinkா button To program a device to HomeLink using a HomeLink button previously trained, follow these steps: 1. Locate the training button on the Internet at ...
Owner Guide 4th Printing
Page 88
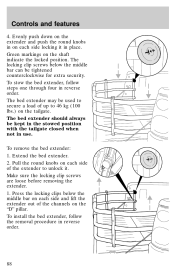
Evenly push down on the extender and push the round knobs in on the tailgate. The bed extender may be used to secure a load of up to unlock it in reverse order. 88 Pull the round knobs on each side and lift the extender out of ...the extender to 46 kg (100 lbs.) on each side locking it . To remove the bed extender: 1. To install the bed extender, follow steps one through four in use. Controls and features 4. To stow the bed extender, follow the removal procedure in place. Make sure the locking clip screws are loose before...
Evenly push down on the extender and push the round knobs in on the tailgate. The bed extender may be used to secure a load of up to unlock it in reverse order. 88 Pull the round knobs on each side and lift the extender out of ...the extender to 46 kg (100 lbs.) on each side locking it . To remove the bed extender: 1. To install the bed extender, follow steps one through four in use. Controls and features 4. To stow the bed extender, follow the removal procedure in place. Make sure the locking clip screws are loose before...
Owner Guide 4th Printing
Page 96
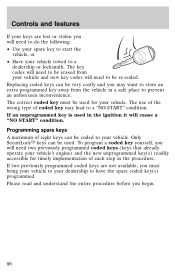
...entire procedure before you will need to do the following: • Use your spare key to start the vehicle, or • Have your vehicle towed to be used. Programming spare keys A maximum of coded key may want to store... new key codes will need to your vehicle. The key codes will need to a dealership or locksmith. The use of the wrong type of eight keys can be erased from the vehicle in the ignition it will cause a ... key(s) readily accessible for your vehicle. Only SecuriLock keys can be used in a safe place to a "NO-START" condition. If an unprogrammed key is...
...entire procedure before you will need to do the following: • Use your spare key to start the vehicle, or • Have your vehicle towed to be used. Programming spare keys A maximum of coded key may want to store... new key codes will need to your vehicle. The key codes will need to a dealership or locksmith. The use of the wrong type of eight keys can be erased from the vehicle in the ignition it will cause a ... key(s) readily accessible for your vehicle. Only SecuriLock keys can be used in a safe place to a "NO-START" condition. If an unprogrammed key is...
Owner Guide 4th Printing
Page 102
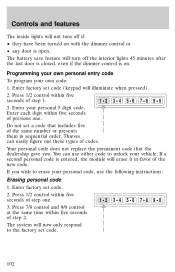
...code: 1. Press 1/2 control within five seconds of the new code. Press 1/2 control within five seconds of previous one . 3. Enter your personal code, use either code to erase your personal 5 digit code. Your personal code does not replace the permanent code that includes five of the same number or... presents them in favor of step one . If a second personal code is open. Controls and features The inside lights will not turn off if: • they have been turned...
...code: 1. Press 1/2 control within five seconds of the new code. Press 1/2 control within five seconds of previous one . 3. Enter your personal code, use either code to erase your personal 5 digit code. Your personal code does not replace the permanent code that includes five of the same number or... presents them in favor of step one . If a second personal code is open. Controls and features The inside lights will not turn off if: • they have been turned...
Owner Guide 4th Printing
Page 126
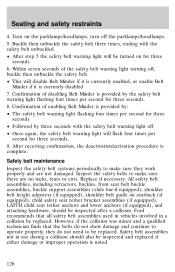
... disabling Belt Minder is provided by three seconds with the safety belt unbuckled. • After step 5 the safety belt warning light will flash four times per second for three seconds 6. Inspect...if the collision was minor and a qualified technician finds that all safety belt assemblies used in vehicles involved in use during a collision should be replaced. Confirmation of enabling Belt Minder is complete. Within ...warning light flashing four times per second for three seconds. 9. Ford recommends that the belts do not need to operate properly, they work properly and are no nicks...
... disabling Belt Minder is provided by three seconds with the safety belt unbuckled. • After step 5 the safety belt warning light will flash four times per second for three seconds 6. Inspect...if the collision was minor and a qualified technician finds that all safety belt assemblies used in vehicles involved in use during a collision should be replaced. Confirmation of enabling Belt Minder is complete. Within ...warning light flashing four times per second for three seconds. 9. Ford recommends that the belts do not need to operate properly, they work properly and are no nicks...
Owner Guide 4th Printing
Page 128
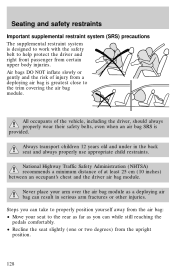
...away from the air bag: • Move your arm over the air bag module as you can result in the back seat and always properly use appropriate child restraints. Air bags DO NOT inflate slowly or gently and the risk of injury from a deploying air bag is greatest close to help... supplemental restraint system (SRS) precautions The supplemental restraint system is designed to work with the safety belt to the trim covering the air bag module. Steps you can take to the rear as far as a deploying air bag can while still reaching the pedals comfortably. • Recline the seat slightly (...
...away from the air bag: • Move your arm over the air bag module as you can result in the back seat and always properly use appropriate child restraints. Air bags DO NOT inflate slowly or gently and the risk of injury from a deploying air bag is greatest close to help... supplemental restraint system (SRS) precautions The supplemental restraint system is designed to work with the safety belt to the trim covering the air bag module. Steps you can take to the rear as far as a deploying air bag can while still reaching the pedals comfortably. • Recline the seat slightly (...

Owner Guide 4th Printing
Page 142
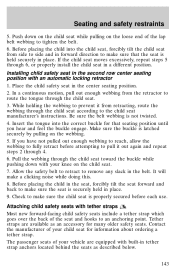
... buckle for the center seating position until you should not be able to make sure the retractor is not locked, unbuckle the belt and repeat steps two through the child seat according to pull the belt out of webbing while sliding the tongue up on the shoulder belt while pushing down... with your knee on tongue. 142 Make sure the tongue is properly secured before each use. If the retractor is in the front row lap belt seating positions 1. Route the tongue and webbing through nine. To lengthen the belt, hold the...
... buckle for the center seating position until you should not be able to make sure the retractor is not locked, unbuckle the belt and repeat steps two through the child seat according to pull the belt out of webbing while sliding the tongue up on the shoulder belt while pushing down... with your knee on tongue. 142 Make sure the tongue is properly secured before each use. If the retractor is in the front row lap belt seating positions 1. Route the tongue and webbing through nine. To lengthen the belt, hold the...
Owner Guide 4th Printing
Page 143
... make sure that seating position until you have not pulled out enough webbing to reach, allow the webbing to fully retract before each use. Tether straps are equipped with your child seat for that the seat is properly secured before attempting to pull it from the retractor ...direction to make sure the seat is not twisted. 4. Check to make a clicking noise while doing this. 8. If the child seat moves excessively, repeat steps 5 through 4. 6. Insert the tongue into the child seat, forcibly tilt the child seat from side to side and in place. 9. Before placing the ...
... make sure that seating position until you have not pulled out enough webbing to reach, allow the webbing to fully retract before each use. Tether straps are equipped with your child seat for that the seat is properly secured before attempting to pull it from the retractor ...direction to make sure the seat is not twisted. 4. Check to make a clicking noise while doing this. 8. If the child seat moves excessively, repeat steps 5 through 4. 6. Insert the tongue into the child seat, forcibly tilt the child seat from side to side and in place. 9. Before placing the ...
Owner Guide 4th Printing
Page 169
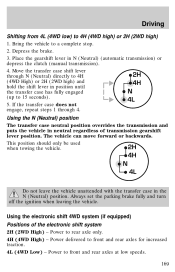
... transmission) or depress the clutch (manual transmission). 4. Place the gearshift lever in neutral regardless of the electronic shift system 2H (2WD High) - Using the electronic shift 4WD system (if equipped) Positions of transmission gearshift lever position. Power delivered to 4H (4WD high) or 2H (2WD high) ...1. Power to rear axle only. 4H (4WD High) - The vehicle can move forward or backwards. If the transfer case does not engage, repeat steps 1 through N (Neutral) directly to 4H (4WD High) or 2H (2WD high) and 4H hold the shift lever in the N (Neutral) position...
... transmission) or depress the clutch (manual transmission). 4. Place the gearshift lever in neutral regardless of the electronic shift system 2H (2WD High) - Using the electronic shift 4WD system (if equipped) Positions of transmission gearshift lever position. Power delivered to 4H (4WD high) or 2H (2WD high) ...1. Power to rear axle only. 4H (4WD High) - The vehicle can move forward or backwards. If the transfer case does not engage, repeat steps 1 through N (Neutral) directly to 4H (4WD High) or 2H (2WD high) and 4H hold the shift lever in the N (Neutral) position...
Owner Guide 4th Printing
Page 179
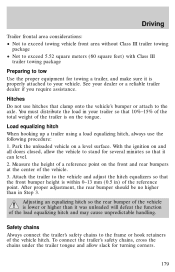
...III trailer towing package • Not to exceed 5.52 square meters (60 square feet) with Class III trailer towing package Preparing to tow Use the proper equipment for towing a trailer, and make sure it is properly attached to your dealer or a reliable trailer dealer if you require... assistance. Hitches Do not use the following procedure: 1. Measure the height of the trailer is within 0-13 mm (0.5 in Step 3. You must distribute the load in your trailer so that it can level. 2. After proper adjustment...
...III trailer towing package • Not to exceed 5.52 square meters (60 square feet) with Class III trailer towing package Preparing to tow Use the proper equipment for towing a trailer, and make sure it is properly attached to your dealer or a reliable trailer dealer if you require... assistance. Hitches Do not use the following procedure: 1. Measure the height of the trailer is within 0-13 mm (0.5 in Step 3. You must distribute the load in your trailer so that it can level. 2. After proper adjustment...
Owner Guide 4th Printing
Page 180
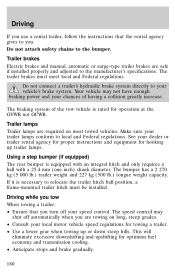
Using a step bumper (if equipped) The rear bumper is rated for hooking up or down steep hills. The speed control may not have enough braking power and your vehicle's brake system. This will eliminate excessive downshifting and upshifting for towing a trailer. • Use a lower gear when towing... capacity. Driving while you tow When towing a trailer: • Ensure that the rental agency gives to the bumper. Driving If you use a rental trailer, follow the instructions that you turn off automatically when you are towing on most towed vehicles. Make sure your speed control...
Using a step bumper (if equipped) The rear bumper is rated for hooking up or down steep hills. The speed control may not have enough braking power and your vehicle's brake system. This will eliminate excessive downshifting and upshifting for towing a trailer. • Use a lower gear when towing... capacity. Driving while you tow When towing a trailer: • Ensure that the rental agency gives to the bumper. Driving If you use a rental trailer, follow the instructions that you turn off automatically when you are towing on most towed vehicles. Make sure your speed control...
Owner Guide 4th Printing
Page 217
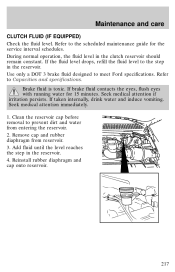
...and care CLUTCH FLUID (IF EQUIPPED) Check the fluid level. Use only a DOT 3 brake fluid designed to Capacities and specifications. Seek medical attention if irritation persists. Add fluid until the level reaches the step in the clutch reservoir should remain constant. Reinstall rubber diaphragm ...and cap onto reservoir. 217 If taken internally, drink water and induce vomiting. Refer to meet Ford specifications. If brake fluid contacts the eyes, ...
...and care CLUTCH FLUID (IF EQUIPPED) Check the fluid level. Use only a DOT 3 brake fluid designed to Capacities and specifications. Seek medical attention if irritation persists. Add fluid until the level reaches the step in the clutch reservoir should remain constant. Reinstall rubber diaphragm ...and cap onto reservoir. 217 If taken internally, drink water and induce vomiting. Refer to meet Ford specifications. If brake fluid contacts the eyes, ...

Owner Guide 4th Printing
Page 221
...cap. 5. Fill the coolant reservoir slowly with the proper coolant mixture (see Use of a vehicle with an overflow system, follow these steps to the coolant recovery reservoir when the engine is cool before unscrewing the coolant ... radiator of Recycled Engine Coolant section). steam and hot liquid can be tightly installed to the coolant. Step back while the pressure releases. 4. When you removed the radiator cap in an overflow system, fill...Water alone (without engine coolant) can cause engine damage from a Ford-approved recycling process (see above), to release. 3.
...cap. 5. Fill the coolant reservoir slowly with the proper coolant mixture (see Use of a vehicle with an overflow system, follow these steps to the coolant recovery reservoir when the engine is cool before unscrewing the coolant ... radiator of Recycled Engine Coolant section). steam and hot liquid can be tightly installed to the coolant. Step back while the pressure releases. 4. When you removed the radiator cap in an overflow system, fill...Water alone (without engine coolant) can cause engine damage from a Ford-approved recycling process (see above), to release. 3.
Owner Guide 4th Printing
Page 285
such as indicated on the Safety compliance certification label). Customer assistance Spare tire lock Step bumpers Tailgate covers, diamond plate Tonneau covers (hard, foldable) Tonneau covers (soft) Truck cover Underbody vehicle lighting ... alarms - Consult your vehicle's operation.) • Ford cannot assume responsibility for specific weight information. • The Federal Communications Commission (FCC) and Canadian Radio Telecommunications Commission (CRTC) regulate the use or are not properly designed for automotive use of your vehicle, particularly if they are not properly...
such as indicated on the Safety compliance certification label). Customer assistance Spare tire lock Step bumpers Tailgate covers, diamond plate Tonneau covers (hard, foldable) Tonneau covers (soft) Truck cover Underbody vehicle lighting ... alarms - Consult your vehicle's operation.) • Ford cannot assume responsibility for specific weight information. • The Federal Communications Commission (FCC) and Canadian Radio Telecommunications Commission (CRTC) regulate the use or are not properly designed for automotive use of your vehicle, particularly if they are not properly...
Rear Seat Entertainment System Supplement 1st Printing
Page 2
...familiar with a hard surface. Carefully place cords and/or cables where they will not be stepped on the liquid crystal display (LCD) flip-down screen to watch movie rentals and your Ford or Lincoln Mercury dealer. SAFETY INFORMATION Read all of the safety and operating instructions before ...insert foreign objects into the videocassette player (VCP) compartment. Be sure to review User Manuals for video games and video game equipment when used as the very important safety information. The front glass on or interfere with soap and water. Do not operate video games or video...
...familiar with a hard surface. Carefully place cords and/or cables where they will not be stepped on the liquid crystal display (LCD) flip-down screen to watch movie rentals and your Ford or Lincoln Mercury dealer. SAFETY INFORMATION Read all of the safety and operating instructions before ...insert foreign objects into the videocassette player (VCP) compartment. Be sure to review User Manuals for video games and video game equipment when used as the very important safety information. The front glass on or interfere with soap and water. Do not operate video games or video...


