
Owner Guide 4th Printing
Page 200
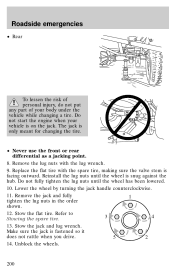
... the flat tire. Unblock the wheels. 200 Replace the flat tire with the lug wrench. 9. Lower the wheel by turning the jack handle counterclockwise. 11. Remove the jack and fully 1 tighten the lug nuts in the order shown. 12. Refer to 3 4 Stowing the spare tire. 13. Do not start the engine ... emergencies • Rear To lessen the risk of personal injury, do not put any part of your vehicle is facing outward. Stow the jack and lug wrench. The jack is fastened so it does not rattle when you drive. 5 2 14. Reinstall the lug nuts until the wheel has been lowered. 10. Make...
... the flat tire. Unblock the wheels. 200 Replace the flat tire with the lug wrench. 9. Lower the wheel by turning the jack handle counterclockwise. 11. Remove the jack and fully 1 tighten the lug nuts in the order shown. 12. Refer to 3 4 Stowing the spare tire. 13. Do not start the engine ... emergencies • Rear To lessen the risk of personal injury, do not put any part of your vehicle is facing outward. Stow the jack and lug wrench. The jack is fastened so it does not rattle when you drive. 5 2 14. Reinstall the lug nuts until the wheel has been lowered. 10. Make...

Rear Seat Entertainment System Supplement 1st Printing
Page 23
...game on the Rear Seat Entertainment Module (RSEM) to enable AUX mode.) • Adjust the VOLUME control buttons as camcorders) at the auxiliary input jacks of the Rear Seat Entertainment Module (RSEM). The liquid crystal display (LCD) screen will be turned ON, and the AUX indicator lamp will be... lit. (The remote control cannot be powered by the power point and may require a 12-volt DC to the headphone jacks. • Press the MEDIA button on the LCD flip-down screen. AUXILIARY INPUT DEVICE CONNECTION Connecting auxiliary video equipment...
...game on the Rear Seat Entertainment Module (RSEM) to enable AUX mode.) • Adjust the VOLUME control buttons as camcorders) at the auxiliary input jacks of the Rear Seat Entertainment Module (RSEM). The liquid crystal display (LCD) screen will be turned ON, and the AUX indicator lamp will be... lit. (The remote control cannot be powered by the power point and may require a 12-volt DC to the headphone jacks. • Press the MEDIA button on the LCD flip-down screen. AUXILIARY INPUT DEVICE CONNECTION Connecting auxiliary video equipment...


