
Owner's Manual
Page 16
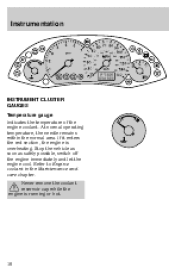
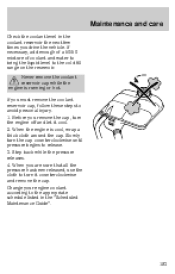
Never remove the coolant reservoir cap while the engine is overheating. Stop the vehicle as soon as safely possible, switch off the engine immediately and let the engine cool. Refer to Engine coolant in the Maintenance and care chapter. At normal operating temperature, the needle remains within the normal area. If it enters the red section, the engine is running or hot. 16 Instrumentation INSTRUMENT CLUSTER GAUGES Temperature gauge Indicates the temperature of the engine coolant.
Never remove the coolant reservoir cap while the engine is overheating. Stop the vehicle as soon as safely possible, switch off the engine immediately and let the engine cool. Refer to Engine coolant in the Maintenance and care chapter. At normal operating temperature, the needle remains within the normal area. If it enters the red section, the engine is running or hot. 16 Instrumentation INSTRUMENT CLUSTER GAUGES Temperature gauge Indicates the temperature of the engine coolant.
Owner's Manual
Page 17
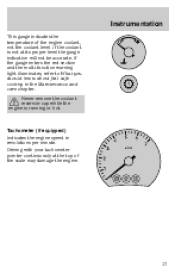
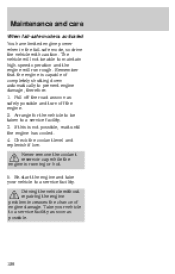
Instrumentation This gauge indicates the temperature of the scale may damage the engine. 17 Never remove the coolant reservoir cap while the engine is not at the top of the engine coolant, not the coolant level. Tachometer (if equipped) Indicates the engine speed in the Maintenance and care chapter. If the gauge enters the red section...
Instrumentation This gauge indicates the temperature of the scale may damage the engine. 17 Never remove the coolant reservoir cap while the engine is not at the top of the engine coolant, not the coolant level. Tachometer (if equipped) Indicates the engine speed in the Maintenance and care chapter. If the gauge enters the red section...
Owner's Manual
Page 53
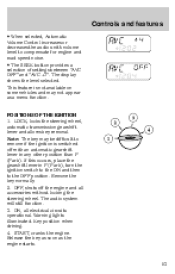
... the audio unit's volume level to the OFF position. START, cranks the engine. Note: The key may be difficult to remove if the ignition is not available on some vehicles and may not appear as the engine starts. 1 53 POSITIONS OF THE IGNITION 1. If this occurs, place the... 4. LOCK, locks the steering wheel, automatic transmission gearshift lever and allows key removal. OFF, shuts off with an automatic gearshift lever in P (Park), turn the ignition switch to the ON and then to compensate for engine and road speed noise. • The SEEK button provides a selection of settings...
... the audio unit's volume level to the OFF position. START, cranks the engine. Note: The key may be difficult to remove if the ignition is not available on some vehicles and may not appear as the engine starts. 1 53 POSITIONS OF THE IGNITION 1. If this occurs, place the... 4. LOCK, locks the steering wheel, automatic transmission gearshift lever and allows key removal. OFF, shuts off with an automatic gearshift lever in P (Park), turn the ignition switch to the ON and then to compensate for engine and road speed noise. • The SEEK button provides a selection of settings...

Owner's Manual
Page 143
Driving • Type A transaxle (with SPI engine) You shift into R (Reverse) only by moving the gearshift fully to the right against a spring pressure and then rearward into R (Reverse) gear (2). Removing key from ignition • Turn the ignition key to the right and rearward into R (Reverse) gear. • Type B transaxle (with Zetec engine) To select reverse gear, lift the locking ring (1) and then move the gearshift fully to position 1. • Remove the ignition key. 1 143
Driving • Type A transaxle (with SPI engine) You shift into R (Reverse) only by moving the gearshift fully to the right against a spring pressure and then rearward into R (Reverse) gear (2). Removing key from ignition • Turn the ignition key to the right and rearward into R (Reverse) gear. • Type B transaxle (with Zetec engine) To select reverse gear, lift the locking ring (1) and then move the gearshift fully to position 1. • Remove the ignition key. 1 143
Owner's Manual
Page 158
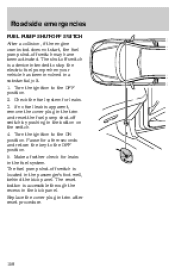
.... 4. Turn the ignition to the OFF position. 5. The reset button is accessible through the recess in the fuel system. If no fuel leak is apparent, remove the cover plug in the trim and reset the fuel pump shut off switch is a device intended to the OFF position. 2. The fuel pump shut... the fuel system for leaks in the kick panel. Make a further check for leaks. 3. Roadside emergencies FUEL PUMP SHUT-OFF SWITCH After a collision, if the engine cranks but does not start, the fuel pump shut off switch is located in the passenger's foot well, behind the kick panel. Replace the cover...
.... 4. Turn the ignition to the OFF position. 5. The reset button is accessible through the recess in the fuel system. If no fuel leak is apparent, remove the cover plug in the trim and reset the fuel pump shut off switch is a device intended to the OFF position. 2. The fuel pump shut... the fuel system for leaks in the kick panel. Make a further check for leaks. 3. Roadside emergencies FUEL PUMP SHUT-OFF SWITCH After a collision, if the engine cranks but does not start, the fuel pump shut off switch is located in the passenger's foot well, behind the kick panel. Replace the cover...
Owner's Manual
Page 176
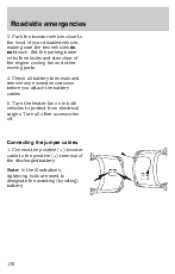
... cables 1. Park the booster vehicle close to protect from electrical surges. Roadside emergencies 3. Turn the heater fan on both vehicles to the hood of the engine cooling fan and other accessories off. Turn all battery terminals and remove any excessive corrosion before you attach the battery cables. 5.
... cables 1. Park the booster vehicle close to protect from electrical surges. Roadside emergencies 3. Turn the heater fan on both vehicles to the hood of the engine cooling fan and other accessories off. Turn all battery terminals and remove any excessive corrosion before you attach the battery cables. 5.
Owner's Manual
Page 179
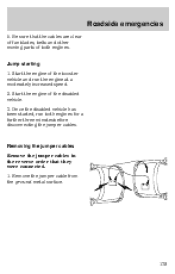
Roadside emergencies 5. Remove the jumper cable from the ground metal surface. 179 Removing the jumper cables Remove the jumper cables in the reverse order that the cables are clear of fan blades, belts and other moving parts of both engines for a further three minutes before disconnecting the jumper cables. Start the engine of the disabled vehicle. 3. Jump starting 1. Start the engine of the booster vehicle and run both engines. Once the disabled vehicle has been started, run the engine at a moderately increased speed. 2. Be sure that they were connected. 1.
Roadside emergencies 5. Remove the jumper cable from the ground metal surface. 179 Removing the jumper cables Remove the jumper cables in the reverse order that the cables are clear of fan blades, belts and other moving parts of both engines for a further three minutes before disconnecting the jumper cables. Start the engine of the disabled vehicle. 3. Jump starting 1. Start the engine of the booster vehicle and run both engines. Once the disabled vehicle has been started, run the engine at a moderately increased speed. 2. Be sure that they were connected. 1.

Owner's Manual
Page 180
Remove the jumper cable from the positive (+) terminal of the disabled vehicle's battery. Remove the jumper cable from the positive (+) terminal of the booster vehicle's battery. 3. After the disabled vehicle has been started and the jumper cables removed, allow it to idle for several minutes so the engine computer can relearn its idle conditions. 180 Remove the jumper cable on the negative (-) connection of the booster vehicle's battery. 4. Roadside emergencies 2.
Remove the jumper cable from the positive (+) terminal of the disabled vehicle's battery. Remove the jumper cable from the positive (+) terminal of the booster vehicle's battery. 3. After the disabled vehicle has been started and the jumper cables removed, allow it to idle for several minutes so the engine computer can relearn its idle conditions. 180 Remove the jumper cable on the negative (-) connection of the booster vehicle's battery. 4. Roadside emergencies 2.
Owner's Manual
Page 186
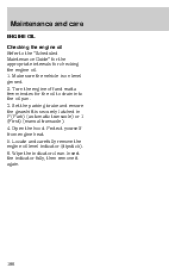
.... 1. Set the parking brake and ensure the gearshift is on level ground. 2. Protect yourself from engine heat. 5. Locate and carefully remove the engine oil level indicator (dipstick). 6. Maintenance and care ENGINE OIL Checking the engine oil Refer to drain into the oil pan. 3. Make sure the vehicle is securely latched in P (Park) (automatic transaxle) or...
.... 1. Set the parking brake and ensure the gearshift is on level ground. 2. Protect yourself from engine heat. 5. Locate and carefully remove the engine oil level indicator (dipstick). 6. Maintenance and care ENGINE OIL Checking the engine oil Refer to drain into the oil pan. 3. Make sure the vehicle is securely latched in P (Park) (automatic transaxle) or...
Owner's Manual
Page 187
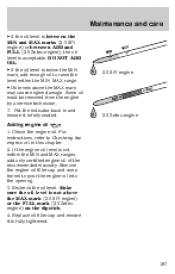
...; Oil levels above the MAX mark (2.0 SPI engine) or the FULL mark (2.0 Zetec engine) on the dipstick. 4. Some oil must be removed from the engine by a service technician. 7. Check the engine oil. If the engine oil level is fully seated. Remove the engine oil filler cap and use a funnel to pour... the engine oil into the opening. 3. Put the indicator back in this chapter. 2. ...
...; Oil levels above the MAX mark (2.0 SPI engine) or the FULL mark (2.0 Zetec engine) on the dipstick. 4. Some oil must be removed from the engine by a service technician. 7. Check the engine oil. If the engine oil level is fully seated. Remove the engine oil filler cap and use a funnel to pour... the engine oil into the opening. 3. Put the indicator back in this chapter. 2. ...
Owner's Manual
Page 193
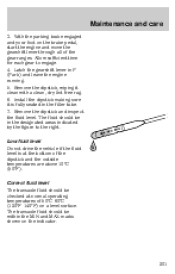
... cap, turn it cool. 2. Step back while the pressure releases. 4. Never remove the coolant reservoir cap while the engine is cool, wrap a thick cloth around the cap. Slowly turn the cap counterclockwise until pressure begins to the appropriate schedule listed in the coolant reservoir ...the next few times you are sure that all the pressure has been released, use the cloth to turn the engine off and let it counterclockwise and remove the cap. Change your engine coolant according to release. 3. If necessary, add enough of a 50/50 mixture of coolant and water to bring the liquid...
... cap, turn it cool. 2. Step back while the pressure releases. 4. Never remove the coolant reservoir cap while the engine is cool, wrap a thick cloth around the cap. Slowly turn the cap counterclockwise until pressure begins to the appropriate schedule listed in the coolant reservoir ...the next few times you are sure that all the pressure has been released, use the cloth to turn the engine off and let it counterclockwise and remove the cap. Change your engine coolant according to release. 3. If necessary, add enough of a 50/50 mixture of coolant and water to bring the liquid...
Owner's Manual
Page 198
...: 1. The vehicle will not be taken to maintain high speed operation and the engine will run rough. Never remove the coolant reservoir cap while the engine is not possible, wait until the engine has cooled. 4. Driving the vehicle without repairing the engine problem increases the chance of completely shutting down automatically to a service facility as...
...: 1. The vehicle will not be taken to maintain high speed operation and the engine will run rough. Never remove the coolant reservoir cap while the engine is not possible, wait until the engine has cooled. 4. Driving the vehicle without repairing the engine problem increases the chance of completely shutting down automatically to a service facility as...
Owner's Manual
Page 201
With the parking brake engaged and your foot on the brake pedal, start the engine and move the gearshift lever through all of 50ºC-60ºC (120ºF-140ºF) on the indicator. 201 Remove the dipstick and inspect the fluid level. Install the dipstick making sure it clean with a clean, dry... filler tube. 7. Allow sufficient time for each gear to the right. The fluid should be within the MIN and MAX marks shown on a level surface. Remove the dipstick, wiping it is at normal operating temperatures of the gear ranges. Latch the gearshift lever in P (Park) and leave the...
With the parking brake engaged and your foot on the brake pedal, start the engine and move the gearshift lever through all of 50ºC-60ºC (120ºF-140ºF) on the indicator. 201 Remove the dipstick and inspect the fluid level. Install the dipstick making sure it clean with a clean, dry... filler tube. 7. Allow sufficient time for each gear to the right. The fluid should be within the MIN and MAX marks shown on a level surface. Remove the dipstick, wiping it is at normal operating temperatures of the gear ranges. Latch the gearshift lever in P (Park) and leave the...
Owner's Manual
Page 218
.... 3. Refer to the fuel tank or fuel system if a genuine Ford or Motorcraft fuel filler cap is venting vapor or if you hear a hissing sound, wait until it clicks. Turn the engine off the engine, remove the fuel filler cap and reinstall it being careful to align the cap... properly. To close, turn cap counterclockwise to remove. 4. The emission system performance may be adversely affected and the customer warranty may not be equipped with a genuine Ford or Motorcraft part...
.... 3. Refer to the fuel tank or fuel system if a genuine Ford or Motorcraft fuel filler cap is venting vapor or if you hear a hissing sound, wait until it clicks. Turn the engine off the engine, remove the fuel filler cap and reinstall it being careful to align the cap... properly. To close, turn cap counterclockwise to remove. 4. The emission system performance may be adversely affected and the customer warranty may not be equipped with a genuine Ford or Motorcraft part...

Owner's Manual
Page 231
Do not make any unauthorized changes to intentionally remove an emission control device or prevent it from working properly. Information about your vehicle's emission system is not working . This decal identifies engine displacement and gives some tune up specifications. By law, vehicle owners and anyone who...system is on the Vehicle Emission Control Information Decal located on or near the engine. Maintenance and care Illumination of the Charging system warning light, Check engine light or a high engine temperature, fluid leaks, strange odors, smoke or loss of vehicles are not ...
Do not make any unauthorized changes to intentionally remove an emission control device or prevent it from working properly. Information about your vehicle's emission system is not working . This decal identifies engine displacement and gives some tune up specifications. By law, vehicle owners and anyone who...system is on the Vehicle Emission Control Information Decal located on or near the engine. Maintenance and care Illumination of the Charging system warning light, Check engine light or a high engine temperature, fluid leaks, strange odors, smoke or loss of vehicles are not ...
Owner's Manual
Page 269
...or products of equivalent quality Ford Custom Clearcoat Polish* Ford Custom Silicone Gloss Polish Ford Custom Vinyl Protectant* Ford Deluxe Leather and Vinyl Cleaner Ford Extra Strength Tar and Road Oil Remover* Ford Extra Strength Upholstery Cleaner Ford Metal Surface Cleaner Ford Multi Purpose Cleaner* Motorcraft ... warranty, whichever is greater. These quality accessories have been specifically engineered to clean your vehicle and protect its finishes. Customer assistance FORD ACCESSORIES FOR YOUR VEHICLE Ford has many quality products available from high quality materials and meets or...
...or products of equivalent quality Ford Custom Clearcoat Polish* Ford Custom Silicone Gloss Polish Ford Custom Vinyl Protectant* Ford Deluxe Leather and Vinyl Cleaner Ford Extra Strength Tar and Road Oil Remover* Ford Extra Strength Upholstery Cleaner Ford Metal Surface Cleaner Ford Multi Purpose Cleaner* Motorcraft ... warranty, whichever is greater. These quality accessories have been specifically engineered to clean your vehicle and protect its finishes. Customer assistance FORD ACCESSORIES FOR YOUR VEHICLE Ford has many quality products available from high quality materials and meets or...
Owner's Manual
Page 270
...systems Comfort and convenience Air conditioner Cargo nets Cargo shades Dash trim Electrocromic/compass/mirror Electrocromic/compass/ o/s temp mirror Engine block heaters Gear shift knob Smokers pack Travel equipment Automatic headlamp system Console Daytime running lights Factory luggage rack adapters Fog... lights Framed luggage covers Heavy duty battery Luggage/cargo basket Removable luggage rack Removable luggage rack adapters Soft luggage cover Speed control Protection and appearance equipment Air bag anti theft locks Car/truck...
...systems Comfort and convenience Air conditioner Cargo nets Cargo shades Dash trim Electrocromic/compass/mirror Electrocromic/compass/ o/s temp mirror Engine block heaters Gear shift knob Smokers pack Travel equipment Automatic headlamp system Console Daytime running lights Factory luggage rack adapters Fog... lights Framed luggage covers Heavy duty battery Luggage/cargo basket Removable luggage rack Removable luggage rack adapters Soft luggage cover Speed control Protection and appearance equipment Air bag anti theft locks Car/truck...


