
Owner Guide 1st Printing
Page 142
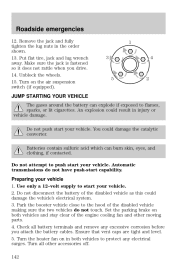
...142 1 3 4 5 2 Turn the heater fan on both vehicles to flames, sparks, or lit cigarettes. Roadside emergencies 12. Put flat tire, jack and lug wrench away. Batteries contain sulfuric acid which can explode if exposed to protect any excessive corrosion before you drive. 14. You could damage the vehicle's electrical system. 3. Automatic.... Park the booster vehicle close to start your vehicle 1. Make sure the jack is fastened so it does not rattle when you attach the battery cables. Remove the jack and fully tighten the lug nuts in injury or vehicle damage.
...142 1 3 4 5 2 Turn the heater fan on both vehicles to flames, sparks, or lit cigarettes. Roadside emergencies 12. Put flat tire, jack and lug wrench away. Batteries contain sulfuric acid which can explode if exposed to protect any excessive corrosion before you drive. 14. You could damage the vehicle's electrical system. 3. Automatic.... Park the booster vehicle close to start your vehicle 1. Make sure the jack is fastened so it does not rattle when you attach the battery cables. Remove the jack and fully tighten the lug nuts in injury or vehicle damage.

Owner Guide 1st Printing
Page 143
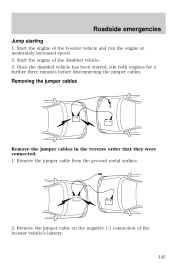
Connect the positive (+) booster cable to the positive (+) terminal of the discharged battery. Connect the other end of the positive (+) cable to the positive (+) terminal of the assisting battery. - - - + - + + + 143 Note: In the illustrations, lightning bolts are used to designate the assisting (boosting) battery. 2. Roadside emergencies Connecting the jumper cables 1.
Connect the positive (+) booster cable to the positive (+) terminal of the discharged battery. Connect the other end of the positive (+) cable to the positive (+) terminal of the assisting battery. - - - + - + + + 143 Note: In the illustrations, lightning bolts are used to designate the assisting (boosting) battery. 2. Roadside emergencies Connecting the jumper cables 1.

Owner Guide 1st Printing
Page 144
Roadside emergencies 3. Be sure that surround the battery. 5. Connect the negative (-) cable to be jumped. The preferred locations of the battery to the negative (-) terminal of both engines. 144 - - - + + + + - Do not connect the end of the second cable to the negative (-) terminal of an exposed metal part...points. A spark may cause an explosion of the stalled vehicle's engine, away from the battery and the carburetor/fuel injection system. Make the final connection of the negative (-) cable to ground the circuit) are clear of fan blades, belts and other moving parts of...
Roadside emergencies 3. Be sure that surround the battery. 5. Connect the negative (-) cable to be jumped. The preferred locations of the battery to the negative (-) terminal of both engines. 144 - - - + + + + - Do not connect the end of the second cable to the negative (-) terminal of an exposed metal part...points. A spark may cause an explosion of the stalled vehicle's engine, away from the battery and the carburetor/fuel injection system. Make the final connection of the negative (-) cable to ground the circuit) are clear of fan blades, belts and other moving parts of...
Owner Guide 1st Printing
Page 145
Remove the jumper cable from the ground metal surface. 2. Once the disabled vehicle has been started, run the engine at moderately increased speed. 2. Removing the jumper cables Remove the jumper cables in the reverse order that they were connected. 1. Roadside emergencies Jump starting 1. Start the engine of the booster vehicle and run both engines for a further three minutes before disconnecting the jumper cables. Remove the jumper cable on the negative (-) connection of the disabled vehicle. 3. Start the engine of the booster vehicle's battery. - - - - + + + + 145
Remove the jumper cable from the ground metal surface. 2. Once the disabled vehicle has been started, run the engine at moderately increased speed. 2. Removing the jumper cables Remove the jumper cables in the reverse order that they were connected. 1. Roadside emergencies Jump starting 1. Start the engine of the booster vehicle and run both engines for a further three minutes before disconnecting the jumper cables. Remove the jumper cable on the negative (-) connection of the disabled vehicle. 3. Start the engine of the booster vehicle's battery. - - - - + + + + 145

Owner Guide 1st Printing
Page 146
Roadside emergencies 3. Remove the jumper cable from the positive (+) terminal of the disabled vehicle's battery. After the disabled vehicle has been started and the jumper cables removed, allow it to idle for several minutes so the engine computer can relearn its idle conditions. 146 - - - + + - + + Remove the jumper cable from the positive (+) terminal of the booster vehicle's battery. 4.
Roadside emergencies 3. Remove the jumper cable from the positive (+) terminal of the disabled vehicle's battery. After the disabled vehicle has been started and the jumper cables removed, allow it to idle for several minutes so the engine computer can relearn its idle conditions. 146 - - - + + - + + Remove the jumper cable from the positive (+) terminal of the booster vehicle's battery. 4.
Owner Guide 1st Printing
Page 162
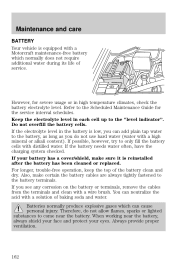
...If the electrolyte level in high temperature climates, check the battery electrolyte level. If the battery needs water often, have the charging system checked. If you see any corrosion on the battery or terminals, remove the cables from the terminals and clean with a high mineral or ...to the battery, as long as you do not allow flames, sparks or lighted substances to come near the battery, always shield your face and protect your battery has a cover/shield, make certain the battery cables are always tightly fastened to the battery terminals. Maintenance and care BATTERY Your vehicle ...
...If the electrolyte level in high temperature climates, check the battery electrolyte level. If the battery needs water often, have the charging system checked. If you see any corrosion on the battery or terminals, remove the cables from the terminals and clean with a high mineral or ...to the battery, as long as you do not allow flames, sparks or lighted substances to come near the battery, always shield your face and protect your battery has a cover/shield, make certain the battery cables are always tightly fastened to the battery terminals. Maintenance and care BATTERY Your vehicle ...

Owner Guide 1st Printing
Page 208
...equipment Console Console armrest Daytime running lights Factory luggage rack Factory luggage rack adaptors Fog lights Framed luggage covers Heavy-duty battery Neutral towing transfer case kit (Explorer 4.0L only) Off road lights Pickup box rails Removable luggage rack Removable luggage rack... adapters Retractable bed hooks and loops Running boards Snow traction cables Soft luggage cover Speed control Towing mirrors Trailer hitch Trailer hitch bars and balls Trailer hitch wiring adaptor Protection and appearance equipment...
...equipment Console Console armrest Daytime running lights Factory luggage rack Factory luggage rack adaptors Fog lights Framed luggage covers Heavy-duty battery Neutral towing transfer case kit (Explorer 4.0L only) Off road lights Pickup box rails Removable luggage rack Removable luggage rack... adapters Retractable bed hooks and loops Running boards Snow traction cables Soft luggage cover Speed control Towing mirrors Trailer hitch Trailer hitch bars and balls Trailer hitch wiring adaptor Protection and appearance equipment...


