
Owner's Manual
Page 11
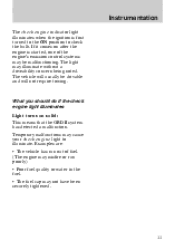
...means that the OBD II system has detected a malfunction. What you should do if the check engine light illuminates Light turns on after the engine is first turned to the ON position to illuminate. The light may not have been securely tightened. 11 The vehicle will usually be ...malfunctioning. Instrumentation The check engine indicator light illuminates when the ignition is started, one of fuel. (The engine may misfire or run ...
...means that the OBD II system has detected a malfunction. What you should do if the check engine light illuminates Light turns on after the engine is first turned to the ON position to illuminate. The light may not have been securely tightened. 11 The vehicle will usually be ...malfunctioning. Instrumentation The check engine indicator light illuminates when the ignition is started, one of fuel. (The engine may misfire or run ...

Owner's Manual
Page 17
Headlamps on warning chime Sounds when the headlamps are on the safety belt warning chime, refer to the on position without starting the engine. Key-in-ignition warning chime Sounds when the key is left in the off (and the key is not in the ignition) ..., ABS, brake, low coolant, low fuel, engine oil pressure, check engine and air bag readiness. Instrumentation Testing the warning and indicator lights and chimes Turn the ignition key to the Seating and safety restraints chapter. 17 The following warning and indicator lights will illuminate briefly: charging system, safety belt (does...
Headlamps on warning chime Sounds when the headlamps are on the safety belt warning chime, refer to the on position without starting the engine. Key-in-ignition warning chime Sounds when the key is left in the off (and the key is not in the ignition) ..., ABS, brake, low coolant, low fuel, engine oil pressure, check engine and air bag readiness. Instrumentation Testing the warning and indicator lights and chimes Turn the ignition key to the Seating and safety restraints chapter. 17 The following warning and indicator lights will illuminate briefly: charging system, safety belt (does...
Owner's Manual
Page 108
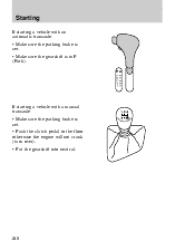
Starting If starting a vehicle with an automatic transaxle: • Make sure the parking brake is in P (Park). If starting a vehicle with a manual transaxle: • Make sure the parking brake is set . • Make sure the gearshift is set . • Push the clutch pedal to the floor otherwise the engine will not crank (turn over). • Put the gearshift into neutral. 108
Starting If starting a vehicle with an automatic transaxle: • Make sure the parking brake is in P (Park). If starting a vehicle with a manual transaxle: • Make sure the parking brake is set . • Make sure the gearshift is set . • Push the clutch pedal to the floor otherwise the engine will not crank (turn over). • Put the gearshift into neutral. 108
Owner's Manual
Page 109
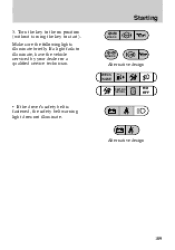
BRAKE BRAKE Alternative design CHECK ENGINE TRACTION CONTROL O/D OFF • If the driver's safety belt is fastened, the safety belt warning light does not illuminate. Alternative design 109 Turn the key to the on position (without turning the key to illuminate, have the vehicle serviced by your dealer or a qualified service technician. Make sure the following lights illuminate briefly. If a light fails to start). Starting 3.
BRAKE BRAKE Alternative design CHECK ENGINE TRACTION CONTROL O/D OFF • If the driver's safety belt is fastened, the safety belt warning light does not illuminate. Alternative design 109 Turn the key to the on position (without turning the key to illuminate, have the vehicle serviced by your dealer or a qualified service technician. Make sure the following lights illuminate briefly. If a light fails to start). Starting 3.

Owner's Manual
Page 110
... of the way down . After idling the engine for more than 30 seconds or you could damage the starter. 4. Starting STARTING THE ENGINE 1. If the engine does not start in two attempts OR the temperature is below -12°C (10°F), depress the accelerator pedal and... brake. 110 Release accelerator pedal when the engine starts. If the engine does not start position (4) without pressing the accelerator pedal and release as soon as the engine starts. The key will return to the start within five seconds, wait ten seconds and try again. 3. Turn the key to the on (3) position. 1 ...
... of the way down . After idling the engine for more than 30 seconds or you could damage the starter. 4. Starting STARTING THE ENGINE 1. If the engine does not start in two attempts OR the temperature is below -12°C (10°F), depress the accelerator pedal and... brake. 110 Release accelerator pedal when the engine starts. If the engine does not start position (4) without pressing the accelerator pedal and release as soon as the engine starts. The key will return to the start within five seconds, wait ten seconds and try again. 3. Turn the key to the on (3) position. 1 ...

Owner's Manual
Page 138
... do not see or smell fuel, you see or smell fuel, do not see or smell fuel, do not reset the switch or try to start your vehicle again. Turn the ignition key to the off position. 2. If the button is already set, you do not... start after a collision or substantial jolt: 1. If you can try to start your vehicle again. 138 Turn the ignition key to the on position for leaking fuel. 3. Have all the passengers get out of the vehicle and call...
... do not see or smell fuel, you see or smell fuel, do not see or smell fuel, do not reset the switch or try to start your vehicle again. Turn the ignition key to the off position. 2. If the button is already set, you do not... start after a collision or substantial jolt: 1. If you can try to start your vehicle again. 138 Turn the ignition key to the on position for leaking fuel. 3. Have all the passengers get out of the vehicle and call...
Owner's Manual
Page 175
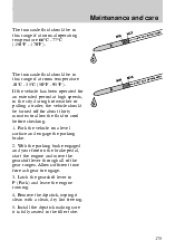
... this range if at normal operating temperature 66°C - 77°C (150°F - 170°F). Park the vehicle on the brake pedal, start the engine and move the gearshift lever through all of the gear ranges. Remove the dipstick, wiping it is fully seated in P (Park) and ...leave the engine running. 4. Install the dipstick making sure it clean with a clean, dry lint free rag. 5. The transaxle fluid should be turned off for each gear to cool before checking. 1. Latch the gearshift lever in the filler tube. 175 Maintenance and care The transaxle fluid should be...
... this range if at normal operating temperature 66°C - 77°C (150°F - 170°F). Park the vehicle on the brake pedal, start the engine and move the gearshift lever through all of the gear ranges. Remove the dipstick, wiping it is fully seated in P (Park) and ...leave the engine running. 4. Install the dipstick making sure it clean with a clean, dry lint free rag. 5. The transaxle fluid should be turned off for each gear to cool before checking. 1. Latch the gearshift lever in the filler tube. 175 Maintenance and care The transaxle fluid should be...

Owner's Manual
Page 179
... from the battery. To begin this process: 1. Put the automatic transaxle gearshift in neutral. 2. Let the engine idle for at least one minute. 4. Turn off all accessories and start the vehicle. 3. When the battery is disconnected or a new battery is reconnected. 179 Put the manual transaxle gearshift in P (Park). Maintenance and care...
... from the battery. To begin this process: 1. Put the automatic transaxle gearshift in neutral. 2. Let the engine idle for at least one minute. 4. Turn off all accessories and start the vehicle. 3. When the battery is disconnected or a new battery is reconnected. 179 Put the manual transaxle gearshift in P (Park). Maintenance and care...
Owner's Manual
Page 194
...authorized Motorcraft fuel filler cap is venting vapor or if you or others. 194 Turn off the engine, remove the fuel filler cap and reinstall it stops before completely removing the fuel filler cap. If you start the engine, the fuel filler cap may be properly installed. The fuel system ...may not be under pressure. If the fuel filler cap is not used. Maintenance and care Cleaner air Ford approves the use of gasolines to align the cap...
...authorized Motorcraft fuel filler cap is venting vapor or if you or others. 194 Turn off the engine, remove the fuel filler cap and reinstall it stops before completely removing the fuel filler cap. If you start the engine, the fuel filler cap may be properly installed. The fuel system ...may not be under pressure. If the fuel filler cap is not used. Maintenance and care Cleaner air Ford approves the use of gasolines to align the cap...
Owner's Manual
Page 199
Then, start the engine and complete the above driving cycle is necessary as described below: • First, at least 10 minutes of driving on an expressway or ... sit for I /M testing, a minimum of 30 minutes of driving in stop and go, city-type traffic with at least eight hours without starting the engine. Once started, do not turn off the engine until the above driving cycle. Maintenance and care If the vehicle's powertrain system or its normal operating temperature. Allow the...
Then, start the engine and complete the above driving cycle is necessary as described below: • First, at least 10 minutes of driving on an expressway or ... sit for I /M testing, a minimum of 30 minutes of driving in stop and go, city-type traffic with at least eight hours without starting the engine. Once started, do not turn off the engine until the above driving cycle. Maintenance and care If the vehicle's powertrain system or its normal operating temperature. Allow the...
Owner's Manual
Page 239
... lighting up the panel ...23 Integrated child seat (see Built-in child seat) Intermittent wipers ...56 Introduction ...2 J Jack positioning ...148 storage ...147 Jump starting your vehicle attaching cables ...151 disconnecting cables ...154 K Keys key in ignition warning chime .17 positions of the ignition ...52 239 L Page Lamps bulb ...check engine ...10 engine oil pressure ...16 high beam ...7 low coolant ...9 low fuel ...13 overdrive off ...9 safety belt ...7 testing the warning lights ...17 turn signal indicator ...6 Load limits ...127 Lubricant specifications ...219 Luggage compartment ...64
... lighting up the panel ...23 Integrated child seat (see Built-in child seat) Intermittent wipers ...56 Introduction ...2 J Jack positioning ...148 storage ...147 Jump starting your vehicle attaching cables ...151 disconnecting cables ...154 K Keys key in ignition warning chime .17 positions of the ignition ...52 239 L Page Lamps bulb ...check engine ...10 engine oil pressure ...16 high beam ...7 low coolant ...9 low fuel ...13 overdrive off ...9 safety belt ...7 testing the warning lights ...17 turn signal indicator ...6 Load limits ...127 Lubricant specifications ...219 Luggage compartment ...64
Owner's Manual
Page 241
... return to a set speed ...60 set a speed ...58 set a higher speed ...59 set a lower speed ...59 turn speed control off ...57 turn speed control on ...57 Speedometer ...19 Starting your vehicle preparing to start the vehicle .107 starting the engine ...110 Steering column controls ...52 Steering wheel horn ...54 speed control ...57 tilting ...53 Sunroof...
... return to a set speed ...60 set a speed ...58 set a higher speed ...59 set a lower speed ...59 turn speed control off ...57 turn speed control on ...57 Speedometer ...19 Starting your vehicle preparing to start the vehicle .107 starting the engine ...110 Steering column controls ...52 Steering wheel horn ...54 speed control ...57 tilting ...53 Sunroof...


