Owner Guide 1st Printing
Page 20
... indicators does not light up or remains on continuously when you drive with Daytime Running Lights (Canadian vehicles only) and they are on when the headlamps are turned to OFF and remove the key from the ignition. 3. Turn Signal Warning Chime If you signal a turn, have the turn signaling system serviced...
... indicators does not light up or remains on continuously when you drive with Daytime Running Lights (Canadian vehicles only) and they are on when the headlamps are turned to OFF and remove the key from the ignition. 3. Turn Signal Warning Chime If you signal a turn, have the turn signaling system serviced...
Owner Guide 1st Printing
Page 71
... airflow UP, DOWN, LEFT and RIGHT. Controls and Features The instrument panel (dashboard) on the instrument panel. Illustrations are provided for the climate control systems, headlamps, dim switch, rear window defogger, fog lamps, power rear quarter windows, Traction Control, clock/radio and the rear window washer and wiper are four registers...
... airflow UP, DOWN, LEFT and RIGHT. Controls and Features The instrument panel (dashboard) on the instrument panel. Illustrations are provided for the climate control systems, headlamps, dim switch, rear window defogger, fog lamps, power rear quarter windows, Traction Control, clock/radio and the rear window washer and wiper are four registers...

Owner Guide 1st Printing
Page 86
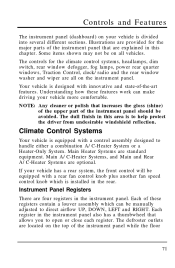
... license plate lamps, marker lamps and instrument panel lamps. 86 To turn on the headlamps, parking lamps, marker lamps, tail lamps, license plate lamps and instrument panel lamps, use the headlamp knob, to behave differently than anticipated, especially when road conditions vary. Turn the... headlamp knob to the second position to turn on the headlamps in addition to turn on the parking lamps, tail lamps, ...
... license plate lamps, marker lamps and instrument panel lamps. 86 To turn on the headlamps, parking lamps, marker lamps, tail lamps, license plate lamps and instrument panel lamps, use the headlamp knob, to behave differently than anticipated, especially when road conditions vary. Turn the... headlamp knob to the second position to turn on the headlamps in addition to turn on the parking lamps, tail lamps, ...
Owner Guide 1st Printing
Page 87
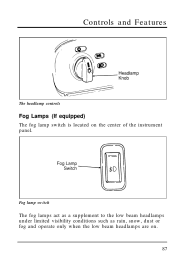
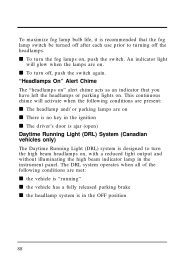
Controls and Features The headlamp controls Fog Lamps (If equipped) The fog lamp switch is located on . 87 Fog lamp switch The fog lamps act as a supplement to the low beam headlamps under limited visibility conditions such as rain, snow, dust or fog and operate only when the low beam headlamps are on the center of the instrument panel.
Controls and Features The headlamp controls Fog Lamps (If equipped) The fog lamp switch is located on . 87 Fog lamp switch The fog lamps act as a supplement to the low beam headlamps under limited visibility conditions such as rain, snow, dust or fog and operate only when the low beam headlamps are on the center of the instrument panel.
Owner Guide 1st Printing
Page 88
...Light (DRL) system is designed to turning off , push the switch again. The DRL system operates when all of the following conditions are present: s The headlamp and/or parking lamps are met: s the vehicle is "running" s the vehicle has a fully released parking brake s the... headlamp system is in the instrument panel. s To turn the high beam headlamps on, with a reduced light output and without illuminating the high beam indicator lamp in the OFF position 88 s To turn off ...
...Light (DRL) system is designed to turning off , push the switch again. The DRL system operates when all of the following conditions are present: s The headlamp and/or parking lamps are met: s the vehicle is "running" s the vehicle has a fully released parking brake s the... headlamp system is in the instrument panel. s To turn the high beam headlamps on, with a reduced light output and without illuminating the high beam indicator lamp in the OFF position 88 s To turn off ...
Owner Guide 1st Printing
Page 89
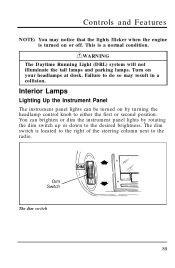
... on by rotating the dim switch up or down to do so may notice that the lights flicker when the engine is turned on your headlamps at dusk. Controls and Features NOTE: You may result in a collision. Interior Lamps Lighting Up the Instrument Panel The instrument panel lights can... brighten or dim the instrument panel lights by turning the headlamp control knob to the radio. The dim switch 89 RWARNING The Daytime Running Light (DRL) system will not illuminate the tail lamps and parking ...
... on by rotating the dim switch up or down to do so may notice that the lights flicker when the engine is turned on your headlamps at dusk. Controls and Features NOTE: You may result in a collision. Interior Lamps Lighting Up the Instrument Panel The instrument panel lights can... brighten or dim the instrument panel lights by turning the headlamp control knob to the radio. The dim switch 89 RWARNING The Daytime Running Light (DRL) system will not illuminate the tail lamps and parking ...
Owner Guide 1st Printing
Page 93
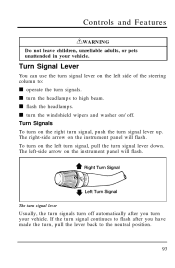
s flash the headlamps. s turn the windshield wipers and washer on the left side of the steering column to flash after you have made the turn on the left -... back to high beam. The turn signal lever Usually, the turn signals turn off . To turn on the right turn signal, push the turn the headlamps to the neutral position. 93 s turn signal lever up.
s flash the headlamps. s turn the windshield wipers and washer on the left side of the steering column to flash after you have made the turn on the left -... back to high beam. The turn signal lever Usually, the turn signals turn off . To turn on the right turn signal, push the turn the headlamps to the neutral position. 93 s turn signal lever up.

Owner Guide 1st Printing
Page 94
... (without latching) and hold it in position. The lever will return to -pass operation 94 High Beams To turn on the high beams, turn the headlamps on and push the turn signal lever away from you signal a turn, the turn signaling system is repaired. To return to the low beam setting...
... (without latching) and hold it in position. The lever will return to -pass operation 94 High Beams To turn on the high beams, turn the headlamps on and push the turn signal lever away from you signal a turn, the turn signaling system is repaired. To return to the low beam setting...
Owner Guide 1st Printing
Page 95
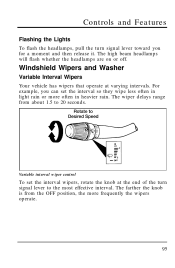
... the interval so they wipe less often in heavier rain. The farther the knob is from about 1.5 to the most effective interval. The high beam headlamps will flash whether the headlamps are on or off. Controls and Features Flashing the Lights To flash the...
... the interval so they wipe less often in heavier rain. The farther the knob is from about 1.5 to the most effective interval. The high beam headlamps will flash whether the headlamps are on or off. Controls and Features Flashing the Lights To flash the...
Owner Guide 1st Printing
Page 104
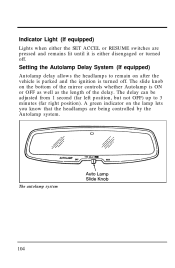
... the vehicle is parked and the ignition is turned off . The autolamp system 104 The slide knob on the lamp lets you know that the headlamps are pressed and remains lit until it is ON or OFF as well as the length of the delay. Setting the Autolamp Delay System (If... equipped) Autolamp delay allows the headlamps to 3 minutes (far right position). A green indicator on the bottom of the mirror controls whether Autolamp is either the SET ACCEL or RESUME switches are...
... the vehicle is parked and the ignition is turned off . The autolamp system 104 The slide knob on the lamp lets you know that the headlamps are pressed and remains lit until it is ON or OFF as well as the length of the delay. Setting the Autolamp Delay System (If... equipped) Autolamp delay allows the headlamps to 3 minutes (far right position). A green indicator on the bottom of the mirror controls whether Autolamp is either the SET ACCEL or RESUME switches are...

Owner Guide 1st Printing
Page 105
... can be adjusted to turn on and off using Autolamp, perform the following procedure. 1. Slowly slide the Autolamp slide knob to the right until the headlamps turn off . The new setting will be stored in a hole on earlier, go to step 6. 5. Slowly slide the Autolamp slide knob to the left ...or later in the overhead console between the driver and front passenger seats. 105 Release the MODE switch. Controls and Features Setting the autolamp The headlamps can be accessed with a paper clip or similar object. 3. The MODE switch is located in permanent memory. To have the...
... can be adjusted to turn on and off using Autolamp, perform the following procedure. 1. Slowly slide the Autolamp slide knob to the right until the headlamps turn off . The new setting will be stored in a hole on earlier, go to step 6. 5. Slowly slide the Autolamp slide knob to the left ...or later in the overhead console between the driver and front passenger seats. 105 Release the MODE switch. Controls and Features Setting the autolamp The headlamps can be accessed with a paper clip or similar object. 3. The MODE switch is located in permanent memory. To have the...
Owner Guide 1st Printing
Page 107
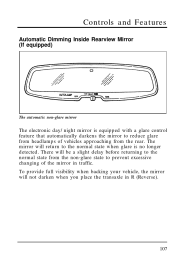
...). 107 There will return to the normal state when glare is equipped with a glare control feature that automatically darkens the mirror to reduce glare from headlamps of vehicles approaching from the non-glare state to the normal state from the rear.
...). 107 There will return to the normal state when glare is equipped with a glare control feature that automatically darkens the mirror to reduce glare from headlamps of vehicles approaching from the non-glare state to the normal state from the rear.
Owner Guide 1st Printing
Page 128
... button again. Typical operating range will honk the horn and flash the tail lamps and low beam headlamps for 25 seconds. You can also be up to 33 feet (10 meters) away from your Ford or Lincoln-Mercury dealer. Replacing the batteries The remote is powered by two coin type three-volt...
... button again. Typical operating range will honk the horn and flash the tail lamps and low beam headlamps for 25 seconds. You can also be up to 33 feet (10 meters) away from your Ford or Lincoln-Mercury dealer. Replacing the batteries The remote is powered by two coin type three-volt...
Owner Guide 1st Printing
Page 132
... will now glow steadily. 4. NOTE: Be sure to prevent the vehicle from the ignition. 2. If not, the alarm indicator light will : s flash the low beam headlamps, parking lamps, and alarm indicator lamp s honk the horn s disable the starting circuit to close all doors and liftgate. When an unauthorized entry occurs, the...
... will now glow steadily. 4. NOTE: Be sure to prevent the vehicle from the ignition. 2. If not, the alarm indicator light will : s flash the low beam headlamps, parking lamps, and alarm indicator lamp s honk the horn s disable the starting circuit to close all doors and liftgate. When an unauthorized entry occurs, the...
Owner Guide 1st Printing
Page 205
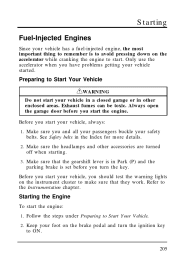
... to Start Your Vehicle RWARNING Do not start your vehicle in a closed garage or in other accessories are turned off when starting. 3. Make sure the headlamps and other enclosed areas. Before you start your vehicle, you should test the warning lights on the accelerator while cranking the engine to start. Refer...
... to Start Your Vehicle RWARNING Do not start your vehicle in a closed garage or in other accessories are turned off when starting. 3. Make sure the headlamps and other enclosed areas. Before you start your vehicle, you should test the warning lights on the accelerator while cranking the engine to start. Refer...
Owner Guide 1st Printing
Page 309
... Your Vehicle for Inspection/Maintenance (I/M) Testing In some localities it may become a legal requirement to pass an Inspection/Maintenance (I/M) test of the following lights frequently: s headlamps s tail lamps s brakelamps s hazard flasher s turn signals s license plate lamps s fog lamps 310 Lights It is required to complete the check of the OBD II...
... Your Vehicle for Inspection/Maintenance (I/M) Testing In some localities it may become a legal requirement to pass an Inspection/Maintenance (I/M) test of the following lights frequently: s headlamps s tail lamps s brakelamps s hazard flasher s turn signals s license plate lamps s fog lamps 310 Lights It is required to complete the check of the OBD II...
Owner Guide 1st Printing
Page 310
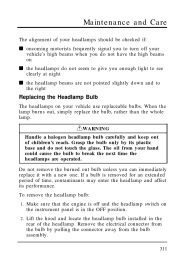
... the whole lamp. The oil from the bulb assembly. 311 If a bulb is removed for an extended period of time, contaminants may enter the headlamp and affect its plastic base and do not seem to give you can immediately replace it with a new one. Remove the electrical connector from the... bulb by its performance. RWARNING Handle a halogen headlamp bulb carefully and keep out of children's reach. Do not remove the burned out bulb unless you enough light to see clearly at night s the...
... the whole lamp. The oil from the bulb assembly. 311 If a bulb is removed for an extended period of time, contaminants may enter the headlamp and affect its plastic base and do not seem to give you can immediately replace it with a new one. Remove the electrical connector from the... bulb by its performance. RWARNING Handle a halogen headlamp bulb carefully and keep out of children's reach. Do not remove the burned out bulb unless you enough light to see clearly at night s the...
Owner Guide 1st Printing
Page 311
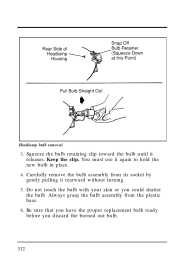
You must use it rearward without turning. 5. Carefully remove the bulb assembly from the plastic base. 6. Be sure that you have the proper replacement bulb ready before you could shatter the bulb. Always grasp the bulb assembly from its socket by gently pulling it again to hold the new bulb in place. 4. Keep the clip. Do not touch the bulb with your skin or you discard the burned out bulb. 312 Headlamp bulb removal 3. Squeeze the bulb retaining clip toward the bulb until it releases.
You must use it rearward without turning. 5. Carefully remove the bulb assembly from the plastic base. 6. Be sure that you have the proper replacement bulb ready before you could shatter the bulb. Always grasp the bulb assembly from its socket by gently pulling it again to hold the new bulb in place. 4. Keep the clip. Do not touch the bulb with your skin or you discard the burned out bulb. 312 Headlamp bulb removal 3. Squeeze the bulb retaining clip toward the bulb until it releases.
Owner Guide 1st Printing
Page 312
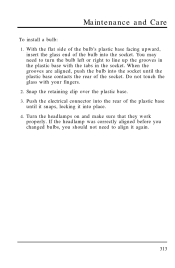
... touch the glass with the tabs in the plastic base with your fingers. 2. When the grooves are aligned, push the bulb into place. 4. Turn the headlamps on and make sure that they work properly. Maintenance and Care To install a bulb: 1. With the flat side of the bulb's plastic base facing upward... rear of the plastic base until the plastic base contacts the rear of the socket. Snap the retaining clip over the plastic base. 3. If the headlamp was correctly aligned before you changed bulbs, you should not need to turn the bulb left or right to align it into the socket until...
... touch the glass with the tabs in the plastic base with your fingers. 2. When the grooves are aligned, push the bulb into place. 4. Turn the headlamps on and make sure that they work properly. Maintenance and Care To install a bulb: 1. With the flat side of the bulb's plastic base facing upward... rear of the plastic base until the plastic base contacts the rear of the socket. Snap the retaining clip over the plastic base. 3. If the headlamp was correctly aligned before you changed bulbs, you should not need to turn the bulb left or right to align it into the socket until...
Owner Guide 1st Printing
Page 350
... . . servicing ...when storing your vehicle ... 360 Anti-theft system arming the system ...description ...disarming an untriggered system ...disarming a triggered system ...triggering ...warning light ...Appeals (see Headlamps) ...Autolock ...Automatic transaxle driving with ...fluid, adding ...fluid, checking ...fluid, refill capacities ...fluid, specification... ... ... ... ... ... ... . 132 . 132 . 133 . 134 132-133 . . 27 . 334 . 331 . . 29 . 104...
... . . servicing ...when storing your vehicle ... 360 Anti-theft system arming the system ...description ...disarming an untriggered system ...disarming a triggered system ...triggering ...warning light ...Appeals (see Headlamps) ...Autolock ...Automatic transaxle driving with ...fluid, adding ...fluid, checking ...fluid, refill capacities ...fluid, specification... ... ... ... ... ... ... . 132 . 132 . 133 . 134 132-133 . . 27 . 334 . 331 . . 29 . 104...