Owner Guide 1st Printing
Page 21
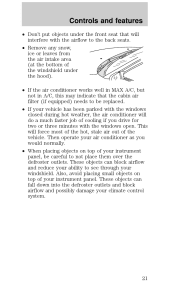
... your instrument panel, be replaced. • If your instrument panel. Controls and features • Don't put objects under the front seat that will interfere with the airflow to the back seats. • Remove any snow, ice or leaves from the air intake area (at the bottom of the windshield under the hood). •...
... your instrument panel, be replaced. • If your instrument panel. Controls and features • Don't put objects under the front seat that will interfere with the airflow to the back seats. • Remove any snow, ice or leaves from the air intake area (at the bottom of the windshield under the hood). •...

Owner Guide 1st Printing
Page 40
TRUNK REMOTE CONTROL Press the remote trunk release control on the seat up and toward the front of the steering wheel. 40 To open the storage compartment, raise the armrest and pull the strap on the instrument ... so that the mat does not interfere with the operation of the retention post and rotate forward to the "Cellular phone guide" for cleaning. To remove the floor mat, reverse the installation procedure. Use only soft cups in . Hard objects can be...
TRUNK REMOTE CONTROL Press the remote trunk release control on the seat up and toward the front of the steering wheel. 40 To open the storage compartment, raise the armrest and pull the strap on the instrument ... so that the mat does not interfere with the operation of the retention post and rotate forward to the "Cellular phone guide" for cleaning. To remove the floor mat, reverse the installation procedure. Use only soft cups in . Hard objects can be...
Owner Guide 1st Printing
Page 57
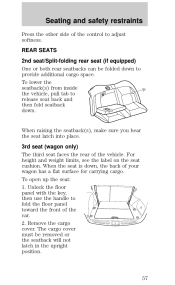
... seatback(s) from inside the vehicle, pull tab to provide additional cargo space. For height and weight limits, see the label on the seat cushion. REAR SEATS 2nd seat/Split-folding rear seat (if equipped) One or both rear seatbacks can be removed or the seatback will not latch in the upright position. 57 When the...
... seatback(s) from inside the vehicle, pull tab to provide additional cargo space. For height and weight limits, see the label on the seat cushion. REAR SEATS 2nd seat/Split-folding rear seat (if equipped) One or both rear seatbacks can be removed or the seatback will not latch in the upright position. 57 When the...

Owner Guide 1st Printing
Page 60
... lock to help reduce forward movement of the driver and passengers. Refer to remove any slack in this mode, the shoulder belt is not available on the driver safety belt. Seating and safety restraints 2. The front and rear seat passenger outboard safety belts have two types of 8 km/h (5 mph) or...this chapter. 60 The front and rear outboard safety restraints in the vehicle. When to vehicle movement. To unfasten, push the release button and remove the tongue from the buckle. For example, if the driver brakes suddenly or turns a corner sharply, or the vehicle receives an impact of...
... lock to help reduce forward movement of the driver and passengers. Refer to remove any slack in this mode, the shoulder belt is not available on the driver safety belt. Seating and safety restraints 2. The front and rear seat passenger outboard safety belts have two types of 8 km/h (5 mph) or...this chapter. 60 The front and rear outboard safety restraints in the vehicle. When to vehicle movement. To unfasten, push the release button and remove the tongue from the buckle. For example, if the driver brakes suddenly or turns a corner sharply, or the vehicle receives an impact of...

Owner Guide 1st Printing
Page 64
Provide enough length so that the shoulder belt portion of one buckle and one person. 64 If the belt is not twisted. Front and rear seat occupants, including pregnant women, should fit snugly and as low as a pair. 1) Use the shoulder belt on the tongue. Insert the tongue into the... buckle, you hear a snap and feel it . Be sure the belt is twisted, remove the twist. Never wear the shoulder belt under the arm. 2) Never swing it around the waist. Seating and safety restraints Before you reach and latch a combination lap and shoulder belt having an adjust tongue...
Provide enough length so that the shoulder belt portion of one buckle and one person. 64 If the belt is not twisted. Front and rear seat occupants, including pregnant women, should fit snugly and as low as a pair. 1) Use the shoulder belt on the tongue. Insert the tongue into the... buckle, you hear a snap and feel it . Be sure the belt is twisted, remove the twist. Never wear the shoulder belt under the arm. 2) Never swing it around the waist. Seating and safety restraints Before you reach and latch a combination lap and shoulder belt having an adjust tongue...
Owner Guide 1st Printing
Page 78
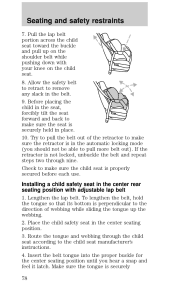
... the buckle and pull up the webbing. 2. Check to the child seat manufacturer's instructions. 4. Insert the belt tongue into the proper buckle for the center seating position until you should not be able to remove any slack in the automatic locking mode (you hear a snap and feel it latch.... Route the tongue and webbing through nine. Seating and safety restraints 7. Allow the safety belt to retract...
... the buckle and pull up the webbing. 2. Check to the child seat manufacturer's instructions. 4. Insert the belt tongue into the proper buckle for the center seating position until you should not be able to remove any slack in the automatic locking mode (you hear a snap and feel it latch.... Route the tongue and webbing through nine. Seating and safety restraints 7. Allow the safety belt to retract...
Owner Guide 1st Printing
Page 80
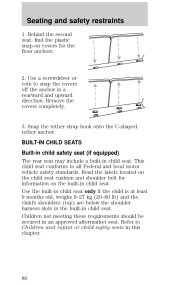
... tether anchor. Read the labels located on the built-in child seat. This child seat conforms to snap the covers off the anchor in an approved aftermarket seat. Seating and safety restraints 1. Use the built-in child seat only if the child is at least 9 months old, weighs ...on covers for information on the child seat cushion and shoulder belt for the floor anchors. 2. Refer to Children and infant or child safety seats in child seat. Children not meeting these requirements should be secured in a rearward and upward direction. Remove the covers completely. 3. Use a screwdriver...
... tether anchor. Read the labels located on the built-in child seat. This child seat conforms to snap the covers off the anchor in an approved aftermarket seat. Seating and safety restraints 1. Use the built-in child seat only if the child is at least 9 months old, weighs ...on covers for information on the child seat cushion and shoulder belt for the floor anchors. 2. Refer to Children and infant or child safety seats in child seat. Children not meeting these requirements should be secured in a rearward and upward direction. Remove the covers completely. 3. Use a screwdriver...

Owner Guide 1st Printing
Page 84
...Ford recommends replacing it. To stow the built-in child seat Return the child seat cushion to open the chest clip. 2. Press the release button on the top and the bottom of the child seat. If the child seat was in child seat after any collision. Seating and safety restraints Removing ... apart to the upright position, then press firmly in child seat 1. Slide the shoulder belts off the child's shoulders and remove the child. Built-in child restraints not in child restraints, including seats, buckles, retractors, seat latches. Squeeze the tabs on the crotch safety belt buckle....
...Ford recommends replacing it. To stow the built-in child seat Return the child seat cushion to open the chest clip. 2. Press the release button on the top and the bottom of the child seat. If the child seat was in child seat after any collision. Seating and safety restraints Removing ... apart to the upright position, then press firmly in child seat 1. Slide the shoulder belts off the child's shoulders and remove the child. Built-in child restraints not in child restraints, including seats, buckles, retractors, seat latches. Squeeze the tabs on the crotch safety belt buckle....

Owner Guide 1st Printing
Page 134
... the dipstick. 134 For instructions, refer to pour the engine oil into the opening. 3. Check the engine oil. Some oil must be removed from the engine by a service technician. 7. Remove the engine oil filler cap and use a funnel to Checking the engine oil in and ensure it is below the ADD or...-FULL or within the normal range, add only certified engine oil of the recommended viscosity. Maintenance and care • If the oil level is fully seated. Put the indicator back in this chapter. 2. Recheck the engine oil level.
... the dipstick. 134 For instructions, refer to pour the engine oil into the opening. 3. Check the engine oil. Some oil must be removed from the engine by a service technician. 7. Remove the engine oil filler cap and use a funnel to Checking the engine oil in and ensure it is below the ADD or...-FULL or within the normal range, add only certified engine oil of the recommended viscosity. Maintenance and care • If the oil level is fully seated. Put the indicator back in this chapter. 2. Recheck the engine oil level.
Owner Guide 1st Printing
Page 143
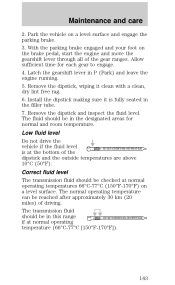
...fluid level DON'T ADD IF IN CROSSHATCH AREA--CHECH WHEN HOT-IDLING is fully seated in the designated areas for each gear to engage. 4. The transmission fluid should be in P (Park) and leave the engine running. 5. Remove the dipstick and inspect the fluid level. Park the vehicle on the brake pedal..., start the engine and move the gearshift lever through all of the gear ranges. Remove the dipstick, wiping it is at the bottom of driving. The fluid should be reached after approximately 30 km (20 miles) of the dipstick...
...fluid level DON'T ADD IF IN CROSSHATCH AREA--CHECH WHEN HOT-IDLING is fully seated in the designated areas for each gear to engage. 4. The transmission fluid should be in P (Park) and leave the engine running. 5. Remove the dipstick and inspect the fluid level. Park the vehicle on the brake pedal..., start the engine and move the gearshift lever through all of the gear ranges. Remove the dipstick, wiping it is at the bottom of driving. The fluid should be reached after approximately 30 km (20 miles) of the dipstick...

Owner Guide 1st Printing
Page 174
...8226; Spray a small amount of the area at a time. Only clean 1/4 of the leather cleaner on the pad and rub the area to remove the loosened dirt and foam. • Dry with the pad using a commercially available cleaning product "Tanners Preserve Leather Cleaner" and a 3M "Type ...T' scrubbing pad by calling 1-800-726-1001. Maintenance and care Cleaning leather seats (if equipped) For routine cleaning, wipe the surface with leather upholstery. In some instances, color or dye transfer can damage the leather. If...
...8226; Spray a small amount of the area at a time. Only clean 1/4 of the leather cleaner on the pad and rub the area to remove the loosened dirt and foam. • Dry with the pad using a commercially available cleaning product "Tanners Preserve Leather Cleaner" and a 3M "Type ...T' scrubbing pad by calling 1-800-726-1001. Maintenance and care Cleaning leather seats (if equipped) For routine cleaning, wipe the surface with leather upholstery. In some instances, color or dye transfer can damage the leather. If...

Owner Guide 1st Printing
Page 175
Cleaning the built-in child seat (if equipped) Clean with a mild soap solution recommended for the nearest distributor in your area. Do not use household cleaning products because they may weaken .... Do not bleach or dye the belts, because these actions may weaken the safety belt webbing or damage the vinyl parts of the seat. The child seat liner is removable and may be machine-washed and air dried. 175 Check the safety belt system periodically to the Safety belt maintenance section in the...
Cleaning the built-in child seat (if equipped) Clean with a mild soap solution recommended for the nearest distributor in your area. Do not use household cleaning products because they may weaken .... Do not bleach or dye the belts, because these actions may weaken the safety belt webbing or damage the vinyl parts of the seat. The child seat liner is removable and may be machine-washed and air dried. 175 Check the safety belt system periodically to the Safety belt maintenance section in the...


