Customer Assistance Guide 1st Printing
Page 11
Ford accessories for your vehicle Framed luggage covers Heavy-duty battery Neutral towing transfer case kit (Explorer only) Off road lights Pickup box rails Removable luggage ... Bed mat/bedliner tailgate covers Bed mats Bedliners Car/truck covers Cargo liners, interior Carpet floor mats Cleaners, waxes and polishes Flat splash guards Front end covers (full and mini) Hood/bag deflectors Locking gas cap 11
Ford accessories for your vehicle Framed luggage covers Heavy-duty battery Neutral towing transfer case kit (Explorer only) Off road lights Pickup box rails Removable luggage ... Bed mat/bedliner tailgate covers Bed mats Bedliners Car/truck covers Cargo liners, interior Carpet floor mats Cleaners, waxes and polishes Flat splash guards Front end covers (full and mini) Hood/bag deflectors Locking gas cap 11
Owner Guide 1st Printing
Page 28
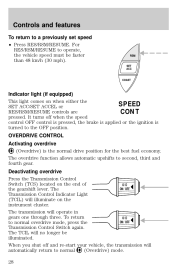
... re-start your vehicle, the transmission will illuminate on the instrument cluster. RSM SET ACC COAST Indicator light (if equipped) This light comes on the end of O/D ON/OFF the gearshift lever. When you shut off when the speed control OFF control is pressed, the brake is applied or the ignition...
... re-start your vehicle, the transmission will illuminate on the instrument cluster. RSM SET ACC COAST Indicator light (if equipped) This light comes on the end of O/D ON/OFF the gearshift lever. When you shut off when the speed control OFF control is pressed, the brake is applied or the ignition...

Owner Guide 1st Printing
Page 29
... to Hazard lights control in the Roadside emergencies chapter. Never adjust the steering wheel when the vehicle is moving. HAZARD FLASHER For information on the end of varying length are for a longer wash cycle. 29 WINDSHIELD WIPER/WASHER CONTROLS Rotate the windshield wiper control to the desired interval, low or high...
... to Hazard lights control in the Roadside emergencies chapter. Never adjust the steering wheel when the vehicle is moving. HAZARD FLASHER For information on the end of varying length are for a longer wash cycle. 29 WINDSHIELD WIPER/WASHER CONTROLS Rotate the windshield wiper control to the desired interval, low or high...
Owner Guide 1st Printing
Page 44
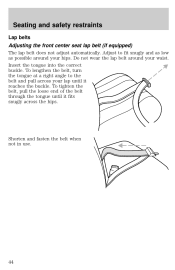
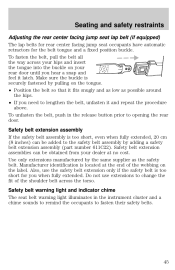
To lengthen the belt, turn the tongue at a right angle to fit snugly and as low as possible around your lap until it reaches the buckle. Insert the tongue into the correct buckle. To tighten the belt, pull the loose end of the belt through the tongue until it fits snugly across your waist. Shorten and fasten the belt when not in use. 44 Adjust to the belt and pull across the hips. Do not wear the lap belt around your hips. Seating and safety restraints Lap belts Adjusting the front center seat lap belt (if equipped) The lap belt does not adjust automatically.
To lengthen the belt, turn the tongue at a right angle to fit snugly and as low as possible around your lap until it reaches the buckle. Insert the tongue into the correct buckle. To tighten the belt, pull the loose end of the belt through the tongue until it fits snugly across your waist. Shorten and fasten the belt when not in use. 44 Adjust to the belt and pull across the hips. Do not wear the lap belt around your hips. Seating and safety restraints Lap belts Adjusting the front center seat lap belt (if equipped) The lap belt does not adjust automatically.
Owner Guide 1st Printing
Page 45
.... To fasten the belt, pull the belt all the way across your hips and insert the tongue into the buckle on your dealer at the end of the shoulder belt across the torso. Use only extensions manufactured by pulling on the label. Do not use the safety belt extension only if...
.... To fasten the belt, pull the belt all the way across your hips and insert the tongue into the buckle on your dealer at the end of the shoulder belt across the torso. Use only extensions manufactured by pulling on the label. Do not use the safety belt extension only if...
Owner Guide 1st Printing
Page 69
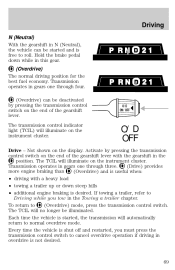
... TCIL will no longer be started and is useful when: • driving with the gearshift in the position. The TCIL will illuminate on the end of the gearshift lever with a heavy load • towing a trailer up or down while in this gear. (Overdrive) The normal driving position...OFF O/D OFF Drive - Driving N (Neutral) With the gearshift in N (Neutral), the vehicle can be deactivated by pressing the transmission control switch on the end of the gearshift lever. The transmission control indicator light (TCIL) will illuminate on the display. Each time the vehicle is desired.
... TCIL will no longer be started and is useful when: • driving with the gearshift in the position. The TCIL will illuminate on the end of the gearshift lever with a heavy load • towing a trailer up or down while in this gear. (Overdrive) The normal driving position...OFF O/D OFF Drive - Driving N (Neutral) With the gearshift in N (Neutral), the vehicle can be deactivated by pressing the transmission control switch on the end of the gearshift lever. The transmission control indicator light (TCIL) will illuminate on the display. Each time the vehicle is desired.
Owner Guide 1st Printing
Page 71
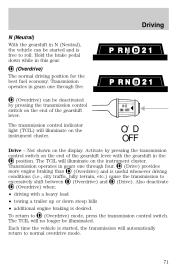
... on the instrument cluster. Driving N (Neutral) With the gearshift in N (Neutral), the vehicle can be illuminated. Activate by pressing the transmission control switch on the end of the gearshift lever with a heavy load • towing a trailer up or down while in gears one through five. (Overdrive) can be started , the transmission... the vehicle is useful whenever driving conditions (i.e., city traffic, hilly terrain, etc.) cause the transmission to roll. O/D ON/OFF O/D OFF Drive - Not shown on the end of the gearshift lever.
... on the instrument cluster. Driving N (Neutral) With the gearshift in N (Neutral), the vehicle can be illuminated. Activate by pressing the transmission control switch on the end of the gearshift lever with a heavy load • towing a trailer up or down while in gears one through five. (Overdrive) can be started , the transmission... the vehicle is useful whenever driving conditions (i.e., city traffic, hilly terrain, etc.) cause the transmission to roll. O/D ON/OFF O/D OFF Drive - Not shown on the end of the gearshift lever.
Owner Guide 1st Printing
Page 103
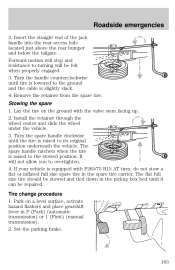
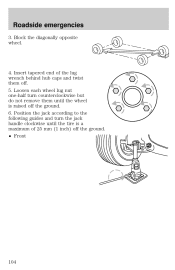
Insert the straight end of the jack handle into the rear access hole located just above the rear bumper and below the tailgate. Install the retainer through the wheel ...
Insert the straight end of the jack handle into the rear access hole located just above the rear bumper and below the tailgate. Install the retainer through the wheel ...
Owner Guide 1st Printing
Page 104
Position the jack according to the following guides and turn counterclockwise but do not remove them off. 5. Block the diagonally opposite wheel. 4. Loosen each wheel lug nut one-half turn the jack handle clockwise until the wheel is a maximum of the lug wrench behind hub caps and twist them until the tire is raised off the ground. • Front 104 Insert tapered end of 25 mm (1 inch) off the ground. 6. Roadside emergencies 3.
Position the jack according to the following guides and turn counterclockwise but do not remove them off. 5. Block the diagonally opposite wheel. 4. Loosen each wheel lug nut one-half turn the jack handle clockwise until the wheel is a maximum of the lug wrench behind hub caps and twist them until the tire is raised off the ground. • Front 104 Insert tapered end of 25 mm (1 inch) off the ground. 6. Roadside emergencies 3.
Owner Guide 1st Printing
Page 107
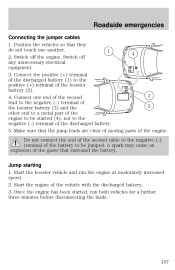
Connect one another. 1 4 2. Do not connect the end of the second cable to the negative (-) terminal of the battery to the negative (-) terminal of the engine to be started , run the engine at ... emergencies Connecting the jumper cables 1. Make sure that the jump leads are clear of moving parts of the gases that they do not touch one end of the second lead to the negative (-) terminal of 2 the booster battery (3) and the other...
Connect one another. 1 4 2. Do not connect the end of the second cable to the negative (-) terminal of the battery to the negative (-) terminal of the engine to be started , run the engine at ... emergencies Connecting the jumper cables 1. Make sure that the jump leads are clear of moving parts of the gases that they do not touch one end of the second lead to the negative (-) terminal of 2 the booster battery (3) and the other...
Owner Guide 1st Printing
Page 141
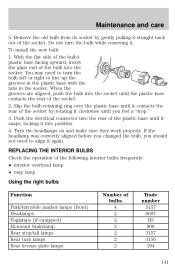
... lamps (front) Headlamps Foglamps (if equipped) Hi-mount brakelamp Rear stop ." 3. With the flat side of the bulb's plastic base facing upward, insert the glass end of the socket. 2. When the grooves are aligned, push the bulb into the socket until it snaps, locking it . You may need to align it...
... lamps (front) Headlamps Foglamps (if equipped) Hi-mount brakelamp Rear stop ." 3. With the flat side of the bulb's plastic base facing upward, insert the glass end of the socket. 2. When the grooves are aligned, push the bulb into the socket until it snaps, locking it . You may need to align it...

