Owner Guide 1st Printing
Page 4
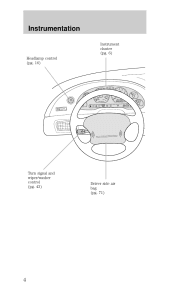
Instrumentation Instrument cluster (pg. 6) Headlamp control (pg. 16) 60 70 80 90 100 2 1 0 3 4 RPMX1000 5 6 7 L H 50 40 C H 30 20 60 40 120 140 110 100 160 80 180 120 200 220 240 km/h 130 140 20 MPH FUEL DOOR 10 E F 150 SELECT/RESET 8 L ABS BRAKE P ! 0 0 0 0 0 0 .0 H AIR THEFT BAG REAR DEF SERVICE ENGINE SOON LOW FUEL O/D OFF HI LO OFF Turn signal and wiper/washer control (pg. 43) Driver side air bag (pg. 71) 4
Instrumentation Instrument cluster (pg. 6) Headlamp control (pg. 16) 60 70 80 90 100 2 1 0 3 4 RPMX1000 5 6 7 L H 50 40 C H 30 20 60 40 120 140 110 100 160 80 180 120 200 220 240 km/h 130 140 20 MPH FUEL DOOR 10 E F 150 SELECT/RESET 8 L ABS BRAKE P ! 0 0 0 0 0 0 .0 H AIR THEFT BAG REAR DEF SERVICE ENGINE SOON LOW FUEL O/D OFF HI LO OFF Turn signal and wiper/washer control (pg. 43) Driver side air bag (pg. 71) 4

Owner Guide 1st Printing
Page 7
..., continues to the ON position and the engine is turned ON. THEFT 7 For more information, refer to SecuriLock passive anti-theft system in the Controls and features chapter. Instrumentation High beams Illuminates when the high beam headlamps are turned on , have the system serviced immediately.
..., continues to the ON position and the engine is turned ON. THEFT 7 For more information, refer to SecuriLock passive anti-theft system in the Controls and features chapter. Instrumentation High beams Illuminates when the high beam headlamps are turned on , have the system serviced immediately.

Owner Guide 1st Printing
Page 16
... be turned off • the parking brake is in a collision. 16 Failure to activate your headlamps under these conditions. Daytime running lamps (DRL) (if equipped) Turns the headlamps on with a reduced output. Controls and features HEADLAMP CONTROL • Pull the headlamp control toward you to the first position to turn on the parking lamps, tail lamps, license...
... be turned off • the parking brake is in a collision. 16 Failure to activate your headlamps under these conditions. Daytime running lamps (DRL) (if equipped) Turns the headlamps on with a reduced output. Controls and features HEADLAMP CONTROL • Pull the headlamp control toward you to the first position to turn on the parking lamps, tail lamps, license...
Owner Guide 1st Printing
Page 17
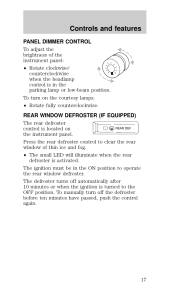
REAR WINDOW DEFROSTER (IF EQUIPPED) The rear defroster REAR DEF control is located on the courtesy lamps: • Rotate fully counterclockwise. To manually turn on the instrument panel. The ignition must be in the parking lamp ... fog. • The small LED will illuminate when the rear defroster is activated. Press the rear defroster control to clear the rear window of the instrument panel: • Rotate clockwise/ counterclockwise when the headlamp control is turned to operate the rear window defroster. The defroster turns off the defroster before ten minutes have...
REAR WINDOW DEFROSTER (IF EQUIPPED) The rear defroster REAR DEF control is located on the courtesy lamps: • Rotate fully counterclockwise. To manually turn on the instrument panel. The ignition must be in the parking lamp ... fog. • The small LED will illuminate when the rear defroster is activated. Press the rear defroster control to clear the rear window of the instrument panel: • Rotate clockwise/ counterclockwise when the headlamp control is turned to operate the rear window defroster. The defroster turns off the defroster before ten minutes have...
Owner Guide 1st Printing
Page 52
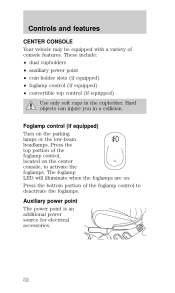
... These include: • dual cupholders • auxiliary power point • coin holder slots (if equipped) • foglamp control (if equipped) • convertible top control (if equipped) Use only soft cups in a collision. The foglamp LED will illuminate when the foglamps are on the parking lamps... or the low-beam headlamps. Press the bottom portion of console features. Foglamp control (if equipped) Turn on . Auxiliary power point The power point is an additional power source for electrical ...
... These include: • dual cupholders • auxiliary power point • coin holder slots (if equipped) • foglamp control (if equipped) • convertible top control (if equipped) Use only soft cups in a collision. The foglamp LED will illuminate when the foglamps are on the parking lamps... or the low-beam headlamps. Press the bottom portion of console features. Foglamp control (if equipped) Turn on . Auxiliary power point The power point is an additional power source for electrical ...
Owner Guide 1st Printing
Page 84
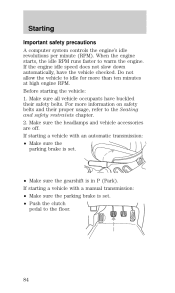
Make sure the headlamps and vehicle accessories are off. Starting Important safety precautions A computer system controls the engine's idle revolutions per minute (RPM). If starting a vehicle with a manual transmission: Make sure the parking brake is in P (Park). When the engine starts, ...
Make sure the headlamps and vehicle accessories are off. Starting Important safety precautions A computer system controls the engine's idle revolutions per minute (RPM). If starting a vehicle with a manual transmission: Make sure the parking brake is in P (Park). When the engine starts, ...

Owner Guide 1st Printing
Page 111
... 3 - 4 10A 5 6 7 8 9 10 11 12 13 14 15A 20A 15A 20A - 10A 15A - 15A - Description Cigar Lighter Engine Controls Not Used RH Low Beam Headlamp Instrument Cluster, Traction Control Switch Starter Motor Relay GEM, Interior Lamps Engine Controls Not Used LH Low Beam Headlamp Back-up Lamps Not Used Electronic Flasher Not Used 43 42 1 2 3 4 5 111
... 3 - 4 10A 5 6 7 8 9 10 11 12 13 14 15A 20A 15A 20A - 10A 15A - 15A - Description Cigar Lighter Engine Controls Not Used RH Low Beam Headlamp Instrument Cluster, Traction Control Switch Starter Motor Relay GEM, Interior Lamps Engine Controls Not Used LH Low Beam Headlamp Back-up Lamps Not Used Electronic Flasher Not Used 43 42 1 2 3 4 5 111
Owner Guide 1st Printing
Page 167
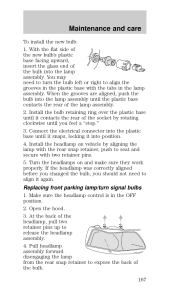
...seat and secure with the tabs in the OFF position. 2. If the headlamp was correctly aligned before you changed the bulb, you feel a "stop." 3. Make sure the headlamp control is in the lamp assembly. Pull headlamp assembly forward disengaging the lamp from the rear snap retainer to expose the back...Open the hood. 3. Connect the electrical connector into the lamp assembly. Replacing front parking lamp/turn the bulb left or right to release the headlamp assembly. 4. With the flat side of the new bulb's plastic base facing upward, insert the glass end of the bulb into the plastic...
...seat and secure with the tabs in the OFF position. 2. If the headlamp was correctly aligned before you changed the bulb, you feel a "stop." 3. Make sure the headlamp control is in the lamp assembly. Pull headlamp assembly forward disengaging the lamp from the rear snap retainer to expose the back...Open the hood. 3. Connect the electrical connector into the lamp assembly. Replacing front parking lamp/turn the bulb left or right to release the headlamp assembly. 4. With the flat side of the new bulb's plastic base facing upward, insert the glass end of the bulb into the plastic...

