
Owner's Manual
Page 75
Daytime Running Light System (Canadian vehicles only) The Daytime Running Light (DRL) system turns the high beam headlamps on dual rear door models. 72 This is turned on your headlamps at dusk. You can be turned on by rotating the headlamp switch knob. High-mount Brakelamp... The high-mount brakelamp is located above the rear window on liftgate models, and on the roof above the rear doors on , with a reduced light output, when: u The headlamp system is in a collision. Turn on or off. RWARNING The ...
Daytime Running Light System (Canadian vehicles only) The Daytime Running Light (DRL) system turns the high beam headlamps on dual rear door models. 72 This is turned on your headlamps at dusk. You can be turned on by rotating the headlamp switch knob. High-mount Brakelamp... The high-mount brakelamp is located above the rear window on liftgate models, and on the roof above the rear doors on , with a reduced light output, when: u The headlamp system is in a collision. Turn on or off. RWARNING The ...
Owner's Manual
Page 86
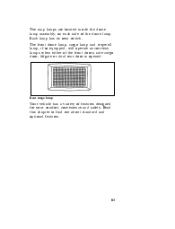
Rear cargo lamp Your vehicle has a variety of the dome lamp. The map lamps are located inside the dome lamp assembly, on each side of features designed for your comfort, convenience and safety. The front dome lamp, cargo lamp and stepwell lamp, if so equipped, will operate as courtesy lamps when either of the front doors, side cargo door, liftgate or dual rear door is opened. Read this chapter to find out about standard and optional features. 83 Each lamp has its own switch.
Rear cargo lamp Your vehicle has a variety of the dome lamp. The map lamps are located inside the dome lamp assembly, on each side of features designed for your comfort, convenience and safety. The front dome lamp, cargo lamp and stepwell lamp, if so equipped, will operate as courtesy lamps when either of the front doors, side cargo door, liftgate or dual rear door is opened. Read this chapter to find out about standard and optional features. 83 Each lamp has its own switch.
Owner's Manual
Page 88
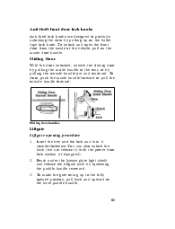
...outside handle out and rearward. Sliding Door With the door unlocked, unlatch the sliding door by pulling the outside handle forward. Reach under the license plate light shield and release the liftgate latch by pulling up to the rear, or by pulling the inside door handle. You can also unlock the... latch (but not release it counterclockwise. Anti-theft front door lock knobs Anti-theft lock knobs are designed to preclude unlocking the...
...outside handle out and rearward. Sliding Door With the door unlocked, unlatch the sliding door by pulling the outside handle forward. Reach under the license plate light shield and release the liftgate latch by pulling up to the rear, or by pulling the inside door handle. You can also unlock the... latch (but not release it counterclockwise. Anti-theft front door lock knobs Anti-theft lock knobs are designed to preclude unlocking the...
Owner's Manual
Page 90
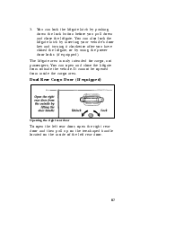
... The liftgate area is only intended for cargo, not passengers. It cannot be opened from outside the vehicle. You can open the right rear door and then pull up on the tee-shaped handle located on the inside the cargo area. You can lock the liftgate latch by pushing ... before you have closed the liftgate, or by inserting your vehicle's door key and turning it clockwise after you pull down and close the liftgate from inside of the left rear door. 87 3. Dual Rear Cargo Door (If equipped) Opening the right rear door To open the left rear door, open and close the liftgate.
... The liftgate area is only intended for cargo, not passengers. It cannot be opened from outside the vehicle. You can open the right rear door and then pull up on the tee-shaped handle located on the inside the cargo area. You can lock the liftgate latch by pushing ... before you have closed the liftgate, or by inserting your vehicle's door key and turning it clockwise after you pull down and close the liftgate from inside of the left rear door. 87 3. Dual Rear Cargo Door (If equipped) Opening the right rear door To open the left rear door, open and close the liftgate.
Owner's Manual
Page 91
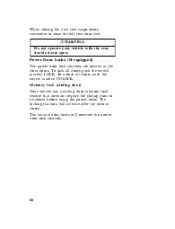
.... When closing the dual rear cargo doors, remember to be closed . Memory lock (sliding door) Your vehicle has a sliding door memory lock feature that does not require the sliding door to close the left rear door first. Power Door Locks (If equipped) The power door lock switches are located in the front doors. To lock all doors push the switch marked...
.... When closing the dual rear cargo doors, remember to be closed . Memory lock (sliding door) Your vehicle has a sliding door memory lock feature that does not require the sliding door to close the left rear door first. Power Door Locks (If equipped) The power door lock switches are located in the front doors. To lock all doors push the switch marked...
Owner's Manual
Page 92
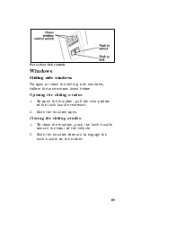
To close the sliding side windows, follow the instructions listed below. Power door lock controls Windows Sliding side windows To open or close the window, push the latch handle toward the front of the latch handle rearward. To open . Opening the sliding window 1. 2. 1. 2. Closing the sliding window 89 Slide the window open the window, pull the rear portion of the vehicle. Slide the window forward to engage the latch handle on the striker.
To close the sliding side windows, follow the instructions listed below. Power door lock controls Windows Sliding side windows To open or close the window, push the latch handle toward the front of the latch handle rearward. To open . Opening the sliding window 1. 2. 1. 2. Closing the sliding window 89 Slide the window open the window, pull the rear portion of the vehicle. Slide the window forward to engage the latch handle on the striker.
Owner's Manual
Page 94
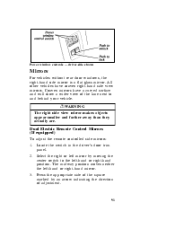
... appear smaller and farther away than they actually are. Select the right or left -hand or right-hand mirror. Locate the switch in the driver's door trim panel. All other vehicles have a curved surface and will show a wider view of the square marked by moving the center switch to and behind...
... appear smaller and farther away than they actually are. Select the right or left -hand or right-hand mirror. Locate the switch in the driver's door trim panel. All other vehicles have a curved surface and will show a wider view of the square marked by moving the center switch to and behind...
Owner's Manual
Page 161
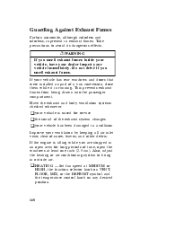
... other debris. Also, adjust the heating or air conditioning system to avoid its dangerous effects. If the engine is running. If your vehicle has rear windows and doors that were installed as part of a van conversion, close them while it is idling while you are stopped in an open area for service...
... other debris. Also, adjust the heating or air conditioning system to avoid its dangerous effects. If the engine is running. If your vehicle has rear windows and doors that were installed as part of a van conversion, close them while it is idling while you are stopped in an open area for service...
Owner's Manual
Page 181
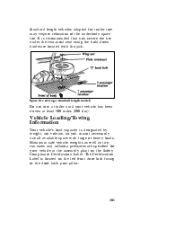
... cannot necessarily use all available space with the jack. The Certification Label is designated by weight, not volume, so you secure the tire under the rear-most seat using the hold-down hardware located with large or heavy loads. Vehicle Loading/Towing Information Your vehicle's load capacity is located on the... require relocation of the underbody spare tire. Standard length vehicles adapted for your vehicle has been driven at the assembly plant on the left front door lock facing or the door latch post pillar. 181
... cannot necessarily use all available space with the jack. The Certification Label is designated by weight, not volume, so you secure the tire under the rear-most seat using the hold-down hardware located with large or heavy loads. Vehicle Loading/Towing Information Your vehicle's load capacity is located on the... require relocation of the underbody spare tire. Standard length vehicles adapted for your vehicle has been driven at the assembly plant on the left front door lock facing or the door latch post pillar. 181
Owner's Manual
Page 260
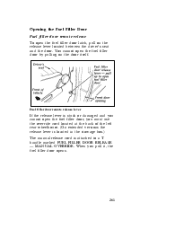
... pulling on the release lever located between the driver's seat and the door. When you must use the override cord located at the back of the left rear wheelhouse. (On extended versions the release lever is located in the stowage box.) The manual release cord is attached to a T handle ...marked FUEL FILLER DOOR RELEASE - MANUAL OVERRIDE. Opening the Fuel Filler Door Fuel filler door remote release To open the fuel filler...
... pulling on the release lever located between the driver's seat and the door. When you must use the override cord located at the back of the left rear wheelhouse. (On extended versions the release lever is located in the stowage box.) The manual release cord is attached to a T handle ...marked FUEL FILLER DOOR RELEASE - MANUAL OVERRIDE. Opening the Fuel Filler Door Fuel filler door remote release To open the fuel filler...
Owner's Manual
Page 275
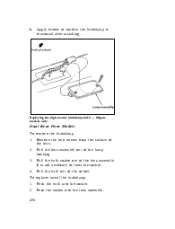
Pull the lens assembly out of the lens assembly. Pull the bulb socket out of the lamp housing. It is functional after installing. Replacing the high-mount brakelamp bulb - liftgate models only Dual Rear Door Models To remove the brakelamp: 1. 2. 3. 4. 1. 2. 276 Remove the two screws from the surface of the socket. Pull the bulb out of the lens. Apply brakes to confirm the brakelamp is not necessary to twist the socket. Push the bulb into the lens assembly. 6. Push the socket into the socket. To replace/install the brakelamp:
Pull the lens assembly out of the lens assembly. Pull the bulb socket out of the lamp housing. It is functional after installing. Replacing the high-mount brakelamp bulb - liftgate models only Dual Rear Door Models To remove the brakelamp: 1. 2. 3. 4. 1. 2. 276 Remove the two screws from the surface of the socket. Pull the bulb out of the lens. Apply brakes to confirm the brakelamp is not necessary to twist the socket. Push the bulb into the lens assembly. 6. Push the socket into the socket. To replace/install the brakelamp:
Owner's Manual
Page 276
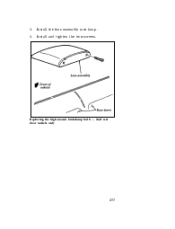
Replacing the high-mount brakelamp bulb - dual rear door models only 277 3. 4. Install and tighten the two screws. Install the lens assembly into lamp.
Replacing the high-mount brakelamp bulb - dual rear door models only 277 3. 4. Install and tighten the two screws. Install the lens assembly into lamp.

Owner's Manual
Page 283
... system u Fill fuel tank with a light grade oil. Re-wax as necessary when the vehicle is running. u Lubricate all rubber parts free from exterior surfaces, rear wheel housing and underside of vehicle storage (60 days or more), fuel may also clog small orifices. 284 u Keep all hood..., door and trunk lid hinges u Cover interior soft trim to prevent fading. Run at fast idle the gears while the engine is washed. and latches with ...
... system u Fill fuel tank with a light grade oil. Re-wax as necessary when the vehicle is running. u Lubricate all rubber parts free from exterior surfaces, rear wheel housing and underside of vehicle storage (60 days or more), fuel may also clog small orifices. 284 u Keep all hood..., door and trunk lid hinges u Cover interior soft trim to prevent fading. Run at fast idle the gears while the engine is washed. and latches with ...
Owner's Manual
Page 331
Electronic stereo cassette radio (see Towing) ...Dispute Settlement Board ...Doors door ajar warning light ...lubricant specifications...Driveline universal joint and slip yoke Driving under special conditions, heavy load ...72 ..... 248 . . 179 E Electrical system circuit breakers ...fuses ...operating when the engine is off . D Daytime running light system ...Defects, reporting ...Defrost, rear window ...Dipstick automatic transmission fluid ...engine oil ...power steering fluid...Disabled vehicle (see Electronic sound system) . . Electronic radio with cassette (see Electronic sound system)...
Electronic stereo cassette radio (see Towing) ...Dispute Settlement Board ...Doors door ajar warning light ...lubricant specifications...Driveline universal joint and slip yoke Driving under special conditions, heavy load ...72 ..... 248 . . 179 E Electrical system circuit breakers ...fuses ...operating when the engine is off . D Daytime running light system ...Defects, reporting ...Defrost, rear window ...Dipstick automatic transmission fluid ...engine oil ...power steering fluid...Disabled vehicle (see Electronic sound system) . . Electronic radio with cassette (see Electronic sound system)...
Customer Assistance Guide 1st Printing
Page 12
... addition, such systems may be damaged or their performance may be installed only by operating your vehicle. (Citizens band [CB] transceivers, garage door openers, and other transmitters with FCC or CRTC regulations and should be affected by a qualified service technician. • Mobile communications systems may ... your vehicle should comply with outputs of five watts or less will not ordinarily affect your vehicle's operation.) • Ford cannot assume responsibility for automotive use of the front or rear axle (GVWR or GAWR as two-way radios, telephones, and theft alarms -
... addition, such systems may be damaged or their performance may be installed only by operating your vehicle. (Citizens band [CB] transceivers, garage door openers, and other transmitters with FCC or CRTC regulations and should be affected by a qualified service technician. • Mobile communications systems may ... your vehicle should comply with outputs of five watts or less will not ordinarily affect your vehicle's operation.) • Ford cannot assume responsibility for automotive use of the front or rear axle (GVWR or GAWR as two-way radios, telephones, and theft alarms -
Warranty Guide 1st Printing
Page 30
... Bumper Warranty and may determine whether the ambulance manufacturer has followed Ford's recommendations by inspecting the information plate on the driver's rear door pillar. You may determine whether the vehicle is equipped with the Ford Ambulance Prep Package. Important information about ambulance conversions Ford vehicles are suitable for producing ambulances only if equipped with the...
... Bumper Warranty and may determine whether the ambulance manufacturer has followed Ford's recommendations by inspecting the information plate on the driver's rear door pillar. You may determine whether the vehicle is equipped with the Ford Ambulance Prep Package. Important information about ambulance conversions Ford vehicles are suitable for producing ambulances only if equipped with the...


