
Owner's Manual
Page 112
Be sure to support the left side to a 45 degree angle (see the following illustration) and lift the right side of the support screw. You can lower the tailgate completely. Doing so will allow for slack in the connector over the screw ...
Be sure to support the left side to a 45 degree angle (see the following illustration) and lift the right side of the support screw. You can lower the tailgate completely. Doing so will allow for slack in the connector over the screw ...

Owner's Manual
Page 122
... of your bucket seats backward. 1. 2. 3. 4. Pushing the seat back backward with the handle released returns the seat upright. 120 To return the seat back upright, lift the handle and lean forward. Reclining Bucket Seats You can tilt the seat back of an unoccupied seat will allow the seat back to fold... forward for access to the rear. Release the handle to the position you want. Lean against the back of the seat, lift the recliner handle up and hold it to lock the seat back in place.
... of your bucket seats backward. 1. 2. 3. 4. Pushing the seat back backward with the handle released returns the seat upright. 120 To return the seat back upright, lift the handle and lean forward. Reclining Bucket Seats You can tilt the seat back of an unoccupied seat will allow the seat back to fold... forward for access to the rear. Release the handle to the position you want. Lean against the back of the seat, lift the recliner handle up and hold it to lock the seat back in place.

Owner's Manual
Page 125
To do so, push up the latch button located at its lower rear corner. Lift the seat back latch at the top of the seat back. Seat back release RWARNING A seatback which is folded forward even a small degree may not ...
To do so, push up the latch button located at its lower rear corner. Lift the seat back latch at the top of the seat back. Seat back release RWARNING A seatback which is folded forward even a small degree may not ...

Owner's Manual
Page 126
... install a child seat in the stored position for easy access to the rear cab area. Raise the seat back to upright position. Clip support. 124 Lift the cushion to the upright position. Opening the center facing jump seat To restore the seat to a horizontal position. Swing the seat support away from...
... install a child seat in the stored position for easy access to the rear cab area. Raise the seat back to upright position. Clip support. 124 Lift the cushion to the upright position. Opening the center facing jump seat To restore the seat to a horizontal position. Swing the seat support away from...

Owner's Manual
Page 127
... seat assembly forward (180 degrees). Move the front seat forward if necessary. Grasp the seat bottom and pivot rearward (180 degrees). To fold the seat: 1. 2. Lift the seat back until it locks in the SuperCab forms a cargo floor when folded. Check to normal seating position: 1. 2. Pull the strap at the top...
... seat assembly forward (180 degrees). Move the front seat forward if necessary. Grasp the seat bottom and pivot rearward (180 degrees). To fold the seat: 1. 2. Lift the seat back until it locks in the SuperCab forms a cargo floor when folded. Check to normal seating position: 1. 2. Pull the strap at the top...

Owner's Manual
Page 128
... can prevent the seat from outside the vehicle.) 2. Continue to push the seat rearward to return it to unlock the slide mechanism and the seatback. Lift the seatback release lever on the outboard side of the vehicle. Push the seat backrest to its latched position. (This can be done from inside...
... can prevent the seat from outside the vehicle.) 2. Continue to push the seat rearward to return it to unlock the slide mechanism and the seatback. Lift the seatback release lever on the outboard side of the vehicle. Push the seat backrest to its latched position. (This can be done from inside...

Owner's Manual
Page 135
Visor vanity mirror Visors that are equipped with the lighted vanity mirror also have an auxiliary visor. Auxiliary sun visor 133 The auxiliary visor slides right and left to cover the windshield when the primary visor is pivoted to the door window. Illuminated Vanity Mirror (If equipped) Your vehicle may feature illuminated vanity mirrors on the lighted mirror by lifting the mirror door cover. You can turn on the sun visors.
Visor vanity mirror Visors that are equipped with the lighted vanity mirror also have an auxiliary visor. Auxiliary sun visor 133 The auxiliary visor slides right and left to cover the windshield when the primary visor is pivoted to the door window. Illuminated Vanity Mirror (If equipped) Your vehicle may feature illuminated vanity mirrors on the lighted mirror by lifting the mirror door cover. You can turn on the sun visors.
Owner's Manual
Page 140
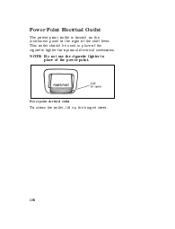
NOTE: Do not use the cigarette lighter in place of the cigarette lighter for optional electrical accessories. Power point electrical outlet To access the outlet, lift up the hinged cover. 138 Power Point Electrical Outlet The power point outlet is located on the instrument panel to the right of the power point. This outlet should be used in place of the shift lever.
NOTE: Do not use the cigarette lighter in place of the cigarette lighter for optional electrical accessories. Power point electrical outlet To access the outlet, lift up the hinged cover. 138 Power Point Electrical Outlet The power point outlet is located on the instrument panel to the right of the power point. This outlet should be used in place of the shift lever.
Owner's Manual
Page 174
... and to a complete stop , and then push it toward the instrument panel. Selection of the driveline. To securely latch the gearshift in a clockwise direction without lifting it toward you . RWARNING Always set the parking brake fully and make sure that the gearshift is in gear. 172 Upshifts from 1 (Low) can be...
... and to a complete stop , and then push it toward the instrument panel. Selection of the driveline. To securely latch the gearshift in a clockwise direction without lifting it toward you . RWARNING Always set the parking brake fully and make sure that the gearshift is in gear. 172 Upshifts from 1 (Low) can be...
Owner's Manual
Page 181
...) position, the engine and transmission are disconnected from turning. The gearshift is securely latched in P (Park) if you cannot rotate it in a clockwise direction without lifting it toward you shift into P (Park). P (Park) Always come to roll even if the automatic transmission is in P (Park) or the manual transmission is in...
...) position, the engine and transmission are disconnected from turning. The gearshift is securely latched in P (Park) if you cannot rotate it in a clockwise direction without lifting it toward you shift into P (Park). P (Park) Always come to roll even if the automatic transmission is in P (Park) or the manual transmission is in...

Owner's Manual
Page 254
... yourself when charging a battery, always shield your diesel-powered light truck. If this happens, you may die if you can explode if exposed to spill. Lift the battery with a carrier or with your hands on jump-starting your face and eyes. Make sure that you leave the lights on or any...
... yourself when charging a battery, always shield your diesel-powered light truck. If this happens, you may die if you can explode if exposed to spill. Lift the battery with a carrier or with your hands on jump-starting your face and eyes. Make sure that you leave the lights on or any...

Owner's Manual
Page 260
... through the channel keyhole. 2. 3. 259 At the same time pull the eyebolt toward the tire. Put the tapered end into the channel assembly tube and lift up the eyebolt eye with the channel slot, the eye toward the tube and push on the wrench. Line up on the wrench to pass...
... through the channel keyhole. 2. 3. 259 At the same time pull the eyebolt toward the tire. Put the tapered end into the channel assembly tube and lift up the eyebolt eye with the channel slot, the eye toward the tube and push on the wrench. Line up on the wrench to pass...

Owner's Manual
Page 261
... ball end bolt is balanced on the center bolt and tighten until the wheel is pushed all the way into the channel assembly tube and lift and line up the channel and eyebolt, so the shoulder of the wrench until the spare tire cannot be moved by hand pressure. Remove the...
... ball end bolt is balanced on the center bolt and tighten until the wheel is pushed all the way into the channel assembly tube and lift and line up the channel and eyebolt, so the shoulder of the wrench until the spare tire cannot be moved by hand pressure. Remove the...

Owner's Manual
Page 263
..., adjust the driver side channel ball end bolt and the eyebolt as necessary until the tire cannot be sure to Change the Tire NOTE: To lift your vehicle will not move or roll. RWARNING Make sure the spare tire and jacking equipment are changing. Remove the wood spacer before installing the...
..., adjust the driver side channel ball end bolt and the eyebolt as necessary until the tire cannot be sure to Change the Tire NOTE: To lift your vehicle will not move or roll. RWARNING Make sure the spare tire and jacking equipment are changing. Remove the wood spacer before installing the...

Owner's Manual
Page 265
... the vehicle slips off the jack, you or someone else could be prevented from moving when a rear wheel is lifted, even if the vehicle is in Park and the parking brake is being lifted. On F-Super Duty vehicles, the parking brake is on the radiator support. Be sure to block both directions...
... the vehicle slips off the jack, you or someone else could be prevented from moving when a rear wheel is lifted, even if the vehicle is in Park and the parking brake is being lifted. On F-Super Duty vehicles, the parking brake is on the radiator support. Be sure to block both directions...

Owner's Manual
Page 277
However, slingbelt towing is with flatbed or wheel lift equipment. On vehicles equipped with a rear valance panel instead of a rear bumper, do not tow the vehicle from the rear with an air dam, the towbar will deform the rubber air dam. The recommended method to have your vehicle towed, contact a professional towing service or, if you are a member, your vehicle is acceptable. On vehicles equipped with slingbelt equipment. 276 Towing Your Vehicle If you need to tow your roadside assistance center.
However, slingbelt towing is with flatbed or wheel lift equipment. On vehicles equipped with a rear valance panel instead of a rear bumper, do not tow the vehicle from the rear with an air dam, the towbar will deform the rubber air dam. The recommended method to have your vehicle towed, contact a professional towing service or, if you are a member, your vehicle is acceptable. On vehicles equipped with slingbelt equipment. 276 Towing Your Vehicle If you need to tow your roadside assistance center.

Owner's Manual
Page 303
The clock spring lift secures the hood at its fullest extent, a clock spring will assist you open the hood to the left. Hood release handle 304 While applying downward pressure on the hood, push the hood latch handle located behind the grille near the center front of the vehicle to its fullest height. 3. Opening the Hood 1. 2. As you and "snap" into position. Pull the hood release handle, located next to the parking brake pedal.
The clock spring lift secures the hood at its fullest extent, a clock spring will assist you open the hood to the left. Hood release handle 304 While applying downward pressure on the hood, push the hood latch handle located behind the grille near the center front of the vehicle to its fullest height. 3. Opening the Hood 1. 2. As you and "snap" into position. Pull the hood release handle, located next to the parking brake pedal.

Owner's Manual
Page 304
Always attempt to lift the hood after closing to maintain smooth operation. Hood and support NOTE: Be sure to oil the hood latch every six months to be sure it is securely latched. 305
Always attempt to lift the hood after closing to maintain smooth operation. Hood and support NOTE: Be sure to oil the hood latch every six months to be sure it is securely latched. 305
Owner's Manual
Page 343
... any of high speed driving during hot weather at/or above +90˚F (+30˚C). (1,600 km) per month. Lift the battery with a carrier or with your hands on the ends when lifting a battery could cause acid to spill. Transmission fluid, filter and seal assembly should be checked. u Towing a trailer for instance...
... any of high speed driving during hot weather at/or above +90˚F (+30˚C). (1,600 km) per month. Lift the battery with a carrier or with your hands on the ends when lifting a battery could cause acid to spill. Transmission fluid, filter and seal assembly should be checked. u Towing a trailer for instance...

Owner's Manual
Page 366
... gently pulling it clockwise until the plastic base contacts the rear of a turn the bulb left or right to hold the new bulb in place. Lift the hood and behind the headlamp remove the electrical connector by turning it 1/8 of the socket.
... gently pulling it clockwise until the plastic base contacts the rear of a turn the bulb left or right to hold the new bulb in place. Lift the hood and behind the headlamp remove the electrical connector by turning it 1/8 of the socket.
