Owner's Manual
Page 20
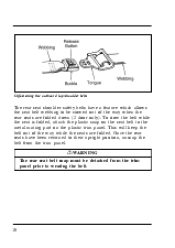
... the seat belt to their upright position, unsnap the belt from the trim panel prior to be stowed out of the way while the seats are folded down (2 door only). RWARNING The rear seat belt snap must be detached from the trim panel. This will keep the belt out of the way when the rear seats are folded. Once the rear seats have a feature which allows the seat belt webbing...
... the seat belt to their upright position, unsnap the belt from the trim panel prior to be stowed out of the way while the seats are folded down (2 door only). RWARNING The rear seat belt snap must be detached from the trim panel. This will keep the belt out of the way when the rear seats are folded. Once the rear seats have a feature which allows the seat belt webbing...
Owner's Manual
Page 21
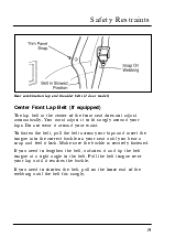
...fasten the belt, pull the belt across your hips. Safety Restraints Rear combination lap and shoulder belts (2 door model) Center Front Lap Belt (If equipped) The lap belt in the center of the webbing until the belt fits snugly. 19 If you need to fit snugly around your seat until it ...around your hips and insert the tongue into the correct buckle on the loose end of the front seat does not adjust automatically. You must adjust it to shorten the belt, pull on your waist. Pull the belt tongue over your lap until you need to lengthen the belt, unfasten it lock...
...fasten the belt, pull the belt across your hips. Safety Restraints Rear combination lap and shoulder belts (2 door model) Center Front Lap Belt (If equipped) The lap belt in the center of the webbing until the belt fits snugly. 19 If you need to fit snugly around your seat until it ...around your hips and insert the tongue into the correct buckle on the loose end of the front seat does not adjust automatically. You must adjust it to shorten the belt, pull on your waist. Pull the belt tongue over your lap until you need to lengthen the belt, unfasten it lock...
Owner's Manual
Page 29
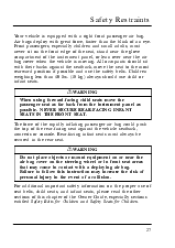
... air bag. For additional important safety information on the proper use the safety belts. The force of the rapidly inflating passenger air bag could push the top of the rear-facing seat against the seatback, move the passenger seat as far back from the instrument panel as possible. Children weighing less than the blink of the Owner Guide, especially sections entitled Safety Belts for Children and Safety Seats...
... air bag. For additional important safety information on the proper use the safety belts. The force of the rapidly inflating passenger air bag could push the top of the rear-facing seat against the seatback, move the passenger seat as far back from the instrument panel as possible. Children weighing less than the blink of the Owner Guide, especially sections entitled Safety Belts for Children and Safety Seats...
Owner's Manual
Page 70
... the engine runs. The key returns to test the brake warning light. If you have a manual transmission, you have a key release lever which allows you open the driver's door while the key is mounted on the floor or console. ON allows you to make sure they work before removing your vehicle has. Gearshift levers may be mounted on the steering column or on the column: 1. If your vehicle's warning lights (except the brake system warning light...
... the engine runs. The key returns to test the brake warning light. If you have a manual transmission, you have a key release lever which allows you open the driver's door while the key is mounted on the floor or console. ON allows you to make sure they work before removing your vehicle has. Gearshift levers may be mounted on the steering column or on the column: 1. If your vehicle's warning lights (except the brake system warning light...
Owner's Manual
Page 71
... key release button. 5. RWARNING Do not leave children, unreliable adults, or pets alone in your foot from the service brake. 4. Starting Your Explorer 3. They could quickly become high enough to cause severe and possibly fatal injuries to OFF. 3. If your vehicle's gearshift lever is latched in 1 (First). 2. Put the gearshift in P (Park) (automatic transmission) or 1 (First) (manual transmission). Turn the key to LOCK. 4. Turn the ignition key to LOCK. 6. Turn the ignition key...
... key release button. 5. RWARNING Do not leave children, unreliable adults, or pets alone in your foot from the service brake. 4. Starting Your Explorer 3. They could quickly become high enough to cause severe and possibly fatal injuries to OFF. 3. If your vehicle's gearshift lever is latched in 1 (First). 2. Put the gearshift in P (Park) (automatic transmission) or 1 (First) (manual transmission). Turn the key to LOCK. 4. Turn the ignition key to LOCK. 6. Turn the ignition key...
Owner's Manual
Page 72
... sure all the way). 70 See Guarding Against Exhaust Fumes in the vehicle buckle their safety belts. Only use the accelerator while you turn the key. (Remember, the starter will operate only if the clutch pedal is set before or during starting. If you have a manual transmission, make sure that the parking brake is fully set, push the clutch pedal to use the accelerator when...
... sure all the way). 70 See Guarding Against Exhaust Fumes in the vehicle buckle their safety belts. Only use the accelerator while you turn the key. (Remember, the starter will operate only if the clutch pedal is set before or during starting. If you have a manual transmission, make sure that the parking brake is fully set, push the clutch pedal to use the accelerator when...

Owner's Manual
Page 100
... in heavy traffic or on . Warnings, Distance Driven, Average Fuel Economy, Fuel Used, and your average fuel economy in the tank, the M/C and the service station fuel pump readings may disagree slightly. Warning Lights and Gauges Because of factors like rounding of numbers and fuel movement in miles/gallons or liters/kilometers. For example, you are the only features which respond to reset this figure...
... in heavy traffic or on . Warnings, Distance Driven, Average Fuel Economy, Fuel Used, and your average fuel economy in the tank, the M/C and the service station fuel pump readings may disagree slightly. Warning Lights and Gauges Because of factors like rounding of numbers and fuel movement in miles/gallons or liters/kilometers. For example, you are the only features which respond to reset this figure...
Owner's Manual
Page 167
... horn s disable the starting circuit to prevent the vehicle from being started Arming the System The system is ready to close. The THEFT indicator in the instrument panel will prevent draining of the following events will prearm the anti-theft system: s Pressing the remote entry transmitter LOCK button to lock the doors (with the doors open or closed ), or s Opening a door and pressing the power door lock...
... horn s disable the starting circuit to prevent the vehicle from being started Arming the System The system is ready to close. The THEFT indicator in the instrument panel will prevent draining of the following events will prearm the anti-theft system: s Pressing the remote entry transmitter LOCK button to lock the doors (with the doors open or closed ), or s Opening a door and pressing the power door lock...
Owner's Manual
Page 247
... release the brake pedal and use the accelerator as necessary. RWARNING DO NOT DRIVE YOUR VEHICLE UNTIL YOU VERIFY THAT THE BRAKELAMPS ARE WORKING. 247 If you need to position. This feature prevents you from shifting from P (Park) unless you cannot shift from position to shift out of P (Park) by using the alternate procedure described above, it one position clockwise (ignition in this Owner Guide...
... release the brake pedal and use the accelerator as necessary. RWARNING DO NOT DRIVE YOUR VEHICLE UNTIL YOU VERIFY THAT THE BRAKELAMPS ARE WORKING. 247 If you need to position. This feature prevents you from shifting from P (Park) unless you cannot shift from position to shift out of P (Park) by using the alternate procedure described above, it one position clockwise (ignition in this Owner Guide...
Owner's Manual
Page 254
... engine, transmission or clutch components. Disengage the clutch and use of stalling and gives your vehicle, apply the service brake pedal, and shift into N (Neutral) while still maintaining pressure on the brakes. Shifting at excessive speeds can result in motion. Set the parking brake fully. RWARNING Continued use the brake as vehicle rpm's are synchronized allowing you to lose power. The clutch pedal should be fully depressed when shifting. NOTE: Shifting...
... engine, transmission or clutch components. Disengage the clutch and use of stalling and gives your vehicle, apply the service brake pedal, and shift into N (Neutral) while still maintaining pressure on the brakes. Shifting at excessive speeds can result in motion. Set the parking brake fully. RWARNING Continued use the brake as vehicle rpm's are synchronized allowing you to lose power. The clutch pedal should be fully depressed when shifting. NOTE: Shifting...
Owner's Manual
Page 265
... engine braking power when slowing down a long or steep hill, shift to properly seat new brakes. This will increase your foot resting on the brake pedal with vehicle performance. Driving Your Explorer If Brakes Pull s Check tire pressure. Do not drive with different loads and driving conditions. It may be necessary to repeat this operation to roll while you steer properly. If pull occurs during the first 500 miles...
... engine braking power when slowing down a long or steep hill, shift to properly seat new brakes. This will increase your foot resting on the brake pedal with vehicle performance. Driving Your Explorer If Brakes Pull s Check tire pressure. Do not drive with different loads and driving conditions. It may be necessary to repeat this operation to roll while you steer properly. If pull occurs during the first 500 miles...
Owner's Manual
Page 270
... run the engine with one wheel off the ground, such as usual. NOTE: All rear axle lube quantities must drive through flooded areas unless you may overheat the 270 Otherwise, the lube should be replaced every 100,000 miles (160,000 km) or if the axle has been submerged in water, their fluids should not be checked or changed , if necessary. If your vehicle...
... run the engine with one wheel off the ground, such as usual. NOTE: All rear axle lube quantities must drive through flooded areas unless you may overheat the 270 Otherwise, the lube should be replaced every 100,000 miles (160,000 km) or if the axle has been submerged in water, their fluids should not be checked or changed , if necessary. If your vehicle...

Owner's Manual
Page 272
... your vehicle's engine, transmission, axle, brakes, tires and suspension. s Carefully and thoroughly prepare your vehicle for towing, making sure to use the right equipment and to attach it properly. (See Preparing to determine the specific towing capability of your vehicle. For your safety and for the good of trailer you tow in this chapter.) s Service your vehicle more frequently if you tow a trailer. (See Servicing your vehicle if you tow. Maximum safe vehicle weights...
... your vehicle's engine, transmission, axle, brakes, tires and suspension. s Carefully and thoroughly prepare your vehicle for towing, making sure to use the right equipment and to attach it properly. (See Preparing to determine the specific towing capability of your vehicle. For your safety and for the good of trailer you tow in this chapter.) s Service your vehicle more frequently if you tow a trailer. (See Servicing your vehicle if you tow. Maximum safe vehicle weights...
Owner's Manual
Page 290
... allow slack for safety chain attachment when towing with a strength rating of at least that of the safety chain rating. Connect the chain to one combination stop /turn light bulb (# 1157, 3157, 2357, or 3357) on most towed vehicles weighing over 1,500 lb (680 kg). When using a frame mounted trailer hitch, do not attach the safety chains to operate trailer stop /turn tail lamps. Safety Chains Located near the step bumper hitch ball position are two...
... allow slack for safety chain attachment when towing with a strength rating of at least that of the safety chain rating. Connect the chain to one combination stop /turn light bulb (# 1157, 3157, 2357, or 3357) on most towed vehicles weighing over 1,500 lb (680 kg). When using a frame mounted trailer hitch, do not attach the safety chains to operate trailer stop /turn tail lamps. Safety Chains Located near the step bumper hitch ball position are two...
Owner's Manual
Page 292
... vehicle will clear curbs or other obstructions. Trailer brakes should be approximately 10-15% of the trailer. After you have traveled about 50 miles (80 km) stop in engine cooling and air conditioner efficiency. Place your hitch and electrical connections. When stopped in P (Park) to increase the engine idle speed. This aids in a protected area and double-check your hand at the rear of your trailer to guide you...
... vehicle will clear curbs or other obstructions. Trailer brakes should be approximately 10-15% of the trailer. After you have traveled about 50 miles (80 km) stop in engine cooling and air conditioner efficiency. Place your hitch and electrical connections. When stopped in P (Park) to increase the engine idle speed. This aids in a protected area and double-check your hand at the rear of your trailer to guide you...
Owner's Manual
Page 355
... engine coolant concentration above 50%. Checking Hoses Inspect all coolant recycling processes produce coolant which you drive during winter months. Make whatever repairs or replacements that Ford and Lincoln-Mercury dealers use of used automotive fluids in the Index. Coolant refill capacity To find out how much fluid your vehicle's cooling system can hold, see Refill capacities for recycling and disposing of engine coolant and water in your community's regulations...
... engine coolant concentration above 50%. Checking Hoses Inspect all coolant recycling processes produce coolant which you drive during winter months. Make whatever repairs or replacements that Ford and Lincoln-Mercury dealers use of used automotive fluids in the Index. Coolant refill capacity To find out how much fluid your vehicle's cooling system can hold, see Refill capacities for recycling and disposing of engine coolant and water in your community's regulations...
Owner's Manual
Page 428
...21:09 1996 Engine (continued) starting ...starting after a collision ...storing your vehicle ...Engine block heater ...Engine coolant checking and adding ...checking hoses ...disposal ...drain and flush ...preparing for storage ...recovery reservoir...refill procedure ...specifications ...temperature gauge ...Engine coolant temperature gauge description ...mechanical ...Engine coolant temperature guage:electronic Engine fan ...Engine:idle speed control...Engine oil changing oil and oil filter ...checking and adding ...dipstick ...disposal ...engine oil pressure gauge ...filter, specifications...
...21:09 1996 Engine (continued) starting ...starting after a collision ...storing your vehicle ...Engine block heater ...Engine coolant checking and adding ...checking hoses ...disposal ...drain and flush ...preparing for storage ...recovery reservoir...refill procedure ...specifications ...temperature gauge ...Engine coolant temperature gauge description ...mechanical ...Engine coolant temperature guage:electronic Engine fan ...Engine:idle speed control...Engine oil changing oil and oil filter ...checking and adding ...dipstick ...disposal ...engine oil pressure gauge ...filter, specifications...
Owner's Manual
Page 430
...09 1996 Fuel cap removing...replacing ...Fuel filler door override, manual ...remote release ...Fuel filter, specifications . Gasoline (see Fuel economy) . . starting after a collision Fuse panels instrument panel ...power distribution box Fuses charts ...checking and replacing ...339 ...339, 341 ...340 . 339 . 405 . . 91 74 74 388 386 ... ...381, 388 ...388 G Gas cap (see Fuel cap) ...Gas mileage (see Fuel) ...Gauges, Electronic engine coolant temperature gauge fuel gauge ...odometer...speedometer ...Gauges, Mechanical battery voltage gauge ...charging system gauge ...engine coolant...
...09 1996 Fuel cap removing...replacing ...Fuel filler door override, manual ...remote release ...Fuel filter, specifications . Gasoline (see Fuel economy) . . starting after a collision Fuse panels instrument panel ...power distribution box Fuses charts ...checking and replacing ...339 ...339, 341 ...340 . 339 . 405 . . 91 74 74 388 386 ... ...381, 388 ...388 G Gas cap (see Fuel cap) ...Gas mileage (see Fuel) ...Gauges, Electronic engine coolant temperature gauge fuel gauge ...odometer...speedometer ...Gauges, Mechanical battery voltage gauge ...charging system gauge ...engine coolant...
Owner's Manual
Page 432
... File:unixx.ex Update:Thu Feb 29 09:21:09 1996 High beams indicator light ...operation...High-mount brakelamp, description . High-mount brakelamp:location ...Hitch...Hood latch location ...lubrication specifications ...release lever ...working under the hood...Horn ...Hoses, checking ... ... ... ... ... ... ... ... ... ...127, ... 91 136 134 134 289 335 406 335 334 140 355 318 I Identification Number, Vehicle (VIN) ...Idle relearning ...speed ...Ignition chime ...positions of components ...registers ...Integrated child seat (see Lights) . .
... File:unixx.ex Update:Thu Feb 29 09:21:09 1996 High beams indicator light ...operation...High-mount brakelamp, description . High-mount brakelamp:location ...Hitch...Hood latch location ...lubrication specifications ...release lever ...working under the hood...Horn ...Hoses, checking ... ... ... ... ... ... ... ... ... ...127, ... 91 136 134 134 289 335 406 335 334 140 355 318 I Identification Number, Vehicle (VIN) ...Idle relearning ...speed ...Ignition chime ...positions of components ...registers ...Integrated child seat (see Lights) . .
Owner's Manual
Page 438
... and air bags ...attaching with tether straps ...automatic locking mode (retractor) ...built-in child seat ...in front seat ...in rear outboard ...in rear seat ...tether anchorage hardware...Seat belts (see Safety restraints) ...Seats adjusting the seat, manual ...adjusting the seats, power ...child safety seats ...cleaning upholstery ...reclining the seat ...seatback release ...Serial number (VIN) ...Service concerns...Servicing your vehicle precautions when servicing ...servicing when you tow ...Shift-lock system ...Shift positions (see Gearshift) ...Shoulder and lap belts (see Moon roof...
... and air bags ...attaching with tether straps ...automatic locking mode (retractor) ...built-in child seat ...in front seat ...in rear outboard ...in rear seat ...tether anchorage hardware...Seat belts (see Safety restraints) ...Seats adjusting the seat, manual ...adjusting the seats, power ...child safety seats ...cleaning upholstery ...reclining the seat ...seatback release ...Serial number (VIN) ...Service concerns...Servicing your vehicle precautions when servicing ...servicing when you tow ...Shift-lock system ...Shift positions (see Gearshift) ...Shoulder and lap belts (see Moon roof...


