

Owners Manual
Page 5
... rear brake pedals 58 Main components and devices 60 E General 6 Warranty 6 Symbols 6 Useful information for safe riding 7 Carrying the maximum load allowed 8 Identification data 9 Position on the vehicle 60 Fuel tank plug 61 Seat latch 62 Side stand 63 Steering damper 64 Front fork adjusters 65 Rear shock absorber adjusters 67 Changing motorcycle track alignment 69 Directions for Streetfighter S) 81 Key-operated ignition switch and steering lock Lh switch 53 Clutch...
... rear brake pedals 58 Main components and devices 60 E General 6 Warranty 6 Symbols 6 Useful information for safe riding 7 Carrying the maximum load allowed 8 Identification data 9 Position on the vehicle 60 Fuel tank plug 61 Seat latch 62 Side stand 63 Steering damper 64 Front fork adjusters 65 Rear shock absorber adjusters 67 Changing motorcycle track alignment 69 Directions for Streetfighter S) 81 Key-operated ignition switch and steering lock Lh switch 53 Clutch...

Owners Manual
Page 6
... Changing the air filter 82 Checking and topping up coolant level 82 Checking brake and clutch fluid level 83 Checking brake pads for wear 85 Lubricating cables and joints 86 Adjusting throttle control free play 87 Charging the battery 88 Checking drive chain tension 89 Chain lubrication 90 Replacing the high and low beam bulbs 91 Rear turn indicators 92 Number plate light 92 Beam setting 93 Tubeless tyres 95 Checking engine oil...
... Changing the air filter 82 Checking and topping up coolant level 82 Checking brake and clutch fluid level 83 Checking brake pads for wear 85 Lubricating cables and joints 86 Adjusting throttle control free play 87 Charging the battery 88 Checking drive chain tension 89 Chain lubrication 90 Replacing the high and low beam bulbs 91 Rear turn indicators 92 Number plate light 92 Beam setting 93 Tubeless tyres 95 Checking engine oil...
Owners Manual
Page 8
... good time using the suitable turn off ; Should any body part and do not park the vehicle next to inflammable material (wood, leaves etc.). Park your clothing. Both rider and pillion passenger must ALWAYS wear a safety helmet. Never start or run the engine indoors. ALWAYS signal your motorcycle may lead to loss of vision. Be extremely careful not to inexperience. E Warning The exhaust system...
... good time using the suitable turn off ; Should any body part and do not park the vehicle next to inflammable material (wood, leaves etc.). Park your clothing. Both rider and pillion passenger must ALWAYS wear a safety helmet. Never start or run the engine indoors. ALWAYS signal your motorcycle may lead to loss of vision. Be extremely careful not to inexperience. E Warning The exhaust system...

Owners Manual
Page 29
... 2. If battery power is suddenly cut off (Batt-OFF), when battery power is restored and upon next Key-On, the backlighting setting is about 30% less than maximum power; Page 2 - If you press the reset button (14, fig. 6) for 3 seconds to maximum. E press "▲" press RESET for 3 sec. Backlighting setting (LIGHT SET) This function allows dashboard backlighting setting...
... 2. If battery power is suddenly cut off (Batt-OFF), when battery power is restored and upon next Key-On, the backlighting setting is about 30% less than maximum power; Page 2 - If you press the reset button (14, fig. 6) for 3 seconds to maximum. E press "▲" press RESET for 3 sec. Backlighting setting (LIGHT SET) This function allows dashboard backlighting setting...

Owners Manual
Page 36
... the Ducati Traction Control system. the level may then be activated (DTC OFF). If the engine suddenly stops or is switched off (Batt-OFF), when battery power is restored and upon next Key-On, the Traction Control will set the sensitivity level to 8; To enable Traction Control, enter the menu and set "DTC" to observe the manufacturer's routine maintenance schedule. E 35...
... the Ducati Traction Control system. the level may then be activated (DTC OFF). If the engine suddenly stops or is switched off (Batt-OFF), when battery power is restored and upon next Key-On, the Traction Control will set the sensitivity level to 8; To enable Traction Control, enter the menu and set "DTC" to observe the manufacturer's routine maintenance schedule. E 35...

Owners Manual
Page 39
...Warning The 8 DTC level settings have been calibrated using the same tyres as for 3 seconds; If DTC is starting to the initial display, with the same dimensions (rear = 190/55-17; In the case of different size to the original tyres may be activated (DTC OFF). the instrument panel... battery power is advisable to restore optimal system operation. The level of the system. The level setting will automatically quit this case is it may alter the operating characteristics of DTC sensitivity decreases in memory even after Key-Off. When level 1, 2 or 3 is selected the DTC control ...
...Warning The 8 DTC level settings have been calibrated using the same tyres as for 3 seconds; If DTC is starting to the initial display, with the same dimensions (rear = 190/55-17; In the case of different size to the original tyres may be activated (DTC OFF). the instrument panel... battery power is advisable to restore optimal system operation. The level of the system. The level setting will automatically quit this case is it may alter the operating characteristics of DTC sensitivity decreases in memory even after Key-Off. When level 1, 2 or 3 is selected the DTC control ...

Owners Manual
Page 47
... after the vehicle has covered 1 Km (0.6 miles) since turn indicator was activated. The device is enabled in three instances: - 1) When the key is turned from OFF to reduce current consumption from the battery, by automatically managing headlight switching-off and will be turned back on next time you start the engine. - 2) When the vehicle has been running with the headlights on and the engine is not started . If turn indicators...
... after the vehicle has covered 1 Km (0.6 miles) since turn indicator was activated. The device is enabled in three instances: - 1) When the key is turned from OFF to reduce current consumption from the battery, by automatically managing headlight switching-off and will be turned back on next time you start the engine. - 2) When the vehicle has been running with the headlights on and the engine is not started . If turn indicators...

Owners Manual
Page 48
...) The Owner receives a set of the fuel tank filler plug - start up the engine. open the lock of keys comprising: - 2 (BLACK) keys B These keys contain the "immobilizer system code". The immobilizer system For improved antitheft protection, the motorcycle is equipped with an IMMOBILIZER, an electronic system that inhibits engine operation whenever the ignition switch is turned on and changes every time. This signal is generated by a special antenna incorporated...
...) The Owner receives a set of the fuel tank filler plug - start up the engine. open the lock of keys comprising: - 2 (BLACK) keys B These keys contain the "immobilizer system code". The immobilizer system For improved antitheft protection, the motorcycle is equipped with an IMMOBILIZER, an electronic system that inhibits engine operation whenever the ignition switch is turned on and changes every time. This signal is generated by a special antenna incorporated...
Owners Manual
Page 73
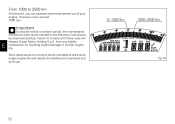
... overhauls and tune-ups. from any liability whatsoever for resulting engine damage or shorter engine life. Strict observance of running -in period, the maintenance and service rules recommended in recommendations will release Ducati Motor Holding S.p.A. However never exceed 7000 rpm. 0÷1000 Km 1000÷2500 Km Important During the whole running -in the Warranty Card should be observed carefully.
... overhauls and tune-ups. from any liability whatsoever for resulting engine damage or shorter engine life. Strict observance of running -in period, the maintenance and service rules recommended in recommendations will release Ducati Motor Holding S.p.A. However never exceed 7000 rpm. 0÷1000 Km 1000÷2500 Km Important During the whole running -in the Warranty Card should be observed carefully.

Owners Manual
Page 74
TYRE CONDITION Check tyre pressure and condition (page 95). Warning In case of malfunction, do not ride the motorcycle and contact a Ducati Dealer or authorised Service Center. CONTROLS Work the brake, clutch, throttle and gear change controls (levers, pedals and twistgrips) and check for proper operation. KEY-OPERATED LOCKS Ensure that fuel filler plug (page 61) and seat (page 62) are firmly secured. BRAKE AND CLUTCH FLUID Check fluid level in the correct position (page...
TYRE CONDITION Check tyre pressure and condition (page 95). Warning In case of malfunction, do not ride the motorcycle and contact a Ducati Dealer or authorised Service Center. CONTROLS Work the brake, clutch, throttle and gear change controls (levers, pedals and twistgrips) and check for proper operation. KEY-OPERATED LOCKS Ensure that fuel filler plug (page 61) and seat (page 62) are firmly secured. BRAKE AND CLUTCH FLUID Check fluid level in the correct position (page...
Owners Manual
Page 77
... to engine-brake first and then brake applying both brake lever and pedal for effective braking. Warning Use both brakes. To shift down, release the twistgrip, pull the clutch control lever, shortly speed up engine, by turning the throttle twistgrip and slightly releasing the clutch lever at a time and use brake controls harshly or violently or you may lead to help gears synchronise, shift down in a bend. Braking Slow down and release the clutch. Using...
... to engine-brake first and then brake applying both brake lever and pedal for effective braking. Warning Use both brakes. To shift down, release the twistgrip, pull the clutch control lever, shortly speed up engine, by turning the throttle twistgrip and slightly releasing the clutch lever at a time and use brake controls harshly or violently or you may lead to help gears synchronise, shift down in a bend. Braking Slow down and release the clutch. Using...

Owners Manual
Page 92
E 2 fig. 82 91 Replacing the high and low beam bulbs Before replacing a burnt-out bulb, make sure that the new one complies with voltage and wattage as specified in fig. 82 are the locations of the low beam bulb (LO) (1), high beam bulb (HI) and parking light bulb (2). 1 Headlight Important Have the high and low beam bulbs replaced by a Ducati Dealer or an authorised Service Centre. Always test the new lamp before refitting the parts you have removed. Shown in the section covering the Electric System for that lighting device (page 112).
E 2 fig. 82 91 Replacing the high and low beam bulbs Before replacing a burnt-out bulb, make sure that the new one complies with voltage and wattage as specified in fig. 82 are the locations of the low beam bulb (LO) (1), high beam bulb (HI) and parking light bulb (2). 1 Headlight Important Have the high and low beam bulbs replaced by a Ducati Dealer or an authorised Service Centre. Always test the new lamp before refitting the parts you have removed. Shown in the section covering the Electric System for that lighting device (page 112).

Owners Manual
Page 103
Change, if necessary Check steering bearings Check chain tension, alignment and lubrication Check clutch plates pack. Change, if necessary (1) Check the coolant level Change the coolant Check electric fan operation and cooling circuit sealing Check rear wheel flexible coupling Check wheel hub bearings Check light and warning devices Check tightening of intervention [set mileage (km/mi) or time interval *] Changing air filter Check throttle body synchronisation and idling (1) Check brake and clutch fluid level Change brake and clutch fluid mi. x1000 List of operations...
Change, if necessary Check steering bearings Check chain tension, alignment and lubrication Check clutch plates pack. Change, if necessary (1) Check the coolant level Change the coolant Check electric fan operation and cooling circuit sealing Check rear wheel flexible coupling Check wheel hub bearings Check light and warning devices Check tightening of intervention [set mileage (km/mi) or time interval *] Changing air filter Check throttle body synchronisation and idling (1) Check brake and clutch fluid level Change brake and clutch fluid mi. x1000 List of operations...

Owners Manual
Page 105
x1000 List of operations and type of intervention [set interval, whichever comes first (mileage or months) 1 0.6 6 E 104 Scheduled maintenance chart: operations to be performed by a dealer * Service on the set mileage (km/mi) or time interval *] mi. If necessary, have replacement performed by the customer Km. x1000 Months Check engine oil level Check brake and clutch fluid level Check tyre pressure and wear Check chain tension and lubrication Check brake pads.
x1000 List of operations and type of intervention [set interval, whichever comes first (mileage or months) 1 0.6 6 E 104 Scheduled maintenance chart: operations to be performed by a dealer * Service on the set mileage (km/mi) or time interval *] mi. If necessary, have replacement performed by the customer Km. x1000 Months Check engine oil level Check brake and clutch fluid level Check tyre pressure and wear Check chain tension and lubrication Check brake pads.

Owners Manual
Page 113
... no . Electric controls on remote control switch, fixed to left-hand side rear subframe (4, fig. 95). ELECTRONIC RECTIFIER, protected by a 30A fuse located on handlebar: Turn indicators: Front: bulb type: RY10W (12V-10W), AMBER Rear: bulb type: RY10W (12V-10W), AMBER Horn. Available colours Streetfighter E Ducati Anniversary red 473.101 (PPG); Lightweight "2 into 1 into 2" exhaust system, with EURO 3 emission regulations. parking light: LED (13.5V - 6.1W). Stop light switches. Two...
... no . Electric controls on remote control switch, fixed to left-hand side rear subframe (4, fig. 95). ELECTRONIC RECTIFIER, protected by a 30A fuse located on handlebar: Turn indicators: Front: bulb type: RY10W (12V-10W), AMBER Rear: bulb type: RY10W (12V-10W), AMBER Horn. Available colours Streetfighter E Ducati Anniversary red 473.101 (PPG); Lightweight "2 into 1 into 2" exhaust system, with EURO 3 emission regulations. parking light: LED (13.5V - 6.1W). Stop light switches. Two...

Owners Manual
Page 115
Warning Never use a fuse with a rating other than specified. Failure to observe this rule may damage the electric system or even lead to avoid possible short circuits. Important Have the fuse (4, fig. 95) replaced at a Ducati Dealer or authorised Service Center. Important E Switch the ignition key to OFF before replacing the fuse to fire. 4 fig. 95 5 5 WHOLE BURNT fig. 96 114 Fuse (4, fig. 95) protects the electronic regulator. A blown fuse is identified by the interrupted centre link (5, fig. 96).
Warning Never use a fuse with a rating other than specified. Failure to observe this rule may damage the electric system or even lead to avoid possible short circuits. Important Have the fuse (4, fig. 95) replaced at a Ducati Dealer or authorised Service Center. Important E Switch the ignition key to OFF before replacing the fuse to fire. 4 fig. 95 5 5 WHOLE BURNT fig. 96 114 Fuse (4, fig. 95) protects the electronic regulator. A blown fuse is identified by the interrupted centre link (5, fig. 96).

Owners Manual
Page 116
...) 22) 23) 24) 25) 26) 27) 28) 29) 30) Right switch Ignition switch LH fan RH fan Starter motor Solenoid starter Battery Regulator fuse Regulator Generator RH rear turn indicator Tail light Number plate light LH rear turn indicator Fuel tank Stepper motor Injection relay Self-diagnosis Horizontal cylinder coil Vertical cylinder coil Horizontal cylinder spark plug Vertical cylinder spark plug Horizontal cylinder injector 1 Vertical cylinder injector 1 Throttle position sensor Timing/rpm sensor Water temperature sensor Rear speed sensor Side stand Horn 31) 32) 33) 34) 35) 36) 37) 38) 39) 40) 41...
...) 22) 23) 24) 25) 26) 27) 28) 29) 30) Right switch Ignition switch LH fan RH fan Starter motor Solenoid starter Battery Regulator fuse Regulator Generator RH rear turn indicator Tail light Number plate light LH rear turn indicator Fuel tank Stepper motor Injection relay Self-diagnosis Horizontal cylinder coil Vertical cylinder coil Horizontal cylinder spark plug Vertical cylinder spark plug Horizontal cylinder injector 1 Vertical cylinder injector 1 Throttle position sensor Timing/rpm sensor Water temperature sensor Rear speed sensor Side stand Horn 31) 32) 33) 34) 35) 36) 37) 38) 39) 40) 41...

Owners Manual
Page 119
... the throttle body and fuel tank. Rough idle. This product should be checked for repair or replacement if the motorcycle noise has increased significantly through the air cleaner and the throttle body. Evaporative Emission Control System California motorcycles are equipped with an evaporative emission control system which conducts exhaust gases. (2) Removal or puncturing of any part of the intake system. (3) Lack of proper maintenance. (4) Replacing any new vehicle...
... the throttle body and fuel tank. Rough idle. This product should be checked for repair or replacement if the motorcycle noise has increased significantly through the air cleaner and the throttle body. Evaporative Emission Control System California motorcycles are equipped with an evaporative emission control system which conducts exhaust gases. (2) Removal or puncturing of any part of the intake system. (3) Lack of proper maintenance. (4) Replacing any new vehicle...

Owners Manual
Page 120
... servicing the fuel system. 119 Do not let protective apparel give you a false sense of your shoulder to skid and lose control. Do not down shift at the proper rate of an automobile, so defensive riding in passing, shift to a lower gear to the safety of brake, clutch, shifter, throttle controls, correct fuel and oil supply. to avoid damage to control vehicle speed and less on the rear view mirror...
... servicing the fuel system. 119 Do not let protective apparel give you a false sense of your shoulder to skid and lose control. Do not down shift at the proper rate of an automobile, so defensive riding in passing, shift to a lower gear to the safety of brake, clutch, shifter, throttle controls, correct fuel and oil supply. to avoid damage to control vehicle speed and less on the rear view mirror...

Owners Manual
Page 125
... replacement parts or accessories not conforming to the first scheduled replacement, and hoses, clamps, fittings and tubing used in competitive racing or related events. The liability of Ducati under this Emission Control Systems Warranty is not complete within 30 days. fuel tank cap for routine maintenance. fuel/ vapor separator; breaker governors; ignition points, condensers, and spark plugs if failure occors prior to Ducati specifications which odometer mileage has been changed...
... replacement parts or accessories not conforming to the first scheduled replacement, and hoses, clamps, fittings and tubing used in competitive racing or related events. The liability of Ducati under this Emission Control Systems Warranty is not complete within 30 days. fuel tank cap for routine maintenance. fuel/ vapor separator; breaker governors; ignition points, condensers, and spark plugs if failure occors prior to Ducati specifications which odometer mileage has been changed...