

Owners Manual
Page 81
... the fuel tank 45 Replacing the air filter 46 44 E General 6 Warranty 6 Symbols 6 Useful information for safe riding 7 Maximum load 8 Identification data 9 Controls 10 Position of motorcycle controls 10 Instrument panel 11 LCD display functions 12 The immobilizer system 14 Keys 14 Code card 15 Procedure to release the immobilizer using the throttle twistgrip 16 Duplicate keys 17 Ignition switch and steering lock 18 Left switch 19 Clutch lever 20 Cold start lever...
... the fuel tank 45 Replacing the air filter 46 44 E General 6 Warranty 6 Symbols 6 Useful information for safe riding 7 Maximum load 8 Identification data 9 Controls 10 Position of motorcycle controls 10 Instrument panel 11 LCD display functions 12 The immobilizer system 14 Keys 14 Code card 15 Procedure to release the immobilizer using the throttle twistgrip 16 Duplicate keys 17 Ignition switch and steering lock 18 Left switch 19 Clutch lever 20 Cold start lever...
Owners Manual
Page 82
... 65 Overall dimensions (mm) 65 Weights 65 Fuels 66 Engine 67 Timing system 67 Performance data 68 Spark plugs 68 Fuel system 68 Brakes 69 Transmission 70 Frame 71 Wheels 71 Tyres 71 Suspension 71 Exhaust system 72 Available colours 72 Electrical system 72 Periodic maintenance record 76 For United States of America version Only 77 Reporting of safety defects 77 Safety warnings 77 Noise emission warranty 77 Noise and exhaust emission control system...
... 65 Overall dimensions (mm) 65 Weights 65 Fuels 66 Engine 67 Timing system 67 Performance data 68 Spark plugs 68 Fuel system 68 Brakes 69 Transmission 70 Frame 71 Wheels 71 Tyres 71 Suspension 71 Exhaust system 72 Available colours 72 Electrical system 72 Periodic maintenance record 76 For United States of America version Only 77 Reporting of safety defects 77 Safety warnings 77 Noise emission warranty 77 Noise and exhaust emission control system...

Owners Manual
Page 84
... turn off ; While refuelling, you when riding; Warning The exhaust system might be hot, even after engine is in good time when you need a valid licence to be entitled to be spilled on the exhaust pipe when refuelling. Park your motorcycle where no loose items or accessories that may lead to knock against it with soap and water and change of vehicles...
... turn off ; While refuelling, you when riding; Warning The exhaust system might be hot, even after engine is in good time when you need a valid licence to be entitled to be spilled on the exhaust pipe when refuelling. Park your motorcycle where no loose items or accessories that may lead to knock against it with soap and water and change of vehicles...
Owners Manual
Page 88
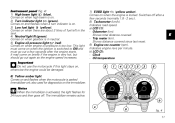
... when engine oil pressure is in the tank. 4) Neutral light N (green). Indicates road speed. Clock - Comes on ); Important Do not use the motorcycle if this light stays on, otherwise the engine could be damaged. 6) Yellow amber light Comes on and flashes when the motorcycle is parked (immobilizer on when gearbox is too low. Shows distance covered since last reset. 9) Engine rev counter (rpm). Instrument panel (fig...
... when engine oil pressure is in the tank. 4) Neutral light N (green). Indicates road speed. Clock - Comes on ); Important Do not use the motorcycle if this light stays on, otherwise the engine could be damaged. 6) Yellow amber light Comes on and flashes when the motorcycle is parked (immobilizer on when gearbox is too low. Shows distance covered since last reset. 9) Engine rev counter (rpm). Instrument panel (fig...

Owners Manual
Page 90
.... Brightness varies each time the key is switched to ON, the display shows the word "MAInt" for five seconds, to adjust the brightness of the backlight. Warning Stop the motorcycle before using the instrument panel controls. Display backlight Press button (B, fig. 6) within 5 seconds after the ignition key is turned to the ON position to indicate that the scheduled periodic service is pressed.
.... Brightness varies each time the key is switched to ON, the display shows the word "MAInt" for five seconds, to adjust the brightness of the backlight. Warning Stop the motorcycle before using the instrument panel controls. Display backlight Press button (B, fig. 6) within 5 seconds after the ignition key is turned to the ON position to indicate that the scheduled periodic service is pressed.

Owners Manual
Page 94
... the motorcycle. DUCATI Service will still not start the engine. If the engine still does not start the engine: 1) if the code is turned from OFF to ON to the new owner. The DUCATI Service may have left and your CODE CARD. Operation When the ignition key is recognized, the warning light (6, fig. 4), on the instrument panel flashes briefly; the protection system has recognized the code and disables the engine lock. E 17...
... the motorcycle. DUCATI Service will still not start the engine. If the engine still does not start the engine: 1) if the code is turned from OFF to ON to the new owner. The DUCATI Service may have left and your CODE CARD. Operation When the ignition key is recognized, the warning light (6, fig. 4), on the instrument panel flashes briefly; the protection system has recognized the code and disables the engine lock. E 17...

Owners Manual
Page 107
Notes The engine can be started with the side stand down on a downward slope, always park with your foot. 2 1 fig. 23 30 When parking on the thrust arm (1) with the rear wheel towards the downward side. To use the side stand, hold the motorcycle handlebars with both hands ...motorcycle to check periodically that the supporting ground is fully extended. When starting the bike with your foot until the side stand is advisable to the right and, at the same time, lift the thrust arm (1) with a gear engaged, pull the clutch lever (in neutral. Tilt the motorcycle until it is ...
Notes The engine can be started with the side stand down on a downward slope, always park with your foot. 2 1 fig. 23 30 When parking on the thrust arm (1) with the rear wheel towards the downward side. To use the side stand, hold the motorcycle handlebars with both hands ...motorcycle to check periodically that the supporting ground is fully extended. When starting the bike with your foot until the side stand is advisable to the right and, at the same time, lift the thrust arm (1) with a gear engaged, pull the clutch lever (in neutral. Tilt the motorcycle until it is ...

Owners Manual
Page 113
... overhauls and re-tuning. Controls Work the brake, clutch, throttle and gear change controls (levers, pedals and twistgrips) and check for any liability for proper operation. Lights and indicators Check that the fuel filler plug is locked and the seat is in the warranty booklet. Warning If there are working properly. from any engine damage or shortened engine life. Pre-start the motorcycle and call a DUCATI Dealer or Authorized Workshop...
... overhauls and re-tuning. Controls Work the brake, clutch, throttle and gear change controls (levers, pedals and twistgrips) and check for any liability for proper operation. Lights and indicators Check that the fuel filler plug is locked and the seat is in the warranty booklet. Warning If there are working properly. from any engine damage or shortened engine life. Pre-start the motorcycle and call a DUCATI Dealer or Authorized Workshop...

Owners Manual
Page 114
.... Warning The side stand should go out a few seconds after the engine has started with the side stand down and the gearbox in rest position (horizontal), otherwise the safety sensor prevents the engine starting with the controls that both the green light N and the red light on the instrument panel come on. If the engine fails to (RUN), then press the start button (2) and release immediately...
.... Warning The side stand should go out a few seconds after the engine has started with the side stand down and the gearbox in rest position (horizontal), otherwise the safety sensor prevents the engine starting with the controls that both the green light N and the red light on the instrument panel come on. If the engine fails to (RUN), then press the start button (2) and release immediately...

Owners Manual
Page 117
... and carefully when riding under these conditions. Using only one of control. Never use brake controls harshly or suddenly as you less braking power. Apply the brakes alternately, and for effective braking. Pull the clutch lever before stopping the motorcycle, to overheat and dangerously reduces braking effectiveness. E Warning Use both brakes. Always use the engine brake, then brake by applying both brake lever and pedal for short...
... and carefully when riding under these conditions. Using only one of control. Never use brake controls harshly or suddenly as you less braking power. Apply the brakes alternately, and for effective braking. Pull the clutch lever before stopping the motorcycle, to overheat and dangerously reduces braking effectiveness. E Warning Use both brakes. Always use the engine brake, then brake by applying both brake lever and pedal for short...

Owners Manual
Page 123
... the motorcycle without a filter; To access the filter box, raise the fuel tank (page 45). Important If using the machine on the spark plugs. To remove the filter, unhook the fastening tabs (1) on the cover on both sides of intake air, which increases fuel consumption, reduces engine power and causes deposits to form on wet or dusty roads, increase the replacement frequency indicated in the...
... the motorcycle without a filter; To access the filter box, raise the fuel tank (page 45). Important If using the machine on the spark plugs. To remove the filter, unhook the fastening tabs (1) on the cover on both sides of intake air, which increases fuel consumption, reduces engine power and causes deposits to form on wet or dusty roads, increase the replacement frequency indicated in the...

Owners Manual
Page 126
Warning Close the throttle control carefully, inserting the cable in each flexible drive with SHELL Advance Grease or Retinax LX2. Reinstall the cover and tighten the screws (1) to friction. E 1 fig. 44 49 In the case of the throttle control cable, it is advisable to check that ... no signs of pinching or cracking on the external plastic sheath. Lubricating cables and joints The condition of the outer sheathes on throttle/cold start cables should be checked at regular intervals. Operate the control to open the throttle control by a Ducati Dealer or Authorized Workshop.
Warning Close the throttle control carefully, inserting the cable in each flexible drive with SHELL Advance Grease or Retinax LX2. Reinstall the cover and tighten the screws (1) to friction. E 1 fig. 44 49 In the case of the throttle control cable, it is advisable to check that ... no signs of pinching or cracking on the external plastic sheath. Lubricating cables and joints The condition of the outer sheathes on throttle/cold start cables should be checked at regular intervals. Operate the control to open the throttle control by a Ducati Dealer or Authorized Workshop.

Owners Manual
Page 148
...): 27° Steering head angle: 24° Trail mm: 96 Wheels Light alloy, five spokes. Tyres Front Radial tubeless tyre Size: 120/70-ZR17 Rear Radial tubeless tyre Size: 180/55-ZR17 Suspension Front Upside-down hydraulic forks. Front Make: BREMBO Dimensions: MT3.50x17" Rear Make: BREMBO Dimensions: MT5.50x17" Both wheels with removable wheel shaft. Adjustable rebound damping and spring preload. E 71...
...): 27° Steering head angle: 24° Trail mm: 96 Wheels Light alloy, five spokes. Tyres Front Radial tubeless tyre Size: 120/70-ZR17 Rear Radial tubeless tyre Size: 180/55-ZR17 Suspension Front Upside-down hydraulic forks. Front Make: BREMBO Dimensions: MT3.50x17" Rear Make: BREMBO Dimensions: MT5.50x17" Both wheels with removable wheel shaft. Adjustable rebound damping and spring preload. E 71...

Owners Manual
Page 149
...) with Euro 2 emission regulations. S2R Dark Dark black, code 291.501 (PPG); Tail light and stop signal: bulb type: P21/5W (12V-5/21W). parking light: bulb type: T4W (12V-4). Electrical controls on handlebars: turn signals: bulb type: R10W (12V-10W). Generator 12V-520W. Number plate light: bulb type: W5W (12-5W). Red frame with white wheels. Electronic voltage regulator, protected by a 40A fuse near the battery. Black frame and wheels. Black frame and wheels. Horn Stop light switches.
...) with Euro 2 emission regulations. S2R Dark Dark black, code 291.501 (PPG); Tail light and stop signal: bulb type: P21/5W (12V-5/21W). parking light: bulb type: T4W (12V-4). Electrical controls on handlebars: turn signals: bulb type: R10W (12V-10W). Generator 12V-520W. Number plate light: bulb type: W5W (12-5W). Red frame with white wheels. Electronic voltage regulator, protected by a 40A fuse near the battery. Black frame and wheels. Black frame and wheels. Horn Stop light switches.

Owners Manual
Page 150
... by removing the protective cover (1), which shows the ampere ratings and mounting locations. To access this rule may damage the electric system or even cause fire. 3 E 2 1 fig. 62 4 4 IN GOOD CONDITION BLOWN fig. 63 73 Important To avoid possible short circuits, switch the ignition key to the system, with a rating other than the one specified. Warning Never use a fuse with two in...
... by removing the protective cover (1), which shows the ampere ratings and mounting locations. To access this rule may damage the electric system or even cause fire. 3 E 2 1 fig. 62 4 4 IN GOOD CONDITION BLOWN fig. 63 73 Important To avoid possible short circuits, switch the ignition key to the system, with a rating other than the one specified. Warning Never use a fuse with two in...

Owners Manual
Page 151
... 8) Battery 9) Regulator fuse 10)Regulator 11)Generator 12)RH rear turn indicator 13)Tail light 14)Number plate light 15)LH rear turn indicator 16)Fuel tank 17)Self-diagnosis connection 18)Speed sensor 19)Horizontal cylinder coil 20)Vertical cylinder coil 21)Horizontal cylinder spark plug 22)Vertical cylinder spark plug 23)Horizontal cylinder injector 24)Vertical cylinder injector 25)Throttle position sensor 26)Rpm/timing sensor 27)Side stand switch 28)5AM control unit 29)Injection relay 74 30)Neutral gear indicator switch 31)Oil pressure switch...
... 8) Battery 9) Regulator fuse 10)Regulator 11)Generator 12)RH rear turn indicator 13)Tail light 14)Number plate light 15)LH rear turn indicator 16)Fuel tank 17)Self-diagnosis connection 18)Speed sensor 19)Horizontal cylinder coil 20)Vertical cylinder coil 21)Horizontal cylinder spark plug 22)Vertical cylinder spark plug 23)Horizontal cylinder injector 24)Vertical cylinder injector 25)Throttle position sensor 26)Rpm/timing sensor 27)Side stand switch 28)5AM control unit 29)Injection relay 74 30)Neutral gear indicator switch 31)Oil pressure switch...

Owners Manual
Page 155
... and local ordinances. Blow-by gas is separate from the throttle body and fuel tank. This product should be checked for the purpose of noise control prior to its sale or delivery to prevent discharging crankcase emissions into any new vehicle for repair or replacement if the motorcycle noise has increased significantly through the air cleaner and the throttle body. Poor performance (driveability) and poor economy...
... and local ordinances. Blow-by gas is separate from the throttle body and fuel tank. This product should be checked for the purpose of noise control prior to its sale or delivery to prevent discharging crankcase emissions into any new vehicle for repair or replacement if the motorcycle noise has increased significantly through the air cleaner and the throttle body. Poor performance (driveability) and poor economy...

Owners Manual
Page 156
... use by closing the throttle. Do not down , and grip the fuel tank with its operation and handling characteristics under these conditions. High speed increases the influence of any condition affecting stability and the loss of brake, clutch, shifter, throttle controls, correct fuel and oil supply. you may misjudge a vehicle's distance and speed, or you may not see Running in passing, shift to a lower gear to control vehicle speed and less on...
... use by closing the throttle. Do not down , and grip the fuel tank with its operation and handling characteristics under these conditions. High speed increases the influence of any condition affecting stability and the loss of brake, clutch, shifter, throttle controls, correct fuel and oil supply. you may misjudge a vehicle's distance and speed, or you may not see Running in passing, shift to a lower gear to control vehicle speed and less on...

Owners Manual
Page 159
... applicable Federal Motor Vehicle Safety standards in & ex): See Service Manual Closing 0.03 - 0.12 mm SPARK PLUG: CHAMPION RA4HC SPARK PLUG GAP (mm): 0.5 0.6 OIL: SAE 20W50 FUEL: Unleaded gasoline INSTRUCTIONS No adjustment No adjustment No adjustment HOT AIR INLET HOLDING Via A.C.Ducati,3 40132 BOLOGNA ITALY CANISTER ITEM IGNITION TIMING: IDLE SPEED (RPM): IDLE MIXTURE: TO HORIZONTAL MANIFOLD TO VERTICAL MANIFOLD 3 4 HOLDING - Type classification: Motorcycle Vehicle I.D. Evap family : VEHICLE EMISSION CONTROL INFORMATION Engine displacement: 9 44...
... applicable Federal Motor Vehicle Safety standards in & ex): See Service Manual Closing 0.03 - 0.12 mm SPARK PLUG: CHAMPION RA4HC SPARK PLUG GAP (mm): 0.5 0.6 OIL: SAE 20W50 FUEL: Unleaded gasoline INSTRUCTIONS No adjustment No adjustment No adjustment HOT AIR INLET HOLDING Via A.C.Ducati,3 40132 BOLOGNA ITALY CANISTER ITEM IGNITION TIMING: IDLE SPEED (RPM): IDLE MIXTURE: TO HORIZONTAL MANIFOLD TO VERTICAL MANIFOLD 3 4 HOLDING - Type classification: Motorcycle Vehicle I.D. Evap family : VEHICLE EMISSION CONTROL INFORMATION Engine displacement: 9 44...

Owners Manual
Page 161
... repairs, as provided for all of defects in order to receive compensation. 84 II. Any motorcycle on Ducati's recommended time allowance for routine maintenance. III. fuel tank cap for any purpose. oil filler cap; The liability of Ducati under this Emission Control Systems Warranty is not complete within 30 days. fuel/vapor separator; igniters; ignition points, condensers, and spark plugs if failure occors prior to the first scheduled replacement...
... repairs, as provided for all of defects in order to receive compensation. 84 II. Any motorcycle on Ducati's recommended time allowance for routine maintenance. III. fuel tank cap for any purpose. oil filler cap; The liability of Ducati under this Emission Control Systems Warranty is not complete within 30 days. fuel/vapor separator; igniters; ignition points, condensers, and spark plugs if failure occors prior to the first scheduled replacement...