

UConnect Manual
Page 45
...Caravan and Town and Country vehicles with Dual Screen Systems refer to its upright position. 44 Uconnect™ Multimedia - Video Entertainment System (VES)™ Uconnect™ Multimedia - Video Entertainment System (VES)™ Getting Started • Screen(s) located in the overhead console : Unfold the overhead LCD screen(s) by pushing the button in the center console... : Lift up to the Dual Video Screen section for more information. • Screen located in the center of the center ...
...Caravan and Town and Country vehicles with Dual Screen Systems refer to its upright position. 44 Uconnect™ Multimedia - Video Entertainment System (VES)™ Uconnect™ Multimedia - Video Entertainment System (VES)™ Getting Started • Screen(s) located in the overhead console : Unfold the overhead LCD screen(s) by pushing the button in the center console... : Lift up to the Dual Video Screen section for more information. • Screen located in the center of the center ...

UConnect Manual
Page 52
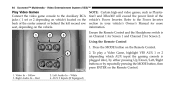
...Owner's Manual for the VES™ jacks: NOTE: Certain high-end video games, such as Playstation3 and XBox360 will exceed the power limit of the center console or on the back of the vehicle's Power Inverter. Video In - Red 2. Left Audio In - Using the Remote Control 1. Right Audio In -... and Headphone switch is on the Remote Control. 3 1. Video Entertainment System (VES)™ 51 Play Video Games Connect the video game console to follow the standard color coding for more information. When connecting an external source to the AUX input, be sure to the Auxiliary RCA...
...Owner's Manual for the VES™ jacks: NOTE: Certain high-end video games, such as Playstation3 and XBox360 will exceed the power limit of the center console or on the back of the vehicle's Power Inverter. Video In - Red 2. Left Audio In - Using the Remote Control 1. Right Audio In -... and Headphone switch is on the Remote Control. 3 1. Video Entertainment System (VES)™ 51 Play Video Games Connect the video game console to follow the standard color coding for more information. When connecting an external source to the AUX input, be sure to the Auxiliary RCA...
UConnect Manual
Page 65
...) located on the back of the vehicle's Power Inverter. To play a Video Game, highlight VES AUX 1 or 2 (depending which AUX input the gaming console is on the vehicle. Left Audio In - NOTE: Certain high-end video games, such as Playstation3 and XBox360 will exceed the power limit of the... center armrest or behind the left second row seat, depending on Channel 1 for Screen 1 and Channel 2 for more information. Right Audio In - White 4. Red 2....
...) located on the back of the vehicle's Power Inverter. To play a Video Game, highlight VES AUX 1 or 2 (depending which AUX input the gaming console is on the vehicle. Left Audio In - NOTE: Certain high-end video games, such as Playstation3 and XBox360 will exceed the power limit of the... center armrest or behind the left second row seat, depending on Channel 1 for Screen 1 and Channel 2 for more information. Right Audio In - White 4. Red 2....

Owner Manual
Page 212
.... 210 UNDERSTANDING THE FEATURES OF YOUR VEHICLE The power outlets include tethered caps, labeled with Console Front 3 - M7 Fuse 20 A Yellow Power Outlet Center Seat (Opt) or with Console Center M36 Fuse 20 A Yellow Power Outlet Instrument Panel or with Console Rear 2 - Items plugged into this power outlet may discharge the battery and/or prevent...
.... 210 UNDERSTANDING THE FEATURES OF YOUR VEHICLE The power outlets include tethered caps, labeled with Console Front 3 - M7 Fuse 20 A Yellow Power Outlet Center Seat (Opt) or with Console Center M36 Fuse 20 A Yellow Power Outlet Instrument Panel or with Console Rear 2 - Items plugged into this power outlet may discharge the battery and/or prevent...
Owner Manual
Page 216
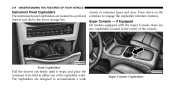
...the drawer out firmly until it stops, and place the container to accommodate a wide Super Console Cupholders drawer just above the lower storage bin. If Equipped On models equipped with the Super Console, there are located in a pull-out container to engage the cupholder retention features. The... cupholders are designed to be held in the center of container types and sizes. Super Console - Press down on the Instrument Panel Cupholders The instrument panel cupholders are two cupholders located in either one of ...
...the drawer out firmly until it stops, and place the container to accommodate a wide Super Console Cupholders drawer just above the lower storage bin. If Equipped On models equipped with the Super Console, there are located in a pull-out container to engage the cupholder retention features. The... cupholders are designed to be held in the center of container types and sizes. Super Console - Press down on the Instrument Panel Cupholders The instrument panel cupholders are two cupholders located in either one of ...

Owner Manual
Page 217
Premium Console Cupholders - Pull the drawer out to the first position to use the cupholders. If Equipped On models equipped with premium center consoles, there are located in the pull-out drawer, located in the back of the console. 3 Rear Cupholders Premium Console Cupholders UNDERSTANDING THE FEATURES OF YOUR VEHICLE 215 For rear passengers two cupholders are four cupholders located on the top of the Super Console.
Premium Console Cupholders - Pull the drawer out to the first position to use the cupholders. If Equipped On models equipped with premium center consoles, there are located in the pull-out drawer, located in the back of the console. 3 Rear Cupholders Premium Console Cupholders UNDERSTANDING THE FEATURES OF YOUR VEHICLE 215 For rear passengers two cupholders are four cupholders located on the top of the Super Console.
Owner Manual
Page 227
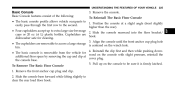
... cup plug hole • The cupholders are hook. Remove the front anchor cup plug and clip. 2. dishwasher safe for ward on the console with slight pressure, reinstall the additional floor space by removing the cap and clip at a slight angle (front slightly easily pass through the... first row to be sure it is centered on the console to the second. Reinstall the clip first and then while pushing down• The basic console is removable from the vehicle for cleaning. 3. To Remove The Basic Floor Console 1. higher than the rear). • Four cupholders...
... cup plug hole • The cupholders are hook. Remove the front anchor cup plug and clip. 2. dishwasher safe for ward on the console with slight pressure, reinstall the additional floor space by removing the cap and clip at a slight angle (front slightly easily pass through the... first row to be sure it is centered on the console to the second. Reinstall the clip first and then while pushing down• The basic console is removable from the vehicle for cleaning. 3. To Remove The Basic Floor Console 1. higher than the rear). • Four cupholders...

Owner Manual
Page 228
... or other items • Large console center storage will also accommodate large size cups and 20 oz (.6 L) bottles. If Equipped The three-compartment console with sliding storage bin, • Rear occupant accessible sliding upper tray with storage and large console storage • Multiple adjustments bin ... user comfort. In an accident, serious injury could result if the removable floor console is fully latched. • Upper storage bin can accept plastic bottles, large The top and center console sections slide forward and cups or mugs with dishwasher safe liners for clean- &#...
... or other items • Large console center storage will also accommodate large size cups and 20 oz (.6 L) bottles. If Equipped The three-compartment console with sliding storage bin, • Rear occupant accessible sliding upper tray with storage and large console storage • Multiple adjustments bin ... user comfort. In an accident, serious injury could result if the removable floor console is fully latched. • Upper storage bin can accept plastic bottles, large The top and center console sections slide forward and cups or mugs with dishwasher safe liners for clean- &#...
Owner Manual
Page 312
... This feature allows an iPod or external USB device to "Uconnect™ Phone" in SET 2 memory can be button number will show in the center console Buttons 1 - 6 or glove compartment. plugged into pushbutton memory. The channels stored in the Uconnect™ User Manual located on the DVD for SET 1 and SET...
... This feature allows an iPod or external USB device to "Uconnect™ Phone" in SET 2 memory can be button number will show in the center console Buttons 1 - 6 or glove compartment. plugged into pushbutton memory. The channels stored in the Uconnect™ User Manual located on the DVD for SET 1 and SET...

Owner Manual
Page 313
... iPod or external USB device support capability. • Connecting an iPod or consumer electronic audio device to the AUX port located in the center console or glove compartOnce the audio device is located in the radio faceplate, plays media, but does not use by pressing radio switches, as described below...
... iPod or external USB device support capability. • Connecting an iPod or consumer electronic audio device to the AUX port located in the center console or glove compartOnce the audio device is located in the radio faceplate, plays media, but does not use by pressing radio switches, as described below...

Owner Manual
Page 333
... vehicle. 4 Rear Manual Climate Controls 1 - Rear MODE 4 - UNDERSTANDING YOUR INSTRUMENT PANEL 331 The rear blower and temperature controls for the rear Rear Blower Control seat passengers are located in the rear overhead console, has an off position and a range of blower speeds. Rear Blower...
... vehicle. 4 Rear Manual Climate Controls 1 - Rear MODE 4 - UNDERSTANDING YOUR INSTRUMENT PANEL 331 The rear blower and temperature controls for the rear Rear Blower Control seat passengers are located in the rear overhead console, has an off position and a range of blower speeds. Rear Blower...
Owner Manual
Page 443
...contains three pieces and can be assembled into a spare tire hook; The "spare tire drive" nut is stowed inside a protective cover located under the center of the vehicle between the front doors by means of a cable winch mechanism. to raise/lower the compact spare tire/ cover assembly. to remove the... Drive Nut To access the spare tire winch drive nut and lower the spare tire, you will need to refer to one of the following center console configurations. 6 Spare Tire Location WHAT TO DO IN EMERGENCIES 441 Spare Tire Removal The spare tire is located on the floor, under a plastic cap...
...contains three pieces and can be assembled into a spare tire hook; The "spare tire drive" nut is stowed inside a protective cover located under the center of the vehicle between the front doors by means of a cable winch mechanism. to raise/lower the compact spare tire/ cover assembly. to remove the... Drive Nut To access the spare tire winch drive nut and lower the spare tire, you will need to refer to one of the following center console configurations. 6 Spare Tire Location WHAT TO DO IN EMERGENCIES 441 Spare Tire Removal The spare tire is located on the floor, under a plastic cap...
Owner Manual
Page 445
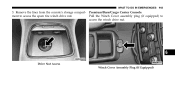
access the winch drive nut. 6 Drive Nut Access Winch Cover Assembly Plug (If Equipped) Premium/Base/Cargo Center Console Pull the Winch Cover assembly plug (if equipped) to ment to access the spare tire winch drive nut. WHAT TO DO IN EMERGENCIES 443 3. Remove the liner from the console's storage compart-
access the winch drive nut. 6 Drive Nut Access Winch Cover Assembly Plug (If Equipped) Premium/Base/Cargo Center Console Pull the Winch Cover assembly plug (if equipped) to ment to access the spare tire winch drive nut. WHAT TO DO IN EMERGENCIES 443 3. Remove the liner from the console's storage compart-
Owner Manual
Page 447
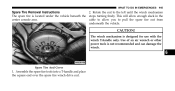
... is designed for use with the winch T-handle only. WHAT TO DO IN EMERGENCIES 445 2. CAUTION! Rotate the nut to allow enough slack in the center console area. Use of an air wrench or other power tools is not recommended and can damage the winch. 6 Spare Tire And Cover 1.
... is designed for use with the winch T-handle only. WHAT TO DO IN EMERGENCIES 445 2. CAUTION! Rotate the nut to allow enough slack in the center console area. Use of an air wrench or other power tools is not recommended and can damage the winch. 6 Spare Tire And Cover 1.

Owner Manual
Page 509
... Side Marker, Park/Turn Signal ...LED (Serviced at Authorized Dealer) Rear Tail, Stop, Turn Signal Lamp ...LED (Serviced at Authorized Dealer) Center High-Mounted Stop Lamp ...LED (Serviced at Authorized Dealer) Backup Lamp ...3157 License ...168 7 If Equipped ...578 Instrument Cluster Lamps ...PC74 ...Liftgate Lamp(s) ...578 Overhead Console Reading Lamps ...PC579 Removable Console Lamp - Slide the red lock tab rearward on the connector, then depress the tab and remove the connector from the bulb...
... Side Marker, Park/Turn Signal ...LED (Serviced at Authorized Dealer) Rear Tail, Stop, Turn Signal Lamp ...LED (Serviced at Authorized Dealer) Center High-Mounted Stop Lamp ...LED (Serviced at Authorized Dealer) Backup Lamp ...3157 License ...168 7 If Equipped ...578 Instrument Cluster Lamps ...PC74 ...Liftgate Lamp(s) ...578 Overhead Console Reading Lamps ...PC579 Removable Console Lamp - Slide the red lock tab rearward on the connector, then depress the tab and remove the connector from the bulb...
Owner Manual
Page 554
552 INDEX Overhead Console ...193 Overhead Travel Information Center ...193 Overheating, Engine ...260,438 Owner's Manual (Operator Manual) ...4,535 Panic Alarm ...23 Park Sense System, Rear ...182 Parking Brake ...367 Pedals, Adjustable ...177 Personal ...
552 INDEX Overhead Console ...193 Overhead Travel Information Center ...193 Overheating, Engine ...260,438 Owner's Manual (Operator Manual) ...4,535 Panic Alarm ...23 Park Sense System, Rear ...182 Parking Brake ...367 Pedals, Adjustable ...177 Personal ...
User Guide
Page 31
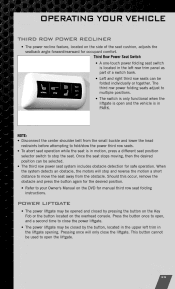
NOTE: • Disconnect the center shoulder belt from the obstacle. Once the seat stops moving, then the desired position can be selected. • The third row power seat system includes ... liftgate. • The power liftgate may be opened and closed by pressing the button on the Key Fob or the button located on the overhead console. This button cannot be closed by the button, located in the upper left rear trim panel as part of the seat cushion, adjusts the seatback...
NOTE: • Disconnect the center shoulder belt from the obstacle. Once the seat stops moving, then the desired position can be selected. • The third row power seat system includes ... liftgate. • The power liftgate may be opened and closed by pressing the button on the Key Fob or the button located on the overhead console. This button cannot be closed by the button, located in the upper left rear trim panel as part of the seat cushion, adjusts the seatback...
User Guide
Page 46
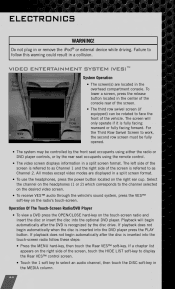
To lower a screen, press the release button located in the center of the console rear of the screen. • The third row swivel screen (if equipped) can be controlled by the front seat occupants using the remote control. • ... radio follow this warning could result in a collision. ® VIDEO ENTERTAINMENT SYSTEM (VES)™ System Operation • The screen(s) are displayed in the overhead compartment console. If playback does not begin automatically after the disc is inserted into the optional DVD player. ELECTRONICS WARNING! Operation Of The Touch-Screen Radio/DVD...
To lower a screen, press the release button located in the center of the console rear of the screen. • The third row swivel screen (if equipped) can be controlled by the front seat occupants using the remote control. • ... radio follow this warning could result in a collision. ® VIDEO ENTERTAINMENT SYSTEM (VES)™ System Operation • The screen(s) are displayed in the overhead compartment console. If playback does not begin automatically after the disc is inserted into the optional DVD player. ELECTRONICS WARNING! Operation Of The Touch-Screen Radio/DVD...
User Guide
Page 62
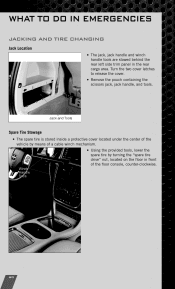
Spare Tire Stowage • The spare tire is stored inside a protective cover located under the center of the vehicle by means of a cable winch mechanism. • Using the provided tools, lower the spare tire by turning the "spare tire drive" nut, ... Jack Location • The jack, jack handle and winch handle tools are stowed behind the rear left side trim panel in front of the floor console, counter-clockwise. 60 Turn the two cover latches to release the cover. • Remove the pouch containing the scissors jack, jack handle, and tools...
Spare Tire Stowage • The spare tire is stored inside a protective cover located under the center of the vehicle by means of a cable winch mechanism. • Using the provided tools, lower the spare tire by turning the "spare tire drive" nut, ... Jack Location • The jack, jack handle and winch handle tools are stowed behind the rear left side trim panel in front of the floor console, counter-clockwise. 60 Turn the two cover latches to release the cover. • Remove the pouch containing the scissors jack, jack handle, and tools...


