
Owner Manual
Page 147
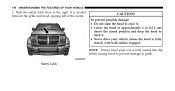
To prevent possible damage: • Do not slam the hood to close it. • Lower the hood to approximately 6 in (15.2 cm) above the closed , with both latches engaged. NOTE: Ensure hood prop rod is fully seated into clip before closing hood to prevent damage to latch it. • Never drive your vehicle unless the hood is located between the grille and hood opening left of the center. 146 UNDERSTANDING THE FEATURES OF YOUR VEHICLE 2. CAUTION! It is fully closed position and drop the hood to grille. Push the safety latch lever to the right. Safety Latch
To prevent possible damage: • Do not slam the hood to close it. • Lower the hood to approximately 6 in (15.2 cm) above the closed , with both latches engaged. NOTE: Ensure hood prop rod is fully seated into clip before closing hood to prevent damage to latch it. • Never drive your vehicle unless the hood is located between the grille and hood opening left of the center. 146 UNDERSTANDING THE FEATURES OF YOUR VEHICLE 2. CAUTION! It is fully closed position and drop the hood to grille. Push the safety latch lever to the right. Safety Latch
Owner Manual
Page 443
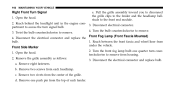
...3. Disconnect the electrical connector and replace bulb. c. Open the hood. 2. Disconnect electrical connector. 4. Pull the grille assembly toward you to disconnect the grille clips to the fender and the headlamp ballstuds to remove. Turn the bulb counterclockwise to remove. Disconnect the electrical ...connector and replace the 1. Front Side Marker 2. Open the hood. Remove the grille assembly as follows: 3. Remove two screws from the top of the grille. Remove two rivets from bulb. d. Remove one quarter turn signal bulb. 3.
...3. Disconnect the electrical connector and replace bulb. c. Open the hood. 2. Disconnect electrical connector. 4. Pull the grille assembly toward you to disconnect the grille clips to the fender and the headlamp ballstuds to remove. Turn the bulb counterclockwise to remove. Disconnect the electrical ...connector and replace the 1. Front Side Marker 2. Open the hood. Remove the grille assembly as follows: 3. Remove two screws from the top of the grille. Remove two rivets from bulb. d. Remove one quarter turn signal bulb. 3.
