Owner's Manual
Page 13
..., brake pedal or the gear selector lever. THINGS TO KNOW BEFORE STARTING YOUR VEHICLE 13 NOTE: The power window switches, radio, power outlets, and removable console (if equipped), will cancel this feature. Don't leave the keys in the ignition switch, a chime will shut the engine off after the ignition switch has...
..., brake pedal or the gear selector lever. THINGS TO KNOW BEFORE STARTING YOUR VEHICLE 13 NOTE: The power window switches, radio, power outlets, and removable console (if equipped), will cancel this feature. Don't leave the keys in the ignition switch, a chime will shut the engine off after the ignition switch has...
Owner's Manual
Page 17
... position (extreme top position). • The illuminated entry system will lock. THINGS TO KNOW BEFORE STARTING YOUR VEHICLE 17 NOTE: • The front courtesy overhead console, door courtesy and liftgate lights do not turn on each door trim panel.
... position (extreme top position). • The illuminated entry system will lock. THINGS TO KNOW BEFORE STARTING YOUR VEHICLE 17 NOTE: • The front courtesy overhead console, door courtesy and liftgate lights do not turn on each door trim panel.
Owner's Manual
Page 31
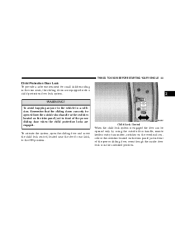
Pressing the switch once will open the power sliding door, once the door is fully opened by pressing the switches on the overhead console or the switch located on the trim panel just in front of the sliding door. This is very important when your sliding door open latch ...
Pressing the switch once will open the power sliding door, once the door is fully opened by pressing the switches on the overhead console or the switch located on the trim panel just in front of the sliding door. This is very important when your sliding door open latch ...
Owner's Manual
Page 32
... sliding door switch is pressed. To avoid unintentional operation of the power sliding door from the rear seats, press the button located in the overhead console to the closed or open position, provided it is fully open and then press the switch again. • The power sliding door switches will not...
... sliding door switch is pressed. To avoid unintentional operation of the power sliding door from the rear seats, press the button located in the overhead console to the closed or open position, provided it is fully open and then press the switch again. • The power sliding door switches will not...
Owner's Manual
Page 33
... the child lock system is engaged the door can only be opened from the outside door handle, remote keyless entry transmitter, switches on the overhead console or the switches located on the trim panel just in front of the power sliding door, even though the inside door lock is in a collision...
... the child lock system is engaged the door can only be opened from the outside door handle, remote keyless entry transmitter, switches on the overhead console or the switches located on the trim panel just in front of the power sliding door, even though the inside door lock is in a collision...
Owner's Manual
Page 34
... the vehicle speed is above 0 mph (0 km/h). • The power sliding door will operate from the rear seats, press the button located in the overhead console to the right. On vehicles equipped with one fluid motion.
... the vehicle speed is above 0 mph (0 km/h). • The power sliding door will operate from the rear seats, press the button located in the overhead console to the right. On vehicles equipped with one fluid motion.
Owner's Manual
Page 36
During power operation, personal injury or cargo damage may also be opened by pressing the button located on the overhead console. Make sure the liftgate is clear. Power Liftgate Switch When the remote keyless entry transmitter button is pressed and the "Lamp Flash" feature is enabled, ...
During power operation, personal injury or cargo damage may also be opened by pressing the button located on the overhead console. Make sure the liftgate is clear. Power Liftgate Switch When the remote keyless entry transmitter button is pressed and the "Lamp Flash" feature is enabled, ...
Owner's Manual
Page 65
... strictly adhered to: • Do not modify the front passenger seat assembly or components in any way. • Do not modify the front seat center console or center position seat in any modifications to the front passenger seat components, assembly, or to ensure that affect the front passenger airbag deployment. The...
... strictly adhered to: • Do not modify the front passenger seat assembly or components in any way. • Do not modify the front seat center console or center position seat in any modifications to the front passenger seat components, assembly, or to ensure that affect the front passenger airbag deployment. The...

Owner's Manual
Page 87
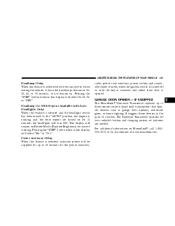
... Speed ...156 ▫ To Deactivate ...156 ▫ To Resume Speed ...156 ▫ To Vary The Speed Setting ...156 ▫ To Accelerate For Passing ...157 Overhead Console - If Equipped ...158 ▫ Courtesy/Reading Lights ...158 ▫ Sunglass Storage ...159 3
... Speed ...156 ▫ To Deactivate ...156 ▫ To Resume Speed ...156 ▫ To Vary The Speed Setting ...156 ▫ To Accelerate For Passing ...157 Overhead Console - If Equipped ...158 ▫ Courtesy/Reading Lights ...158 ▫ Sunglass Storage ...159 3

Owner's Manual
Page 89
UNDERSTANDING THE FEATURES OF YOUR VEHICLE 89 ▫ Overhead Rail System - If Equipped ...182 ▫ Removable Floor Console With Fold-In-Floor Seating - If Equipped ...184 ▫ Removable Floor Console Without Fold-In-Floor Seating - If Equipped ...185 ▫ Rear Compartment Storage Bins ...189 ▫ Cargo/Tub Nets ...189 ▫ Coat Hooks ...189 ▫ Cargo Area Storage ...189 Roof Luggage Rack - If Equipped ...190 Load Leveling System ...193 3
UNDERSTANDING THE FEATURES OF YOUR VEHICLE 89 ▫ Overhead Rail System - If Equipped ...182 ▫ Removable Floor Console With Fold-In-Floor Seating - If Equipped ...184 ▫ Removable Floor Console Without Fold-In-Floor Seating - If Equipped ...185 ▫ Rear Compartment Storage Bins ...189 ▫ Cargo/Tub Nets ...189 ▫ Coat Hooks ...189 ▫ Cargo Area Storage ...189 Roof Luggage Rack - If Equipped ...190 Load Leveling System ...193 3
Owner's Manual
Page 158
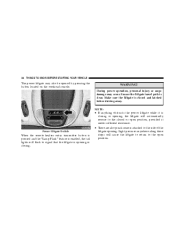
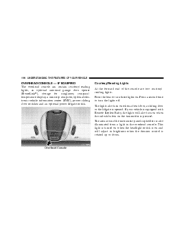
... Remote Keyless Entry, the lights will adjust in brightness when the dimmer control is also illuminated from a light in the overhead console. The area around the instrument panel cupholders is rotated up or down. Press the lens to turn on . 158 UNDERSTANDING THE... FEATURES OF YOUR VEHICLE OVERHEAD CONSOLE - IF EQUIPPED The overhead console can contain courtesy/reading lights, an optional universal garage door opener (HomeLink ), storage for sunglasses, compass/ temperature display, a...
... Remote Keyless Entry, the lights will adjust in brightness when the dimmer control is also illuminated from a light in the overhead console. The area around the instrument panel cupholders is rotated up or down. Press the lens to turn on . 158 UNDERSTANDING THE... FEATURES OF YOUR VEHICLE OVERHEAD CONSOLE - IF EQUIPPED The overhead console can contain courtesy/reading lights, an optional universal garage door opener (HomeLink ), storage for sunglasses, compass/ temperature display, a...

Owner's Manual
Page 159
... the compass will slowly rotate to an open the compartment. UNDERSTANDING THE FEATURES OF YOUR VEHICLE 159 Sunglass Storage At the rear of the overhead console, a compartment is self calibrating which eliminates the need to manually set the compass. The door will function normally. Manual Compass Calibration If the compass appears...
... the compass will slowly rotate to an open the compartment. UNDERSTANDING THE FEATURES OF YOUR VEHICLE 159 Sunglass Storage At the rear of the overhead console, a compartment is self calibrating which eliminates the need to manually set the compass. The door will function normally. Manual Compass Calibration If the compass appears...

Owner's Manual
Page 160
... some areas of the compass. CAUTION! Do not place any external magnets, such as magnetic roof mount antennas, in an area free from the overhead console. The "CAL" symbol will turn off and the compass will function normally. Do not use magnetic tools when servicing the overhead... console. Compass Variance Compass Variance is great enough to cause the compass to Comp/Temp. On vehicles equipped with a Compass/ Mini Trip Computer for 10 seconds. ...
... some areas of the compass. CAUTION! Do not place any external magnets, such as magnetic roof mount antennas, in an area free from the overhead console. The "CAL" symbol will turn off and the compass will function normally. Do not use magnetic tools when servicing the overhead... console. Compass Variance Compass Variance is great enough to cause the compass to Comp/Temp. On vehicles equipped with a Compass/ Mini Trip Computer for 10 seconds. ...

Owner's Manual
Page 164
The overhead console and climate control displays will be in this display you continue the displayed information will be selected. Reset Service Distance (Displays Only if Service Interval ...
The overhead console and climate control displays will be in this display you continue the displayed information will be selected. Reset Service Distance (Displays Only if Service Interval ...
Owner's Manual
Page 167
... is selected and the headlight switch has been moved to 45 seconds for the power windows, radio, power vent windows, power outlets, and removable center console, when the ignition switch is turned off your vehicle's battery and charging system; It triggers these devices at www.homelink.com. 3 no batteries are turned...
... is selected and the headlight switch has been moved to 45 seconds for the power windows, radio, power vent windows, power outlets, and removable center console, when the ignition switch is turned off your vehicle's battery and charging system; It triggers these devices at www.homelink.com. 3 no batteries are turned...

Owner's Manual
Page 173
... may be received including interference that may not cause harmful interference. • This device must accept any position between the sun visors on the overhead console. 3 Power Sunroof Controls Press and hold the switch rearward to the following the "Erasing HomeLink Buttons" instructions in this section.
... may be received including interference that may not cause harmful interference. • This device must accept any position between the sun visors on the overhead console. 3 Power Sunroof Controls Press and hold the switch rearward to the following the "Erasing HomeLink Buttons" instructions in this section.

Owner's Manual
Page 176
...provide power with a key or battery symbol indicating the power source. The circuit breaker also supplies power to the outlet in the removable floor console, when in this outlet may discharge the battery and/or prevent engine starting. NOTE: If desired, all of the sliding door and is powered... directly from the battery, items plugged into this manual. Refer to section 3 "Removable Floor Console" in the front position. 176 UNDERSTANDING THE FEATURES OF YOUR VEHICLE A third outlet is located on the driver's side, just to the rear of...
...provide power with a key or battery symbol indicating the power source. The circuit breaker also supplies power to the outlet in the removable floor console, when in this outlet may discharge the battery and/or prevent engine starting. NOTE: If desired, all of the sliding door and is powered... directly from the battery, items plugged into this manual. Refer to section 3 "Removable Floor Console" in the front position. 176 UNDERSTANDING THE FEATURES OF YOUR VEHICLE A third outlet is located on the driver's side, just to the rear of...

Owner's Manual
Page 184
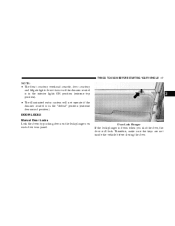
... phone holder, tissue holder, pen holder and a map holder. Pull up on the release handle located inside the floor console. Open the console lid and remove the storage tray. 2. To remove the console use the following procedure: 1. Release Handle It can be removed from the vehicle by pulling the release handle inside the...
... phone holder, tissue holder, pen holder and a map holder. Pull up on the release handle located inside the floor console. Open the console lid and remove the storage tray. 2. To remove the console use the following procedure: 1. Release Handle It can be removed from the vehicle by pulling the release handle inside the...

Owner's Manual
Page 185
...guides and push forward to be placed between either the front seats or middle seats. 3 WARNING! Removable Floor Console Without Fold-in-Floor Seating - If Equipped The removable floor console has a power outlet, storage tray, light, cell phone holder, tissue holder, and a map holder. ...In an accident, serious injury could result if the removable floor console is firmly attached. Pull up on the console to snap the legs into the floor tray. Remove the floor console. To reinstall the console, open the console lid and remove the storage tray. Cell Phone Holder Removal ...
...guides and push forward to be placed between either the front seats or middle seats. 3 WARNING! Removable Floor Console Without Fold-in-Floor Seating - If Equipped The removable floor console has a power outlet, storage tray, light, cell phone holder, tissue holder, and a map holder. ...In an accident, serious injury could result if the removable floor console is firmly attached. Pull up on the console to snap the legs into the floor tray. Remove the floor console. To reinstall the console, open the console lid and remove the storage tray. Cell Phone Holder Removal ...

Owner's Manual
Page 186
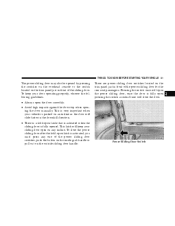
Open the rear lid and remove the storage tray. 2. Removable Floor Console Release Handle 186 UNDERSTANDING THE FEATURES OF YOUR VEHICLE NOTE: When the console is located between the front seats the outlet is protected by an automatic circuit breaker and is powered directly from the battery, items plugged into this outlet may discharge the battery and/or prevent engine starting. Pull up on the release handle located inside the floor console to disengage the floor console, reinstall the storage tray and close the rear lid. To remove the console use the following procedure: 1.
Open the rear lid and remove the storage tray. 2. Removable Floor Console Release Handle 186 UNDERSTANDING THE FEATURES OF YOUR VEHICLE NOTE: When the console is located between the front seats the outlet is protected by an automatic circuit breaker and is powered directly from the battery, items plugged into this outlet may discharge the battery and/or prevent engine starting. Pull up on the release handle located inside the floor console to disengage the floor console, reinstall the storage tray and close the rear lid. To remove the console use the following procedure: 1.
