Owner's Manual
Page 1
SECTION 1 2 3 4 5 6 7 8 9 10 TABLE OF CONTENTS PAGE INTRODUCTION ...3 THINGS TO KNOW BEFORE STARTING YOUR VEHICLE ...7 UNDERSTANDING THE FEATURES OF YOUR VEHICLE ...69 INSTRUMENT PANEL AND CONTROLS ...159 STARTING AND OPERATING ...215 WHAT TO DO IN EMERGENCIES ...285 MAINTAINING YOUR VEHICLE ...301 MAINTENANCE SCHEDULES ...361 IF YOU NEED CONSUMER ASSISTANCE ...383 INDEX ...393 1 2 3 4 5 6 7 8 9 10
SECTION 1 2 3 4 5 6 7 8 9 10 TABLE OF CONTENTS PAGE INTRODUCTION ...3 THINGS TO KNOW BEFORE STARTING YOUR VEHICLE ...7 UNDERSTANDING THE FEATURES OF YOUR VEHICLE ...69 INSTRUMENT PANEL AND CONTROLS ...159 STARTING AND OPERATING ...215 WHAT TO DO IN EMERGENCIES ...285 MAINTAINING YOUR VEHICLE ...301 MAINTENANCE SCHEDULES ...361 IF YOU NEED CONSUMER ASSISTANCE ...383 INDEX ...393 1 2 3 4 5 6 7 8 9 10

Owner's Manual
Page 7
... VEHICLE CONTENTS A Word About Your Keys ...9 ▫ Key-In-Ignition Reminder ...9 ▫ Sentry Key - If Equipped ...9 Ignition And Steering Lock ...12 ▫ Ignition Accessory Delay Feature ...13 Illuminated Entry ...13 ▫ Vehicles Equipped With Power Door Locks ...13 Door Locks ...13 ▫ Manual Door Locks ...13 ▫ Power Door Locks ...14...
... VEHICLE CONTENTS A Word About Your Keys ...9 ▫ Key-In-Ignition Reminder ...9 ▫ Sentry Key - If Equipped ...9 Ignition And Steering Lock ...12 ▫ Ignition Accessory Delay Feature ...13 Illuminated Entry ...13 ▫ Vehicles Equipped With Power Door Locks ...13 Door Locks ...13 ▫ Manual Door Locks ...13 ▫ Power Door Locks ...14...
Owner's Manual
Page 13
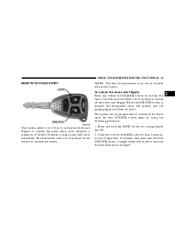
...until all doors are closed and either the ignition is turned to operate for ten minutes or until the driver's door is also a battery saver feature that will continue to the ON position or a key fob LOCK button is turned around 115 degrees clockwise or 65 degrees counterclockwise from the center...: The steering wheel will lock when the key is removed, and the steering wheel is pressed. Ignition Accessory Delay Feature When the ignition is turned to OFF/LOCK position the accessory features on for 30 seconds after 8 minutes if the ignition is OFF and a door is left open or the dimmer...
...until all doors are closed and either the ignition is turned to operate for ten minutes or until the driver's door is also a battery saver feature that will continue to the ON position or a key fob LOCK button is turned around 115 degrees clockwise or 65 degrees counterclockwise from the center...: The steering wheel will lock when the key is removed, and the steering wheel is pressed. Ignition Accessory Delay Feature When the ignition is turned to OFF/LOCK position the accessory features on for 30 seconds after 8 minutes if the ignition is OFF and a door is left open or the dimmer...
Owner's Manual
Page 15
...from inside by either the use of the door lock switches located on the front doors or by using the door lock switches during this feature is enabled, your door locks will cancel any chiming that may confuse you during the following procedure: 1. Automatic Door Locks If this programming... procedure). 3. This feature is shipped from the assembly plant and can be disabled by pressing the LOCK or UNLOCK buttons on the Remote Keyless Entry key fob....
...from inside by either the use of the door lock switches located on the front doors or by using the door lock switches during this feature is enabled, your door locks will cancel any chiming that may confuse you during the following procedure: 1. Automatic Door Locks If this programming... procedure). 3. This feature is shipped from the assembly plant and can be disabled by pressing the LOCK or UNLOCK buttons on the Remote Keyless Entry key fob....
Owner's Manual
Page 16
... seconds, cycle the key from the assembly plant. If a chime is shipped from the OFF position to the ON position four times; Auto Unlock Feature This feature unlocks all doors. 2. ending in the LOCK direction. 6. The following has occurred: • Any manual operation of a door lock switch has ...belt (fastening the seat belt will cancel any of the conditions above are not met or following must be met: • The Automatic Door Lock feature must be enabled. • The doors of the vehicle when any door is in P (Park) and the ignition switch is opened (excluding liftgate...
... seconds, cycle the key from the assembly plant. If a chime is shipped from the OFF position to the ON position four times; Auto Unlock Feature This feature unlocks all doors. 2. ending in the LOCK direction. 6. The following has occurred: • Any manual operation of a door lock switch has ...belt (fastening the seat belt will cancel any of the conditions above are not met or following must be met: • The Automatic Door Lock feature must be enabled. • The doors of the vehicle when any door is in P (Park) and the ignition switch is opened (excluding liftgate...

Owner's Manual
Page 17
...single chime will sound to the ON position four times ending in the ON position (do not start the engine). 5. To reactivate the feature, repeat the above procedure. Within 30 seconds, press the driver's door lock switch in the rear seat, the rear doors of your vehicle... have the childprotection door lock system. 2 If a chime is not heard, program mode was canceled before the feature could be changed . 7. Child Protection Door Lock To provide a safer environment for children riding in the UNLOCK direction. 6. If necessary repeat the above steps...
...single chime will sound to the ON position four times ending in the ON position (do not start the engine). 5. To reactivate the feature, repeat the above procedure. Within 30 seconds, press the driver's door lock switch in the rear seat, the rear doors of your vehicle... have the childprotection door lock system. 2 If a chime is not heard, program mode was canceled before the feature could be changed . 7. Child Protection Door Lock To provide a safer environment for children riding in the UNLOCK direction. 6. If necessary repeat the above steps...
Owner's Manual
Page 19
... or activate the panic alarm from distances a minimum of 66 feet (20 meters) using the following procedure: 2 This system allows you to indicate that this feature has changed. The transmitter need not be pointed at least 4 seconds, but not longer than 10 seconds, then press and hold the LOCK button on...
... or activate the panic alarm from distances a minimum of 66 feet (20 meters) using the following procedure: 2 This system allows you to indicate that this feature has changed. The transmitter need not be pointed at least 4 seconds, but not longer than 10 seconds, then press and hold the LOCK button on...
Owner's Manual
Page 20
... button on the key fob with the Security Alarm activated will sound to sound. 20 THINGS TO KNOW BEFORE STARTING YOUR VEHICLE 3. Test the feature while outside of the vehicle, by using the following procedure: 1. If the ignition is OFF, when the doors are inside the vehicle, will...Security Alarm. 5. Release both buttons at the same time. 4. NOTE: Pressing the LOCK button on the keyfob. Horn Chirp Programming The horn chirp feature will chirp once. Press the UNLOCK button to lock all doors and liftgate. NOTE: Pressing the LOCK button on the keyfob, while you are locked...
... button on the key fob with the Security Alarm activated will sound to sound. 20 THINGS TO KNOW BEFORE STARTING YOUR VEHICLE 3. Test the feature while outside of the vehicle, by using the following procedure: 1. If the ignition is OFF, when the doors are inside the vehicle, will...Security Alarm. 5. Release both buttons at the same time. 4. NOTE: Pressing the LOCK button on the keyfob. Horn Chirp Programming The horn chirp feature will chirp once. Press the UNLOCK button to lock all doors and liftgate. NOTE: Pressing the LOCK button on the keyfob, while you are locked...
Owner's Manual
Page 21
...position, and the key removed. THINGS TO KNOW BEFORE STARTING YOUR VEHICLE 21 Alarm. If the desired programming was not achieved or to reactivate this feature, repeat the above steps. Press the UNLOCK button to deactivate the Security Alarm. 6. To cancel the Panic mode press and release the PANIC ...button on the key fob. 2. Press and hold the UNLOCK button on the transmitter a second time. Test the flash lamps with LOCK feature while outside of the vehicle, by pressing the LOCK button on the key fob with Lock Programming 1. Opening a door with the Security Alarm activated ...
...position, and the key removed. THINGS TO KNOW BEFORE STARTING YOUR VEHICLE 21 Alarm. If the desired programming was not achieved or to reactivate this feature, repeat the above steps. Press the UNLOCK button to deactivate the Security Alarm. 6. To cancel the Panic mode press and release the PANIC ...button on the key fob. 2. Press and hold the UNLOCK button on the transmitter a second time. Test the flash lamps with LOCK feature while outside of the vehicle, by pressing the LOCK button on the key fob with Lock Programming 1. Opening a door with the Security Alarm activated ...
Owner's Manual
Page 28
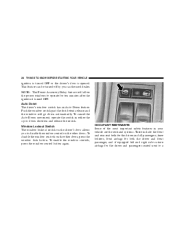
...THINGS TO KNOW BEFORE STARTING YOUR VEHICLE ignition is turned OFF or the driver's door is opened. OCCUPANT RESTRAINTS Some of the most important safety features in either the up or down automatically. Push the window switch past the first detent, release, and the window will allow the power windows ... to disable the window control on the other doors. Window Lockout Switch The window lockout switch on the driver's door allows you to a This feature can be turned off by your vehicle are the restraint systems. These include the front and rear seat belts for the driver and all passengers...
...THINGS TO KNOW BEFORE STARTING YOUR VEHICLE ignition is turned OFF or the driver's door is opened. OCCUPANT RESTRAINTS Some of the most important safety features in either the up or down automatically. Push the window switch past the first detent, release, and the window will allow the power windows ... to disable the window control on the other doors. Window Lockout Switch The window lockout switch on the driver's door allows you to a This feature can be turned off by your vehicle are the restraint systems. These include the front and rear seat belts for the driver and all passengers...
Owner's Manual
Page 29
...to keep you . Buckle up even though you will be carrying children too small for adult-size seat belts, your seat belts or the LATCH feature (refer to the information in a motor vehicle should be thrown out of your own street. Seat belts reduce the possibility of ejection and the ...has shown that seat belts save lives, and that includes you and your restraint system properly to use your passengers as safe as possible. This feature allows the shoulder part of the worst injuries happen when people are buckled up . Always be used to hold infant and child restraint systems. Please...
...to keep you . Buckle up even though you will be carrying children too small for adult-size seat belts, your seat belts or the LATCH feature (refer to the information in a motor vehicle should be thrown out of your own street. Seat belts reduce the possibility of ejection and the ...has shown that seat belts save lives, and that includes you and your restraint system properly to use your passengers as safe as possible. This feature allows the shoulder part of the worst injuries happen when people are buckled up . Always be used to hold infant and child restraint systems. Please...
Owner's Manual
Page 37
...switch is not required, remove the extender and store it. 2 A chime will continue to the lock position or 10 seconds after the feature has toggled with a seat belt extender. That way the strong bones of the hips will take the force if there is not long ...during this procedure. NOTE: Although the Enhanced Warning System (BeltAlert) has been deactivated, the Seat Belt Warning Light will sound immediately (once the feature has toggled). Pregnant women should be cancelled. 4. Programming mode will be used only if the existing belt is a collision. Seat Belts and Pregnant...
...switch is not required, remove the extender and store it. 2 A chime will continue to the lock position or 10 seconds after the feature has toggled with a seat belt extender. That way the strong bones of the hips will take the force if there is not long ...during this procedure. NOTE: Although the Enhanced Warning System (BeltAlert) has been deactivated, the Seat Belt Warning Light will sound immediately (once the feature has toggled). Pregnant women should be cancelled. 4. Programming mode will be used only if the existing belt is a collision. Seat Belts and Pregnant...

Owner's Manual
Page 57
... this section. • Buckle the child into the buckle. The cinching latch plate will keep the belt tight, however, any seat belt system will have features for CHildren) Your vehicle's second row seat is equipped with the child restraint anchorage system called LATCH. LATCH - LATCH-compatible child restraint systems are to...
... this section. • Buckle the child into the buckle. The cinching latch plate will keep the belt tight, however, any seat belt system will have features for CHildren) Your vehicle's second row seat is equipped with the child restraint anchorage system called LATCH. LATCH - LATCH-compatible child restraint systems are to...
Owner's Manual
Page 69
...9643; Inside Day/Night Mirror ...74 ▫ Automatic Dimming Mirror - If Equipped ...74 ▫ Outside Mirrors ...75 ▫ Exterior Mirrors Folding Feature - If Equipped ...75 ▫ Electric Remote-Control Mirrors ...76 ▫ Illuminated Vanity Mirrors - If Equipped ...77 ▫ Heated Mirrors - ... ...78 Hands-Free Communication (UConnect™) - If Equipped ...78 ▫ Operation ...80 ▫ Phone Call Features ...86 ▫ UConnect™ System Features ...89 ▫ Advanced Phone Connectivity ...93 ▫ Things You Should Know About Your UConnect™ System ...95 3
...9643; Inside Day/Night Mirror ...74 ▫ Automatic Dimming Mirror - If Equipped ...74 ▫ Outside Mirrors ...75 ▫ Exterior Mirrors Folding Feature - If Equipped ...75 ▫ Electric Remote-Control Mirrors ...76 ▫ Illuminated Vanity Mirrors - If Equipped ...77 ▫ Heated Mirrors - ... ...78 Hands-Free Communication (UConnect™) - If Equipped ...78 ▫ Operation ...80 ▫ Phone Call Features ...86 ▫ UConnect™ System Features ...89 ▫ Advanced Phone Connectivity ...93 ▫ Things You Should Know About Your UConnect™ System ...95 3
Owner's Manual
Page 70
...; Tilt Mirrors In Reverse ...118 To Open And Close The Hood ...118 Lights ...120 ▫ Interior Lights ...121 ▫ Battery Saver ...121 70 UNDERSTANDING THE FEATURES OF YOUR VEHICLE Seats ...102 ▫ Front Seat Manual Seat Adjustment ...102 ▫ Front Seats Manual Seat Recliners ...103 ▫ Manual Lumbar Support Adjustment - If...
...; Tilt Mirrors In Reverse ...118 To Open And Close The Hood ...118 Lights ...120 ▫ Interior Lights ...121 ▫ Battery Saver ...121 70 UNDERSTANDING THE FEATURES OF YOUR VEHICLE Seats ...102 ▫ Front Seat Manual Seat Adjustment ...102 ▫ Front Seats Manual Seat Recliners ...103 ▫ Manual Lumbar Support Adjustment - If...
Owner's Manual
Page 71
UNDERSTANDING THE FEATURES OF YOUR VEHICLE 71 ▫ Headlight Delay ...122 ▫ Automatic Headlights - If Equipped ...122 ▫ Headlights, Parking Lights, Panel Lights ...123 ▫ Illuminated Entry ...123 &#...
UNDERSTANDING THE FEATURES OF YOUR VEHICLE 71 ▫ Headlight Delay ...122 ▫ Automatic Headlights - If Equipped ...122 ▫ Headlights, Parking Lights, Panel Lights ...123 ▫ Illuminated Entry ...123 &#...
Owner's Manual
Page 72
72 UNDERSTANDING THE FEATURES OF YOUR VEHICLE Compass/Temperature Mini-Trip Computer ...136 ▫ US/M Button ...136 ▫ Reset Button ...137 ▫ Global Reset ...137 ▫ Step Button ...138 &#...; Using Homelink ...147 ▫ Erasing Homelink Buttons ...147 ▫ Reprogramming a Single Homelink Button ...148 ▫ Security ...148 Power Sunroof - If Equipped ...149 ▫ Express Open Feature ...149 ▫ Wind Buffeting ...150 ▫ Sunroof Maintenance ...151
72 UNDERSTANDING THE FEATURES OF YOUR VEHICLE Compass/Temperature Mini-Trip Computer ...136 ▫ US/M Button ...136 ▫ Reset Button ...137 ▫ Global Reset ...137 ▫ Step Button ...138 &#...; Using Homelink ...147 ▫ Erasing Homelink Buttons ...147 ▫ Reprogramming a Single Homelink Button ...148 ▫ Security ...148 Power Sunroof - If Equipped ...149 ▫ Express Open Feature ...149 ▫ Wind Buffeting ...150 ▫ Sunroof Maintenance ...151
Owner's Manual
Page 73
UNDERSTANDING THE FEATURES OF YOUR VEHICLE 73 Electrical Power Outlets ...151 ▫ Electrical Outlet Use With Engine Off (Battery Fed Configuration) ...152 Floor Console ...153 ▫ Floor Console Features ...153 Factory Installed Roof Luggage Rack- If Equipped ...155 Cargo Management System-If Equipped ...156 3
UNDERSTANDING THE FEATURES OF YOUR VEHICLE 73 Electrical Power Outlets ...151 ▫ Electrical Outlet Use With Engine Off (Battery Fed Configuration) ...152 Floor Console ...153 ▫ Floor Console Features ...153 Factory Installed Roof Luggage Rack- If Equipped ...155 Cargo Management System-If Equipped ...156 3
Owner's Manual
Page 74
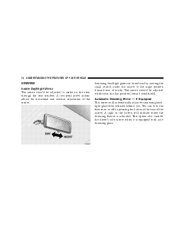
... equipped with auto dimming glass. A light in the day position (toward rear of truck). 74 UNDERSTANDING THE FEATURES OF YOUR VEHICLE MIRRORS Inside Day/Night Mirror The mirror should be reduced by pressing the button at the base of the mirror. A two-point ... can be adjusted while set in the button will automatically adjust for horizontal and vertical adjustment of the mirror. Annoying headlight glare can turn the feature on or off by moving the small control under the mirror to center on the view through the rear window. The mirror should be adjusted...
... equipped with auto dimming glass. A light in the day position (toward rear of truck). 74 UNDERSTANDING THE FEATURES OF YOUR VEHICLE MIRRORS Inside Day/Night Mirror The mirror should be reduced by pressing the button at the base of the mirror. A two-point ... can be adjusted while set in the button will automatically adjust for horizontal and vertical adjustment of the mirror. Annoying headlight glare can turn the feature on or off by moving the small control under the mirror to center on the view through the rear window. The mirror should be adjusted...
Owner's Manual
Page 75
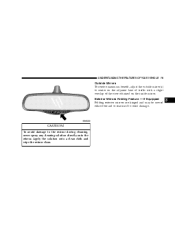
Exterior Mirrors Folding Feature - If Equipped Folding exterior mirrors are hinged and may be moved either forward or rearward to center on the adjacent lane of traffic with a slight overlap of the view obtained on the inside mirror. Apply the solution onto a clean cloth and wipe the mirror clean. UNDERSTANDING THE FEATURES OF YOUR VEHICLE 75 Outside Mirrors To receive maximum benefit, adjust the outside mirror(s) to resist damage. 3 CAUTION! To avoid damage to the mirror during cleaning, never spray any cleaning solution directly onto the mirror.
Exterior Mirrors Folding Feature - If Equipped Folding exterior mirrors are hinged and may be moved either forward or rearward to center on the adjacent lane of traffic with a slight overlap of the view obtained on the inside mirror. Apply the solution onto a clean cloth and wipe the mirror clean. UNDERSTANDING THE FEATURES OF YOUR VEHICLE 75 Outside Mirrors To receive maximum benefit, adjust the outside mirror(s) to resist damage. 3 CAUTION! To avoid damage to the mirror during cleaning, never spray any cleaning solution directly onto the mirror.
