

Owner Manual
Page 146
... your Uconnect™ Phone to "Working by the word "Send". Systems". For example, if required to the 24-Hour "Towing Assistance" coverage details on the DVD in Mexico). service or automated customer service line. your Uconnect™ Phone that may be too quick for pagers of numbers, followed by "Towing Assistance...
... your Uconnect™ Phone to "Working by the word "Send". Systems". For example, if required to the 24-Hour "Towing Assistance" coverage details on the DVD in Mexico). service or automated customer service line. your Uconnect™ Phone that may be too quick for pagers of numbers, followed by "Towing Assistance...
Owner Manual
Page 177
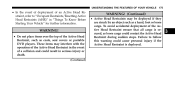
... the Active Head Restraint is deployed. These items may be deployed if they are struck by an object such as coats, seat covers or portable DVD players. UNDERSTANDING THE FEATURES OF YOUR VEHICLE 175 • In the event of deployment of an Active Head Restraint, refer to follow this warning could...
... the Active Head Restraint is deployed. These items may be deployed if they are struck by an object such as coats, seat covers or portable DVD players. UNDERSTANDING THE FEATURES OF YOUR VEHICLE 175 • In the event of deployment of an Active Head Restraint, refer to follow this warning could...

Owner Manual
Page 238
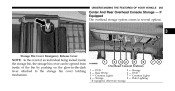
... as garage door openers, motorized gates, lighting or home security systems. The HomeLink unit is powered by the headlight switch. Overhead Compartment Features 1 2 3 4 1 - Storage DVD 1 Interior Lights Halo Lighting The HomeLink buttons, located on the front foot-well area while in "Understanding the Features Of Your Vehicle" for added... HomeLink replaces up to "Lights/ Halo Lights - 236 UNDERSTANDING THE FEATURES OF YOUR VEHICLE An additional LED at the front of the console base. DVD 1 - Storage If equipped, otherwise storage. 5 6 7 8 - - - -
... as garage door openers, motorized gates, lighting or home security systems. The HomeLink unit is powered by the headlight switch. Overhead Compartment Features 1 2 3 4 1 - Storage DVD 1 Interior Lights Halo Lighting The HomeLink buttons, located on the front foot-well area while in "Understanding the Features Of Your Vehicle" for added... HomeLink replaces up to "Lights/ Halo Lights - 236 UNDERSTANDING THE FEATURES OF YOUR VEHICLE An additional LED at the front of the console base. DVD 1 - Storage If equipped, otherwise storage. 5 6 7 8 - - - -
Owner Manual
Page 265
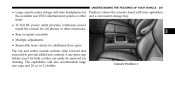
... be opened from inside of the bin by pushing on the glow-in-the-dark lever attached to the storage bin cover latching mechanism. Storage DVD 1 Courtesy Lights Halo Lighting Storage If equipped, otherwise storage. 5 6 7 8 - - - - Rear HVAC...
... be opened from inside of the bin by pushing on the glow-in-the-dark lever attached to the storage bin cover latching mechanism. Storage DVD 1 Courtesy Lights Halo Lighting Storage If equipped, otherwise storage. 5 6 7 8 - - - - Rear HVAC...
Owner Manual
Page 269
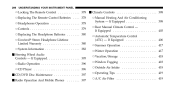
The cupholders will store headphones for Position 1 shows the console closed with four cupholders the available rear DVD entertainment system or other electronics. • Rear occupant accessible • Multiple adjustments • Removable from vehicle for cleaning. items • 12 Volt DC power outlet ...
The cupholders will store headphones for Position 1 shows the console closed with four cupholders the available rear DVD entertainment system or other electronics. • Rear occupant accessible • Multiple adjustments • Removable from vehicle for cleaning. items • 12 Volt DC power outlet ...

Owner Manual
Page 286
... Equipped ...318 ▫ Compass / Temperature Display ...318 ▫ Customer-Programmable Features (System Setup) ...320 Ⅵ Media Center 730N/430/430N (RHR/RER/ RBZ/RHB) CD/DVD/HDD/NAV - CD Mode For CD And MP3 Audio Play ...343 ▫ Notes On Playing MP3 Files ...345 ▫ List Button (CD Mode For MP3...
... Equipped ...318 ▫ Compass / Temperature Display ...318 ▫ Customer-Programmable Features (System Setup) ...320 Ⅵ Media Center 730N/430/430N (RHR/RER/ RBZ/RHB) CD/DVD/HDD/NAV - CD Mode For CD And MP3 Audio Play ...343 ▫ Notes On Playing MP3 Files ...345 ▫ List Button (CD Mode For MP3...

Owner Manual
Page 287
...; Listen To An Audio Source On Channel 2 While A Video Is Playing On Channel 1 ...363 ▫ Dual Video Screen ...365 ▫ Play A DVD Using The Touch-Screen Radio ...365 ▫ Play A DVD Using The VES™ Player (If Equipped) ...368 ▫ Listen To An Audio Source While A Video Is Playing ...370 ▫ Third...
...; Listen To An Audio Source On Channel 2 While A Video Is Playing On Channel 1 ...363 ▫ Dual Video Screen ...365 ▫ Play A DVD Using The Touch-Screen Radio ...365 ▫ Play A DVD Using The VES™ Player (If Equipped) ...368 ▫ Listen To An Audio Source While A Video Is Playing ...370 ▫ Third...
Owner Manual
Page 288
...; Outside Air Intake ...418 ▫ Operating Tips ...419 ▫ A/C Air Filter ...419 If Equipped...395 ▫ Radio Operation ...396 ▫ CD Player ...396 Ⅵ CD/DVD Disc Maintenance ...397 Ⅵ Radio Operation And Mobile Phones ...397 ▫ Manual Heating And Air Conditioning System -
...; Outside Air Intake ...418 ▫ Operating Tips ...419 ▫ A/C Air Filter ...419 If Equipped...395 ▫ Radio Operation ...396 ▫ CD Player ...396 Ⅵ CD/DVD Disc Maintenance ...397 Ⅵ Radio Operation And Mobile Phones ...397 ▫ Manual Heating And Air Conditioning System -

Owner Manual
Page 289
Cup Holders 12 - Climate Controls 9 - Radio 5 6 7 8 - Switch Bank 13 14 15 16 - - - - Instrument Cluster - Analog Clock - Storage Bin 11 - Shift Lever - Lower Glove Compartment - Ignition Switch Hood Release Dimmer Switch Headlight Switch Upper Glove Compartment - If Equipped 10 - DVD - Air Vents - UNDERSTANDING YOUR INSTRUMENT PANEL 287 INSTRUMENT PANEL FEATURES 4 1 2 3 4 -
Cup Holders 12 - Climate Controls 9 - Radio 5 6 7 8 - Switch Bank 13 14 15 16 - - - - Instrument Cluster - Analog Clock - Storage Bin 11 - Shift Lever - Lower Glove Compartment - Ignition Switch Hood Release Dimmer Switch Headlight Switch Upper Glove Compartment - If Equipped 10 - DVD - Air Vents - UNDERSTANDING YOUR INSTRUMENT PANEL 287 INSTRUMENT PANEL FEATURES 4 1 2 3 4 -

Owner Manual
Page 327
... appears next to the feature showing the system has been activated or the check-mark is turned OFF. switches, radio, Uconnect™ phone (if equipped), DVD video system (if equipped), power sunroof (if equipped), Flashers with the RKE transmitter. Opening either when power or manual sliding doors are unlocked with Sliding...
... appears next to the feature showing the system has been activated or the check-mark is turned OFF. switches, radio, Uconnect™ phone (if equipped), DVD video system (if equipped), power sunroof (if equipped), Flashers with the RKE transmitter. Opening either when power or manual sliding doors are unlocked with Sliding...
Owner Manual
Page 329
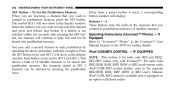
... appears next to the feature MEDIA CENTER 730N/430/430N (RHR/RER/RBZ/ showing the system has been activated or the check-mark RHB) CD/DVD/HDD/NAV - When "Blind Spot Alert Off" is selected the Blind Spot Monitor (BSM) system is removed showing the system has been deactivated. Having a sensor...
... appears next to the feature MEDIA CENTER 730N/430/430N (RHR/RER/RBZ/ showing the system has been activated or the check-mark RHB) CD/DVD/HDD/NAV - When "Blind Spot Alert Off" is selected the Blind Spot Monitor (BSM) system is removed showing the system has been deactivated. Having a sensor...
Owner Manual
Page 330
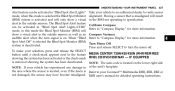
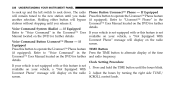
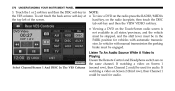
... - 328 UNDERSTANDING YOUR INSTRUMENT PANEL Operating Instructions (Voice Command System) - MEDIA CENTER 130 (SALES CODE RES) NOTE: The radio sales code is located on the DVD for further details. Radio Mode NOTE: The ignition switch must be in the ON or ACC position to "Uconnect™ Phone" in the Uconnect™... side of the radio faceplate. Operating Instructions (Uconnect™ Phone) - If Equipped Refer to "Voice Command" in the Uconnect™ User Manual located on the DVD for further details.
... - 328 UNDERSTANDING YOUR INSTRUMENT PANEL Operating Instructions (Voice Command System) - MEDIA CENTER 130 (SALES CODE RES) NOTE: The radio sales code is located on the DVD for further details. Radio Mode NOTE: The ignition switch must be in the ON or ACC position to "Uconnect™ Phone" in the Uconnect™... side of the radio faceplate. Operating Instructions (Uconnect™ Phone) - If Equipped Refer to "Voice Command" in the Uconnect™ User Manual located on the DVD for further details.
Owner Manual
Page 340
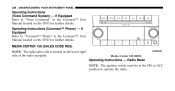
...hold the TIME button until you release it. screen. available on your vehicle, a "Not Equipped With Uconnect Phone" message will display on the DVD for further details. Phone Button Uconnect™ Phone - If Equipped Refer to operate the Uconnect™ Phone feature TIME Button (if equipped). ...right side TUNE/ SCROLL control knob. If screen. Refer to alternate display of the time Uconnect™ User Manual located on the DVD for further and radio frequency. Clock Setting Procedure If your vehicle is not equipped with or this feature is not 1. The radio ...
...hold the TIME button until you release it. screen. available on your vehicle, a "Not Equipped With Uconnect Phone" message will display on the DVD for further details. Phone Button Uconnect™ Phone - If Equipped Refer to operate the Uconnect™ Phone feature TIME Button (if equipped). ...right side TUNE/ SCROLL control knob. If screen. Refer to alternate display of the time Uconnect™ User Manual located on the DVD for further and radio frequency. Clock Setting Procedure If your vehicle is not equipped with or this feature is not 1. The radio ...
Owner Manual
Page 354
... control feature, refer to "Uconnect™ Phone" in the display window. The symbol SET 1 will show in the Uconnect™ User Manual located on the DVD for SET 1 and SET 2. Every time a preset button is not selected within five seconds after pressing the SET button, the channel will continue to each...
... control feature, refer to "Uconnect™ Phone" in the display window. The symbol SET 1 will show in the Uconnect™ User Manual located on the DVD for SET 1 and SET 2. Every time a preset button is not selected within five seconds after pressing the SET button, the channel will continue to each...
Owner Manual
Page 362
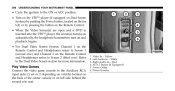
... back of the center console or on left , or by pressing the button on the Remote Control. • When the Video Screen(s) are open and a DVD is inserted into the VES™ player, the screen(s) turn(s) on automatically, the headphone transmitters turn on and playback begins. • For Dual Video Screen...
... back of the center console or on left , or by pressing the button on the Remote Control. • When the Video Screen(s) are open and a DVD is inserted into the VES™ player, the screen(s) turn(s) on automatically, the headphone transmitters turn on and playback begins. • For Dual Video Screen...
Owner Manual
Page 367
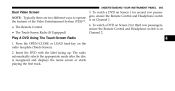
... different ways to operate is on the radio faceplate (Touch-Screen). 2. Press the OPEN/CLOSE or LOAD hard-key on Channel 1. Insert the DVD with the label facing up. The radio automatically selects the appropriate mode after the disc is on Channel 2. • The Touch-Screen Radio (...If Equipped) Dual Video Screen Play A DVD Using The Touch-Screen Radio 1. To watch a DVD on Screen 1 for third row passengers, • The Remote Control ensure the Remote Control and Headphone switch is recognized and ...
... different ways to operate is on the radio faceplate (Touch-Screen). 2. Press the OPEN/CLOSE or LOAD hard-key on Channel 1. Insert the DVD with the label facing up. The radio automatically selects the appropriate mode after the disc is on Channel 2. • The Touch-Screen Radio (...If Equipped) Dual Video Screen Play A DVD Using The Touch-Screen Radio 1. To watch a DVD on Screen 1 for third row passengers, • The Remote Control ensure the Remote Control and Headphone switch is recognized and ...
Owner Manual
Page 369
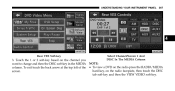
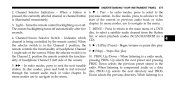
To exit touch the back arrow at the top left of the • To view a DVD on the radio press the RADIO/MEDIA hard-key, on the channel you want to change and then the DISC soft-key in the MEDIA NOTE: column. tab soft-key and then the VIEW VIDEO soft-key. UNDERSTANDING YOUR INSTRUMENT PANEL 367 4 Rear VES Soft-key Select Channel/Screen 1 And DISC In The MEDIA Column 3. Touch the 1 or 2 soft-key based on the radio faceplate, then touch the DISC screen.
To exit touch the back arrow at the top left of the • To view a DVD on the radio press the RADIO/MEDIA hard-key, on the channel you want to change and then the DISC soft-key in the MEDIA NOTE: column. tab soft-key and then the VIEW VIDEO soft-key. UNDERSTANDING YOUR INSTRUMENT PANEL 367 4 Rear VES Soft-key Select Channel/Screen 1 And DISC In The MEDIA Column 3. Touch the 1 or 2 soft-key based on the radio faceplate, then touch the DISC screen.
Owner Manual
Page 370
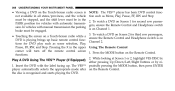
...Up/Down/Left/Right buttons or by re1. Press the MODE button on Channel 2. 368 UNDERSTANDING YOUR INSTRUMENT PANEL • Viewing a DVD on the Touch-Screen radio screen is not available in all states/provinces, and the vehicle must be stopped, and the shift lever must...for second row passengers, ensure the Remote Control and Headphone switch is recognized and starts playing the DVD. To watch a DVD on Channel 1. 3. In vehicles with automatic transmission. Insert the DVD with the label facing up basic remote control functions for third row passengers, ensure the Remote ...
...Up/Down/Left/Right buttons or by re1. Press the MODE button on Channel 2. 368 UNDERSTANDING YOUR INSTRUMENT PANEL • Viewing a DVD on the Touch-Screen radio screen is not available in all states/provinces, and the vehicle must be stopped, and the shift lever must...for second row passengers, ensure the Remote Control and Headphone switch is recognized and starts playing the DVD. To watch a DVD on Channel 1. 3. In vehicles with automatic transmission. Insert the DVD with the label facing up basic remote control functions for third row passengers, ensure the Remote ...
Owner Manual
Page 372
... the DISC the top left of the screen. 370 UNDERSTANDING YOUR INSTRUMENT PANEL 3. To exit touch the back arrow soft-key at • To view a DVD on the radio press the RADIO/MEDIA hard-key, on the same channel. If watching a video on Screen 1 (second row), then Channel 2 could be ...engaged. tab soft-key and then the VIEW VIDEO soft-key. • Viewing a DVD on the Touch-Screen radio screen is not available in all states/provinces, and the vehicle must be stopped, and the shift lever must be...
... the DISC the top left of the screen. 370 UNDERSTANDING YOUR INSTRUMENT PANEL 3. To exit touch the back arrow soft-key at • To view a DVD on the radio press the RADIO/MEDIA hard-key, on the same channel. If watching a video on Screen 1 (second row), then Channel 2 could be ...engaged. tab soft-key and then the VIEW VIDEO soft-key. • Viewing a DVD on the Touch-Screen radio screen is not available in all states/provinces, and the vehicle must be stopped, and the shift lever must be...
Owner Manual
Page 377
... by the remote control. Indicates which CD). Stops disc play . In Down selects the previous directory. Begin/resume or pause disc play 1 (right side of a DVD disc, to navigate in the menu. 3. PROG Up/Down - In disc modes, press and hold to navigate in the 5. ᭤᭤ - When the selector switch...
... by the remote control. Indicates which CD). Stops disc play . In Down selects the previous directory. Begin/resume or pause disc play 1 (right side of a DVD disc, to navigate in the menu. 3. PROG Up/Down - In disc modes, press and hold to navigate in the 5. ᭤᭤ - When the selector switch...


