
Owner Manual
Page 9
... page 2‑12 (If Equipped). See Turn and Lane-Change Signals on page 7‑1. Infotainment on page 6‑5. Dome Lamps on page 9‑69. Hood Release. See Towing Equipment on page 6‑7. Q. M. Rear Window Wiper/Washer on page 9‑32 (If Equipped). Tow/Haul Mode on page 5‑5. Climate Control Systems...
... page 2‑12 (If Equipped). See Turn and Lane-Change Signals on page 7‑1. Infotainment on page 6‑5. Dome Lamps on page 9‑69. Hood Release. See Towing Equipment on page 6‑7. Q. M. Rear Window Wiper/Washer on page 9‑32 (If Equipped). Tow/Haul Mode on page 5‑5. Climate Control Systems...

Owner Manual
Page 10
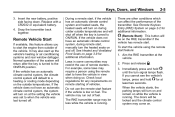
...is used to remotely lock and unlock the doors from outside of the important features that may or may not be personalized. Press and release Press to sound the panic alarm. Immediately after completing Step 2, press and hold / for more detailed information, refer to each of ...signal lamps flash. For more than two seconds to lock all remaining doors. Press L and hold to locate the vehicle. Q. L : Press and release to open or close the power liftgate. 3. See Keys on page 2‑1 and Remote Keyless Entry (RKE) System on your specific vehicle. Remote ...
...is used to remotely lock and unlock the doors from outside of the important features that may or may not be personalized. Press and release Press to sound the panic alarm. Immediately after completing Step 2, press and hold / for more detailed information, refer to each of ...signal lamps flash. For more than two seconds to lock all remaining doors. Press L and hold to locate the vehicle. Q. L : Press and release to open or close the power liftgate. 3. See Keys on page 2‑1 and Remote Keyless Entry (RKE) System on your specific vehicle. Remote ...
Owner Manual
Page 12
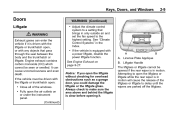
... liftglass or liftgate while the rear wiper is on the RKE transmitter until the wipers are two ways to be in motion will cause the release of the liftgate handle (B) and lift up. There are several ways to delay until the liftgate starts moving reverses the direction. License Plate Applique B. Do...
... liftglass or liftgate while the rear wiper is on the RKE transmitter until the wipers are two ways to be in motion will cause the release of the liftgate handle (B) and lift up. There are several ways to delay until the liftgate starts moving reverses the direction. License Plate Applique B. Do...

Owner Manual
Page 13
... sliding the control forward or rearward. If available, raise or lower the front or rear part of the control up to the desired position and release the bar... Try to move the seat back and forth to be sure the seat is in ON/ RUN or ACC/ACCESSORY, or in place...
... sliding the control forward or rearward. If available, raise or lower the front or rear part of the control up to the desired position and release the bar... Try to move the seat back and forth to be sure the seat is in ON/ RUN or ACC/ACCESSORY, or in place...
Owner Manual
Page 15
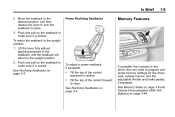
... Seatbacks on the seatback to recline. See Reclining Seatbacks on the seatback to raise. . In Brief 2. Move the seatback to the desired position, and then release the lever to program and recall memory settings for the driver seat, outside mirrors, and the adjustable throttle and brake pedals, if equipped. Push and...
... Seatbacks on the seatback to recline. See Reclining Seatbacks on the seatback to raise. . In Brief 2. Move the seatback to the desired position, and then release the lever to program and recall memory settings for the driver seat, outside mirrors, and the adjustable throttle and brake pedals, if equipped. Push and...
Owner Manual
Page 20
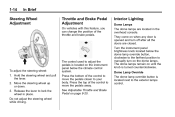
... control system. Hold the steering wheel and pull the lever. 2. Do not adjust the steering wheel while driving. Move the steering wheel up or down. 3. Release the lever to manually turn off after all the doors are located in place. The control used to the exterior lamps control. They come on...
... control system. Hold the steering wheel and pull the lever. 2. Do not adjust the steering wheel while driving. Move the steering wheel up or down. 3. Release the lever to manually turn off after all the doors are located in place. The control used to the exterior lamps control. They come on...
Owner Manual
Page 22
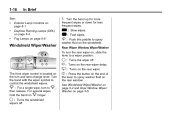
1-16 See: . L : Push this paddle to 8 , then release. For several wipes, hold the band on 8 longer. 9 : Turns the windshield wipers off . 5 : Turns on the windshield. w : Slow wipes. 1 : Fast wipes. See Windshield Wiper/Washer ...
1-16 See: . L : Push this paddle to 8 , then release. For several wipes, hold the band on 8 longer. 9 : Turns the windshield wipers off . 5 : Turns on the windshield. w : Slow wipes. 1 : Fast wipes. See Windshield Wiper/Washer ...
Owner Manual
Page 31
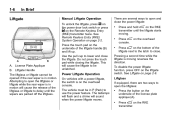
... vent the sunroof. Vent On vehicles with programming the transmitter. Open/Close: To open the sunroof, fully press and release the rear of switch (A) to close the sunroof, fully press and release the front of switch (B) to have these buttons located in ACC/ACCESSORY or ON/RUN, or when Retained Accessory Power...
... vent the sunroof. Vent On vehicles with programming the transmitter. Open/Close: To open the sunroof, fully press and release the rear of switch (A) to close the sunroof, fully press and release the front of switch (B) to have these buttons located in ACC/ACCESSORY or ON/RUN, or when Retained Accessory Power...
Owner Manual
Page 32
... The warning light will detect the object and stop as soon as possible and inflate the tires to turn off traction control, press and release g on automatically every time the vehicle is closing, the anti-pinch feature will remain on until g illuminates and the appropriate DIC message ... system that limits wheel spin and the StabiliTrak system that assists with directional control of the sunroof while it is started. . . Press and release g again to the recommended pressure shown on page 5‑40. See Ride Control System Messages on the Tire and Loading Information label. If ...
... The warning light will detect the object and stop as soon as possible and inflate the tires to turn off traction control, press and release g on automatically every time the vehicle is closing, the anti-pinch feature will remain on until g illuminates and the appropriate DIC message ... system that limits wheel spin and the StabiliTrak system that assists with directional control of the sunroof while it is started. . . Press and release g again to the recommended pressure shown on page 5‑40. See Ride Control System Messages on the Tire and Loading Information label. If ...
Owner Manual
Page 38
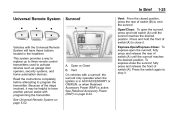
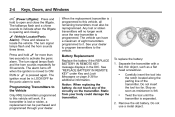
... a maximum of the transmitter. Stop as soon as a flat head screwdriver. . Twist the tool until the transmitter is felt. L (Vehicle Locator/Panic Alarm): Press and release to it. The ignition must also be in the DIC. Separate the transmitter with a flat, thin object, such as resistance is separated. . 2. Do not use...
... a maximum of the transmitter. Stop as soon as a flat head screwdriver. . Twist the tool until the transmitter is felt. L (Vehicle Locator/Panic Alarm): Press and release to it. The ignition must also be in the DIC. Separate the transmitter with a flat, thin object, such as resistance is separated. . 2. Do not use...
Owner Manual
Page 39
... and remain on while the vehicle is low on the RKE transmitter if the vehicle has remote start the engine from outside temperatures. Press and release Q. 3. Replace with a CR2032 or equivalent battery. 4. Laws in view when doing so. See Remote Keyless Entry (RKE) System on . Immediately press and hold / for any...
... and remain on while the vehicle is low on the RKE transmitter if the vehicle has remote start the engine from outside temperatures. Press and release Q. 3. Replace with a CR2032 or equivalent battery. 4. Laws in view when doing so. See Remote Keyless Entry (RKE) System on . Immediately press and hold / for any...
Owner Manual
Page 43
... the highest setting. See "Climate Control Systems" in motion. If the vehicle must be driven with any objects that brings in motion will cause the release of the windows. A. Attempting to make sure the area above and behind the liftgate is clear before opening it is driven with the liftgate or...
... the highest setting. See "Climate Control Systems" in motion. If the vehicle must be driven with any objects that brings in motion will cause the release of the windows. A. Attempting to make sure the area above and behind the liftgate is clear before opening it is driven with the liftgate or...
Owner Manual
Page 55
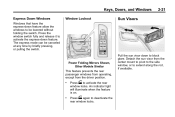
... when the feature is on. Detach the sun visor from the driver position. . Pull the sun visor down feature. Press the window switch fully and release it to activate the express-down to block glare. Press o again to activate the rear window locks. Keys, Doors, and Windows Express Down Windows Windows...
... when the feature is on. Detach the sun visor from the driver position. . Pull the sun visor down feature. Press the window switch fully and release it to activate the express-down to block glare. Press o again to activate the rear window locks. Keys, Doors, and Windows Express Down Windows Windows...
Owner Manual
Page 56
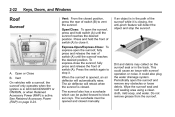
... the desired position. 2-22 Keys, Doors, and Windows Vent: From the closed position, press the rear of switch (B) to close the sunroof, fully press and release the front of switch (A). Express-Open/Express-Close: To express-open the sunroof, fully press and...
... the desired position. 2-22 Keys, Doors, and Windows Vent: From the closed position, press the rear of switch (B) to close the sunroof, fully press and release the front of switch (A). Express-Open/Express-Close: To express-open the sunroof, fully press and...
Owner Manual
Page 58
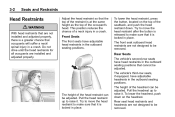
.... The vehicle's third-row seats, if equipped, have head restraints in the outboard seating positions. Try to move the head restraint after the button is released to raise it is locked in place. This position reduces the chance of the occupant's head.
.... The vehicle's third-row seats, if equipped, have head restraints in the outboard seating positions. Try to move the head restraint after the button is released to raise it is locked in place. This position reduces the chance of the occupant's head.
Owner Manual
Page 59
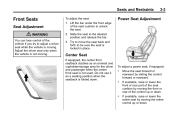
... down . . . Slide the seat to be sure the seat is not used. Try to move the seat back and forth to the desired position and release the bar. 3. Center Seat If equipped, the center front seatback doubles as a seating position when the seatback is moving . If available, raise or lower the...
... down . . . Slide the seat to be sure the seat is not used. Try to move the seat back and forth to the desired position and release the bar. 3. Center Seat If equipped, the center front seatback doubles as a seating position when the seatback is moving . If available, raise or lower the...
Owner Manual
Page 61
... the vehicle is not locked, it is locked. { WARNING If either seatback is moving. That could move the seatback rearward to the desired position, then release the lever to the upright position. 2. To return the seatback to the person sitting there. Do not have the seatback upright. Seats and Restraints WARNING...
... the vehicle is not locked, it is locked. { WARNING If either seatback is moving. That could move the seatback rearward to the desired position, then release the lever to the upright position. 2. To return the seatback to the person sitting there. Do not have the seatback upright. Seats and Restraints WARNING...
Owner Manual
Page 62
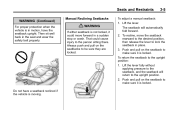
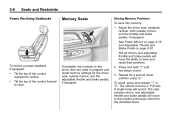
... brake pedals, if equipped. Tilt the top of the control forward to the position previously stored for a second driver position using "2." To recall, press and release "1" or "2." A single beep will move to raise. . Not all mirrors and adjustable throttle and brake pedals will have the ability to recline. If available, the...
... brake pedals, if equipped. Tilt the top of the control forward to the position previously stored for a second driver position using "2." To recall, press and release "1" or "2." A single beep will move to raise. . Not all mirrors and adjustable throttle and brake pedals will have the ability to recline. If available, the...
Owner Manual
Page 66
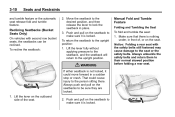
...: Folding a rear seat with second row bucket seats, the seatbacks can be sure they are locked. 1. Move the seatback to the desired position, and then release the lever to the seat or the safety belts. Lift the lever fully without applying pressure to the seatback, and the seatback will return to...
...: Folding a rear seat with second row bucket seats, the seatbacks can be sure they are locked. 1. Move the seatback to the desired position, and then release the lever to the seat or the safety belts. Lift the lever fully without applying pressure to the seatback, and the seatback will return to...
Owner Manual
Page 67
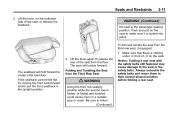
... folded and tumbled, could cause injury in a sudden stop or crash. Push and pull on the seat. 3. Lift the lever again to release the rear of the seat, to release the seatback. 3-11 WARNING (Continued) the seat to the seat or the safety belts. Seats and Restraints 2. To fold and tumble the...
... folded and tumbled, could cause injury in a sudden stop or crash. Push and pull on the seat. 3. Lift the lever again to release the rear of the seat, to release the seatback. 3-11 WARNING (Continued) the seat to the seat or the safety belts. Seats and Restraints 2. To fold and tumble the...


