

Owner Manual
Page 3
... Printing © 2012 General Motors LLC. If the vehicle is in U.S.A. This manual describes features that you did not purchase or due to changes subsequent to confirm each of the features found . Using this Manual To quickly locate information about the vehicle, use the Index in this owner manual... vehicle to the printing of this manual. Keep this manual in this manual including, but not limited to, GM, the GM logo, CHEVROLET, the CHEVROLET Emblem, TAHOE, SUBURBAN, and Z71 are options that may or may not be obtained from your dealer or from: On peut obtenir un exemplaire de...
... Printing © 2012 General Motors LLC. If the vehicle is in U.S.A. This manual describes features that you did not purchase or due to changes subsequent to confirm each of the features found . Using this Manual To quickly locate information about the vehicle, use the Index in this owner manual... vehicle to the printing of this manual. Keep this manual in this manual including, but not limited to, GM, the GM logo, CHEVROLET, the CHEVROLET Emblem, TAHOE, SUBURBAN, and Z71 are options that may or may not be obtained from your dealer or from: On peut obtenir un exemplaire de...
Owner Manual
Page 9
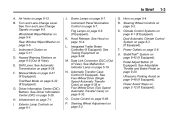
See Turn and Lane-Change Signals on page 9‑31 (If Equipped). C. Shift Lever. Manual Mode on page 6‑5. G. See Driver Information Center (DIC) on page 7‑1. Infotainment on page 5&#... page 9‑20. See Adjustable Throttle and Brake Pedal on page 9‑42 (If Equipped). Power Assist Steps on page 5‑4. O. Turn and Lane‐Change Lever. Windshield Wiper/Washer on page 2‑12 (If Equipped). H. Horn on page 8‑12. Data Link Connector (DLC) (Out of View). Automatic Transfer Case...
See Turn and Lane-Change Signals on page 9‑31 (If Equipped). C. Shift Lever. Manual Mode on page 6‑5. G. See Driver Information Center (DIC) on page 7‑1. Infotainment on page 5&#... page 9‑20. See Adjustable Throttle and Brake Pedal on page 9‑42 (If Equipped). Power Assist Steps on page 5‑4. O. Turn and Lane‐Change Lever. Windshield Wiper/Washer on page 2‑12 (If Equipped). H. Horn on page 8‑12. Data Link Connector (DLC) (Out of View). Automatic Transfer Case...
Owner Manual
Page 16
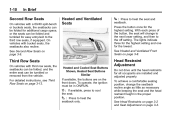
...recline. The lights indicate three for the highest setting and one for the highest setting. With each press of the button, the seat will change the seatback recline angle as little as necessary while keeping the seat and the head restraint height in ON/RUN. Third Row Seats On ... See Head Restraints on page 3‑2 and Seat Adjustment on page 3‑9. Press the button once for the lowest. To achieve a comfortable seating position, change to the next lower setting, and then to cool the seat. See Second Row Seats on page 3‑3. 1-10 In Brief Second Row Seats On...
...recline. The lights indicate three for the highest setting and one for the highest setting. With each press of the button, the seat will change the seatback recline angle as little as necessary while keeping the seat and the head restraint height in ON/RUN. Third Row Seats On ... See Head Restraints on page 3‑2 and Seat Adjustment on page 3‑9. Press the button once for the lowest. To achieve a comfortable seating position, change to the next lower setting, and then to cool the seat. See Second Row Seats on page 3‑3. 1-10 In Brief Second Row Seats On...
Owner Manual
Page 20
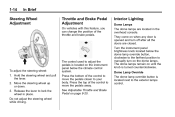
.... Move the steering wheel up or down. 3. 1-14 In Brief Steering Wheel Adjustment Throttle and Brake Pedal Adjustment On vehicles with this feature, you can change the position of the throttle and brake pedals. Dome Lamp Override The dome lamp override button is opened and turn on page 9‑20.
.... Move the steering wheel up or down. 3. 1-14 In Brief Steering Wheel Adjustment Throttle and Brake Pedal Adjustment On vehicles with this feature, you can change the position of the throttle and brake pedals. Dome Lamp Override The dome lamp override button is opened and turn on page 9‑20.
Owner Manual
Page 22
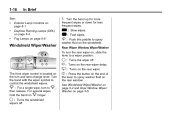
.../ Washer on the rear window. w : Slow wipes. 1 : Fast wipes. L : Push this paddle to spray washer fluid on page 5‑5. 8: For a single wipe, turn and lane-change lever. Z : Turns on the rear wiper. = : Press the button on the end of the lever to spray washer fluid on page 6‑6 Turn the band...
.../ Washer on the rear window. w : Slow wipes. 1 : Fast wipes. L : Push this paddle to spray washer fluid on page 5‑5. 8: For a single wipe, turn and lane-change lever. Z : Turns on the rear wiper. = : Press the button on the end of the lever to spray washer fluid on page 6‑6 Turn the band...
Owner Manual
Page 27
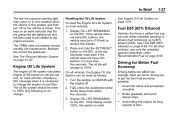
... WMA playback, the song title information displays on the top line of the display and artist information displays on . 2. Each page of favorites can be changed. 4. For more information about these and other radio features, see "Storing Radio Stations" in AM-FM Radio on page 7‑6. Setting the Clock To set...
... WMA playback, the song title information displays on the top line of the display and artist information displays on . 2. Each page of favorites can be changed. 4. For more information about these and other radio features, see "Storing Radio Stations" in AM-FM Radio on page 7‑6. Setting the Clock To set...
Owner Manual
Page 33
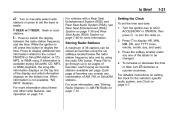
... idling the engine for more than five seconds. Avoid fast starts and accelerate smoothly. This may come on page 9‑56. The oil life will change to get the best fuel economy possible. . See Tire Pressure Monitor System on the DIC. If the vehicle does not have DIC buttons, the vehicle... Fuel on in P (Park) to 85% ethanol (E85). Here are getting low and the tires need to be inflated to 100% only following an oil change the engine oil and filter. Resetting the Oil Life System To reset the Engine Oil Life System on page 9‑58. See Fuel E85 (85...
... idling the engine for more than five seconds. Avoid fast starts and accelerate smoothly. This may come on page 9‑56. The oil life will change to get the best fuel economy possible. . See Tire Pressure Monitor System on the DIC. If the vehicle does not have DIC buttons, the vehicle... Fuel on in P (Park) to 85% ethanol (E85). Here are getting low and the tires need to be inflated to 100% only following an oil change the engine oil and filter. Resetting the Oil Life System To reset the Engine Oil Life System on page 9‑58. See Fuel E85 (85...
Owner Manual
Page 45
... opened and closed or open position. The liftgate will reverse direction and open fully. With the power liftgate disabled and all of Power Liftgate To change the liftgate to lower and close the liftgate before driving. Do not press the touch pad while closing the liftgate. If the battery is disconnected...
... opened and closed or open position. The liftgate will reverse direction and open fully. With the power liftgate disabled and all of Power Liftgate To change the liftgate to lower and close the liftgate before driving. Do not press the touch pad while closing the liftgate. If the battery is disconnected...
Owner Manual
Page 49
... service PASS-Key III+ to have a new key made and programmed to the LOCK/OFF position in the ignition and start , see your shoulder before changing lanes. Insert the original, already programmed key in Step 3. After the engine has started, turn off once the key has been programmed. 5. Check the inside...
... service PASS-Key III+ to have a new key made and programmed to the LOCK/OFF position in the ignition and start , see your shoulder before changing lanes. Insert the original, already programmed key in Step 3. After the engine has started, turn off once the key has been programmed. 5. Check the inside...
Owner Manual
Page 50
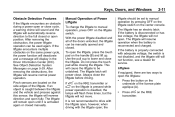
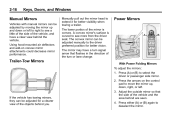
... turn signal arrow that the side of the mirror is curved to see a little of the side of the vehicle, and have a turn or lane change. The mirror may have a clear view behind the vehicle. The convex mirror can be adjusted manually to the driver preferred position for better visibility when...
... turn signal arrow that the side of the mirror is curved to see a little of the side of the vehicle, and have a turn or lane change. The mirror may have a clear view behind the vehicle. The convex mirror can be adjusted manually to the driver preferred position for better visibility when...
Owner Manual
Page 51
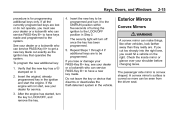
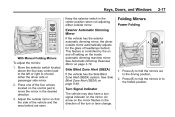
.... Adjust the outside mirror automatically adjusts for the glare of headlamps behind are seen. Turn Signal Indicator The vehicle may also have a turn or lane change. An arrow on the mirror flashes in the direction of the turn signal indicator on the inside automatic dimming rearview mirror. Press (B) to fold the...
.... Adjust the outside mirror automatically adjusts for the glare of headlamps behind are seen. Turn Signal Indicator The vehicle may also have a turn or lane change. An arrow on the mirror flashes in the direction of the turn signal indicator on the inside automatic dimming rearview mirror. Press (B) to fold the...
Owner Manual
Page 64
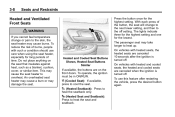
Heated and Ventilated Front Seats { WARNING If you cannot feel temperature change to the next lower setting, and then to heat up. Do not place anything on the front doors. To operate, the ignition must be in ... Press the button once for the lowest. To use care when using the seat heater, especially for long periods of the button, the seat will change or pain to the skin, the seat heater may take longer to the off setting. An overheated seat heater may cause a burn or may cause...
Heated and Ventilated Front Seats { WARNING If you cannot feel temperature change to the next lower setting, and then to heat up. Do not place anything on the front doors. To operate, the ignition must be in ... Press the button once for the lowest. To use care when using the seat heater, especially for long periods of the button, the seat will change or pain to the skin, the seat heater may take longer to the off setting. An overheated seat heater may cause a burn or may cause...
Owner Manual
Page 65
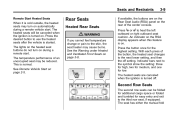
Press the button once for low. This is on. With each press of the button, the heated seat changes to the third row seat, if equipped. Second Row Seats The second row seats can be folded for additional cargo space or folded and tumbled ...for easy entry and exit to the next lower setting, and then the off . { WARNING If you cannot feel temperature change or pain to use the heated seats after the vehicle is started. Press M or L to the symbol show the setting: three for high, two for...
Press the button once for low. This is on. With each press of the button, the heated seat changes to the third row seat, if equipped. Second Row Seats The second row seats can be folded for additional cargo space or folded and tumbled ...for easy entry and exit to the next lower setting, and then the off . { WARNING If you cannot feel temperature change or pain to use the heated seats after the vehicle is started. Press M or L to the symbol show the setting: three for high, two for...
Owner Manual
Page 94
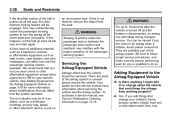
... the object from working properly? A: Yes. See Adding Equipment to the Airbag-Equipped Vehicle on indicator may unintentionally cause the passenger sensing system to or change your vehicle's frame, bumper system, height, front end or side sheet metal, they may interfere with the proper operation of additional material, such as a blanket... up to an airbag when it inflates. Servicing the Airbag-Equipped Vehicle Airbags affect how the vehicle should be injured if you add things that change about servicing the vehicle and the airbag system.
... the object from working properly? A: Yes. See Adding Equipment to the Airbag-Equipped Vehicle on indicator may unintentionally cause the passenger sensing system to or change your vehicle's frame, bumper system, height, front end or side sheet metal, they may interfere with the proper operation of additional material, such as a blanket... up to an airbag when it inflates. Servicing the Airbag-Equipped Vehicle Airbags affect how the vehicle should be injured if you add things that change about servicing the vehicle and the airbag system.
Owner Manual
Page 95
... of the Customer Satisfaction Procedure in Step Two of the passenger airbag(s) or prevent the passenger sensing system from working properly? If you do not change or defeat the snow plow's "tripping mechanism." Q: What if I added a snow plow? If you have the optional Snow Plow Prep Package (RPO VYU...) on page 13‑4. 3-39 If the vehicle has rollover roof-rail airbags, see Different Size Tires and Wheels on page 3‑34. Changing or moving any questions about this manual. In addition, the vehicle may not operate properly if the original seat trim is replaced with non-GM...
... of the Customer Satisfaction Procedure in Step Two of the passenger airbag(s) or prevent the passenger sensing system from working properly? If you do not change or defeat the snow plow's "tripping mechanism." Q: What if I added a snow plow? If you have the optional Snow Plow Prep Package (RPO VYU...) on page 13‑4. 3-39 If the vehicle has rollover roof-rail airbags, see Different Size Tires and Wheels on page 3‑34. Changing or moving any questions about this manual. In addition, the vehicle may not operate properly if the original seat trim is replaced with non-GM...

Owner Manual
Page 99
... designed for them. Seats and Restraints 3-43 Infants and Young Children Everyone in an appropriate restraint. { WARNING Children can be thrown out of the traveler changes the need, for everyone, to hold an infant or a child while riding in a vehicle. Neither the distance traveled nor the age and size of the...
... designed for them. Seats and Restraints 3-43 Infants and Young Children Everyone in an appropriate restraint. { WARNING Children can be thrown out of the traveler changes the need, for everyone, to hold an infant or a child while riding in a vehicle. Neither the distance traveled nor the age and size of the...
Owner Manual
Page 126
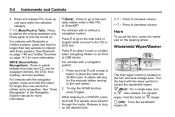
.... See "Voice Recognition" in AM, FM, or SiriusXM®. Press ¨ to go to control the windshield wipers. 8 (Mist): For a single wipe, turn and lane-change lever. Release to 8 , then release. 5-4 Instruments and Controls 3. For vehicles with Bluetooth or OnStar systems, press and hold ¨ until a beep is located on the...
.... See "Voice Recognition" in AM, FM, or SiriusXM®. Press ¨ to go to control the windshield wipers. 8 (Mist): For a single wipe, turn and lane-change lever. Release to 8 , then release. 5-4 Instruments and Controls 3. For vehicles with Bluetooth or OnStar systems, press and hold ¨ until a beep is located on the...
Owner Manual
Page 127
... then either stop or return to spray washer fluid on page 10‑29. See Wiper Blade Replacement on the windshield. To turn and lane-change lever. Compass Zone The zone is on the rear window. L (Washer Fluid): w (Low Speed): 1 (High Speed): Slow wipes. Your dealer will set the correct zone...
... then either stop or return to spray washer fluid on page 10‑29. See Wiper Blade Replacement on the windshield. To turn and lane-change lever. Compass Zone The zone is on the rear window. L (Washer Fluid): w (Low Speed): 1 (High Speed): Slow wipes. Your dealer will set the correct zone...

Owner Manual
Page 128
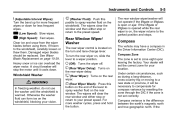
...in which the vehicle is traveling. Find the vehicle's current location and variance zone number on the map. Press the trip/fuel button until CHANGE COMPASS ZONE displays. 2. Zones 1 through and select the appropriate variance zone. 4. Compass Calibration The compass can be set /reset button ...from tall buildings, utility wires, manhole covers, or other industrial structures, if possible. To adjust for North, or the heading does not change after making turns, there may give false readings. Only calibrate the compass in a magnetically clean and safe location, such as an open ...
...in which the vehicle is traveling. Find the vehicle's current location and variance zone number on the map. Press the trip/fuel button until CHANGE COMPASS ZONE displays. 2. Zones 1 through and select the appropriate variance zone. 4. Compass Calibration The compass can be set /reset button ...from tall buildings, utility wires, manhole covers, or other industrial structures, if possible. To adjust for North, or the heading does not change after making turns, there may give false readings. Only calibrate the compass in a magnetically clean and safe location, such as an open ...
Owner Manual
Page 129
... press the O button to the variance zone in this section. Before calibrating the compass, make sure the compass zone is complete. Press the H button to change that setting. 4. Press the softkey located under any one of the tabs to display HR, MIN, MM, DD, YYYY (hour, minute, month, day, and year...
... press the O button to the variance zone in this section. Before calibrating the compass, make sure the compass zone is complete. Press the H button to change that setting. 4. Press the softkey located under any one of the tabs to display HR, MIN, MM, DD, YYYY (hour, minute, month, day, and year...


