Owner's Manual
Page 1
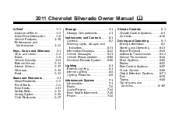
... Silverado Owner Manual M In Brief ...1-1 Instrument Panel ...1-2 Initial Drive Information ...1-8 Vehicle Features ...1-25 Performance and Maintenance ...1-32 Keys, Doors and Windows ...2-1 Keys and Locks ...2-2 Doors ...2-9 Vehicle Security...2-11 Exterior Mirrors ...2-14 Interior Mirrors ...2-17 Windows ...2-18 Roof ...2-20 Seats and Restraints ...3-1 Head Restraints ...3-2 Front Seats ...3-3 Rear Seats ...3-11 Safety Belts ...3-12 Airbag System ...3-29 Child Restraints ...3-47 Storage ...4-1 Storage Compartments ...4-1 Instruments and Controls ...5-1 Controls ...5-2 Warning Lights, Gauges...
... Silverado Owner Manual M In Brief ...1-1 Instrument Panel ...1-2 Initial Drive Information ...1-8 Vehicle Features ...1-25 Performance and Maintenance ...1-32 Keys, Doors and Windows ...2-1 Keys and Locks ...2-2 Doors ...2-9 Vehicle Security...2-11 Exterior Mirrors ...2-14 Interior Mirrors ...2-17 Windows ...2-18 Roof ...2-20 Seats and Restraints ...3-1 Head Restraints ...3-2 Front Seats ...3-3 Rear Seats ...3-11 Safety Belts ...3-12 Airbag System ...3-29 Child Restraints ...3-47 Storage ...4-1 Storage Compartments ...4-1 Instruments and Controls ...5-1 Controls ...5-2 Warning Lights, Gauges...
Owner's Manual
Page 2
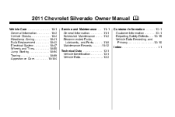
2011 Chevrolet Silverado Owner Manual M Vehicle Care ...10-1 General Information ...10-2 Vehicle Checks ...10-4 Headlamp Aiming ...10-41 Bulb Replacement ...10-43 Electrical System ...10-47 Wheels and Tires ...10-55 Jump Starting ...10-94 Towing ...10-99 Appearance Care ...10-104 Service and Maintenance ...11-1 General Information ...11-1 Scheduled Maintenance ...11-2 Recommended Fluids, Lubricants, and Parts ...11-8 Maintenance Records ...11-12 Technical Data ...12-1 Vehicle Identification ...12-1 Vehicle Data ...12-2 Customer Information...
2011 Chevrolet Silverado Owner Manual M Vehicle Care ...10-1 General Information ...10-2 Vehicle Checks ...10-4 Headlamp Aiming ...10-41 Bulb Replacement ...10-43 Electrical System ...10-47 Wheels and Tires ...10-55 Jump Starting ...10-94 Towing ...10-99 Appearance Care ...10-104 Service and Maintenance ...11-1 General Information ...11-1 Scheduled Maintenance ...11-2 Recommended Fluids, Lubricants, and Parts ...11-8 Maintenance Records ...11-12 Technical Data ...12-1 Vehicle Identification ...12-1 Vehicle Data ...12-2 Customer Information...
Owner's Manual
Page 7
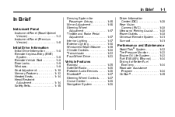
...33 Engine Oil Life System ...1-33 Fuel E85 (85% Ethanol) ...1-34 Driving for Passenger Airbag ...Mirror Adjustment ...Steering Wheel Adjustment ...Throttle and Brake Pedal Adjustment ...Interior Lighting ...Exterior Lighting ...Windshield Wiper/Washer ...Climate Controls ...Transmission ...Four-Wheel Drive ... 1-15 1-16 1-17 1-17 1-17 1-18 1-19 1-20 1-22 1-23 1-25 1-26 1-26 1-27 1-27 1-28 1-28 Driver Information Center (DIC) ...Rear Vision Camera (RVC) ...Ultrasonic Parking Assist ...Power Outlets ...Universal Remote System ...Sunroof ... Performance and Maintenance Vehicle Features Radio...
...33 Engine Oil Life System ...1-33 Fuel E85 (85% Ethanol) ...1-34 Driving for Passenger Airbag ...Mirror Adjustment ...Steering Wheel Adjustment ...Throttle and Brake Pedal Adjustment ...Interior Lighting ...Exterior Lighting ...Windshield Wiper/Washer ...Climate Controls ...Transmission ...Four-Wheel Drive ... 1-15 1-16 1-17 1-17 1-17 1-18 1-19 1-20 1-22 1-23 1-25 1-26 1-26 1-27 1-27 1-28 1-28 Driver Information Center (DIC) ...Rear Vision Camera (RVC) ...Ultrasonic Parking Assist ...Power Outlets ...Universal Remote System ...Sunroof ... Performance and Maintenance Vehicle Features Radio...
Owner's Manual
Page 9
... Hood on page 7‑1. Instrument Cluster on page 5‑4. N. Windshield Wiper/Washer on page 5‑12. D. See Automatic Transmission on page 5‑32. Data Link Connector (DLC) (Out of View). Tow/Haul Selector Button (If Equipped). K. See Driver Information Center (DIC) on page 9‑42. Hazard Warning Flashers on page 6‑6. Shift Lever. M. See Turn and Lane-Change Signals on page 6‑5 (Out of View). Instrument Panel...
... Hood on page 7‑1. Instrument Cluster on page 5‑4. N. Windshield Wiper/Washer on page 5‑12. D. See Automatic Transmission on page 5‑32. Data Link Connector (DLC) (Out of View). Tow/Haul Selector Button (If Equipped). K. See Driver Information Center (DIC) on page 9‑42. Hazard Warning Flashers on page 6‑6. Shift Lever. M. See Turn and Lane-Change Signals on page 6‑5 (Out of View). Instrument Panel...
Owner's Manual
Page 13
...-Change Signals on page 9‑42. See Automatic Transmission on page 6‑6. Tow/Haul Mode on page 6‑8. Dome Lamps on page 9‑46 (If Equipped). See Four-Wheel Drive on page 10‑5. See Hood on page 10‑34. Cruise Control on page 7‑1. R. T. Driver Information Center (DIC) Buttons. Infotainment on page 9‑69. K. M. N. P. U. V. Ultrasonic Parking Assist on page 5‑4. G. Windshield Wiper...
...-Change Signals on page 9‑42. See Automatic Transmission on page 6‑6. Tow/Haul Mode on page 6‑8. Dome Lamps on page 9‑46 (If Equipped). See Four-Wheel Drive on page 10‑5. See Hood on page 10‑34. Cruise Control on page 7‑1. R. T. Driver Information Center (DIC) Buttons. Infotainment on page 9‑69. K. M. N. P. U. V. Ultrasonic Parking Assist on page 5‑4. G. Windshield Wiper...
Owner's Manual
Page 14
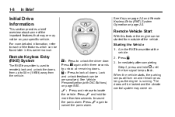
... turn signal lamps flash. L : Press and release to unlock the driver door. Press K again within three seconds to sound the panic alarm. Lock and unlock feedback can be found later in this feature the engine can be on . Initial Drive Information This section provides a brief overview about some of the vehicle. Press to locate the vehicle. Remote Keyless Entry (RKE) System The RKE transmitter is running...
... turn signal lamps flash. L : Press and release to unlock the driver door. Press K again within three seconds to sound the panic alarm. Lock and unlock feedback can be found later in this feature the engine can be on . Initial Drive Information This section provides a brief overview about some of the vehicle. Press to locate the vehicle. Remote Keyless Entry (RKE) System The RKE transmitter is running...
Owner's Manual
Page 22
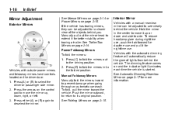
... nighttime use. See Trailer-Tow Mirrors on page 2‑15. Press either (A) or (B) again to its original position. Mirror Adjustment Exterior Mirrors Interior Mirror Vehicles with outside power mirrors and foldaway mirrors have controls located on page 2‑17 for a clearer view of lights from behind you. Press (A) or (B) to extend it for better visibility when towing a trailer. Manually pull out the mirror head to select the driver or passenger side mirror. 2.
... nighttime use. See Trailer-Tow Mirrors on page 2‑15. Press either (A) or (B) again to its original position. Mirror Adjustment Exterior Mirrors Interior Mirror Vehicles with outside power mirrors and foldaway mirrors have controls located on page 2‑17 for a clearer view of lights from behind you. Press (A) or (B) to extend it for better visibility when towing a trailer. Manually pull out the mirror head to select the driver or passenger side mirror. 2.

Owner's Manual
Page 45
Keys, Doors and Windows 2-1 Keys, Doors and Windows Keys and Locks Keys ...Remote Keyless Entry (RKE) System ...Remote Keyless Entry (RKE) System Operation ...Remote Vehicle Start ...Door Locks ...Power Door Locks ...Delayed Locking ...Automatic Door Locks ...Lockout Protection ...Safety Locks ...2-2 2-2 2-3 2-5 2-7 2-8 2-8 2-8 2-8 2-8 Doors Rear Doors (Extended Cab) ...2-9 Tailgate ...2-10 Interior Mirrors Manual Rearview Mirror ...2-17 Automatic Dimming Rearview Mirror ...2-17 Vehicle Security Vehicle Security ...2-11 Anti-theft Alarm System ...2-11 Immobilizer ...2-12 Immobilizer ...
Keys, Doors and Windows 2-1 Keys, Doors and Windows Keys and Locks Keys ...Remote Keyless Entry (RKE) System ...Remote Keyless Entry (RKE) System Operation ...Remote Vehicle Start ...Door Locks ...Power Door Locks ...Delayed Locking ...Automatic Door Locks ...Lockout Protection ...Safety Locks ...2-2 2-2 2-3 2-5 2-7 2-8 2-8 2-8 2-8 2-8 Doors Rear Doors (Extended Cab) ...2-9 Tailgate ...2-10 Interior Mirrors Manual Rearview Mirror ...2-17 Automatic Dimming Rearview Mirror ...2-17 Vehicle Security Vehicle Security ...2-11 Anti-theft Alarm System ...2-11 Immobilizer ...2-12 Immobilizer ...
Owner's Manual
Page 54
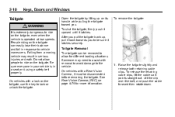
... sure everyone in your vehicle is operated at low speeds. On vehicles with a lock on the tailgate can be sure it back towards you . Raise the tailgate slightly and release both retaining cable clips. To release the retaining cable clips, lift the cable so it latches. 2-10 Keys, Doors and Windows Open the tailgate by lifting up , pull it latches securely. Someone may...
... sure everyone in your vehicle is operated at low speeds. On vehicles with a lock on the tailgate can be sure it back towards you . Raise the tailgate slightly and release both retaining cable clips. To release the retaining cable clips, lift the cable so it latches. 2-10 Keys, Doors and Windows Open the tailgate by lifting up , pull it latches securely. Someone may...
Owner's Manual
Page 56
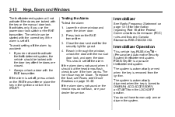
.../RUN, ACC/ACCESSORY, or START from the ignition. This should set off , press unlock on page 13‑18 for service. The theft-deterrent system will not activate if the doors are closed. Always unlock a door with the key or the manual door lock. Close the door and wait for the security light to manually arm or disarm the system. The vehicle can be started with the manual door lock...
.../RUN, ACC/ACCESSORY, or START from the ignition. This should set off , press unlock on page 13‑18 for service. The theft-deterrent system will not activate if the doors are closed. Always unlock a door with the key or the manual door lock. Close the door and wait for the security light to manually arm or disarm the system. The vehicle can be started with the manual door lock...
Owner's Manual
Page 151
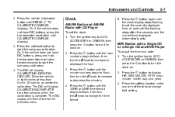
...Drive the vehicle in tight circles at less than 8 km/h (5 mph) to the previous menu. 5-7 Clock AM-FM Radio and AM‐FM Radio with a Single CD or a Single CD and DVD Player To adjust the time and date: 1. Press the H button to turn the radio on . 2. Turn the ignition key to ACC/ ACCESSORY or ON/RUN... time displayed automatically sets. Instruments and Controls 2. Or, if the vehicle does not have DIC buttons, press the trip odometer reset stem until PRESS V TO CALIBRATE COMPASS displays. Turn the ignition key to ACC/ ACCESSORY or ON/RUN, then press the O button to change that...
...Drive the vehicle in tight circles at less than 8 km/h (5 mph) to the previous menu. 5-7 Clock AM-FM Radio and AM‐FM Radio with a Single CD or a Single CD and DVD Player To adjust the time and date: 1. Press the H button to turn the radio on . 2. Turn the ignition key to ACC/ ACCESSORY or ON/RUN... time displayed automatically sets. Instruments and Controls 2. Or, if the vehicle does not have DIC buttons, press the trip odometer reset stem until PRESS V TO CALIBRATE COMPASS displays. Turn the ignition key to ACC/ ACCESSORY or ON/RUN, then press the O button to change that...
Owner's Manual
Page 285
...29 Fast Idle System ...Retained Accessory Power (RAP) ...Engine Coolant Heater ...Shifting Into Park ...Shifting out of Park ...Parking (Manual Transmission) ...Parking over Things That Burn ...Active Fuel Management® ... 9-35 9-36 9-36 9-37 9-38 9-39 9-39 9-40 Brakes Antilock Brake System (ABS) ...Parking Brake ...Brake Assist (Except With 4.3L V6 Engine) ...Hill Start Assist (HSA) ...9-63 9-64 9-66 9-66 Ride Control Systems StabiliTrak® System ...9-67 Locking Rear Axle ...9-69 Cruise Control ...9-69 Engine Exhaust Engine Exhaust ...9-40 Running the Vehicle While Parked ...9-41...
...29 Fast Idle System ...Retained Accessory Power (RAP) ...Engine Coolant Heater ...Shifting Into Park ...Shifting out of Park ...Parking (Manual Transmission) ...Parking over Things That Burn ...Active Fuel Management® ... 9-35 9-36 9-36 9-37 9-38 9-39 9-39 9-40 Brakes Antilock Brake System (ABS) ...Parking Brake ...Brake Assist (Except With 4.3L V6 Engine) ...Hill Start Assist (HSA) ...9-63 9-64 9-66 9-66 Ride Control Systems StabiliTrak® System ...9-67 Locking Rear Axle ...9-69 Cruise Control ...9-69 Engine Exhaust Engine Exhaust ...9-40 Running the Vehicle While Parked ...9-41...
Owner's Manual
Page 291
... laws that the spare tire is very important that fluid levels are where they should not be driven off -roading where you will need special alertness and driving skills, your safety belt and observe safe driving speeds, especially on any road and this manual. Have all underbody shields, if the vehicle has them, are no road signs. The airbag system is the terrain...
... laws that the spare tire is very important that fluid levels are where they should not be driven off -roading where you will need special alertness and driving skills, your safety belt and observe safe driving speeds, especially on any road and this manual. Have all underbody shields, if the vehicle has them, are no road signs. The airbag system is the terrain...
Owner's Manual
Page 365
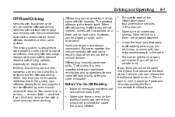
... reduce spark plug life and affect emission control system performance. We recommend against the use only the unleaded gasoline described under the vehicle warranty. For all other vehicles, use of such gasolines. A list of marketers providing TOP TIER Detergent Gasoline can use TOP TIER Detergent Gasoline regularly, one bottle of GM Fuel System Treatment PLUS, added to the fuel tank at...
... reduce spark plug life and affect emission control system performance. We recommend against the use only the unleaded gasoline described under the vehicle warranty. For all other vehicles, use of such gasolines. A list of marketers providing TOP TIER Detergent Gasoline can use TOP TIER Detergent Gasoline regularly, one bottle of GM Fuel System Treatment PLUS, added to the fuel tank at...
Owner's Manual
Page 398
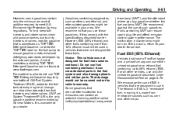
... vehicle braking or manual trailer brakes are in locked trailer brakes. Adjusting trailer gain at about 32 to 40 km/h (20 to the vehicle and make all necessary mechanical and electrical connections. Drive the vehicle with electric brakes: . . Trailer Gain Adjustment Procedure Trailer Gain should be set for each towing condition: 1. Setting the Trailer Gain properly is made to correctly adjust Trailer Gain for a specific trailering condition and must be briefly displayed on the Trailer Brake Control Panel. 5. A trailer...
... vehicle braking or manual trailer brakes are in locked trailer brakes. Adjusting trailer gain at about 32 to 40 km/h (20 to the vehicle and make all necessary mechanical and electrical connections. Drive the vehicle with electric brakes: . . Trailer Gain Adjustment Procedure Trailer Gain should be set for each towing condition: 1. Setting the Trailer Gain properly is made to correctly adjust Trailer Gain for a specific trailering condition and must be briefly displayed on the Trailer Brake Control Panel. 5. A trailer...
Owner's Manual
Page 459
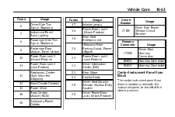
...Body Control Module (BCM) Accessory Power Outlets 26 Fuses 17 18 19 20 21 22 23 24 25 Usage Interior Lamps Power Door Lock 1 (Unlock Feature) Rear Seat Entertainment Ultrasonic Rear Parking Assist, Power Liftgate Power Door Lock 1 (Lock Feature) Driver Information Center (DIC) Rear Wiper Cooled Seats Driver Seat Module, Remote Keyless Entry System Driver Power Door Lock (Unlock Feature) Circuit Breaker LT DR Usage 10-53 Driver Side Power Window Circuit Breaker Harness Connector LT DR BODY BODY Usage Driver Door Harness Connection Harness Connector Harness Connector Center Instrument Panel...
...Body Control Module (BCM) Accessory Power Outlets 26 Fuses 17 18 19 20 21 22 23 24 25 Usage Interior Lamps Power Door Lock 1 (Unlock Feature) Rear Seat Entertainment Ultrasonic Rear Parking Assist, Power Liftgate Power Door Lock 1 (Lock Feature) Driver Information Center (DIC) Rear Wiper Cooled Seats Driver Seat Module, Remote Keyless Entry System Driver Power Door Lock (Unlock Feature) Circuit Breaker LT DR Usage 10-53 Driver Side Power Window Circuit Breaker Harness Connector LT DR BODY BODY Usage Driver Door Harness Connection Harness Connector Harness Connector Center Instrument Panel...
Owner's Manual
Page 474
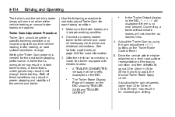
... light and DIC message come on and stay on. The sensors are two minutes to match the first tire/wheel position, and five minutes overall to signal the receiver is performed successfully. See your dealer for service or to ON/RUN with a road tire containing the TPMS sensor. If it cannot detect or signal a low tire condition. The horn sounds twice to match all four tire/wheel...
... light and DIC message come on and stay on. The sensors are two minutes to match the first tire/wheel position, and five minutes overall to signal the receiver is performed successfully. See your dealer for service or to ON/RUN with a road tire containing the TPMS sensor. If it cannot detect or signal a low tire condition. The horn sounds twice to match all four tire/wheel...
Owner's Manual
Page 480
... vehicle damage. When new, the vehicle included a spare tire and wheel assembly with the same TPC Spec rating. 10-74 Vehicle Care GM recommends replacing all wheels. Buying New Tires GM has developed and matched specific tires for mud and snow. Only your dealer or authorized tire service center should mount or dismount the tires. Uniform tread depth on it is molded onto the tire's sidewall near the tire size. Braking and handling performance...
... vehicle damage. When new, the vehicle included a spare tire and wheel assembly with the same TPC Spec rating. 10-74 Vehicle Care GM recommends replacing all wheels. Buying New Tires GM has developed and matched specific tires for mud and snow. Only your dealer or authorized tire service center should mount or dismount the tires. Uniform tread depth on it is molded onto the tire's sidewall near the tire size. Braking and handling performance...

Owner's Manual
Page 523
... maintenance, if a power washer is used for farming, mining, forestry, Department of the transfer case and should be replaced. Service and Maintenance Once a Month . . 11-5 Tire inflation pressures check. See Park Brake and P (Park) Mechanism Check on page 10‑69. Hood/Decklid/Liftgate/Liftglass Support Gas Strut Service: Visually inspect gas strut, if equipped, for vehicles mainly driven off‐road in four‐wheel drive. Once a Year . . High pressure water...
... maintenance, if a power washer is used for farming, mining, forestry, Department of the transfer case and should be replaced. Service and Maintenance Once a Month . . 11-5 Tire inflation pressures check. See Park Brake and P (Park) Mechanism Check on page 10‑69. Hood/Decklid/Liftgate/Liftglass Support Gas Strut Service: Visually inspect gas strut, if equipped, for vehicles mainly driven off‐road in four‐wheel drive. Once a Year . . High pressure water...
Owner's Manual
Page 563
...) ...9-66 Hood ...10-5 Horn ...5-4 How to Wear Safety Belts Properly ...3-16 Hydraulic Clutch ...10-19 i-7 J Jump Starting ...10-94 K Key and Lock Messages ...5-45 Keyless Entry Remote (RKE) System ...2-3 Keys ...2-2 I Idle System Fast ...9-35 Ignition Positions ...9-32 Ignition Transmission Lock Check ...10-39 Immobilizer ...2-12 Infants and Young Children, Restraints ...3-50 Infotainment ...7-1 Instrument Cluster ...5-12 Instrument Panel Storage Area ...4-1 Introduction ...iii L Labeling, Tire Sidewall ...10-56 Lamp Messages ...5-45 Lamps Auxiliary Roof Mounted Lamp...
...) ...9-66 Hood ...10-5 Horn ...5-4 How to Wear Safety Belts Properly ...3-16 Hydraulic Clutch ...10-19 i-7 J Jump Starting ...10-94 K Key and Lock Messages ...5-45 Keyless Entry Remote (RKE) System ...2-3 Keys ...2-2 I Idle System Fast ...9-35 Ignition Positions ...9-32 Ignition Transmission Lock Check ...10-39 Immobilizer ...2-12 Infants and Young Children, Restraints ...3-50 Infotainment ...7-1 Instrument Cluster ...5-12 Instrument Panel Storage Area ...4-1 Introduction ...iii L Labeling, Tire Sidewall ...10-56 Lamp Messages ...5-45 Lamps Auxiliary Roof Mounted Lamp...


