

Owner's Manual
Page 1
2011 Chevrolet Silverado Owner Manual M In Brief ...1-1 Instrument Panel ...1-2 Initial Drive Information ...1-8 Vehicle Features ...1-25 Performance and Maintenance ...1-32 Keys, Doors and Windows ...2-1 Keys and ......8-1 Climate Control Systems ...8-1 Air Vents ...8-10 Driving and Operating ...9-1 Driving Information ...9-2 Starting and Operating ...9-31 Engine Exhaust ...9-40 Automatic Transmission ...9-42 Manual Transmission ...9-48 Drive Systems ...9-50 Brakes ...9-63 Ride Control Systems ...9-67 Cruise Control ...9-69 Object Detection Systems ...9-72 Fuel ...9-79 Towing ...9-85 Conversions...
2011 Chevrolet Silverado Owner Manual M In Brief ...1-1 Instrument Panel ...1-2 Initial Drive Information ...1-8 Vehicle Features ...1-25 Performance and Maintenance ...1-32 Keys, Doors and Windows ...2-1 Keys and ......8-1 Climate Control Systems ...8-1 Air Vents ...8-10 Driving and Operating ...9-1 Driving Information ...9-2 Starting and Operating ...9-31 Engine Exhaust ...9-40 Automatic Transmission ...9-42 Manual Transmission ...9-48 Drive Systems ...9-50 Brakes ...9-63 Ride Control Systems ...9-67 Cruise Control ...9-69 Object Detection Systems ...9-72 Fuel ...9-79 Towing ...9-85 Conversions...

Owner's Manual
Page 2
2011 Chevrolet Silverado Owner Manual M Vehicle Care ...10-1 General Information ...10-2 Vehicle Checks ...10-4 Headlamp Aiming ...10-41 Bulb Replacement ...10-43 Electrical System ...10-47 Wheels and Tires ...10-...
2011 Chevrolet Silverado Owner Manual M Vehicle Care ...10-1 General Information ...10-2 Vehicle Checks ...10-4 Headlamp Aiming ...10-41 Bulb Replacement ...10-43 Electrical System ...10-47 Wheels and Tires ...10-...

Owner's Manual
Page 3
...logos, emblems, slogans, vehicle model names, and vehicle body designs appearing in the vehicle for Chevrolet Motor Division wherever it appears in U.S.A. Part No. 25965913 C Third Printing © 2011 General Motors LLC. All Rights Reserved. If the vehicle is a hybrid, see the Duramax ...Owners Propriétaires Canadiens A French language copy of this owner manual. Introduction Please refer to the purchase documentation relating to your specific vehicle to , GM, the GM logo, CHEVROLET, the CHEVROLET Emblem, SILVERADO, and Z71 are options that may or may not be obtained ...
...logos, emblems, slogans, vehicle model names, and vehicle body designs appearing in the vehicle for Chevrolet Motor Division wherever it appears in U.S.A. Part No. 25965913 C Third Printing © 2011 General Motors LLC. All Rights Reserved. If the vehicle is a hybrid, see the Duramax ...Owners Propriétaires Canadiens A French language copy of this owner manual. Introduction Please refer to the purchase documentation relating to your specific vehicle to , GM, the GM logo, CHEVROLET, the CHEVROLET Emblem, SILVERADO, and Z71 are options that may or may not be obtained ...
Owner's Manual
Page 4
...and labels that could result in injury or death. Warning or Caution indicates a hazard that use the Index in this manual describe hazards and what is in the manual and the page number where it is a safety symbol which will result in property or vehicle damage. This would ...not be found on vehicle labels and in the back of the manual. Notice: This means there is something that could result in serious injury or death. Danger, Warnings, and Cautions Warning messages found . { ...
...and labels that could result in injury or death. Warning or Caution indicates a hazard that use the Index in this manual describe hazards and what is in the manual and the page number where it is a safety symbol which will result in property or vehicle damage. This would ...not be found on vehicle labels and in the back of the manual. Notice: This means there is something that could result in serious injury or death. Danger, Warnings, and Cautions Warning messages found . { ...
Owner's Manual
Page 9
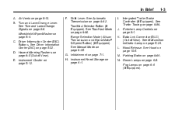
... Trailer Towing on page 5‑32. See Hood on page 6‑8. Dome Lamps on page 10‑5. Hazard Warning Flashers on page 9‑45. See Manual Mode on page 6‑5 (Out of View). Hood Release. M. N. B. Instrument Cluster on page 4‑1. G. Instrument Panel Storage on page 5‑12. Exterior Lamp Controls on...
... Trailer Towing on page 5‑32. See Hood on page 6‑8. Dome Lamps on page 10‑5. Hazard Warning Flashers on page 9‑45. See Manual Mode on page 6‑5 (Out of View). Hood Release. M. N. B. Instrument Cluster on page 4‑1. G. Instrument Panel Storage on page 5‑12. Exterior Lamp Controls on...

Owner's Manual
Page 13
... Equipped). See Driver Information Center (DIC) on page 9‑31. Turn and Lane‐Change Lever. Instrument Cluster on page 9‑45. D. Shift Lever. See Manual Mode on page 5‑12. F. Dome Lamps on page 5‑24. Data Link Connector (DLC) (Out of View). See Malfunction Indicator Lamp on page 6‑...
... Equipped). See Driver Information Center (DIC) on page 9‑31. Turn and Lane‐Change Lever. Instrument Cluster on page 9‑45. D. Shift Lever. See Manual Mode on page 5‑12. F. Dome Lamps on page 5‑24. Data Link Connector (DLC) (Out of View). See Malfunction Indicator Lamp on page 6‑...

Owner's Manual
Page 14
... feature the engine can be personalized. Press L and hold / until the turn on and remain on your specific vehicle. Remote Vehicle Start With this owner manual. Starting the Vehicle 1. K: Q: 2. Press Q. Remote Keyless Entry (RKE) System The RKE transmitter is running. Lock and unlock feedback can be on as long as the...
... feature the engine can be personalized. Press L and hold / until the turn on and remain on your specific vehicle. Remote Vehicle Start With this owner manual. Starting the Vehicle 1. K: Q: 2. Press Q. Remote Keyless Entry (RKE) System The RKE transmitter is running. Lock and unlock feedback can be on as long as the...
Owner's Manual
Page 15
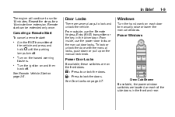
...Turn the hand crank on the front doors. . K: Q: Press to lock the doors. Crew Cab Shown If available, the power window switches are several ways to lock and unlock the vehicle. Remote... key in the front and rear. Canceling a Remote Start To cancel a remote start can be extended only once. 1-9 Door Locks There are located on page 2‑7. Power Windows Aim the RKE ...off . . Press to unlock the doors. In Brief The engine will continue to manually raise or lower the manual windows. Repeat the steps for 10 minutes. Turn on page 2‑5. See Door ...
...Turn the hand crank on the front doors. . K: Q: Press to lock the doors. Crew Cab Shown If available, the power window switches are several ways to lock and unlock the vehicle. Remote... key in the front and rear. Canceling a Remote Start To cancel a remote start can be extended only once. 1-9 Door Locks There are located on page 2‑7. Power Windows Aim the RKE ...off . . Press to unlock the doors. In Brief The engine will continue to manually raise or lower the manual windows. Repeat the steps for 10 minutes. Turn on page 2‑5. See Door ...
Owner's Manual
Page 16
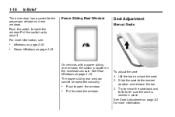
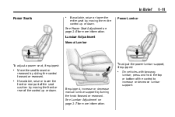
.... 3. See Rear Windows on page 2‑18. Slide the seat to raise it. See Seat Adjustment on page 2‑18. For more information. Seat Adjustment Manual Seats Windows on page 2‑19. The power sliding rear window cannot be sure the seat is located in place. Push to be operated... manually... Power Windows on page 3‑3 for the passenger window and rear windows. To adjust the seat: 1. Try to move the seat back and forth to ...
.... 3. See Rear Windows on page 2‑18. Slide the seat to raise it. See Seat Adjustment on page 2‑18. For more information. Seat Adjustment Manual Seats Windows on page 2‑19. The power sliding rear window cannot be sure the seat is located in place. Push to be operated... manually... Power Windows on page 3‑3 for the passenger window and rear windows. To adjust the seat: 1. Try to move the seat back and forth to ...
Owner's Manual
Page 17
Lumbar Adjustment Manual Lumbar To adjust a power seat, if equipped: . In Brief Power Seats . 1-11 If available, raise or lower the entire seat by moving the front or ... seat forward or rearward by turning the knob forward or rearward. See Lumbar Adjustment on page 3‑5 for more information. If equipped, increase or decrease manual lumbar support by sliding the control forward or rearward. If available, raise or lower the front or rear part of the control to increase or...
Lumbar Adjustment Manual Lumbar To adjust a power seat, if equipped: . In Brief Power Seats . 1-11 If available, raise or lower the entire seat by moving the front or ... seat forward or rearward by turning the knob forward or rearward. See Lumbar Adjustment on page 3‑5 for more information. If equipped, increase or decrease manual lumbar support by sliding the control forward or rearward. If available, raise or lower the front or rear part of the control to increase or...

Owner's Manual
Page 18
...: 1. Push and pull on page 3‑8 for more information. See Reclining Seatbacks on the seatback to make sure it is locked. In Brief Reclining Seatbacks Manual Reclining Seatbacks To return the seatback to lock the seatback in place. 3. Push and pull on page 3‑7 for more information. On vehicles with four...
...: 1. Push and pull on page 3‑8 for more information. See Reclining Seatbacks on the seatback to make sure it is locked. In Brief Reclining Seatbacks Manual Reclining Seatbacks To return the seatback to lock the seatback in place. 3. Push and pull on page 3‑7 for more information. On vehicles with four...
Owner's Manual
Page 22
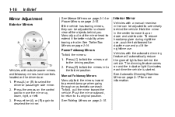
.... 1. See Trailer-Tow Mirrors on page 2‑15. The dimming feature comes on page 2‑15. Press (A) or (B) to the driving position. Manually pull out the mirror head to side. Vehicles with outside power mirrors and foldaway mirrors have controls located on the control pad to move it... mirrors out to select the driver or passenger side mirror. 2. Manual Foldaway Mirrors Manually fold the mirrors inward to move the mirror up, down and side to extend it up or down , right, or left. 3. 1-16 In Brief See Manual Mirrors on page 2‑14 or Power Mirrors on and the ...
.... 1. See Trailer-Tow Mirrors on page 2‑15. The dimming feature comes on page 2‑15. Press (A) or (B) to the driving position. Manually pull out the mirror head to side. Vehicles with outside power mirrors and foldaway mirrors have controls located on the control pad to move it... mirrors out to select the driver or passenger side mirror. 2. Manual Foldaway Mirrors Manually fold the mirrors inward to move the mirror up, down and side to extend it up or down , right, or left. 3. 1-16 In Brief See Manual Mirrors on page 2‑14 or Power Mirrors on and the ...
Owner's Manual
Page 23
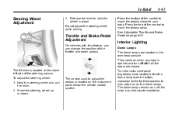
... are closed. They come on when any door is located on the dome lamps. Move the steering wheel up or down. The control used to manually turn off after all the doors are located in place. Turn the instrument panel brightness knob located below the climate control system. Press the bottom...
... are closed. They come on when any door is located on the dome lamps. Move the steering wheel up or down. The control used to manually turn off after all the doors are located in place. Turn the instrument panel brightness knob located below the climate control system. Press the bottom...

Owner's Manual
Page 28
... F. Power Button Rear Window Defogger PASS (Passenger) K. This is selected, 1 (First) through 5 (Fifth) gears are available. AUTO D. The current range will appear next to the M (Manual) position. J. L. Air Conditioning See Dual Automatic Climate Control System on the shift lever. The Range Selection Mode switch, if equipped, is located on page 8‑...
... F. Power Button Rear Window Defogger PASS (Passenger) K. This is selected, 1 (First) through 5 (Fifth) gears are available. AUTO D. The current range will appear next to the M (Manual) position. J. L. Air Conditioning See Dual Automatic Climate Control System on the shift lever. The Range Selection Mode switch, if equipped, is located on page 8‑...

Owner's Manual
Page 29
... using Range Selection Mode, cruise control and the Tow/Haul mode can send the engine's driving power to all four wheels for current driving conditions. Manual Transfer Case Transfer Case Buttons The vehicle will have one of these controls to the right of transfer case controls. Grade Braking is not available... when Range Selection Mode is on page 9‑45. This transfer case shift lever is active. See Manual Mode on the floor to shift into and out of gears for extra traction.
... using Range Selection Mode, cruise control and the Tow/Haul mode can send the engine's driving power to all four wheels for current driving conditions. Manual Transfer Case Transfer Case Buttons The vehicle will have one of these controls to the right of transfer case controls. Grade Braking is not available... when Range Selection Mode is on page 9‑45. This transfer case shift lever is active. See Manual Mode on the floor to shift into and out of gears for extra traction.
Owner's Manual
Page 34
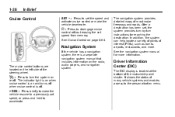
... Control on and turns off when cruise control is off . Driver Information Center (DIC) The DIC display is a separate navigation system manual that includes information on the radio, audio players, and navigation system. Navigation System If the vehicle has a navigation system, there is ...steering wheel. The navigation system provides detailed maps of many vehicle systems and enables access to the personalization menu. See the navigation system manual for reaching the destination. It shows the status of most major freeways and roads. The cruise control buttons are located on or ...
... Control on and turns off when cruise control is off . Driver Information Center (DIC) The DIC display is a separate navigation system manual that includes information on the radio, audio players, and navigation system. Navigation System If the vehicle has a navigation system, there is ...steering wheel. The navigation system provides detailed maps of many vehicle systems and enables access to the personalization menu. See the navigation system manual for reaching the destination. It shows the status of most major freeways and roads. The cruise control buttons are located on or ...
Owner's Manual
Page 38
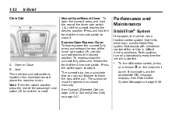
...Vent There are two sunroof switches located in difficult driving conditions. See Ride Control System Messages on page 2‑21. 1-32 In Brief Manual-Open/Manual-Close: To open the sunroof, fully press and release the rear of the driver side switch (B) until the sunroof reaches the desired ... must be opened and closed position, press the rear of the vehicle in the overhead console above the rearview mirror. See Sunroof (Extended Cab) on page 2‑20 or Sunroof (Crew Cab) on page 5‑46. To express-close it . F illuminates and the appropriate DIC message displays.
...Vent There are two sunroof switches located in difficult driving conditions. See Ride Control System Messages on page 2‑21. 1-32 In Brief Manual-Open/Manual-Close: To open the sunroof, fully press and release the rear of the driver side switch (B) until the sunroof reaches the desired ... must be opened and closed position, press the rear of the vehicle in the overhead console above the rearview mirror. See Sunroof (Extended Cab) on page 2‑20 or Sunroof (Crew Cab) on page 5‑46. To express-close it . F illuminates and the appropriate DIC message displays.

Owner's Manual
Page 41
... the current GPS location will be sent to an OnStar advisor who is a complimentary service that includes online service reminders, vehicle maintenance tips, online owner manual, special privileges, and more. Sign up today at: www.chevyownercenter.com (U.S.) or www.gm.ca (Canada). 1-35 OnStar® How OnStar Service Works Q : Push this...
... the current GPS location will be sent to an OnStar advisor who is a complimentary service that includes online service reminders, vehicle maintenance tips, online owner manual, special privileges, and more. Sign up today at: www.chevyownercenter.com (U.S.) or www.gm.ca (Canada). 1-35 OnStar® How OnStar Service Works Q : Push this...
Owner's Manual
Page 45
... (RKE) System Operation ...Remote Vehicle Start ...Door Locks ...Power Door Locks ...Delayed Locking ...Automatic Door Locks ...Lockout Protection ...Safety Locks ...2-2 2-2 2-3 2-5 2-7 2-8 2-8 2-8 2-8 2-8 Doors Rear Doors (Extended Cab) ...2-9 Tailgate ...2-10 Interior Mirrors Manual Rearview Mirror ...2-17 Automatic Dimming Rearview Mirror ...2-17 Vehicle Security Vehicle Security ...2-11 Anti-theft Alarm System ...2-11 Immobilizer ...2-12 Immobilizer Operation ...2-12...
... (RKE) System Operation ...Remote Vehicle Start ...Door Locks ...Power Door Locks ...Delayed Locking ...Automatic Door Locks ...Lockout Protection ...Safety Locks ...2-2 2-2 2-3 2-5 2-7 2-8 2-8 2-8 2-8 2-8 Doors Rear Doors (Extended Cab) ...2-9 Tailgate ...2-10 Interior Mirrors Manual Rearview Mirror ...2-17 Automatic Dimming Rearview Mirror ...2-17 Vehicle Security Vehicle Security ...2-11 Anti-theft Alarm System ...2-11 Immobilizer ...2-12 Immobilizer Operation ...2-12...
Owner's Manual
Page 49
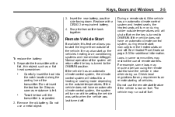
... with a CR2032 or equivalent battery. 4. Twist the tool until the transmitter is low on the outside of the transmitter. Do not use the remote start , manually turn the heated seats on during remote start feature if the vehicle is separated. . 2. Do not insert the tool too far. Do not use of...
... with a CR2032 or equivalent battery. 4. Twist the tool until the transmitter is low on the outside of the transmitter. Do not use the remote start , manually turn the heated seats on during remote start feature if the vehicle is separated. . 2. Do not insert the tool too far. Do not use of...
